Shortbread Crust Recipe: A buttery, crisp, melt-in-your-mouth shortbread crust is the perfect foundation for so many desserts.
Whether you’re baking a lemon bar, cheesecake, or tart, this crust adds that golden crunch that elevates your dessert from good to absolutely irresistible.
In this step-by-step guide, we’ll cover everything you need to make a professional-quality shortbread crust at home, even if you’ve never baked before.
Let’s get into it!
What is Shortbread Crust?
Shortbread crust is a simple, buttery base made from flour, sugar, and butter—sometimes with a pinch of salt or vanilla. Unlike a flaky pie crust, shortbread is crumbly and tender, offering a rich, melt-in-your-mouth texture.
This type of crust doesn’t rely on ice water or rolling pins. Instead, the dough is pressed directly into the baking pan. That’s what makes it ideal for beginners and a favorite among bakers for bars, tarts, and layered desserts. Think of it like the thick, buttery bottom of your favorite lemon bars or millionaire’s shortbread.
Why Choose a Shortbread Crust?
Let’s be real—some pie crusts are stressful. Shortbread crusts? Not so much. Here’s why you’ll fall in love with this recipe:
- Simplicity: No chilling, rolling, or fancy techniques.
- Flavor: Rich, buttery taste with a satisfying crunch.
- Texture: Perfectly crumbly, never soggy.
- Versatility: Works with fruit fillings, chocolate layers, creamy tarts—you name it.
Shortbread crusts also hold up well to moisture, making them ideal for desserts with wet fillings like lemon curd or cheesecake batter.
Best Uses for Shortbread Crust
Not sure where to use a shortbread crust? Here are some winning ideas:
- Lemon bars
- Cheesecake bars
- Fruit tarts
- Chocolate ganache tarts
- Millionaire’s shortbread
- Custard or pudding-based pies
- Ice cream pies
Basically, anytime you want a buttery base that won’t overshadow your filling, shortbread crust is the move.
Ingredients You’ll Need
Basic Pantry Ingredients
- 1 cup (2 sticks) unsalted butter, softened to room temperature
- 1/2 cup powdered sugar – gives a tender texture
- 1/4 cup granulated sugar – for slight crispness
- 2 cups all-purpose flour – spooned and leveled
- 1/4 teaspoon salt – balances the sweetness
Optional Flavor Enhancers
- 1 teaspoon vanilla extract – for extra depth
- 1/2 teaspoon almond extract – for a nutty twist
- Zest of 1 lemon – adds brightness
- 1 tablespoon cornstarch – makes the crust even more delicate
You can customize the crust’s flavor easily without changing its structure.
Equipment You’ll Need
- Mixing bowls
- Hand mixer or stand mixer (or a strong arm and whisk)
- Measuring cups and spoons
- Rubber spatula
- 8×8 or 9×13 baking pan (depending on desired thickness)
- Parchment paper (optional, but helpful for clean release)
Tips Before You Begin
- Always soften your butter—it should dent easily but not be melty.
- Spoon and level your flour to avoid a dry crust.
- Mix just until combined. Overworking leads to toughness.
- For easier slicing and removal, line your pan with parchment paper.
- If you like a crispier base, bake it a bit longer.
Step-by-Step Guide to Making Shortbread Crust
Step 1: Preheat Your Oven
Preheat your oven to 350°F (175°C). A properly heated oven ensures the crust bakes evenly and develops a light golden color.
Step 2: Prepare Your Baking Pan
Lightly grease your baking pan or line it with parchment paper. This makes it easier to remove the crust once baked.
Step 3: Cream Butter and Sugar
In a mixing bowl, beat softened butter and sugar together until smooth and creamy. This step creates the tender texture shortbread is known for.
Step 4: Add the Dry Ingredients
Gradually mix in flour and a pinch of salt. Stir just until the mixture forms a soft dough. Avoid overmixing to keep the crust delicate and crumbly.
Step 5: Press the Dough Into the Pan
Transfer the dough to the prepared pan. Use your hands or the back of a spoon to press it evenly across the bottom, making sure the thickness is uniform.
Step 6: Dock the Dough (Optional)
Use a fork to gently poke small holes across the surface. Docking helps prevent bubbling during baking.
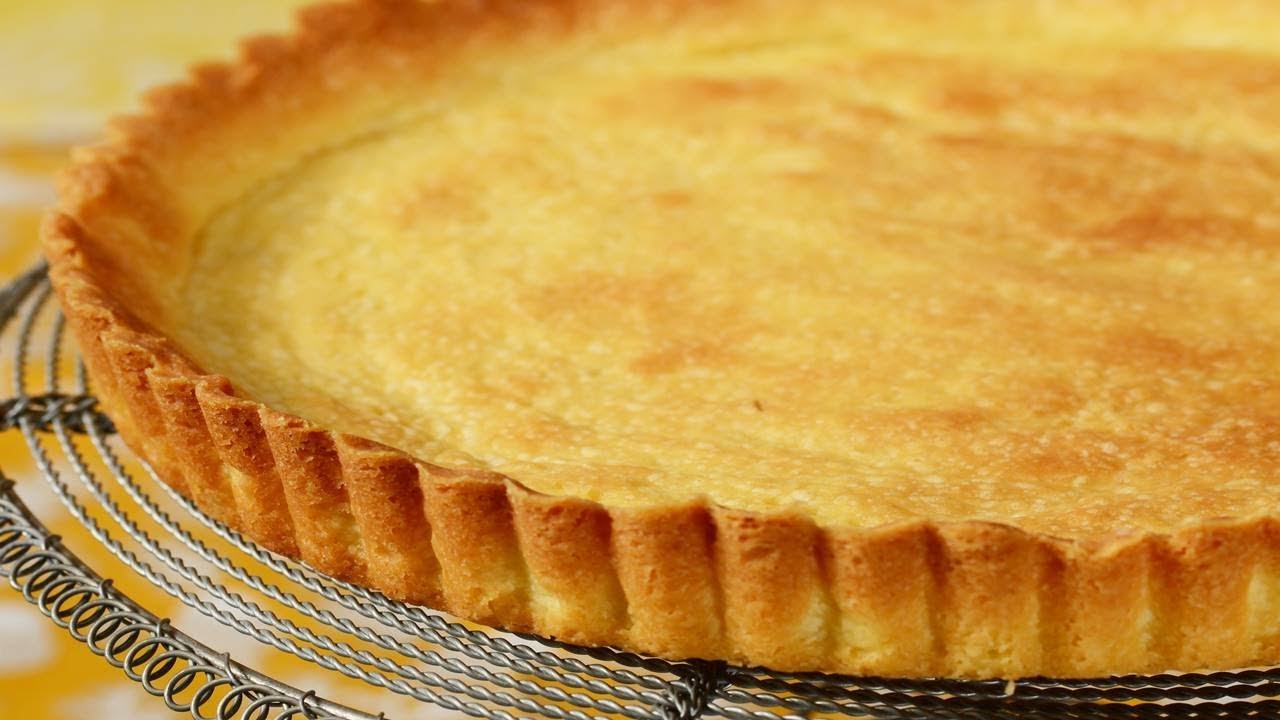
Step 7: Bake Until Golden
Bake for 18–25 minutes, or until the edges are lightly golden and the center is set. Keep an eye on it to avoid over-browning.
Step 8: Cool and Use as Desired
Allow the crust to cool completely before adding fillings or toppings. It can be used for lemon bars, cheesecake bases, or fruit tarts.
Buttery, crisp, and perfectly crumbly—shortbread crust is a simple yet reliable foundation for many desserts 🍪✨
Pro Tips for the Perfect Shortbread Crust
Want to take your shortbread crust from good to bakery-worthy? These pro tips will help you nail it every time:
- Use quality butter: The flavor of the crust comes primarily from the butter, so a high-quality unsalted butter makes a noticeable difference.
- Don’t overwork the dough: After adding flour, mix only until everything is combined. Overmixing activates gluten, which can make the crust tough instead of tender.
- Chill the dough (optional): If you want a firmer texture or sharper edges, you can press the dough into the pan and chill it for 15–20 minutes before baking.
- Blind bake for custards: If you’re filling it with a no-bake custard or mousse, bake it until fully golden, then cool completely before adding your filling.
- Flavor it up: Try adding a dash of cinnamon, nutmeg, citrus zest, or even ground nuts to personalize your crust depending on the filling.
Even one small tweak—like adding lemon zest for a citrus tart or almond extract for cherry bars—can totally elevate the final result.
Common Mistakes to Avoid
Avoid these common slip-ups for a foolproof shortbread crust every time:
- Too much flour: Scooping your flour directly from the bag packs it in. Always spoon and level it for accurate measuring.
- Cold butter: If your butter is too cold, it won’t cream properly with the sugar, leading to a dense, uneven texture.
- Skipping parchment paper: Without a liner, the crust can stick to the pan and crack during removal.
- Overbaking: The crust should be light golden on the edges, not brown throughout. It continues to cook slightly even after it’s removed from the oven.
- Underbaking for wet fillings: If you’re adding a moist topping later, bake the crust a little longer to ensure it doesn’t get soggy.
Think of these mistakes as baking potholes—and now you know exactly how to steer clear.
How to Store Your Shortbread Crust
Need to prep ahead? Good news—shortbread crust stores beautifully.
- Room temperature: If unfilled, store cooled crust tightly covered at room temperature for up to 3 days.
- Refrigerator: For filled crusts, cover and refrigerate. Most desserts will last 3–5 days.
- Freezer (baked): Bake, cool, and wrap tightly with plastic wrap and foil. Freeze up to 3 months. Thaw at room temp before using.
- Freezer (unbaked dough): You can also freeze the dough itself. Wrap it into a disc or press into a pan and freeze. Thaw in the fridge before baking.
These options make it easy to stay ahead of holiday baking or dessert prep for a dinner party.
Can You Freeze Shortbread Dough?
Absolutely! In fact, shortbread dough is one of the easiest to freeze.
Here’s how:
- Roll into a log or press into your baking pan.
- Wrap tightly in plastic wrap and then aluminum foil.
- Label with the date.
- Freeze for up to 3 months.
When you’re ready to use it:
- Thaw overnight in the fridge.
- Let it sit at room temp for 10–15 minutes so it’s pliable.
- Press into your pan (if it’s not already) and bake as directed.
Freezing doesn’t affect texture or flavor, so it’s perfect for planning ahead.
Flavor Variations to Try
Want to mix things up? Here are some creative ways to customize your shortbread crust:
| Flavor | What to Add | Best For |
|---|---|---|
| Lemon | 1 tbsp lemon zest | Lemon bars, berry tarts |
| Almond | 1/2 tsp almond extract | Cherry, raspberry fillings |
| Spiced | 1/2 tsp cinnamon, 1/4 tsp nutmeg | Fall tarts, pumpkin bars |
| Chocolate | 1/4 cup cocoa powder (reduce flour by same amount) | Chocolate tarts, mousse desserts |
| Nutty | 1/2 cup finely ground pecans or almonds | Cheesecake bars, custard pies |
These simple tweaks bring new life to the classic shortbread base.
FAQs about Shortbread Crust Recipe
Q1: Can I make this crust gluten-free?
Yes! Use a cup-for-cup gluten-free flour blend. The texture will still be tender and crumbly.
Q2: What if I don’t have powdered sugar?
You can blend granulated sugar in a blender or food processor until fine, or use all granulated sugar (the crust will be a little crunchier).
Q3: Can I double this recipe?
Absolutely. Double the ingredients and use a 9×13 pan for thicker bars or a sheet pan for thinner crust.
Q4: Do I need to prick the crust before baking?
Only if you’re blind baking it (baking without filling). It prevents air bubbles, but isn’t necessary if you’re baking the crust and filling together.
Q5: Can I make it dairy-free?
Try using vegan butter. Coconut oil can work too, but the flavor and texture will be slightly different.
Final Thoughts
Whether you’re baking for a party, a holiday, or just because you’re craving something sweet, this shortbread crust recipe is one you’ll return to again and again. It’s beginner-friendly, versatile, and endlessly customizable. Once you master the basics, the sky’s the limit for what you can create on top of this golden, buttery base.
So next time you’re staring at a dessert recipe that calls for a crust, skip the store-bought stuff. With just a few ingredients and this simple step-by-step guide, you’ve got everything you need to create a crust that’s crisp, tender, and delicious every single time.
Happy baking!