Seven Layer Dip Recipe: Seven Layer Dip is the MVP of any party snack table. It’s that one dish you bring to a potluck or game night, and before you know it, it’s gone—scraped clean, with guests asking who made it. Why does it work so well? It’s the perfect combination of creamy, crunchy, tangy, and savory. It doesn’t require any baking, it can be prepped ahead, and it looks fantastic in a clear dish, showing off all those vibrant layers.
Unlike some complicated appetizers that require hours in the kitchen, this dip comes together with minimal effort but delivers major flavor. Each layer brings something different to the table—refried beans offer that hearty base, guacamole adds creaminess, sour cream provides a cool contrast, salsa gives it a zesty punch, cheese melts into the flavor party, and the crisp lettuce with olives and green onions on top makes it feel fresh and fancy.
Whether you’re throwing a backyard BBQ, celebrating Cinco de Mayo, or just craving something snacky and satisfying, Seven Layer Dip is a total crowd-pleaser. It’s also super versatile—spicy or mild, meaty or vegetarian, store-bought or homemade—whatever suits your vibe.
A Brief History of the Dip
While the exact origins of Seven Layer Dip are a little murky, it’s widely considered a Tex-Mex-inspired dish that gained popularity in the U.S. during the 1980s. Originally dubbed “Tex-Mex Dip” or “Fiesta Dip,” it was a clever way to combine beloved Mexican ingredients into one big, shareable dish. Over the years, it evolved from a basic three or four-layer concoction into the epic seven-layer version we know and love today.
As its popularity soared, variations began popping up with added meats like ground beef or chorizo, different types of beans, and even extra layers. But at its core, the classic vegetarian seven-layer dip remains a go-to because it’s simple, satisfying, and hits all the flavor notes in one glorious scoop.
Ingredients You’ll Need
The Essential Seven Layers
Here’s the heart of the recipe—the seven layers that make this dip iconic:
- Refried Beans – The solid, savory base.
- Guacamole – Rich and creamy, bringing that avocado magic.
- Sour Cream – Cools things down with a smooth texture.
- Salsa or Pico de Gallo – Adds a punch of freshness and acidity.
- Shredded Cheese – Usually a blend like cheddar and Monterey Jack.
- Chopped Lettuce – Offers a crunchy contrast.
- Sliced Black Olives & Green Onions – For that final pop of flavor and color.
These ingredients not only taste amazing together but also create a visual appeal when layered in a clear dish. The contrast in textures—from creamy to crunchy—and the blend of savory, tangy, and spicy elements make each bite addictive.
Optional Ingredients to Elevate the Flavor
Want to take your dip to the next level? Here are a few optional add-ins:
- Taco-seasoned ground beef or turkey for a meaty version.
- Chopped jalapeños if you love heat.
- Diced tomatoes or red onions for added freshness.
- Corn kernels or black beans to give it more texture and bulk.
- A squeeze of lime juice over the guac for extra zing.
These additions can help you personalize the dip to your taste or make it more substantial if you’re serving it as the main snack.
Step-by-Step Guide to Making Seven Layer Dip
Step 1 – Preparing the Refried Bean Layer
Start with the foundation—the refried beans. You can use canned beans for convenience, or make them from scratch if you’re feeling extra. If using canned, try to go for the vegetarian variety for wider appeal. Mix in a little taco seasoning or hot sauce if you want to boost the flavor.
Spread the beans evenly into the bottom of a 9×13 inch glass dish or a large serving bowl. Make sure it’s smooth and even; this will help support the layers above and make scooping easier later on.
Pro tip: Warm the beans slightly before spreading so they go on smoothly and don’t tear the chips when dipping.
Step 2 – Mixing and Spreading the Guacamole
Guacamole is the creamy green layer that really shines. You can keep it simple—mashed avocados with lime juice, salt, and garlic—or mix in extras like diced onions, tomatoes, and cilantro for a chunkier version.
Spread the guac gently over the bean layer. To prevent browning, squeeze a little lime juice over the top or use plastic wrap to seal it directly on the surface until ready to serve.
This layer brings freshness and richness, creating a nice contrast with the beans below.
Step 3 – Creating a Flavorful Sour Cream Mixture
Plain sour cream is fine, but we’re going for max flavor here. Stir in a little taco seasoning to create a zesty crema that elevates everything. Some people mix in a bit of cream cheese or Greek yogurt for extra tang and structure.
Spread this mixture carefully over the guacamole. Using a spoon or offset spatula works well here. Be gentle to keep the layers distinct, especially if your guac is a bit loose.
This creamy layer cuts through the richness of the beans and guac, balancing the dip and making it ultra scoopable.
Step 4 – Adding the Fresh Salsa or Pico de Gallo
Now comes the punchy, tangy layer—salsa. You can use store-bought salsa if you’re in a hurry, but making a fresh pico de gallo really kicks things up a notch. All you need is chopped tomatoes, red onions, cilantro, jalapeños, lime juice, and a pinch of salt.
Spread the salsa or pico gently over the sour cream layer. If your salsa is watery, strain it a bit first to avoid soggy dip. This layer adds acidity and brightness, which balances the richness of the layers below.
The key here is texture and flavor contrast. That juicy bite of tomato and crunch from onion is what makes each mouthful so good. And if you’re serving this dip at a summer event, pico de gallo gives it that ultra-fresh, garden-picked vibe.
Step 5 – Sprinkling the Shredded Cheese
Time for everyone’s favorite: cheese. Most people go with a mix of shredded cheddar and Monterey Jack, but feel free to experiment. Pepper Jack adds a little kick, while a Mexican cheese blend offers a nice melt and mix of flavors.
Sprinkle the cheese generously over the salsa. You want enough to get cheese in every bite, but not so much that it smothers the salsa layer underneath.
Since the dip isn’t baked, the cheese remains soft and fresh—not melted, but still savory and satisfying. It’s best to use freshly shredded cheese (not pre-bagged) for better texture and taste.
Step 6 – Topping with Chopped Lettuce
Now let’s bring in some crunch and freshness with a layer of shredded lettuce. Romaine is a great choice because it holds its texture, but iceberg also works if you want that classic crisp bite.
Make sure the lettuce is thoroughly washed and dried before chopping. You don’t want any extra moisture leaking into the dip. Chop it finely and scatter it evenly over the cheese.
This layer not only adds crunch but makes the dish feel lighter and fresher, which is super important when you’ve got all those creamy layers underneath. It’s also the green that makes this dip visually pop—layer after layer of beautiful contrast.
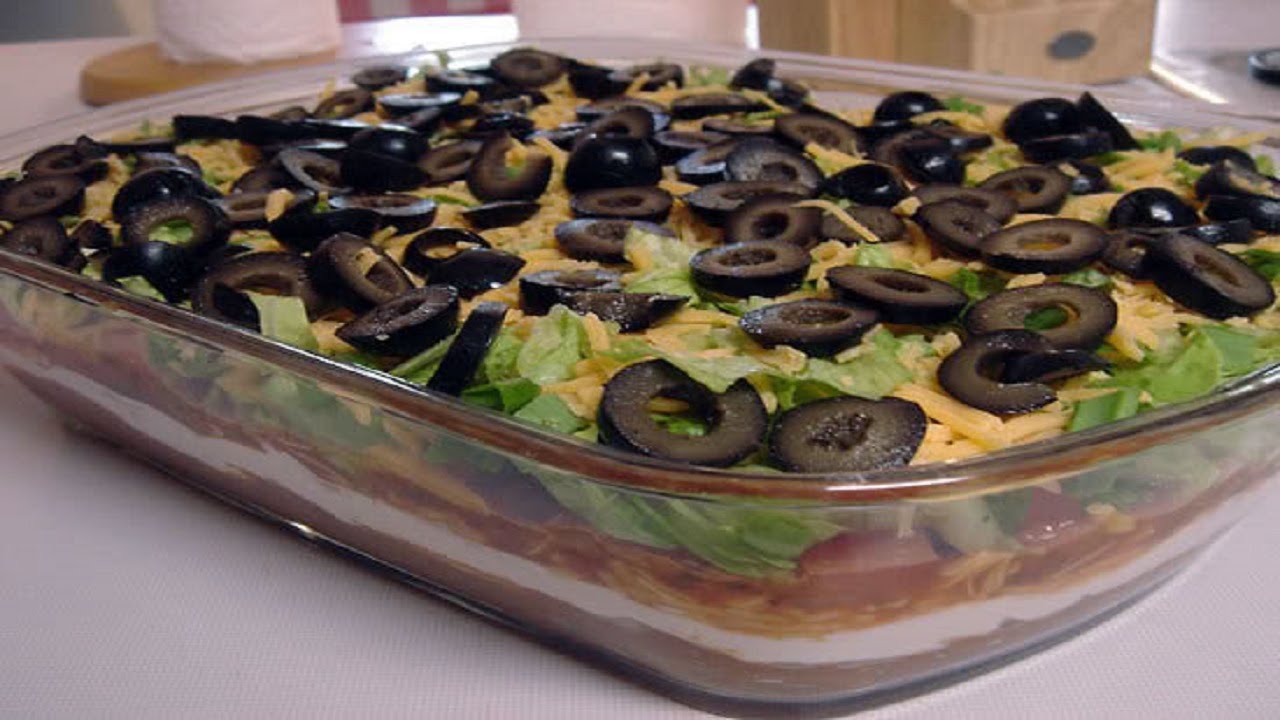
Step 7 – Garnishing with Sliced Olives and Green Onions
And now for the finishing touches. A final sprinkle of sliced black olives and chopped green onions brings everything together. The olives give that slightly salty, briny bite that cuts through the richness, while green onions add sharpness and a pop of color.
If you’re not a fan of olives, you can swap them for jalapeño slices, diced bell peppers, or even sweet corn. Just be sure to choose toppings that add a new texture or flavor note.
These garnishes not only make your dip more beautiful, but they complete the flavor circle—salty, tangy, creamy, crunchy, and fresh. It’s not just a dip; it’s a masterpiece in a bowl.
Tips for Perfecting Your Seven Layer Dip
Best Practices for Layering
Layering sounds simple, but doing it right makes a big difference. Always start with the thickest and densest layer at the bottom—refried beans. This provides a strong foundation and keeps the top layers from sinking.
As you go up, try to spread each layer gently and evenly. Using a spoon or spatula helps maintain clean lines between layers. If you’re working with a particularly wet ingredient like salsa, be sure to drain it a little so your dip doesn’t get soggy over time.
One trick pros use: build the dip in a clear glass dish. That way, your guests can see each layer, which isn’t just gorgeous—it’s irresistible.
Storage and Make-Ahead Tips
Seven Layer Dip is best enjoyed fresh, but you can absolutely make it ahead of time. Prepare it up to 24 hours in advance and keep it tightly covered in the fridge. Just be mindful of the guacamole and lettuce—these tend to wilt or brown first.
If you’re prepping ahead, you can assemble everything except the top two layers (lettuce and garnishes). Add those right before serving to keep the crunch and freshness intact.
Leftovers? Store in an airtight container in the fridge for up to 2 days. It might get a little messy as the layers blend, but it still tastes great—maybe even better after the flavors have mingled.
Serving Suggestions
What to Serve With Seven Layer Dip
Chips are the classic dip partner, but not all chips are created equal. Go for sturdy tortilla chips that can handle a heavy scoop. Thin chips might break under the weight of all those glorious layers.
You can also serve it with:
- Mini bell pepper halves for a low-carb crunch
- Pita chips or baked crackers
- Veggie sticks like carrots and celery
If you’re hosting a bigger party, consider setting up a “dip bar” with different scooping options so guests can customize their bites.
Presentation Ideas for Parties
Want to impress your guests? Here are a few fun presentation ideas:
- Individual Cups: Serve the dip in clear plastic cups for easy, no-mess portions.
- Mini Mason Jars: Great for a rustic or picnic-themed event.
- Layered Trifle Bowl: For dramatic effect, serve it in a tall glass bowl to showcase the layers.
- Taco Boats or Mini Shells: Scoop dip into taco shells for grab-and-go bites.
A little creativity goes a long way. The more visually appealing your dip looks, the faster it’ll disappear.
FAQs about Seven Layer Dip Recipe
What are the seven layers in a classic Seven Layer Dip?
The classic Seven Layer Dip features a delightful combination of refried beans, guacamole, sour cream mixed with taco seasoning, salsa, cheese, olives, and green onions. Each layer contributes its unique flavor and texture, creating a perfect balance that’s irresistible.
Can I make Seven Layer Dip ahead of time?
Absolutely! You can prepare Seven Layer Dip a day in advance. Layer the ingredients except for the top layers of cheese and green onions. Cover and refrigerate. Add these final layers just before serving to keep the dip fresh and visually appealing.
What are some variations I can try with the Seven Layer Dip?
Get creative by swapping in ingredients like corn, diced bell peppers, or jalapeños for a spicy kick. For a healthier twist, use Greek yogurt instead of sour cream and low-fat cheese. The beauty of this dip is its versatility!
Is Seven Layer Dip gluten-free?
Yes, the traditional Seven Layer Dip is naturally gluten-free. However, always check the labels on your ingredients like refried beans and taco seasoning to ensure they do not contain gluten additives.
What’s the best way to serve Seven Layer Dip?
Seven Layer Dip is best served chilled and with a side of sturdy tortilla chips for dipping. You can also serve it with sliced veggies like carrots and bell peppers for a lighter option.
How long can I store leftover Seven Layer Dip?
Leftover Seven Layer Dip can be stored in the refrigerator for up to 3 days. Keep it covered to maintain freshness. Note that the dip’s layers may become watery over time, so it’s best enjoyed fresh.
Conclusion
What makes this dip truly special is how customizable it is. You can switch up ingredients, spice levels, or even make it vegan or gluten-free. No two versions are ever quite the same, and that’s part of the fun. It’s one of those rare recipes where leftovers never go to waste, and it only takes one bite to get hooked.
So next time you’re planning a get-together—or just feel like indulging in something hearty and satisfying—whip up this Seven Layer Dip. Trust me, your taste buds (and your guests) will thank you.