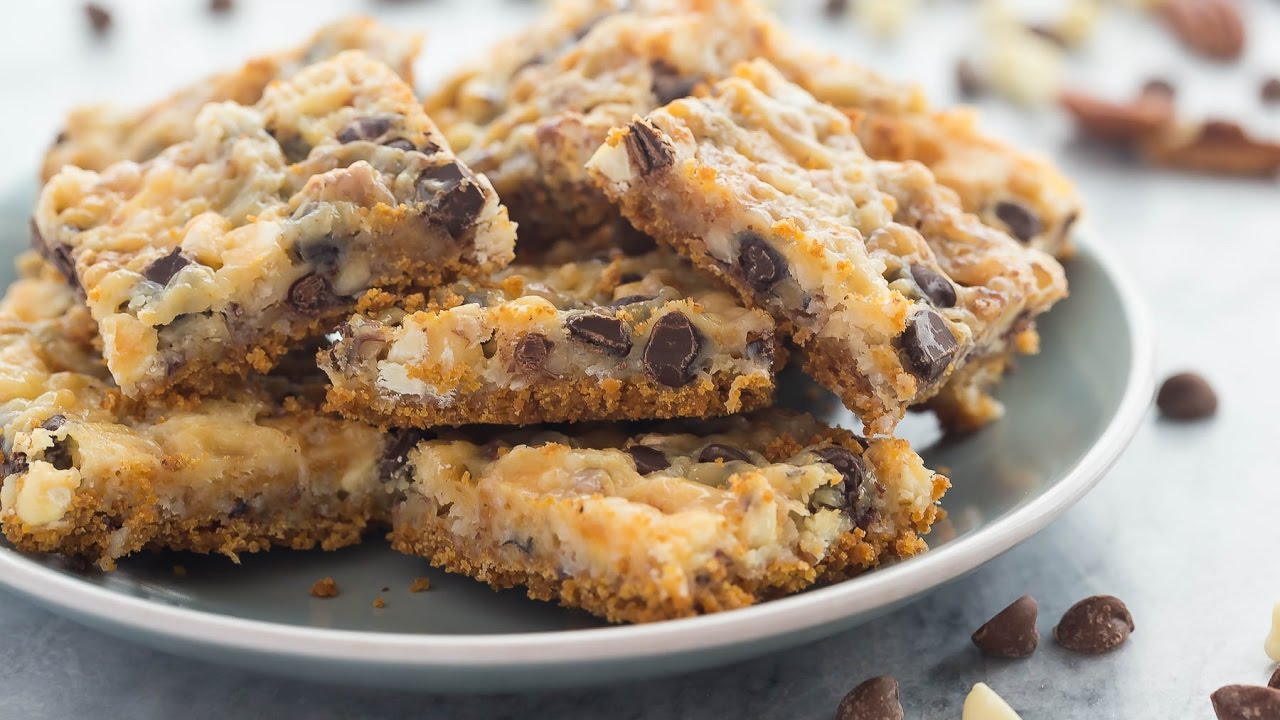
Seven Layer Bars Recipe: Seven Layer Bars, also fondly known as Magic Bars or Hello Dolly Bars, are a layered dessert that delivers rich, gooey goodness in every bite. This treat is a delightful medley of textures and flavors—starting with a buttery graham cracker crust, followed by layers of chocolate chips, butterscotch chips, shredded coconut, chopped nuts, and a generous pour of sweetened condensed milk that holds everything together. It’s simple, indulgent, and incredibly satisfying.
These bars are perfect for those times when you want to make something sweet but don’t have the energy for a complicated recipe. They require no mixing, no advanced baking skills, and can be whipped up in less than an hour from start to finish. That’s the beauty of Seven Layer Bars—the effort-to-reward ratio is unbeatable. Whether you’re baking for a potluck, holiday party, or just to satisfy a sweet craving, this dessert always gets rave reviews.
Why They’re a Beloved Dessert
What makes these bars so universally loved? For starters, it’s their beautiful layers, each offering its own flavor punch. The buttery base gives a crumbly foundation, while the chocolate and butterscotch chips add sweetness and richness. The coconut layer adds chewiness and depth, and the chopped nuts introduce a lovely crunch that balances the gooey layers above. When topped with condensed milk, the result is a moist, melt-in-your-mouth dessert that’s both rustic and decadent.
Moreover, these bars are highly customizable. Don’t like coconut? Skip it. Want to use peanut butter chips instead of butterscotch? Go ahead. The base recipe acts as a blank canvas, allowing home bakers to add their personal twist while still sticking to the core concept of seven distinct layers. That flexibility, paired with the ease of preparation, makes Seven Layer Bars a must-have recipe in every dessert lover’s repertoire.
Ingredients You’ll Need
Classic Seven Layer Bar Ingredients
Before diving into the process, let’s gather everything you need. Here’s a list of the traditional ingredients that make up the iconic seven layers:
- Graham cracker crumbs – This makes the crust. You’ll need about 1 ½ cups.
- Unsalted butter – Melted, this binds the crust. Typically, half a cup is perfect.
- Semi-sweet chocolate chips – Adds richness and chocolatey depth. Use 1 cup.
- Butterscotch chips – Brings a caramelized sweetness to balance the chocolate. Also 1 cup.
- Sweetened shredded coconut – Gives a chewy texture and tropical flair. Use 1 ⅓ cups.
- Chopped nuts – Walnuts or pecans are the go-to for crunch. Around 1 cup.
- Sweetened condensed milk – The magic glue that ties it all together. One 14-ounce can does the job.
These ingredients are the heart of the recipe. Each plays a unique role in flavor, texture, and structure. Skipping or replacing any ingredient will change the character of the bars, so choose substitutions wisely.
Substitutes and Variations
Love to experiment in the kitchen? Here are some creative twists to consider:
- Graham cracker crust alternative: Use crushed Oreos or digestive biscuits for a chocolatey or malted base.
- Different chips: Try peanut butter, white chocolate, or even dark chocolate chips.
- Nut-free version: Replace nuts with sunflower seeds or extra coconut for allergen-friendly treats.
- Vegan swap: Use vegan butter and sweetened condensed coconut milk. There are even dairy-free chocolate and butterscotch chips available.
The beauty of Seven Layer Bars lies in their adaptability. You can easily make them gluten-free, dairy-free, or nut-free with a few simple tweaks, all without losing their signature gooey charm.
Kitchen Tools Required
Essential Equipment List
Before you begin, make sure you’ve got the right tools. Fortunately, Seven Layer Bars don’t require a fancy setup. Here’s what you’ll need:
- 9×13-inch baking pan – This is the perfect size for evenly baking your bars.
- Mixing bowl – For combining the crust ingredients.
- Measuring cups and spoons – Accuracy matters when layering.
- Spatula or spoon – To press the crust and spread the layers evenly.
- Parchment paper or non-stick spray – Ensures easy removal and cleanup.
That’s it! Most of these items are already in your kitchen, making this recipe super accessible for beginners and seasoned bakers alike.
Optional Tools for Ease
While not necessary, a few extras can make the process even smoother:
- Food processor – Great for crushing graham crackers into fine crumbs.
- Offset spatula – Helps in evenly spreading sticky layers.
- Cooling rack – Speeds up the cooling process so you can enjoy your bars faster.
- Sharp knife – A must for clean, even cuts.
Using the right tools helps ensure your Seven Layer Bars not only taste amazing but also look Instagram-worthy when you serve them.
Step-by-Step Recipe Guide
Step 1: Preparing the Base
Start with the crust. In a mixing bowl, combine 1 ½ cups of graham cracker crumbs with ½ cup of melted unsalted butter. Stir until the mixture resembles wet sand. Pour this into a greased or parchment-lined 9×13-inch baking pan and press it down firmly using the back of a spoon or a flat-bottomed glass. This will create a solid foundation for your bars.
Make sure the crust is even and firmly packed—this helps prevent crumbling later. Some people like to bake the crust for 5 minutes at 350°F for added crunch, but it’s not essential. Once that’s done, you’re ready to build your delicious layers.
Step 2: Layering the Ingredients
Now comes the fun part—building those magical layers. Here’s how to layer your ingredients correctly to ensure every bite is balanced and flavorful.
Start by sprinkling 1 cup of semi-sweet chocolate chips evenly over your graham cracker crust. Next, add 1 cup of butterscotch chips. Try to distribute them uniformly so each bite contains a sweet blend of both chips. Follow this by adding 1 ⅓ cups of shredded coconut, spreading it evenly. The coconut gives your bars that signature chewiness and a slight tropical kick.
Now it’s time for 1 cup of chopped nuts—typically walnuts or pecans. They add that delightful crunch and balance the richness of the chips. If you’re not a fan of nuts or want a nut-free version, simply double the coconut or add seeds like pumpkin or sunflower.
Finally, pour a full can (14 ounces) of sweetened condensed milk evenly over the entire pan. Don’t skimp or pour in globs—use a spatula or spoon to gently guide the milk to every corner. This step is crucial as the condensed milk acts like glue, binding all the layers together during baking.
Step 3: Baking to Perfection
Preheat your oven to 350°F (175°C). Place the layered pan on the center rack and bake for 25 to 30 minutes, or until the top is golden brown and bubbling. Keep an eye on the edges—they’ll start to brown faster. That’s your cue that the bars are caramelizing nicely.
Avoid over-baking. If the coconut gets too dark or the condensed milk turns a deep amber, it might harden your bars more than desired. When done correctly, the bars should be soft and slightly gooey in the middle with firm, crisp edges. Your kitchen will smell heavenly—like a bakery of dreams.
Remove from the oven and let the pan sit at room temperature for at least 2 hours. This helps the layers settle and firm up. Don’t rush this process, or you’ll end up with a gooey mess when cutting.
Step 4: Cooling and Cutting
Once your Seven Layer Bars have cooled to room temperature, they’re ready for cutting. For the cleanest cuts, refrigerate the pan for 30 minutes before slicing. This firms up the layers and prevents them from sticking to your knife.
Use a sharp knife and clean it with a damp towel between slices. You can cut them into traditional squares or even into smaller bite-sized pieces for parties. If you used parchment paper, lift the whole slab out of the pan before cutting—it makes handling and storage much easier.
These bars are rich and sweet, so smaller portions go a long way. They also look beautiful on a dessert tray, thanks to the contrasting layers of golden crust, white coconut, and dark chocolate chips.
Tips for Perfect Seven Layer Bars
Common Mistakes to Avoid
Even though this recipe is super simple, a few common mistakes can ruin the final result:
- Pouring condensed milk first: Always pour the condensed milk last. This helps everything stay in place during baking.
- Over-baking: Too much time in the oven dries out the bars. Stick to 25–30 minutes max.
- Not pressing the crust: A loose crust will crumble and fall apart when cutting. Pack it tightly.
- Skipping the cooling phase: Warm bars are hard to slice cleanly and may fall apart.
- Using sweetened coconut: While it adds flavor, it’s already very sweet. Combine with unsweetened if you want to balance the sweetness better.
Taking a little extra care with these details can make the difference between a good bar and a great one.
Enhancements and Add-Ons
Want to elevate your Seven Layer Bars? Here are some fun and tasty ideas:
- Drizzle with chocolate ganache after baking for a gourmet touch.
- Add a layer of crushed pretzels beneath the chips for a salty-sweet combo.
- Mix in dried cranberries or cherries for a tangy contrast.
- Sprinkle flaky sea salt on top before baking to cut through the sweetness.
- Swap in flavored chips, like mint or caramel swirl, to match seasonal themes.
Once you master the basics, you can customize these bars endlessly to match any occasion or taste preference.
How to Store and Serve
Storage Tips
Proper storage is essential to keep your Seven Layer Bars tasting fresh and delicious. The good news? These bars store exceptionally well.
Room Temperature: If you plan to eat them within 3–4 days, you can store them in an airtight container at room temperature. Just make sure they are completely cool before sealing, to prevent condensation which could make them soggy.
Refrigeration: For longer storage (up to 1 week), place them in the refrigerator. Use parchment paper between layers if stacking to avoid sticking. The cold keeps the layers firm and maintains their structure.
Freezing: Want to save some for a rainy day? These bars freeze beautifully. Wrap individual bars tightly in plastic wrap and store them in a freezer-safe bag or container for up to 3 months. When ready to eat, let them thaw at room temperature for 30–60 minutes. They taste just as good, if not better, when chilled.
By using these storage methods, you can always have a delicious treat ready to go, whether it’s for last-minute guests or late-night cravings.
Best Ways to Serve
While Seven Layer Bars are incredible on their own, you can dress them up a bit depending on the occasion.
- As a standalone dessert: Serve on a dessert platter alongside cookies and brownies.
- With coffee or tea: The sweet richness pairs wonderfully with a hot beverage.
- A la mode: Warm slightly and serve with a scoop of vanilla ice cream for a heavenly experience.
- Cut into shapes: Use cookie cutters to make festive shapes for holidays or parties.
These serving ideas make Seven Layer Bars even more versatile and appealing, turning a simple treat into something special for any gathering.
FAQs about Seven Layer Bars Recipe
1. Can I make Seven Layer Bars without coconut?
Yes! While coconut adds texture, you can leave it out or replace it with crushed pretzels, oats, or extra nuts to maintain the structure and texture.
2. Are Seven Layer Bars gluten-free?
They can be! Just use gluten-free graham crackers for the base and double-check that your chips and condensed milk are certified gluten-free.
3. Can I make a vegan version?
Absolutely. Use plant-based butter, dairy-free chips, and sweetened condensed coconut milk to create a delicious vegan alternative.
4. Why are my bars too gooey or falling apart?
Make sure you let them cool completely before cutting, and chill them in the fridge for firmer, cleaner slices.
5. Can I use a different type of crust?
Yes. Oreo crumbs, vanilla wafers, or even crushed pretzels can be used for a unique twist on the traditional graham cracker base.
Conclusion
Seven Layer Bars are the ultimate dessert for anyone looking for a quick, no-fuss treat that delivers on flavor, texture, and crowd-pleasing appeal. From the buttery graham cracker crust to the sweet, gooey layers of chips, coconut, and nuts—all held together by creamy condensed milk—this recipe is pure magic in a pan.
The best part? It’s completely customizable. Whether you stick to the classic or add your own creative twist, you can’t go wrong. They’re perfect for potlucks, parties, or just satisfying a sweet craving at home. With easy prep, simple ingredients, and foolproof steps, there’s no reason not to keep this recipe in your dessert arsenal.
So go ahead, preheat that oven, and make a batch. Your taste buds (and everyone else’s) will thank you.