Scrapple Recipe: Scrapple is one of those rustic, hearty dishes that tell a story of resourcefulness and tradition. At its core, scrapple is a meatloaf-like dish made from pork scraps, cornmeal, flour, and spices. After cooking, it is molded, cooled, and sliced before being pan-fried to crispy perfection. Its savory, slightly earthy flavor paired with a crispy exterior and soft interior makes it a breakfast favorite, especially in regions like Pennsylvania and the Mid-Atlantic. If you’ve ever heard of it but never tasted it, imagine a cross between sausage, polenta, and meatloaf—it’s comforting, filling, and surprisingly delicious.
The Origins of Scrapple
Scrapple has its roots in Pennsylvania Dutch cuisine, brought to America by German immigrants in the 17th and 18th centuries. The name itself comes from the word “scrap,” since it was originally created to use up leftover cuts of pork after butchering. By mixing pork scraps with cornmeal and spices, families could stretch their food supplies and waste nothing. Over time, this humble dish became a regional delicacy, especially popular in Pennsylvania, Maryland, Delaware, and New Jersey. Today, scrapple has made its way into diners, breakfast joints, and even gourmet menus, proving that simple food made with care never goes out of style.
Why You Should Try Making Scrapple at Home
Sure, you can buy scrapple pre-made from the store, but there’s something deeply satisfying about making it yourself. Homemade scrapple allows you to control the ingredients, seasonings, and texture to suit your taste. Do you like it spicier? Add extra pepper or sage. Prefer a smoother texture? Adjust the ratio of broth to cornmeal. Making scrapple at home also connects you with an age-old tradition of making the most out of simple ingredients. Plus, when you fry up your first homemade slice and pair it with eggs or toast, you’ll instantly see why this dish has stood the test of time.
Ingredients You’ll Need
Main Ingredients
To make traditional scrapple, you’ll need the following essentials:
- Pork scraps or pork shoulder – This can include fatty cuts, organ meats, or just a simple pork roast if you want a milder flavor.
- Cornmeal – The base that gives scrapple its signature firm, sliceable texture.
- Flour (optional) – Some recipes use a little wheat flour to help bind everything together.
- Water or broth – Essential for cooking the pork and blending with cornmeal.
Spices and Seasonings
Seasonings make or break a good scrapple. Traditionally, Pennsylvania Dutch scrapple uses:
- Salt and black pepper – The basics for flavor.
- Sage – Adds an earthy, herbal note.
- Thyme – Provides a subtle depth.
- Onion powder or minced onion – For added savory richness.
- Red pepper flakes (optional) – For a touch of heat.
These spices balance out the pork’s richness and keep the scrapple from tasting bland.
Optional Add-Ins for Extra Flavor
Want to give your scrapple a modern twist? Try adding:
- Garlic – For a bolder, more savory flavor.
- Apple cider vinegar – Adds tanginess to cut through the richness.
- Fresh herbs like parsley or rosemary – Elevates the flavor profile.
- Cheese (sharp cheddar works best) – For a creamy, indulgent version.
These extras aren’t traditional, but they can make your homemade scrapple truly unique.
Kitchen Tools and Equipment
Essential Tools
Making scrapple doesn’t require fancy gadgets, but a few basics are non-negotiable:
- Large stockpot – For simmering the pork and making broth.
- Mixing spoon or whisk – To stir the cornmeal into the broth without lumps.
- Loaf pans or molds – To shape the scrapple as it cools.
- Sharp knife – For slicing scrapple evenly before frying.
Helpful Extras for Convenience
While not strictly necessary, these tools make the process easier:
- Meat grinder or food processor – If you’re using larger cuts of pork scraps, grinding ensures a smoother texture.
- Thermometer – Helpful for checking the broth and scrapple’s cooking temperature.
- Nonstick skillet or cast-iron pan – For frying slices to that perfect golden crisp.
Think of it this way: scrapple is all about simplicity, but the right tools can turn a rustic dish into a polished homemade delicacy.
Step-by-Step Guide to Making Scrapple
Step 1 – Preparing the Meat
The first step in making scrapple is to prepare the pork. Traditionally, this involves using a mix of pork scraps, including organ meats, to create a deep, rich flavor. If you prefer a milder taste, pork shoulder or roast works perfectly. Place the pork into a large stockpot, cover it with water, and simmer until the meat is tender and falling apart. This usually takes about 2 to 3 hours. During this time, skim off any foam or impurities that rise to the top, ensuring a clean broth. Once the meat is cooked, remove it from the pot and finely chop or grind it. This chopped meat will later be combined with the cornmeal mixture to form the base of your scrapple.
Step 2 – Creating the Broth
After removing the pork, don’t discard the liquid—that flavorful broth is the backbone of scrapple. Strain it to get rid of any bones or leftover bits, leaving you with a smooth, rich stock. Return it to the pot and bring it back to a gentle simmer. This broth provides not only moisture but also depth of flavor when combined with cornmeal. Think of it as the canvas on which your scrapple flavors will shine. A weak broth equals bland scrapple, so let it simmer a little longer if you want a more concentrated taste. If you find the broth too mild, you can even add a bouillon cube or a splash of pork or chicken stock to strengthen the flavor.
Now’s the perfect time to season. Add salt, black pepper, sage, and thyme directly into the simmering broth. Stir well to ensure the seasonings dissolve evenly. This step is crucial because the flavors will infuse into every bite of the scrapple later. At this stage, your kitchen will start to smell like a cozy farmhouse breakfast—herbal, savory, and comforting all at once.
Step 3 – Mixing Cornmeal and Seasonings
Cornmeal is what transforms your broth and meat into a solid, sliceable loaf. Slowly whisk cornmeal into the simmering broth, making sure to stir continuously to avoid lumps. It’s similar to making polenta: pour the cornmeal in gradually, whisking as you go. The mixture will start off thin but gradually thicken into a creamy consistency. This process usually takes 10 to 15 minutes of stirring and patience.
Once the cornmeal mixture thickens, fold in the finely chopped pork. At this point, you’ll see the scrapple come together—savory meat evenly dispersed in a cornmeal base. If you like a coarser texture, leave the pork chunky; if you want it smoother, make sure the meat is well ground. Taste the mixture now and adjust the seasonings. Some people like more sage or pepper, while others prefer a subtle profile. Remember, once it sets, you can’t stir in more spices, so this is your chance to fine-tune the flavor.
Optional add-ins like garlic or red pepper flakes can be stirred in here as well. They’ll add complexity without straying too far from tradition. Keep stirring until the mixture is thick enough to pull away slightly from the sides of the pot—this means it’s ready for the next step.
Step 4 – Cooking and Thickening the Mixture
This stage is all about patience and consistency. After the cornmeal and pork are combined, lower the heat and let the mixture simmer gently. Stir frequently to prevent sticking or scorching at the bottom. Over time, it will become thicker, almost like a dense porridge. You want it thick enough to hold its shape when poured into a mold but still moist enough to remain tender after cooling.
Cooking time here can vary—some recipes call for 30 minutes, others closer to an hour. The key is to watch the texture. If it’s too loose, your scrapple will fall apart when sliced. If it’s too stiff, it’ll be dry. Aim for a thick, spoonable consistency. To test, scoop a little on a spoon; if it holds together without dripping, you’re in the right zone.
This step also helps the cornmeal cook fully, eliminating any grainy texture. Once the mixture looks smooth and thick, give it a final stir, taste again, and prepare your molds. Your scrapple is almost ready for its signature loaf form.
Step 5 – Pouring into Molds and Cooling
Now comes the part where scrapple transforms from a pot of thick porridge-like goodness into a firm loaf. Lightly grease your loaf pans or molds with butter or oil to prevent sticking. Carefully pour the hot mixture into the pans, smoothing the top with a spatula. The mixture should be packed evenly to ensure consistent texture when sliced later.
Allow the scrapple to cool at room temperature for about an hour. After that, transfer the pans to the refrigerator. Cooling overnight is best, as it gives the scrapple enough time to firm up completely. Once chilled, it will solidify into a dense loaf that can be sliced cleanly without falling apart.
If you want to make multiple batches, this is the perfect stage to wrap one loaf tightly in plastic wrap and freeze it. Homemade scrapple freezes beautifully and can be stored for months. Whether you’re making it for immediate breakfast or prepping ahead for future meals, this cooling step locks everything into place.
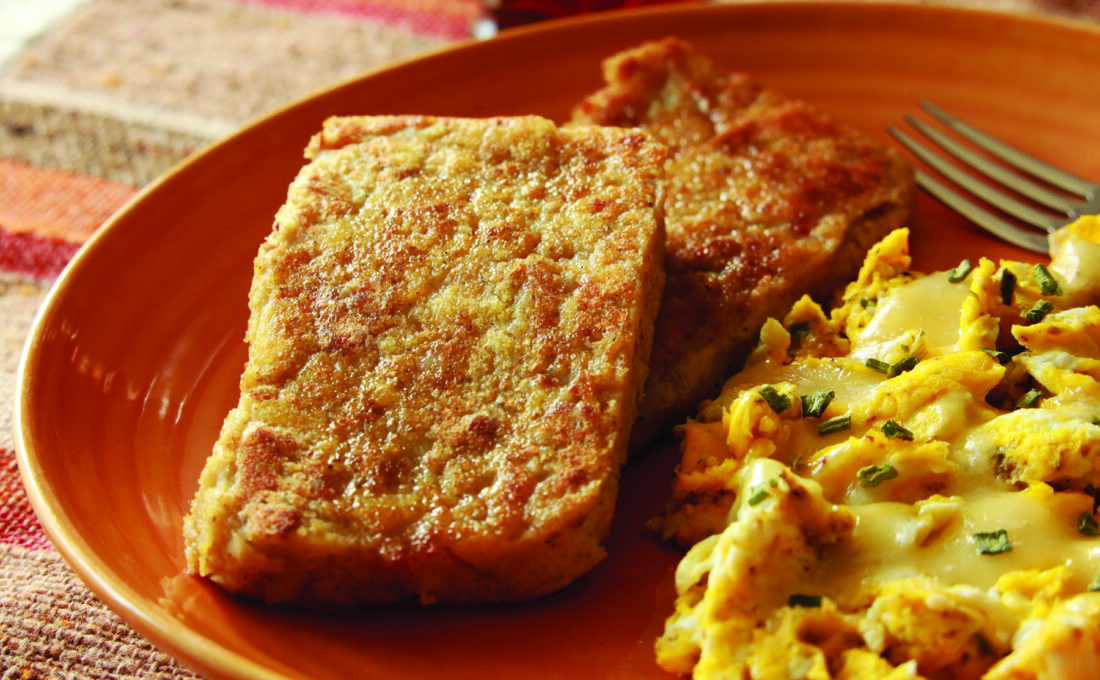
Step 6 – Slicing and Frying the Scrapple
This is the moment of truth—the cooking method that gives scrapple its irresistible contrast of textures. Remove the loaf from the pan and slice it into pieces about half an inch thick. Too thin, and they may fall apart; too thick, and they’ll be soft inside without getting crispy outside.
Heat a skillet—cast iron works best—over medium heat and add a thin layer of oil or butter. Place the slices in the hot pan, frying until golden brown on each side. Don’t rush this step; let the slices develop that signature crisp crust before flipping. Inside, the scrapple will stay tender and moist, while the outside becomes crunchy and flavorful. It’s this balance that makes scrapple so beloved.
Serve hot with eggs, toast, or pancakes for a hearty breakfast. Some people like to drizzle theirs with maple syrup, while others prefer ketchup, mustard, or hot sauce. However you serve it, fried scrapple is a comfort food experience that hits all the right notes—crispy, savory, and deeply satisfying.
Serving Suggestions
Traditional Ways to Serve Scrapple
Traditionally, scrapple is served at breakfast alongside eggs, toast, or pancakes. The crispy, savory slices pair perfectly with runny yolks or a stack of flapjacks. Many Mid-Atlantic diners serve scrapple with buttered toast and coffee, keeping things simple and hearty. A drizzle of maple syrup is also common, giving a sweet-and-savory balance that elevates every bite.
Modern Twists and Creative Pairings
Scrapple isn’t just for breakfast anymore. In modern kitchens, chefs are experimenting with scrapple in new and exciting ways. Imagine scrapple breakfast sandwiches with eggs and cheese, scrapple burgers topped with lettuce and tomato, or even scrapple tacos with salsa and avocado. Some creative cooks crumble fried scrapple into salads or pasta dishes for a smoky, savory kick. The versatility of scrapple means you can adapt it into just about any meal.
Best Side Dishes and Toppings
If you’re sticking with tradition, serve scrapple with fried or scrambled eggs, hash browns, or grits. For toppings, options include:
- Maple syrup for sweetness
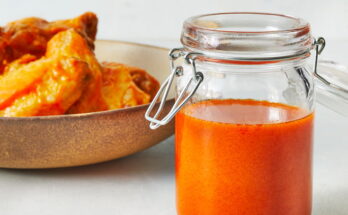
- Ketchup or hot sauce for tang and spice
- Apple butter for a regional favorite
- Mustard for a bold punch
Each topping highlights scrapple’s flavors in different ways, so don’t be afraid to experiment and find your perfect pairing.
Storage and Reheating Tips
How to Store Scrapple in the Fridge
Homemade scrapple will keep well in the refrigerator if stored properly. Once your loaf has cooled and firmed up, wrap it tightly in plastic wrap or place it in an airtight container. This prevents it from drying out or absorbing unwanted fridge odors. When stored correctly, scrapple will stay fresh for up to 5–7 days in the refrigerator. To make things more convenient, slice the loaf into portions before storing. This way, you can grab a slice or two at a time and fry them up without having to handle the entire loaf each morning.
Freezing Scrapple for Longer Shelf Life
If you’ve made a big batch and want to save some for later, scrapple freezes beautifully. Wrap each loaf (or individual slices) tightly in plastic wrap, then place them in a freezer bag to prevent freezer burn. Label the bag with the date, and you’ll have scrapple ready to go for up to 3–4 months. When you’re ready to enjoy it, simply thaw overnight in the refrigerator and then fry as usual. Freezing individual slices is especially handy—you can cook them straight from frozen with just a few extra minutes in the pan.
Best Reheating Methods
The best way to reheat scrapple is to fry it fresh in a skillet. This keeps the outside crispy while warming the inside. Avoid microwaving, as it tends to make scrapple rubbery and soggy. If you’ve got a large batch of slices to reheat, you can also bake them in the oven at 350°F (175°C) for about 15 minutes, flipping halfway through. This method is less traditional but works well for crisping multiple slices at once without babysitting them on the stove.
Nutritional Value of Scrapple
Calories and Macronutrients
Scrapple is hearty and filling, but it’s also a calorie-dense food. On average, a two-ounce slice of fried scrapple contains about:
- 150–180 calories
- 8–10 grams of fat
- 8–9 grams of protein
- 10–12 grams of carbohydrates
The exact numbers depend on the cuts of pork used and the amount of cornmeal in your recipe. Scrapple provides a good balance of protein and carbs, making it a solid energy source, especially for a busy morning.
Health Benefits and Considerations
Scrapple, like many traditional foods, has its pros and cons nutritionally. On the plus side, it’s rich in protein and essential minerals like iron and zinc from the pork. The cornmeal adds fiber, which can help with digestion. On the downside, scrapple can be high in sodium and saturated fats, especially if fried in oil. For a healthier version, you can use leaner pork cuts, reduce the salt, or fry with minimal oil in a nonstick pan. Like many comfort foods, scrapple is best enjoyed in moderation, paired with lighter sides like fruit or vegetables.
Common Mistakes to Avoid
Overcooking or Undercooking
Timing is everything when it comes to scrapple. If the cornmeal mixture isn’t cooked long enough, it may remain grainy or fail to set properly. On the flip side, overcooking it can make the mixture too stiff and dry. The key is to simmer until the texture is creamy and thick but still spoonable. Another common mistake happens during frying—turning the slices too soon. Give each slice time to crisp before flipping; otherwise, it will fall apart.
Seasoning Mistakes
One of the biggest disappointments in homemade scrapple is blandness. Cornmeal absorbs a lot of flavor, so under-seasoning the broth leads to a dull-tasting loaf. Always taste your broth before adding the cornmeal and adjust the seasoning generously with salt, pepper, and herbs. On the other hand, going overboard with spices like sage or red pepper can overwhelm the balance. Start with a traditional blend, then tweak to your taste.
Storage Errors
Improper storage can ruin all your hard work. Leaving scrapple uncovered in the fridge will dry it out and make it crumbly. Freezing without proper wrapping leads to freezer burn and off flavors. Always wrap tightly and label your storage bags. Another mistake is reheating in the microwave—scrapple deserves a skillet or oven to maintain its crispy exterior and soft inside.
Variations of Scrapple
Vegetarian Scrapple
Believe it or not, scrapple can be made vegetarian. Instead of pork, you can use mushrooms, beans, or lentils as the base protein. The process remains the same—simmer the ingredients in broth (vegetable broth in this case), thicken with cornmeal, and season with herbs like sage and thyme. The result is a savory loaf that crisps up beautifully when fried, making it a great alternative for those who want to enjoy the tradition without meat.
Regional Variations
Scrapple may be most famous in Pennsylvania, but different regions have their own versions. In the South, you’ll find livermush, which is similar but uses more liver for a bolder flavor. In other places, scrapple is made with chicken or turkey instead of pork. Some areas add buckwheat flour alongside cornmeal, creating a nuttier, earthier taste. Each variation reflects the local culture and available ingredients, keeping the tradition alive while adding unique twists.
Gourmet Scrapple Ideas
Modern chefs are taking scrapple beyond its humble roots. Imagine scrapple topped with poached eggs and hollandaise sauce for a scrapple Benedict, or crispy scrapple cubes served as appetizers with dipping sauces. Some gourmet versions incorporate sharp cheddar, caramelized onions, or even truffle oil. While these aren’t traditional, they show how scrapple can be both rustic and refined, proving its versatility in today’s kitchens.
FAQs about Scrapple Recipe
Can I make scrapple without pork?
Yes! You can use chicken, turkey, or even beef as a substitute. For a vegetarian option, mushrooms, lentils, or beans work well.
How long does homemade scrapple last?
In the fridge, scrapple will keep for 5–7 days. In the freezer, it lasts up to 3–4 months if wrapped properly.
Is scrapple gluten-free?
Traditional scrapple made with just cornmeal is gluten-free. If you add flour as a binder, choose a gluten-free option if needed.
What’s the best way to fry scrapple?
Use a cast-iron skillet or nonstick pan with a thin layer of oil or butter. Fry on medium heat until each side is golden brown and crispy.
Can scrapple be baked instead of fried?
Yes, you can bake slices at 350°F (175°C) for about 15 minutes, flipping halfway. They won’t be as crispy as pan-fried but still tasty.
Conclusion
Scrapple is more than just a breakfast dish—it’s a piece of culinary history, born from resourcefulness and cherished for generations. With just a few simple ingredients—pork, cornmeal, spices—you can transform humble scraps into a loaf that fries up into something crispy, savory, and deeply comforting. Whether you stick with tradition or put your own twist on it, making scrapple at home connects you to a time-honored practice while letting you enjoy a hearty, satisfying meal.
So next time you’re looking for something different to add to your breakfast table, give scrapple a try. You’ll find it’s not just food—it’s an experience that combines flavor, history, and tradition in every bite.