Scottish Shortbread Recipe: Scottish shortbread isn’t just a cookie—it’s a culinary icon. This melt-in-your-mouth delicacy dates back to the 12th century and became popular during the reign of Mary, Queen of Scots in the 16th century. She adored a version of shortbread made with caraway seeds, which were common in baking during that time. Over the years, the recipe was refined, losing the yeast that was once a part of it, and taking on the rich, buttery form we know today.
The term “short” refers to the high fat content (butter), which gives shortbread its crumbly texture. It’s traditionally associated with celebrations like Christmas and Hogmanay (Scottish New Year). The original recipe had three basic ingredients—flour, sugar, and butter—making it a staple in almost every Scottish household.
In a country where weather often drives people indoors, a cup of tea and a piece of shortbread offer warmth and comfort. Passed down through generations, making shortbread has become both a tradition and a family ritual in many Scottish homes.
Why It’s a Beloved Treat Around the World
From tea rooms in Edinburgh to homes across the globe, Scottish shortbread has made its way into hearts and kitchens worldwide. Its universal appeal lies in its simplicity. Unlike heavily spiced or overly sweet cookies, shortbread is delicate and buttery. It complements both tea and coffee and can be dressed up or down with minimal effort.
Its crumbly texture and rich, buttery taste make it stand out from other cookies. Whether it’s part of a holiday gift box or served alongside a scoop of ice cream, shortbread holds its own. In fact, many commercial brands have tried to replicate its authentic taste, but nothing beats the homemade version.
Its popularity is also due to its versatility—you can flavor it, shape it, dip it in chocolate, or enjoy it plain. And because the ingredients are pantry staples, it’s an easy go-to recipe when you want to whip up something sweet.
Essential Ingredients for Authentic Shortbread
Traditional Ingredients
What makes Scottish shortbread unique is its unwavering reliance on a few high-quality ingredients. For a traditional batch, you’ll need:
- All-purpose flour – The base of the shortbread, giving it structure.
- Unsalted butter – The star of the show. Choose high-fat, European-style butter if possible for richness.
- Caster sugar – Finer than granulated sugar, it blends seamlessly with the butter and flour.
- A pinch of salt – Enhances the buttery flavor and balances sweetness.
These four ingredients, when combined correctly, create a harmony that’s hard to beat. It’s all about the balance: too much flour makes it dry, too little butter and you miss that luxurious mouthfeel.
Traditional shortbread sticks to these basics, and that’s what makes it special. No eggs, no leavening agents—just good, simple baking.
Optional Flavor Enhancements
Though purists may frown, modern bakers like to experiment. Here are a few add-ins that won’t overpower the base recipe:
- Vanilla extract – Adds a subtle depth of flavor.
- Lemon or orange zest – Gives a bright, citrusy kick.
- Caraway or fennel seeds – A nod to the 16th-century variation.
- Chocolate chips – For those who like a richer twist.
You can also replace a portion of the flour with rice flour or cornstarch for a finer crumb. These additions elevate the texture and give the shortbread a melt-in-the-mouth quality.
Just remember—less is more. Shortbread is about simplicity. Don’t overwhelm it with too many flavors.
Choosing the Right Tools
Must-Have Baking Tools
You don’t need a fancy kitchen setup to make great shortbread. But having the right tools will make the process smoother. Here’s what you’ll need:
- Mixing bowls – Preferably one large bowl for combining all your ingredients.
- Electric hand mixer or stand mixer – Helpful for creaming butter and sugar evenly.
- Measuring cups and spoons – Precision matters in baking.
- Rolling pin – For evenly flattening the dough.
- Sharp knife or cookie cutters – Depending on how you want to shape your shortbread.
- Baking tray – Lined with parchment paper for easy cleanup.
- Cooling rack – To let your shortbread set properly without becoming soggy underneath.
You can also use a springform pan or shortbread mold for more traditional, patterned cookies. The mold adds a beautiful, embossed design that makes your shortbread look bakery-ready.
Useful Extras for Presentation
Want to gift or impress? A few extra touches can elevate your shortbread game:
- Decorative tins or boxes – Perfect for gifting.
- Parchment or wax paper – For separating layers and keeping cookies fresh.
- Ribbon or twine – Adds a rustic touch to gift packaging.
- Stamps or pattern presses – Create visually appealing designs on the dough before baking.
Presentation matters—especially when you’re making shortbread for special occasions. A beautiful box of buttery, golden cookies never fails to charm.
Step-by-Step Scottish Shortbread Recipe
Step 1 – Preparing Your Workspace and Tools
Before diving into baking, it’s essential to set yourself up for success. Start by clearing a clean space on your kitchen counter and gathering all your ingredients and tools. Preheat your oven to 300°F (150°C)—shortbread bakes low and slow to maintain its delicate texture and prevent browning too much.
Next, line a baking tray with parchment paper or a silicone baking mat. This prevents sticking and helps your shortbread bake evenly. If you’re using a shortbread mold or pan, lightly grease it or dust it with flour to make it easier to release the dough later.
This is also the time to bring your butter to room temperature. Softened butter ensures a smooth and consistent dough. It should be pliable, not melted. If you’re short on time, you can cube the butter and leave it out for about 15-20 minutes.
Set out your mixing bowls, measuring cups, spoons, and electric mixer if using. Keep everything within reach to avoid delays once you start mixing. Having your kitchen well-prepped can make the difference between a relaxing baking experience and a chaotic one.
Step 2 – Measuring and Mixing the Dough
Accuracy is everything in baking, especially with a recipe as simple as this one. Start by creaming 1 cup (2 sticks) of unsalted butter in a bowl. Beat it until it’s light and fluffy—this usually takes about 2-3 minutes with an electric mixer. You’re looking for a creamy, pale yellow mixture.
Next, add ½ cup of caster sugar to the butter and beat again until the mixture is smooth and well combined. Don’t rush this step; it helps incorporate air into the dough, giving the shortbread a more tender crumb.
Gradually sift in 2 cups of all-purpose flour and ¼ teaspoon of salt. Use a spatula or wooden spoon to fold the flour into the butter mixture. The dough will start to come together and may appear crumbly at first—that’s completely normal. Avoid over-mixing; just knead gently until the dough forms a soft ball.
If you’re adding flavors like vanilla extract (1 tsp) or lemon zest (1 tsp), now’s the time. Mix just enough to distribute the flavoring without overworking the dough.
Step 3 – Shaping and Cutting the Shortbread
Once your dough is ready, place it on a lightly floured surface and roll it out gently to about ½-inch thickness. If you prefer a more rustic style, you can also press the dough directly into a baking pan or mold.
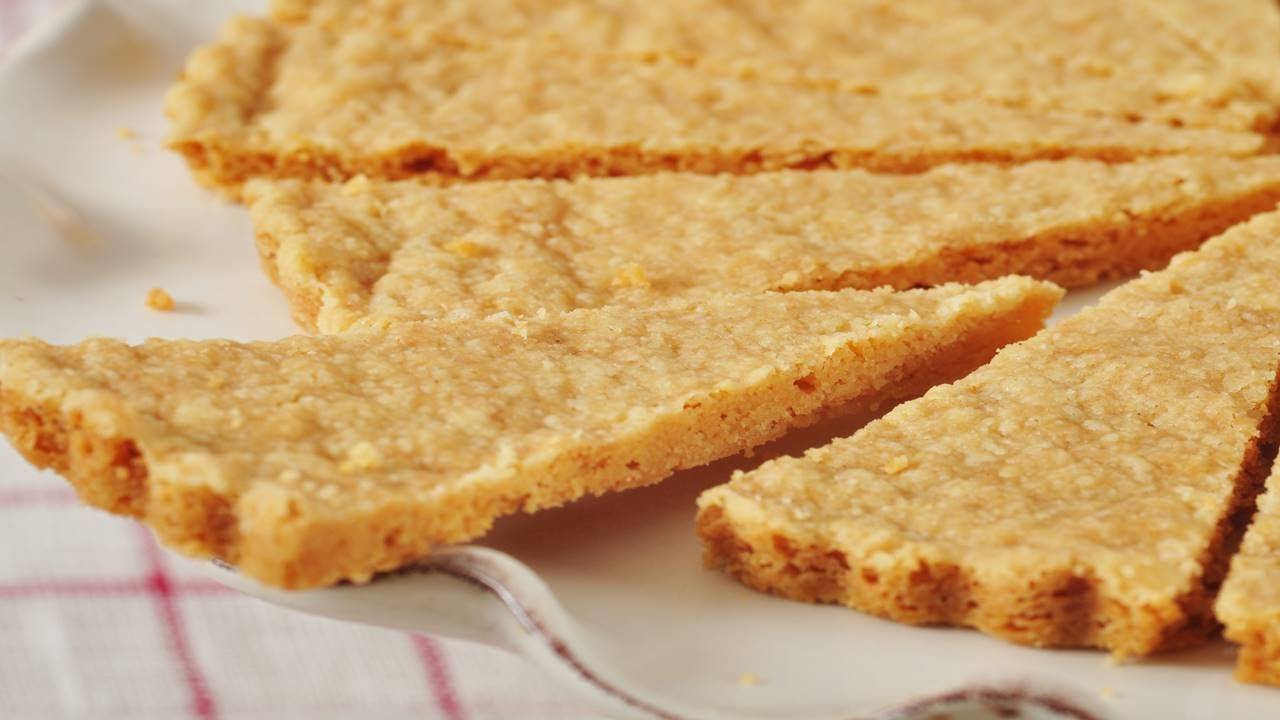
Use a sharp knife, pizza cutter, or cookie cutters to shape your shortbread. Traditional shapes include fingers (rectangular), petticoat tails (triangular wedges), and rounds. If you want a classic look, poke holes into the top of each piece with a fork. This not only adds the signature shortbread appearance but helps prevent bubbling during baking.
Place your cut pieces onto the prepared baking tray, leaving a little space between each. The dough doesn’t spread much, but some breathing room ensures even cooking. For molded shortbread, gently press the dough into the mold, smoothing the surface for an even bake.
Pop the tray in the fridge for 15-20 minutes before baking. Chilling helps the cookies retain their shape and enhances their texture.
Step 4 – Baking to Golden Perfection
Now for the transformation from dough to delectable shortbread. Bake the chilled cookies in your preheated oven at 300°F (150°C) for 30-35 minutes. Keep an eye on them—shortbread should be pale and golden around the edges, not browned on top.
Rotate the tray halfway through for even baking. Depending on your oven, baking times can vary slightly. When done, the shortbread will be firm to the touch but still light in color. Don’t wait for them to brown all over, or you’ll lose that delicate melt-in-your-mouth quality.
Once baked, remove the tray from the oven and allow the shortbread to cool for about 10 minutes on the tray. Then, transfer them to a wire rack to cool completely. They will continue to firm up as they cool, developing that perfect crumbly texture.
If you’ve used a mold, allow it to cool slightly before carefully turning it out onto a wire rack.
Step 5 – Cooling and Serving Tips
Proper cooling is vital. If shortbread is moved too early, it can break apart. Let them rest on the baking sheet before transferring them to the rack. Once cooled, store them in an airtight container lined with parchment paper.
For presentation, dust the tops with powdered sugar, drizzle with melted chocolate, or simply keep them plain and let the buttery flavor shine. Pair your shortbread with Earl Grey tea, espresso, or even a glass of Scotch whisky if you’re feeling fancy.
Shortbread is perfect for gifting. Wrap them in parchment, tie with twine, and place in a festive tin. They’re a hit at bake sales, holiday parties, or even as a thoughtful homemade treat for a neighbor.
Pro Tips for Perfect Shortbread Every Time
Texture Tips
Creating the ideal shortbread is all about achieving that signature crumbly, melt-in-your-mouth texture. It sounds simple, but there’s an art to getting it just right. The first and most crucial tip: don’t overwork the dough. Once the flour is added, mix just until the dough comes together. Overmixing develops gluten, which can lead to a tougher texture—not what we want in a delicate shortbread.
Using cold butter can also yield a slightly different result. While most recipes call for softened butter, using chilled butter and working quickly can give your shortbread an even crumblier bite. It’s all about preference—experiment and see which method gives you the results you love most.
Always sift your flour. This prevents lumps and makes for a finer, lighter cookie. And if you’re using cornstarch or rice flour in part, it’ll help maintain a smooth consistency.
If your shortbread turns out dry or grainy, it’s often because too much flour was added or the dough was overbaked. Stick to the recommended bake time and look for pale golden edges as your cue to remove them from the oven.
Avoiding Common Mistakes
Here are a few common pitfalls and how to avoid them:
- Skipping the chilling step: If you don’t chill the dough before baking, the butter can melt too quickly in the oven, causing the shortbread to spread or lose its shape.
- Overbaking: Shortbread doesn’t need to be browned on top to be cooked. Bake until just golden around the edges.
- Wrong sugar type: Using granulated sugar instead of caster sugar can leave you with a grainy texture. If you can’t find caster sugar, pulse granulated sugar in a food processor for a few seconds to make it finer.
- Using margarine or low-fat butter: These don’t have the same fat content and water ratio as real butter, resulting in less flavorful and greasy shortbread. Always go for high-quality, unsalted butter.
By keeping these points in mind, you’ll ensure each batch is bakery-worthy every time.
Storing and Serving Ideas
How to Store Shortbread for Freshness
Shortbread has a relatively long shelf life for a baked good, thanks to its low moisture content. Once cooled completely, store your cookies in an airtight container at room temperature. They’ll stay fresh for up to 2 weeks. Place parchment or wax paper between layers to prevent sticking and preserve their texture.
If you want to keep them even longer, you can freeze shortbread. Place them in a single layer on a baking sheet and freeze until solid, then transfer to a freezer-safe bag or container. They’ll last for up to 3 months. To serve, simply let them thaw at room temperature for about 15–20 minutes.
Shortbread dough can also be frozen. Shape it into a disc or log, wrap tightly in plastic, and freeze. When you’re ready to bake, let it thaw in the fridge overnight before rolling and cutting.
Serving Suggestions
Shortbread is incredibly versatile and can be enjoyed in so many ways:
- With tea or coffee: The classic combo. It complements any hot drink beautifully.
- Dipped in chocolate: Half-dip the shortbread in melted dark or milk chocolate for an indulgent upgrade.
- With ice cream: Serve a shortbread finger alongside a scoop of vanilla or caramel ice cream for an easy dessert.
- Holiday platter: Add shortbread to a holiday cookie tray for an elegant touch.
- As a base: Crumbled shortbread makes a rich, buttery base for cheesecakes and dessert bars.
Whether you’re serving guests or indulging in a solo treat, shortbread always adds a touch of class to the table.
Fun Twists on the Classic Recipe
Chocolate-Dipped Shortbread
A little chocolate goes a long way. Once your shortbread has cooled, melt some semi-sweet or dark chocolate in a heatproof bowl over simmering water. Dip each cookie halfway, allow excess to drip off, and place on parchment paper. Let them set at room temperature or in the fridge.
You can even sprinkle crushed nuts, sea salt, or coconut flakes on the chocolate before it sets for a gourmet touch. These make fantastic gifts or party treats.
Lavender-Infused Shortbread
Add a floral twist with culinary lavender. Just 1 to 2 teaspoons is enough to infuse your dough with a delicate, aromatic flavor. Be careful not to overdo it—lavender can become overpowering quickly.
You can also steep the lavender in melted butter before mixing, then strain out the solids. This adds flavor without the texture of the flowers in the finished cookie.
Pair lavender shortbread with herbal tea for a calming afternoon break.
Nutty and Fruity Variations
Get creative with mix-ins:
- Finely chopped almonds or pecans add crunch and depth.
- Dried cranberries or cherries bring a chewy texture and a touch of tartness.
- Orange zest and pistachio make an elegant flavor combo.
The key is balance—don’t overload the dough. Keep add-ins to no more than ½ cup total per batch to avoid compromising the texture.
Healthier Versions of Shortbread
Gluten-Free Options
For those with gluten sensitivities or celiac disease, there’s no reason to miss out on this buttery delight. Making gluten-free shortbread is easier than you think. Replace regular flour with a gluten-free all-purpose flour blend—preferably one that includes xanthan gum or another binding agent to help mimic the structure gluten provides.
Another great alternative is using rice flour, almond flour, or a combination of coconut and tapioca flours. These options will give the shortbread a unique texture and flavor, sometimes even more tender than the traditional version. If you’re using nut flours, expect a nuttier flavor and a slightly denser texture.
Here’s a basic gluten-free shortbread tweak:
- 1 cup unsalted butter (room temperature)
- ½ cup caster sugar
- 2 cups gluten-free flour blend
- ¼ tsp salt
Prepare and bake the same way as the original recipe. It might take one or two tries to get your preferred texture, but once you find the right balance, gluten-free shortbread can be just as good—if not better.
Lower-Sugar Substitutes
Looking to cut down on sugar without sacrificing taste? Shortbread can be adapted for a lower-sugar lifestyle. The key is to find a substitute that mimics the texture and sweetness of caster sugar.
Try using:
- Coconut sugar – Adds a subtle caramel flavor and is lower on the glycemic index.
- Erythritol or monk fruit sweetener – These zero-calorie options work well and don’t affect the structure much.
- Stevia blends – Use with caution; too much can create a bitter aftertaste.
When using sugar substitutes, be aware that some may brown differently or create a drier texture. You may need to adjust the butter or flour slightly to compensate. Start small, test a batch, and modify as needed.
Even when reducing sugar, shortbread still maintains that comforting, indulgent feel—just with a bit less guilt.
FAQs about Scottish Shortbread Recipe
Can I freeze shortbread dough?
Yes, shortbread dough freezes beautifully. Shape it into a disc or log, wrap it tightly in plastic wrap, and freeze for up to 3 months. Thaw in the refrigerator overnight before rolling and baking.
Why did my shortbread turn out too hard?
This usually happens from overbaking or adding too much flour. Watch for pale golden edges and remove the cookies while the centers are still slightly soft. They’ll firm up as they cool.
Can I use salted butter instead of unsalted?
You can, but reduce or omit the added salt in the recipe. Salted butter can vary in salt content, so taste your dough if unsure.
What’s the best flour for shortbread?
All-purpose flour works best for classic shortbread. For a finer texture, you can mix in rice flour or cornstarch. Avoid self-raising flour—it can change the structure.
How long does homemade shortbread last?
Stored in an airtight container at room temperature, homemade shortbread lasts up to 2 weeks. For longer storage, freeze it and enjoy for up to 3 months.
Conclusion
Scottish shortbread is more than just a simple cookie—it’s a cultural treasure wrapped in buttery perfection. Whether you’re a novice baker or a seasoned pro, making shortbread offers a rewarding experience that connects you to centuries of Scottish tradition. From the first creamy bite to the final crumb, it’s a treat that never disappoints.
Its beauty lies in its simplicity: just a few pantry staples, a gentle hand, and a bit of patience create a cookie that’s timeless, elegant, and loved the world over. Whether you stick to the traditional recipe or add your own creative twist, shortbread is a canvas for flavor and joy.
And the best part? It’s versatile enough to suit every occasion—holidays, gifts, afternoon tea, or just a quiet moment to yourself. So preheat that oven, grab your butter and sugar, and bake a batch of love the Scottish way.