Saltine Cracker Recipe: Saltine crackers, those light, crispy, and slightly salty squares, have been a household staple for decades. They are enjoyed with soups, cheeses, spreads, or even just on their own as a quick snack. But have you ever wondered how simple it would be to make them at home? Making saltine crackers from scratch is not just about having control over the ingredients; it’s about rediscovering the joy of homemade baking.
Store-bought versions may be convenient, but they often contain preservatives and added sugars that aren’t necessary for such a simple recipe. By making them yourself, you’ll know exactly what’s going into your food—and you can tailor the flavor to your liking.
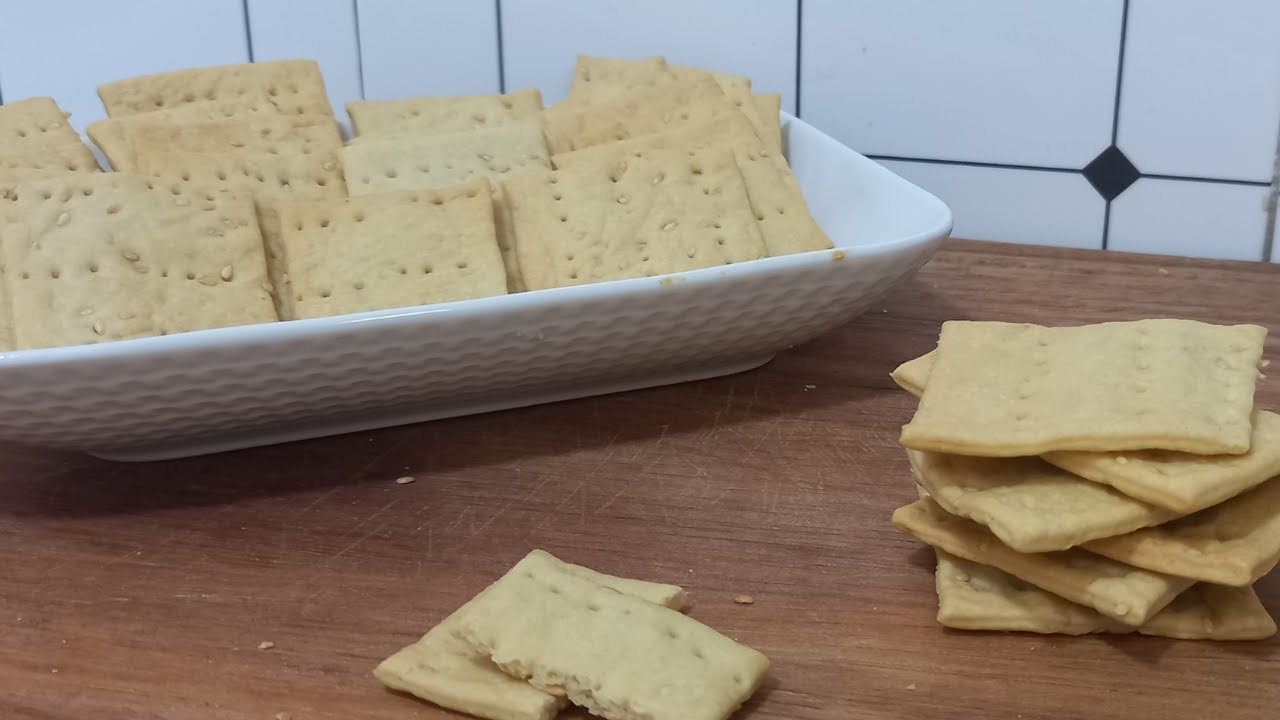
Saltine crackers stand out because of their unique texture: crisp yet light, with just enough salt sprinkled on top. They pair perfectly with dips, spreads, and toppings, making them a versatile snack for any occasion. In this guide, you’ll learn everything from the ingredients you’ll need to the exact steps for baking these crunchy delights right in your kitchen.
So, whether you’re a beginner looking for an easy baking project or a seasoned home chef who wants to try something new, this saltine cracker recipe will be your go-to.
Ingredients You’ll Need
Making saltine crackers requires only a handful of simple ingredients that you likely already have in your pantry. That’s one of the best things about this recipe—it’s budget-friendly and doesn’t require exotic items. Let’s break down the essentials:
Core Ingredients for Saltine Crackers
- All-Purpose Flour (2 cups) – This forms the base of the crackers, giving structure and body.
- Baking Powder (1 teaspoon) – Helps the crackers puff slightly and prevents them from being too dense.
- Salt (1 teaspoon + extra for topping) – Enhances flavor and gives that signature “saltine” taste.
- Unsalted Butter (2 tablespoons) – Adds a subtle richness and helps achieve crispiness.
- Warm Water (about ¾ cup) – Brings the dough together and gives it flexibility for rolling.
Optional Additions for Flavor
- Olive Oil instead of butter for a dairy-free option.
- Garlic Powder, Onion Powder, or Paprika sprinkled on top for a flavored twist.
- Sea Salt Flakes for a gourmet finish.
Ingredient Substitutions for Dietary Needs
- Gluten-Free Flour for those with gluten intolerance.
- Vegan Margarine or Coconut Oil in place of butter.
- Low-Sodium Salt or Skip Salt if you’re monitoring sodium intake.
By keeping the recipe simple, you can always adjust to suit your family’s taste and dietary requirements.
Essential Kitchen Tools for Making Crackers
You don’t need any special gadgets to make these crackers, but having the right tools will make the process smoother and more enjoyable.
Baking Equipment
- Baking Sheet or Cookie Sheet – A flat pan to bake the crackers evenly.
- Parchment Paper – Prevents sticking and makes cleanup easier.
Measuring Tools
- Measuring Cups and Spoons – For accurate proportions.
- Kitchen Scale (optional) – If you prefer precise measurements.
Handy Extras for Better Results
- Rolling Pin – Essential for rolling out thin dough.
- Pizza Cutter or Sharp Knife – To cut the dough into cracker squares.
- Fork – To poke holes in the dough, helping the crackers bake evenly without puffing too much.
When you have these basics ready, making crackers becomes a straightforward task.
Step-by-Step Guide to Making Saltine Crackers
Now that we’ve covered the essentials, let’s move on to the exciting part—actually making the crackers!
Step 1 – Preparing the Dough
Start by whisking together the dry ingredients—flour, baking powder, and salt—in a large mixing bowl. Add the butter, cutting it into small cubes, and work it into the flour mixture with your fingertips until it resembles coarse crumbs. Gradually add warm water, stirring until the dough comes together.
The goal is to create a soft yet firm dough that isn’t sticky. If it feels too dry, add a tiny splash of water. If it’s too wet, sprinkle in a little more flour.
This stage is crucial because it sets the foundation for the texture of your crackers. A well-prepared dough ensures the crackers bake evenly and develop that crisp, airy bite saltines are known for.
Step 2 – Kneading and Resting
Once your dough is formed, transfer it onto a lightly floured surface. Kneading is the next essential step—it helps develop structure while ensuring the ingredients are well incorporated. Using the heel of your palm, push the dough forward, then fold it back over itself. Repeat this motion for about 5–7 minutes until the dough feels smooth and elastic.
You don’t need to knead as long as you would for bread, since crackers don’t rely on heavy gluten development. The goal here is simply to create a uniform, pliable dough that rolls out easily later.
After kneading, form the dough into a ball and cover it with a clean kitchen towel or plastic wrap. Let it rest for 15–20 minutes at room temperature. This resting period allows the gluten to relax, which makes rolling the dough much easier. If you skip this step, you may find the dough springs back when you try to roll it thin, making it difficult to get that crisp cracker texture.
Pro tip: If your kitchen is very warm, rest the dough in the fridge to prevent the butter from melting too much. Cooler dough is easier to handle and results in lighter, crispier crackers.
Step 3 – Rolling Out the Dough
Rolling out the dough is perhaps the most critical part of making saltine crackers. The thinner you roll it, the crisper the crackers will be. Aim for about ⅛ inch thickness or even thinner if possible.
Lightly flour your work surface and rolling pin to prevent sticking. Begin rolling from the center outward, turning the dough occasionally to keep it even. Try to maintain a consistent thickness throughout, as uneven dough will lead to crackers that bake unevenly—some may burn while others remain soft.
If the dough resists rolling, let it rest for another 5 minutes. This means the gluten is still a bit tense. With patience, it will relax and roll out more easily.
Pro tip: Roll the dough directly onto parchment paper that you’ll later transfer to a baking sheet. This prevents the delicate, thin dough from tearing when moved.
Step 4 – Cutting and Shaping Crackers
Once your dough is rolled thin, it’s time to cut it into those classic saltine shapes. Traditionally, saltines are small squares about 2 inches across, but you can make them larger or even cut fun shapes with cookie cutters if you’re making them for kids or parties.
Use a pizza cutter, sharp knife, or pastry wheel to cut straight lines across the dough. Don’t worry if they aren’t perfectly uniform; the homemade look adds charm.
Next, take a fork and gently prick holes across the surface of each cracker. This step is important—it prevents the crackers from puffing up too much in the oven, keeping them flat and crisp.
Finally, sprinkle a light dusting of salt over the top. You can stick to fine table salt for a classic taste, or use flaky sea salt for a more gourmet finish. If you’d like to experiment, try brushing the dough lightly with olive oil before sprinkling on spices like garlic powder, rosemary, or sesame seeds.
Step 5 – Baking the Crackers
Preheat your oven to 400°F (200°C). Carefully transfer your parchment-lined dough onto a baking sheet. Place it in the middle rack of the oven for even heat distribution.
Bake for 12–15 minutes, or until the crackers are golden brown around the edges and crisp to the touch. Keep a close eye on them after the 10-minute mark, as thin crackers can brown quickly.
Once done, remove them from the oven and let them cool completely on a wire rack. Don’t skip the cooling step—this is when the crackers harden and achieve that irresistible crunch.
After cooling, break them apart along the cut lines if they’ve baked together. Store them in an airtight container at room temperature, where they’ll stay fresh for about one week.
Pro tip: For extra-crispy crackers, you can return them to a warm oven (about 250°F) for an additional 5 minutes after cooling. This removes any lingering moisture and guarantees maximum crunch.
Tips for Perfect Homemade Saltine Crackers
Even though this recipe is simple, a few key tricks can help you achieve truly bakery-quality crackers:
Achieving the Right Crispiness
The thinner you roll the dough, the crispier your crackers will be. If you prefer a lighter crunch, go as thin as possible without tearing the dough. On the other hand, rolling slightly thicker gives a more substantial bite.
Preventing Over-Browning
Every oven runs a little differently, so start checking your crackers at the 10-minute mark. If the edges are browning too quickly, lower your oven temperature slightly.
Adding Seasonings for Variety
Saltines are a perfect blank canvas. You can season them with:
- Garlic powder and black pepper for a savory twist.
- Sesame seeds or poppy seeds for a nutty flavor.
- Smoked paprika or chili powder for a spicy kick.
- A light brush of butter and a sprinkle of cinnamon sugar for a sweet version.
The beauty of homemade crackers is their versatility—you can make a batch plain, then experiment with flavor variations for different occasions.
Creative Variations of Saltine Crackers
Once you’ve mastered the basic saltine cracker recipe, it’s time to get creative. Saltines are like a blank canvas in the culinary world—they can take on countless flavors and textures depending on how you season or top them. With a few tweaks, you can transform a simple snack into something gourmet-worthy.
Cheesy Saltine Crackers
For a cheesy twist, mix a handful of finely grated cheddar, parmesan, or asiago into the dough before rolling it out. The cheese melts as the crackers bake, giving them a savory bite and irresistible aroma.
Herb-Infused Crackers
Sprinkle chopped fresh herbs like rosemary, thyme, or dill over the dough before baking. Press them gently into the surface with your rolling pin so they stick. This adds a fresh, fragrant note that pairs beautifully with dips and cheeses.
Sweet Dessert Crackers
Believe it or not, saltines can be turned into a sweet treat. Brush them with melted butter, sprinkle with cinnamon sugar, and bake until golden. They become a crunchy dessert option that pairs well with tea or coffee.
Seed-Topped Crackers
For extra crunch and nutrition, top your crackers with sesame seeds, flax seeds, or sunflower seeds before baking. Seeds not only add texture but also boost the nutritional value of your homemade snack.
Experimenting with these variations means you’ll never get bored—each batch can bring something new to the table.
Serving Ideas for Saltine Crackers
Homemade saltine crackers aren’t just for snacking straight from the jar. They can be served in many delicious ways that elevate everyday meals and gatherings.
Classic Pairings
- With Soup: A bowl of tomato soup or chicken noodle soup feels incomplete without a side of crispy crackers.
- With Cheese: Pair with soft cheeses like brie or goat cheese, or go traditional with cheddar.
- With Spreads: Hummus, guacamole, or salsa spread on saltines makes a quick, satisfying snack.
Entertaining Ideas
- Charcuterie Boards: Add homemade crackers to a cheese and meat platter for a rustic, homemade touch.
- Party Snacks: Top crackers with smoked salmon, cream cheese, or sliced cucumbers for elegant appetizers.
Unique Uses
- Cracker Toppings: Use them as a crunchy base for peanut butter, Nutella, or honey.
- Crushed Cracker Coating: Grind them and use as breading for chicken tenders or fish fillets.
- Dessert Base: Layer them with caramel and chocolate to make saltine toffee, a quick and addictive treat.
Saltines are incredibly versatile, and with a little creativity, they can fit into any mealtime scenario—from casual snacking to fancy entertaining.
Storage and Shelf Life of Homemade Saltines
You’ve put in the effort to bake your crackers, so it’s important to store them properly to maintain that perfect crunch. Unlike store-bought versions loaded with preservatives, homemade saltines are fresher but have a shorter shelf life.
Proper Storage
- Store completely cooled crackers in an airtight container to prevent them from turning soft.
- Keep them in a cool, dry place—the pantry works best.
Shelf Life
- At room temperature: They stay fresh for about 7 days.
- For longer storage: Freeze them in an airtight bag or container for up to 2 months. When ready to eat, thaw at room temperature and re-crisp in a warm oven.
Re-Crisping Tip
If your crackers lose their crunch, place them on a baking sheet and reheat in a 250°F oven for 5–7 minutes. This drives out moisture and restores their crisp texture.
With the right storage, your homemade saltines will stay just as crunchy and delicious as the day they came out of the oven.
Health Benefits of Homemade Crackers
While saltine crackers may not be considered a health food, making them at home can be a smarter choice compared to store-bought options. By controlling what goes into your recipe, you can avoid unnecessary additives and enjoy a cleaner, fresher snack.
No Preservatives or Hidden Ingredients
Commercial crackers often contain preservatives, added sugars, and hydrogenated oils. Homemade versions are made with simple ingredients—flour, butter, salt, and water.
Lower Sodium Options
If you’re watching your sodium intake, you can easily reduce or skip the extra salt topping. This way, you still get a crunchy cracker without the excess sodium found in store-bought brands.
Customizable for Diets
- Gluten-Free: Use gluten-free flour blends.
- Vegan: Substitute butter with olive oil or plant-based margarine.
- Whole Grain: Swap all-purpose flour with whole wheat flour for extra fiber.
Better Pairings
When paired with wholesome toppings like hummus, nut butters, or fresh vegetables, homemade crackers can be part of a balanced snack or light meal.
So while a cracker might seem like a small thing, making them at home allows you to take charge of your nutrition in a surprisingly easy way.
Common Mistakes to Avoid When Making Crackers
Even though saltine crackers are simple to make, a few common missteps can turn a crunchy delight into a kitchen disappointment. Learning what to avoid will help you achieve perfect crackers every time.
Rolling the Dough Too Thick
One of the most frequent mistakes is leaving the dough too thick. Thick dough results in soft, bread-like crackers instead of light and crispy ones. Always aim for paper-thin sheets—about ⅛ inch or thinner.
Skipping the Resting Step
It’s tempting to rush through the process, but skipping the dough’s resting time makes rolling difficult. The dough will resist, springing back as you roll, leading to uneven thickness. Resting ensures a smoother process and better results.
Over-Baking
Since crackers are thin, they can go from golden brown to burnt in a matter of minutes. Always keep a close eye on them in the oven, especially after the 10-minute mark.
Not Pricking the Dough
Those little fork holes aren’t just decorative—they keep the crackers from puffing up too much in the oven. Forgetting to prick the dough leads to uneven crackers that bake into odd shapes.
Improper Storage
Leaving crackers uncovered allows them to absorb moisture from the air, making them soft and chewy. Always store them in an airtight container once cooled.
By steering clear of these mistakes, your saltine crackers will turn out crisp, golden, and bakery-worthy every time.
Nutritional Value of Saltine Crackers
Homemade saltine crackers are not only tastier but also healthier than store-bought alternatives. Knowing their nutritional breakdown can help you fit them into your diet without guilt.
Typical Nutrition per Serving (4 Crackers)
- Calories: ~60
- Carbohydrates: ~12g
- Protein: ~1.5g
- Fat: ~1.5g (depends on butter or oil used)
- Fiber: ~0.5g
- Sodium: Varies depending on salt topping
Why Homemade Wins
- Lower Sodium: You can control how much salt is added.
- No Preservatives: Store-bought crackers often contain unnecessary additives.
- Healthier Fats: Using olive oil instead of butter makes them a lighter, heart-healthy snack.
- Whole Grain Option: Substituting with whole wheat flour boosts fiber and nutrients.
While crackers aren’t a superfood, homemade versions can absolutely be part of a balanced, mindful diet—especially when paired with healthy toppings like avocado, nut butter, or fresh veggies.
Pairing Ideas with Homemade Saltines
Saltine crackers are versatile and can be dressed up or down depending on the occasion. Here are some creative pairing ideas that will make your homemade crackers the star of the table.
Everyday Snacks
- Peanut Butter & Banana Slices – A quick, protein-packed treat.
- Avocado Mash – Sprinkle with lime and chili flakes for a zesty snack.
- Cheese & Tomato Slices – A refreshing combo with a touch of salt.
Party-Ready Pairings
- Smoked Salmon & Cream Cheese – Elegant yet simple appetizer.
- Goat Cheese & Honey – A balance of creamy and sweet flavors.
- Roasted Red Pepper Hummus – Bold and colorful, perfect for sharing.
Unique Toppings
- Nutella & Strawberries – A sweet, dessert-style cracker snack.
- Herbed Cream Cheese & Olives – Savory with Mediterranean flair.
- Salsa & Shredded Cheese – For a quick nacho-inspired bite.
Whether you’re preparing a light lunch, an afternoon snack, or a spread for guests, homemade saltines make the perfect base.
FAQs about Saltine Cracker Recipe
1. Can I make the dough ahead of time?
Yes! You can prepare the dough and store it in the refrigerator for up to 24 hours before rolling and baking. Just make sure to bring it to room temperature before rolling it out.
2. How do I keep my crackers crunchy?
Store them in an airtight container at room temperature. If they lose their crispiness, reheat them in a 250°F oven for a few minutes.
3. Can I make gluten-free saltine crackers?
Absolutely. Replace all-purpose flour with a gluten-free flour blend. Just keep in mind the texture may be slightly different, but they’ll still be delicious.
4. Why did my crackers puff up too much?
Most likely, the dough wasn’t pricked enough before baking. Use a fork to poke evenly spaced holes across the surface to prevent excessive puffing.
5. Can I freeze homemade crackers?
Yes, you can freeze them in an airtight container or bag for up to 2 months. Thaw at room temperature and re-crisp in the oven before serving.
Conclusion
Homemade saltine crackers are proof that sometimes the simplest recipes bring the greatest joy. With just a few pantry staples—flour, butter, salt, and water—you can create a snack that’s fresher, tastier, and healthier than anything you’d find in a box. From kneading the dough to sprinkling on the final touch of salt, the process is easy and rewarding.
These versatile crackers can be enjoyed in countless ways—paired with soups, cheeses, spreads, or even as the base of sweet treats. Best of all, making them at home means you control the flavors, nutrition, and quality. Whether you stick to the classic recipe or branch out with herbs, seeds, or spices, homemade saltines will quickly become a staple in your kitchen.
So, roll up your sleeves, preheat your oven, and get ready to bake your own batch of golden, crispy crackers. Once you taste them, you’ll never look at store-bought saltines the same way again.