Salt Dough Ornament Recipe: Salt dough ornaments are a classic DIY craft project that’s been loved for generations. They’re simple to make, fun to decorate, and perfect for adding a personal touch to any celebration or holiday. Whether you’re crafting with kids, making keepsakes for Christmas, or just looking to spend a cozy afternoon creating something beautiful, salt dough is your go-to solution.
One of the best parts? You don’t need to be an artist to make them look amazing. This project is totally beginner-friendly and can turn into a heartwarming tradition. If you’ve never tried it before, you’re in for a real treat!
Why Salt Dough Ornaments Are Popular
So, what’s all the fuss about salt dough? Well, for starters, it’s incredibly budget-friendly. You’re using just three basic ingredients: flour, salt, and water. It doesn’t get simpler—or cheaper—than that. No fancy tools, no hard-to-find materials, just good old-fashioned creativity.
Another reason salt dough is a hit: it’s super versatile. You can make Christmas ornaments, handprint keepsakes, Easter decorations, or even custom gift tags. And once they’re dry, they last for years. It’s like making little time capsules with love baked right in.
Families especially love them because kids can get involved without the stress. It’s messy in a good way, and there’s something magical about turning simple dough into a treasured memory. Plus, once you start making them, it’s hard to stop!
Best Occasions to Make Them
You can whip up a batch of salt dough ornaments anytime, but some moments make them even more special:
- Christmas: The classic time for salt dough fun. Make stars, trees, snowflakes, and hang them on your tree.
- Baby’s First Christmas: Use tiny handprints or footprints as keepsakes.
- Mother’s Day & Father’s Day: Personalized ornaments with names or messages make heartfelt gifts.
- Birthdays: Create custom party favors or birthday decorations.
- Weddings: Craft unique guest favors or place settings.
Anytime you want to add a handmade touch to your celebration, salt dough has your back.
Ingredients and Tools You’ll Need
Before we dive into the how-to, let’s talk about what you’ll need.
Common Ingredients From Your Pantry
Here’s your basic salt dough recipe, which makes enough for several ornaments:
- 2 cups all-purpose flour
- 1 cup table salt
- 3/4 cup to 1 cup water (start with 3/4 and add more if needed)
That’s it! These pantry staples are usually already sitting in your kitchen. No need to run to the store.
Essential Tools for Crafting
To bring your creations to life, gather the following:
- Mixing bowl
- Spoon or spatula
- Rolling pin
- Cookie cutters (for fun shapes)
- Straw or skewer (to poke holes for hanging)
- Baking sheet
- Parchment paper
- Paints, brushes, and sealant (for decorating)
Optional but helpful:
- Glitter
- String or ribbon for hanging
- Sandpaper (for smoothing rough edges)
With these tools ready, you’re all set to start creating!
Step-by-Step Recipe to Make Salt Dough
Now the fun begins! Let’s walk through the process, one easy step at a time.
Step 1 – Mix Your Ingredients
Start by combining 2 cups of flour and 1 cup of salt in a mixing bowl. Stir them together until they’re well-blended. Slowly add 3/4 cup of water while stirring. The mixture should start coming together into a dough.
If the dough feels too dry, add a splash more water. If it’s too sticky, sprinkle in a little more flour. You’re aiming for a firm, pliable texture—kind of like playdough.
This step is great for kids to help with—hands-on, sensory fun they’ll love!
Step 2 – Knead the Dough Properly
Once the dough forms, take it out of the bowl and knead it on a floured surface. Kneading is key to getting that smooth, workable consistency.
Spend about 10 minutes working the dough. It should feel elastic and firm but not crumbly. This step helps make sure your ornaments don’t crack or break after baking.
Pro tip: Kneading also makes the dough more enjoyable to work with, especially for detailed shapes.
Step 3 – Roll and Cut the Shapes
Once your dough is perfectly kneaded, it’s time to roll it out. Lightly flour your surface and your rolling pin to prevent sticking. Aim for a thickness of about 1/4 inch (6 mm)—thin enough to dry evenly but thick enough to stay sturdy.
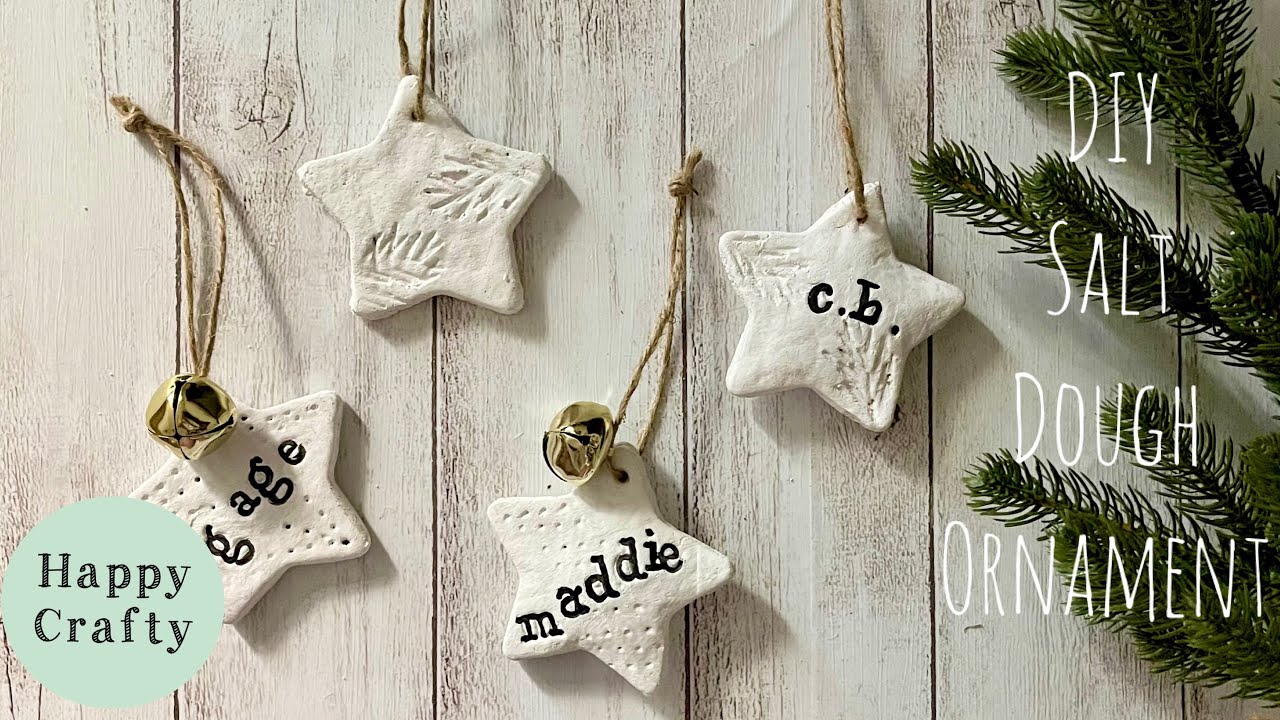
Now comes the fun part: cutting out shapes! You can use cookie cutters to make stars, hearts, trees, animals, or any shape that fits your occasion. If you don’t have cookie cutters, a butter knife works great for freestyle designs.
Want to add a personal touch? Try using alphabet stamps to press names or messages into the dough before baking. You can also use small toys or natural objects like leaves to imprint textures into the surface.
Carefully transfer your cut-out shapes onto a baking sheet lined with parchment paper, making sure they’re spaced out a bit to avoid touching edges.
Step 4 – Make Holes for Hanging
Before baking, don’t forget to make holes for hanging your ornaments! Use a straw, skewer, or the end of a paintbrush to poke a hole near the top of each ornament. Make sure the hole is big enough for your string or ribbon to fit through later.
Double-check the placement—too close to the edge and it might break, too far in and it may not hang straight. Aim for balance.
If you’re not planning to hang them, you can skip this step. But trust me, hanging ornaments are super versatile for decorating trees, walls, or gifts!
Step 5 – Bake the Ornaments
Preheat your oven to 200°F (93°C)—a low temperature is key to drying the ornaments without burning them. Place your tray of ornaments in the oven and let them bake for 2 to 3 hours, flipping them halfway through for even drying.
Larger or thicker ornaments might need more time. You’ll know they’re done when they feel hard and dry all the way through.
If you’re not in a hurry, you can let them air dry for a couple of days instead. This method is gentler and reduces the chance of cracking but takes a bit longer.
Once fully dry, let them cool completely before moving on to decorating. This is where your creativity really gets to shine!
Decorating Your Salt Dough Ornaments
Now that your ornaments are dry and cool, it’s time to make them beautiful!
Painting and Designing Tips
Acrylic paints are perfect for salt dough. They stick well, dry quickly, and come in every color imaginable. You can paint the entire surface one color or get creative with patterns, characters, and scenes.
Here are some fun design ideas:
- Metallic paints for a classy finish
- Polka dots or stripes using the back of a paintbrush
- Stamped designs for texture
- Handprint or footprint keepsakes painted in bright colors
- Names and dates to make each piece personal
Let each color dry before adding the next to avoid smudging. If you’re working with kids, washable paints might be a safer option—even if they don’t last quite as long.
Sealing for Longevity
Once the paint is completely dry, seal your ornaments to protect them from moisture and damage. You can use:
- Clear acrylic spray sealant
- Mod Podge or craft varnish
- PVA glue (thinned with a little water)
Apply an even coat, making sure to cover the edges and the hole. Sealing not only keeps your artwork intact but also prevents your ornaments from absorbing moisture, which can lead to cracking or mold over time.
If you plan to use them year after year—or give them as gifts—this step is a must.
Storing and Preserving Your Ornaments
Now that you’ve crafted and decorated your salt dough treasures, let’s make sure they last for years to come.
Best Storage Practices
When the holidays are over or the event has passed, store your ornaments with care. Here’s how to keep them safe:
- Wrap each ornament in tissue paper or bubble wrap to prevent scratches.
- Store them in a sturdy box or ornament container.
- Keep them in a cool, dry place away from moisture and humidity.
Avoid plastic bags unless you’re sure they’re completely dry and sealed—plastic can trap moisture and lead to mold.
Preventing Moisture Damage
Moisture is the enemy of salt dough. Even sealed ornaments can absorb water over time if they’re not stored properly. To prevent this:
- Use silica gel packets in your storage box.
- Reapply sealant every couple of years if they’re exposed to air.
- Avoid hanging them in damp areas like kitchens or bathrooms.
If an ornament starts to soften, it’s likely absorbing moisture. Dry it out and reseal it if possible. With just a little care, your creations can last a lifetime.
Creative Ideas and Inspiration
If you’ve got the basics down and are ready to level up your salt dough game, let’s talk about some super creative ways to customize your ornaments. You’re not just limited to stars and snowflakes—you can turn salt dough into practically anything!
Holiday-Themed Designs
Christmas might be the most popular time to make salt dough ornaments, but the options go way beyond basic bells and trees. Try some of these festive ideas:
- Miniature snowmen with painted scarves and buttons
- Christmas stockings personalized with names
- Tiny gingerbread houses with 3D designs
- Candy canes with painted red and white swirls
- Ornaments shaped like gift boxes with painted “ribbons”
You can also make an entire custom tree set with matching themes—like a woodland set with owls, pine trees, and foxes, or a celestial set with stars, moons, and planets.
Don’t forget about other holidays! For Easter, think eggs, bunnies, and crosses. For Halloween, create spooky pumpkins, ghosts, and bats. Salt dough isn’t just for Christmas—it’s perfect for year-round celebration crafts.
Kids’ Fun Craft Projects
Kids absolutely love working with salt dough, and it’s such a great way to keep little hands busy. Let their imaginations run wild with these playful project ideas:
- Handprint or footprint ornaments – perfect for toddlers and makes adorable keepsakes
- Alphabet and number shapes – fun for learning and play
- Animal figures – dinosaurs, fish, or zoo animals they can paint and display
- Storybook characters – recreate their favorite characters with dough
- Holiday countdown calendars – make numbered ornaments to count down to the big day
Make it even more fun by turning decorating into a party or classroom activity. Just keep in mind that young kids may need help with rolling and cutting, but they’ll love painting and personalizing their creations.
And here’s a tip: If the final ornaments aren’t perfect, that’s totally okay! The charm lies in the imperfections—it shows they were made with love.
FAQs about Salt Dough Ornament Recipe
What are the basic ingredients needed for salt dough ornaments?
The fundamental ingredients for making salt dough ornaments are simple: flour, salt, and water. Typically, the recipe calls for 2 cups of all-purpose flour, 1 cup of salt, and 3/4 cup of water. These ingredients create a moldable, non-toxic dough that’s perfect for crafting.
How long do I bake salt dough ornaments, and at what temperature?
Bake your salt dough ornaments in a preheated oven at 250°F (120°C) for about 2 to 3 hours. The key is to bake them slowly at a low temperature to prevent puffing and to ensure they harden properly. Thickness can affect baking time, so adjust accordingly.
Are salt dough ornaments durable?
Absolutely! Once your salt dough ornaments have completely cooled, you can paint them with acrylic paints for a vibrant finish. For added durability and to make the colors pop, consider sealing the painted ornaments with a clear acrylic sealer.
Are salt dough ornaments durable?
Salt dough ornaments can be quite durable if properly made and sealed. However, they can be susceptible to moisture. To extend their life, ensure they are thoroughly dried out during the baking process and apply a good-quality sealant. This makes them more resistant to humidity and handling.
Can salt dough ornaments be used outdoors?
While salt dough ornaments are generally recommended for indoor use due to their vulnerability to moisture, they can be displayed outdoors temporarily in dry conditions if they are well sealed with a waterproof sealer. Nonetheless, it’s best to keep them inside as weather conditions can degrade the ornaments over time.
Is there a way to make salt dough ornaments smell nice?
Yes, you can add cinnamon, cloves, or even essential oils to the dough mixture before baking to give your ornaments a pleasant scent. This addition will not only make them smell delightful but can also add a touch of warmth to your holiday decor.
How do I store salt dough ornaments?
To preserve your salt dough ornaments, store them in a cool, dry place in an airtight container. Layer them between pieces of parchment paper or bubble wrap to prevent them from sticking together or breaking. Proper storage will help maintain their condition for future holiday seasons.
Conclusion
Salt dough ornaments are more than just a craft—they’re a chance to slow down, get creative, and make something meaningful with your own two hands. Whether you’re crafting alone on a quiet afternoon or making memories with your kids during the holidays, there’s nothing quite like turning a lump of dough into a keepsake you’ll treasure forever.
Here are a few final tips before you dive in:
- Always knead your dough well to avoid cracking.
- Bake low and slow—don’t rush the drying process.
- Seal your ornaments to make them last.
- Let your creativity shine—there’s no wrong way to decorate.
- Most importantly: Have fun with it!
Whether you’re a first-timer or a seasoned DIYer, salt dough offers endless possibilities for creating art that comes from the heart.