Rosca de Reyes Recipe: There’s something magical about baking a Rosca de Reyes, especially if you’re celebrating Three Kings Day (Día de Reyes) with your family.
The sweet, fluffy bread ring, decked out in candied fruits and sugary toppings, is more than just a delicious treat—it’s a tradition full of meaning and joy.
Whether you’re new to this holiday bread or looking to perfect your recipe, this detailed step-by-step guide will walk you through how to make an authentic, bakery-quality Rosca de Reyes right at home.
What is Rosca de Reyes?
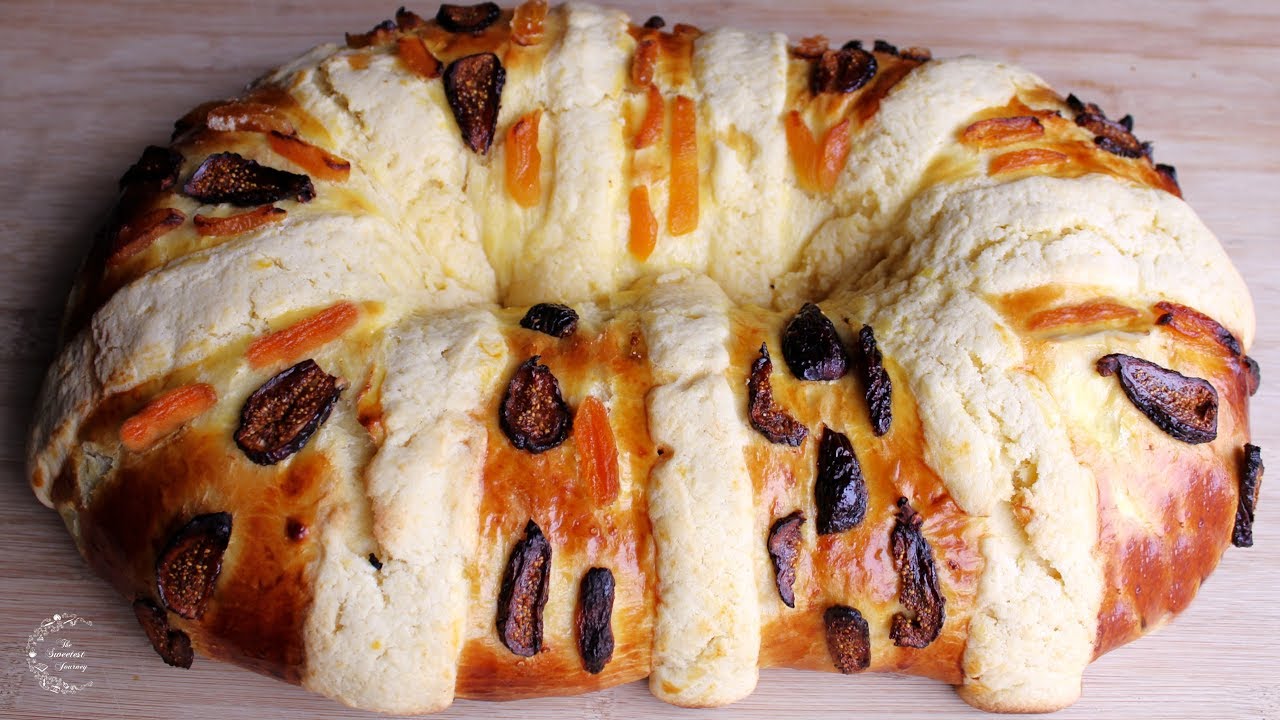
Rosca de Reyes, or “King’s Ring,” is a traditional sweet bread made to celebrate Epiphany on January 6th. It’s a large, oval-shaped bread, often decorated with candied fruits, sugar, and sometimes filled with delightful surprises. The shape of the Rosca represents a crown, honoring the three wise men who visited baby Jesus with gifts.
But Rosca de Reyes is more than a festive bread—it’s a fun and symbolic part of Latin American and Spanish celebrations. Hidden inside the bread is often a small figurine of baby Jesus, and whoever finds it is expected to host a party on Día de la Candelaria (Candlemas) in February.
The History and Cultural Significance
The Rosca de Reyes tradition has deep Catholic and Hispanic roots, dating back to Spain and spreading throughout Latin America. Inspired by European Epiphany cakes like the Galette des Rois in France, the Rosca was adapted with local flavors and customs, becoming a central part of Epiphany celebrations in Mexico and other countries.
It’s not just about the flavor—it’s about community, family, and faith. Sharing a Rosca is a way of celebrating unity, joy, and the continuation of holiday spirit after Christmas and New Year’s.
When is Rosca de Reyes Traditionally Eaten?
Traditionally, Rosca de Reyes is eaten on January 6th, during Día de los Reyes Magos, also known as the Feast of the Epiphany. Families gather for a festive meal and slice the bread together, eager to see who finds the hidden baby figurine. Some enjoy it with Mexican hot chocolate, atole, or coffee, making it a cozy, heartwarming occasion to wrap up the holiday season.
Ingredients You’ll Need
Let’s break down everything you’ll need to make the perfect Rosca. Most of the ingredients are pantry staples, but a few (like candied fruits) are seasonal and can be found in Latin markets around January.
For the Dough:
- 4 cups all-purpose flour
- 2 ¼ tsp active dry yeast (1 packet)
- ⅓ cup sugar
- ½ tsp salt
- 4 large eggs (room temperature)
- ½ cup whole milk (warm)
- ½ cup unsalted butter (softened)
- 1 tbsp orange zest
- 1 tbsp lemon zest
- 1 tsp vanilla extract
- 1 tsp cinnamon
For the Topping:
- ½ cup all-purpose flour
- ½ cup powdered sugar
- ¼ cup unsalted butter
- 1 tsp vanilla extract
For Decoration:
- Candied fruits (figs, cherries, orange peel, cactus strips)
- Egg wash (1 egg + 1 tbsp milk)
- Optional: baby Jesus figurines or dried beans (about 2-3)
Tools You’ll Need
- Stand mixer with dough hook (optional but helpful)
- Large mixing bowl
- Clean kitchen towel or plastic wrap
- Baking sheet or round pizza pan
- Pastry brush
- Rolling pin
- Parchment paper
Step-by-Step Guide to Making Rosca de Reyes
Now it’s time to roll up your sleeves and get baking! This step-by-step guide makes the process smooth and beginner-friendly.
Step 1: Preparing the Dough
Mix warm milk, yeast, sugar, flour, eggs, butter, salt, and orange zest into a soft, slightly sticky dough. Knead until smooth and elastic.
Step 2: First Dough Rise
Place the dough in a greased bowl, cover, and let rise in a warm place for 1–1½ hours, until doubled in size.
Step 3: Shaping the Rosca
Punch down the dough and shape it into a long rope. Join the ends to form a large oval or ring, sealing well.
Step 4: Adding Hidden Figurines (Optional but Traditional)
Carefully insert small figurines or beans from the bottom of the dough, spacing them evenly.
Step 5: Preparing the Topping
Mix softened butter, sugar, flour, and vanilla into a paste. This creates the classic sweet topping.
Step 6: Decorating the Rosca
Spread topping strips over the dough and decorate with candied fruits, pressing them gently into place.
Step 7: Second Rise
Cover loosely and let the rosca rise for 30–45 minutes until puffy.
Step 8: Baking the Rosca
Bake at 350°F (175°C) for 25–30 minutes until golden brown and fragrant.
Step 9: Cooling and Serving
Cool completely before slicing. Serve with hot chocolate or coffee and enjoy this festive bread.
Tips for a Perfect Rosca de Reyes
- Use fresh yeast: Expired yeast won’t activate properly, and your dough won’t rise.
- Don’t rush the kneading: A well-kneaded dough creates soft, fluffy bread.
- Room temperature ingredients: Cold eggs or milk can slow yeast activation.
- Decorate with contrast: Mix colorful fruits and sugar strips for that signature look.
- Let it cool completely before slicing to avoid deflating the bread.
Common Mistakes to Avoid
Even experienced bakers can hit a few bumps, so here are mistakes to steer clear of:
- Overproofing the dough: This can cause the Rosca to collapse after baking.
- Skipping the second rise: Your Rosca will be dense instead of light and airy.
- Adding too many figurines: One per 6-8 servings is plenty.
- Using overly wet fruits: Pat candied fruits dry to prevent sogginess.
- Underbaking: Ensure the dough is fully cooked—golden brown on top and fluffy inside.
How to Store Your Rosca
If you have leftovers, wrap the Rosca tightly in plastic wrap or foil and store it at room temperature for up to 3 days. You can also refrigerate it for up to a week, though it’s best enjoyed fresh.
To reheat:
- Warm slices in the oven at 300°F for 5-10 minutes.
- Or toast lightly and spread with butter or jam.
Freezing? Absolutely. Wrap it tightly in foil and place it in a freezer bag for up to 1 month. Thaw at room temperature before reheating.
Rosca de Reyes Variations
While the classic Rosca de Reyes is always a crowd-pleaser, there are some tasty variations you can try if you’re feeling creative or want to put your own twist on tradition. These ideas are fun for experimenting or adapting to suit different tastes.
Chocolate Rosca
Chocolate lovers, this one’s for you! To make a chocolate version:
- Add ¼ cup cocoa powder to the dough during mixing.
- Mix in chocolate chips or chunks for extra richness.
- Dust the top with cocoa powder and powdered sugar after baking for a beautiful finish.
This variation pairs wonderfully with coffee or a rich hot chocolate. It’s a modern take that still respects tradition while offering something unique.
Stuffed with Cream Cheese or Dulce de Leche
Want to surprise your guests? Try stuffing the Rosca with a delicious filling:
- Roll the dough into a rectangle before shaping.
- Spread a layer of sweetened cream cheese, dulce de leche, or even fruit preserves.
- Carefully roll the dough into a log, seal it, and shape it into the traditional oval ring.
The filling adds extra moisture and flavor—especially great for people who prefer richer desserts. Just make sure not to overfill, or it may leak during baking.
Mini Individual Roscas
These are perfect for parties or gifting!
- Divide your dough into 4 to 6 equal pieces after the first rise.
- Shape each piece into a small ring and decorate as usual.
- Bake for slightly less time (about 15–18 minutes) until golden.
Mini Roscas are adorable, easier to portion, and let everyone have their own festive treat—with or without a baby figurine!
How to Celebrate Día de Reyes
Making and sharing Rosca de Reyes is just part of the celebration. If you’re planning to observe Día de los Reyes Magos, here are some traditions to consider:
- Leave out shoes the night before: Kids in many Latin American countries place their shoes by the door for the Three Kings to leave gifts.
- Set up the Three Kings nativity scene: Add the kings to your manger display on January 6.
- Read the story of the Magi from the Bible or tell it as a family tradition.
- Share the Rosca with family and friends, making it the centerpiece of the day’s meal.
- Celebrate Candlemas (Feb 2) if you find the baby figurine—traditionally with a tamales party.
These moments create beautiful memories, connecting faith, culture, and food in a meaningful way.
Pairing Ideas (Drinks and Sides)
To elevate your Rosca experience, consider pairing it with traditional drinks or side dishes that bring out the flavor and turn your gathering into a feast.
Drinks to serve with Rosca:
- Mexican Hot Chocolate – thick, rich, and spiced with cinnamon.
- Atole – a warm corn-based drink often flavored with vanilla or chocolate.
- Cafe de Olla – brewed coffee with cinnamon and piloncillo (unrefined cane sugar).
Savory pairings:
- Tamales – if you’re celebrating Candlemas later!
- Cheese platters – mild cheeses balance the sweetness.
- Fruit salad – adds freshness to your dessert table.
Rosca de Reyes Fun Facts
- The oval shape of the Rosca represents the king’s crown, and the candied fruits mimic the jewels on it.
- The baby figurine hidden inside represents Jesus in hiding, and finding it makes you the godparent of the celebration.
- In Mexico alone, millions of Roscas are sold every January.
- The biggest Rosca ever made was over 2,000 feet long and served over 200,000 people in Mexico City!
- The tradition is not limited to Mexico—Spain, Venezuela, Puerto Rico, and more celebrate with their own versions.
FAQs about Rosca de Reyes Recipe
1. What does the baby figurine symbolize?
The baby figurine hidden inside the Rosca represents baby Jesus hiding from King Herod. Finding it means you have to host a tamales party on Candlemas (February 2nd).
2. Can I make Rosca de Reyes without a stand mixer?
Absolutely. You can mix and knead the dough by hand. It takes a bit more effort, but it’s totally doable and even a little therapeutic!
3. How long does it take to make a Rosca?
From start to finish, including rising and baking time, it takes about 4 to 5 hours. Plan ahead and enjoy the process—it’s worth every minute.
4. Can I freeze leftover Rosca?
Yes! Wrap it tightly in foil and freeze for up to a month. Reheat in the oven to refresh the texture and flavor.
5. Is it okay to leave out the figurines?
Yes, if you prefer not to include them or if you’re concerned about choking hazards, you can skip them or add them after baking for safety.
Conclusion
Making a Rosca de Reyes at home is more than just baking a delicious sweet bread—it’s about embracing tradition, creating family memories, and sharing joy. With this step-by-step guide, you now have everything you need to make your own crown-worthy Rosca, whether it’s your first time or your fiftieth.
From activating the yeast to that final decorative touch, each step brings you closer to a beautiful tradition passed down through generations. And remember, finding the baby Jesus isn’t just luck—it’s a sign you get to keep the celebration going into February!
So warm up that oven, gather your ingredients, and start a new or continued tradition with your very own homemade Rosca de Reyes. ¡Feliz Día de Reyes!


