Roasted Duck Recipe: Roasted duck is one of those dishes that makes an unforgettable impression—crispy skin, succulent meat, and rich, savory flavor. It’s the kind of main course that brings people together around the dinner table, offering an elevated experience that goes far beyond your usual weeknight dinner. Duck is a fatty bird, which means it self-bastes as it roasts, leading to a juicy interior and beautifully golden, crispy skin on the outside. Unlike chicken or turkey, duck has a distinct flavor—richer and slightly gamier—that pairs wonderfully with sweet, citrusy, or wine-based sauces.
People often associate roasted duck with fine dining or festive holidays, and for good reason. It’s decadent, it looks impressive, and when done right, it tastes absolutely divine. While some home cooks feel intimidated by the idea of roasting a whole duck, the truth is it’s very achievable with the right guidance—and that’s exactly what this guide offers. Whether you’re hosting a special dinner or just want to try something new, roasted duck is a guaranteed crowd-pleaser.
The Perfect Occasion for Roasted Duck
So when’s the best time to roast a duck? While it’s a favorite at Christmas, Thanksgiving, and New Year’s celebrations, roasted duck is perfect for any dinner party or romantic evening at home. Its rich flavor and crisp texture make it a showstopper that doesn’t need a holiday excuse.
Think anniversaries, birthdays, or even a Sunday roast with a twist. Duck pairs beautifully with seasonal sides—roasted root vegetables in the winter, fresh greens in the spring, or citrus-forward dishes in the summer. It’s versatile, memorable, and sure to wow any guest lucky enough to sit at your table.
Ingredients You’ll Need
Essential Ingredients for the Duck
Before you get started, gather everything you need for this culinary adventure. Here’s a breakdown of the essential ingredients:
- 1 whole duck (about 5–6 lbs)
- Salt (preferably kosher or sea salt)
- Freshly ground black pepper
- Garlic cloves (4–6, smashed)
- Fresh thyme or rosemary sprigs
- 1 orange (cut into quarters)
- 1 onion (quartered)
These are your basic flavor agents. Garlic and herbs add aroma, while orange brings a bright acidity that cuts through the richness of the duck fat. Salt is crucial—it helps draw out moisture from the skin, which is what gets it extra crispy in the oven.
Optional Add-ons for Extra Flavor
Want to level up your duck even more? Consider adding these optional ingredients:
- Chinese Five-Spice Powder – Adds an aromatic, warm twist to the duck.
- Honey or Maple Syrup – For a glaze that’s sweet and sticky.
- Soy Sauce – A touch of umami if you want a more Asian-inspired profile.
- Apple slices or cranberries – For stuffing or serving on the side.
These extras allow you to customize the flavor profile depending on the season or theme of your dinner. Try different combinations until you find your favorite.
Tools and Equipment Checklist
Cooking a duck doesn’t require a Michelin-star kitchen, but having the right tools makes the process smoother:
- Roasting pan with a rack – Elevates the duck so fat can drip below.
- Sharp knife and kitchen shears – For trimming and scoring.
- Meat thermometer – Crucial for checking internal temperature.
- Paper towels – You’ll need these to dry the duck thoroughly.
- Baster or spoon – For basting the duck during roasting.
- Tongs – For flipping or moving the duck if needed.
Don’t forget aluminum foil (to tent the duck if it browns too quickly) and a bowl or jar to collect the rendered duck fat—it’s liquid gold for cooking potatoes or vegetables later.
Preparing the Duck
Cleaning and Prepping the Bird
Start by removing the duck from its packaging and removing any giblets from the cavity. Rinse it under cold water, then pat it completely dry with paper towels. Dry skin is key for getting that beautiful, golden crisp. If the skin is wet, it’ll steam instead of roast.
Once dry, check the duck for any remaining pin feathers. You can use kitchen tweezers to pluck these out. Also, trim any excess fat from around the neck and cavity openings—but don’t throw it away. Save it for rendering or roasting potatoes later.
Trimming and Drying for Crispy Skin
After trimming, you’ll want to air-dry the duck in your fridge for several hours—or ideally overnight. This helps draw out more moisture from the skin, ensuring that ultra-crispy result when roasted. Simply place the duck, uncovered, on a rack set over a baking sheet in the fridge.
It might sound like overkill, but this step makes all the difference. It allows the skin to firm up and dry out, setting you up for that restaurant-quality texture. If you’re short on time, even a couple of hours in the fridge helps.
Scoring and Seasoning the Duck
Before roasting, use a sharp knife to score the duck’s skin in a crisscross pattern—just be careful not to cut into the meat. This allows the fat beneath the skin to render out during cooking, which not only crisps the skin but also prevents the duck from becoming greasy.
Once scored, generously season the entire duck (including inside the cavity) with salt and pepper. Rub it all over and into the cuts. Then, stuff the cavity with aromatics like garlic cloves, orange wedges, onion quarters, and fresh herbs. These will infuse the meat with flavor as it cooks.
Step-by-Step Cooking Instructions
Step 1: Preparing the Oven
Before you even touch the duck, preheat your oven to 350°F (175°C). This moderate temperature allows the duck to roast slowly and evenly, ensuring the fat renders properly and the meat remains juicy. While the oven is heating, position the oven rack in the lower third of the oven. This will give you enough clearance for the duck and ensure even heat circulation.
Also, set up your roasting pan. Ideally, use a pan with a rack insert, which lifts the duck and allows the fat to drip below. This helps with even cooking and prevents the bottom of the duck from getting soggy. If you don’t have a rack, you can create a makeshift one using chopped vegetables like carrots and celery as a base layer—bonus, they’ll soak up flavor!
Don’t forget to place a shallow pan filled with water on the bottom rack. This creates steam, helping keep the duck moist during the long roast. It also helps catch some of the fat that might otherwise smoke up your kitchen.
Step 2: Stuffing the Duck (Optional)
Stuffing the duck is optional but highly recommended if you want to enhance the aroma and add subtle flavor to the meat. The goal isn’t to fill the bird tightly (you want airflow), but to add aromatic depth.
Here are a few ideas for stuffing:
- Classic Aromatics: Orange wedges, onion quarters, garlic cloves, and fresh rosemary or thyme.
- Fruit Forward: Apples, cranberries, or pomegranate seeds add sweetness and visual appeal.
- Spiced: Star anise, cloves, and cinnamon for a more exotic, warming profile.
Once stuffed, tie the legs loosely with kitchen twine to hold everything in. Be sure not to pack the cavity too tight—airflow is crucial for even roasting and cooking the inside thoroughly.
Step 3: Roasting the Duck
Now it’s showtime. Place the seasoned and stuffed duck breast-side up on your roasting rack and slide it into the preheated oven. Roast for about 2 to 2.5 hours, depending on the size of your duck.
Here’s a rough guideline:
- 5 lb duck – Roast for about 2 hours
- 6 lb duck – Roast for about 2.5 hours
Plan to check the duck every 30 minutes. This allows you to monitor browning, drain off excess fat (more on that later), and give it a quick baste. The skin should slowly turn golden and start crisping up.
About halfway through the cooking time, flip the duck over using tongs or two spatulas. This helps the fat render more evenly and ensures both sides get that gorgeous crispy finish.
Step 4: Basting and Monitoring
Basting is one of the best-kept secrets for juicy duck with deep flavor. Every time you check the duck (roughly every 30 minutes), spoon some of the rendered fat over the skin. This not only bastes the meat but contributes to a crispy, shiny exterior.
Also, carefully drain off excess fat from the pan as you go. Duck releases a significant amount of fat during roasting, and too much in the pan can cause smoking or soggy skin. Save this fat—it’s absolutely delicious for cooking potatoes or vegetables later.
To check if your duck is done, insert a meat thermometer into the thickest part of the thigh, avoiding bone. The internal temperature should read 165°F (74°C). If it’s below that, continue roasting and checking every 10–15 minutes.
Step 5: Final Crisping and Resting
Once the duck reaches temperature and is beautifully browned, you’re not quite done yet. For extra crispy skin, increase the oven temperature to 425°F (220°C) for the last 15 minutes. This blast of high heat crisps up the outer layer without drying out the inside.
After removing the duck from the oven, rest it for at least 15–20 minutes before carving. This is non-negotiable. Resting allows the juices to redistribute throughout the meat, keeping it moist and flavorful.
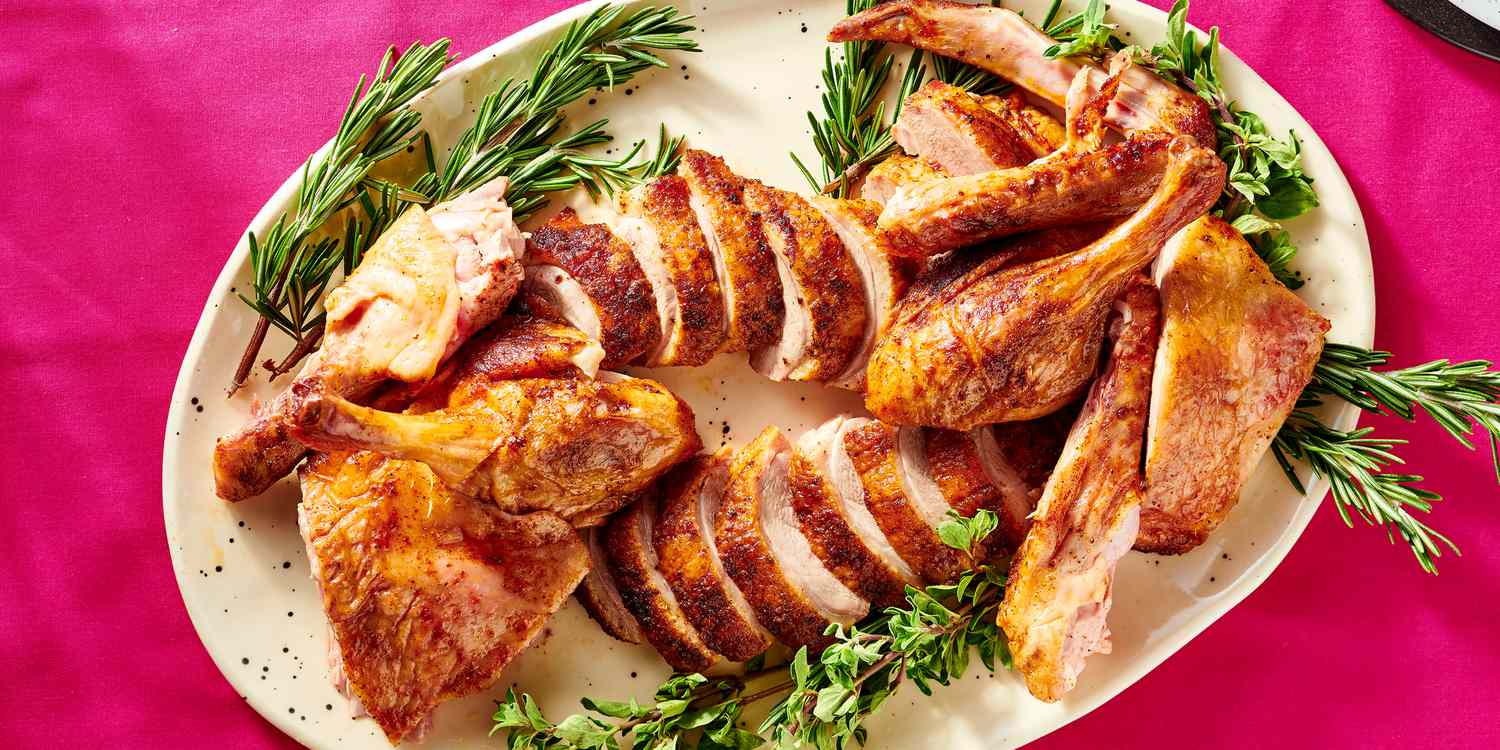
While it rests, you can make your sauce (see the next section). Then, slice the duck using a sharp carving knife. Start with the legs and thighs, then move on to the breasts. Serve immediately while the skin is still crispy and the meat warm.
Making the Perfect Sauce
Classic Orange Glaze
You can’t talk about roasted duck without mentioning orange glaze. This sweet, tangy sauce complements the richness of the meat beautifully.
Here’s a quick recipe:
- ½ cup orange juice (fresh is best)
- Zest of one orange
- 1 tablespoon honey or brown sugar
- 1 tablespoon soy sauce
- 1 teaspoon Dijon mustard
- Pinch of salt
Combine all ingredients in a saucepan over medium heat. Let it simmer until reduced by half and slightly thickened. Spoon it over sliced duck or serve on the side for dipping. The citrus cuts through the fat and balances every bite.
Savory Red Wine Reduction
If you prefer something more robust, a red wine sauce is the way to go. Here’s what you’ll need:
- 1 cup dry red wine
- ½ cup chicken or duck stock
- 1 tablespoon butter
- 1 shallot, finely chopped
- Salt and pepper to taste
Sauté the shallot in butter until soft. Add wine and stock, bring to a boil, then reduce to a simmer. Let it reduce by half, then strain and season. This sauce is deep, earthy, and perfect for date-night elegance.
Simple Pan Drippings Gravy
Sometimes, simple is best. If you want to keep it rustic and flavorful, use the duck’s own drippings to make a quick gravy.
Here’s how:
- Spoon off most of the fat, leaving about 2 tablespoons in the pan.
- Place the roasting pan over two burners on medium heat.
- Whisk in 2 tablespoons flour and cook for 1 minute.
- Gradually add 1 cup chicken stock or water, whisking constantly.
Simmer until thickened, season with salt and pepper, and strain if needed. This sauce captures every bit of flavor left in the pan—don’t waste it!
Serving Suggestions
Best Side Dishes to Pair With Roasted Duck
Roasted duck is luxurious and full of rich flavor, so it pairs best with sides that offer contrast—think crisp textures, bright flavors, or creamy comfort. Here are some delicious pairings:
1. Roasted Vegetables
Root vegetables like carrots, parsnips, sweet potatoes, and Brussels sprouts roast beautifully in duck fat. Simply toss them in a bit of oil, salt, and herbs, or better yet, in the reserved duck fat for maximum flavor.
2. Mashed Potatoes or Cauliflower Puree
A creamy mash is always a hit. The creaminess complements the richness of the duck, and a touch of garlic or horseradish can cut through the fattiness.
3. Wild Rice or Mushroom Pilaf
Earthy flavors go hand in hand with duck. A wild rice blend with sautéed mushrooms, garlic, and herbs is hearty, nutty, and an excellent match.
4. Braised Red Cabbage
This traditional European side is a winner with duck. The slightly sweet, tangy taste of cabbage braised in apple cider vinegar and brown sugar balances the gamey meat.
5. Citrus Salad
Want to keep it light and fresh? A salad with orange segments, arugula, red onions, and a citrus vinaigrette provides acidity and brightness.
6. French Green Beans (Haricots Verts)
Lightly sautéed with garlic and almonds, these beans are crisp, vibrant, and bring freshness to the plate.
Mix and match based on the season and mood. If you’re doing a holiday spread, load up the table. For a date night or simple dinner, a couple of sides are more than enough.
Plating and Presentation Tips
Let’s be real—duck is fancy, and your plating should match. You’ve put all that effort into roasting the bird, so make sure your final presentation does it justice.
Here’s how to make it visually stunning:
- Slice with precision: Use a sharp knife and aim for even slices. Lay the duck breast slices overlapping slightly.
- Use contrasting colors: Serve with colorful vegetables, a deep red wine sauce, or bright orange glaze to make the plate pop.
- Keep it clean: Wipe the edges of your plates for a professional finish.
- Add a garnish: A sprig of thyme, rosemary, or some finely chopped parsley adds elegance and freshness.
- Warm your plates: Always serve roasted duck on a warm plate to keep it at the perfect temperature when it hits the table.
If you’re serving family-style, arrange the duck on a large platter with sides around it. For individual plating, be intentional—less is more, but make every element count.
Storing and Reheating Leftovers
Best Practices for Storing Duck
If you’re lucky enough to have leftovers, good news: duck stores well and is easy to reheat without losing quality.
Follow these steps:
- Cool completely: Let the duck reach room temperature before storing.
- Use airtight containers: Store duck slices or pieces in a sealed container to lock in moisture.
- Refrigerate: Duck will keep in the fridge for up to 4 days.
- Freeze for longer storage: If you’re not eating it soon, freeze the duck in vacuum-sealed or heavy-duty freezer bags. It will last up to 3 months.
If freezing, try to separate pieces with parchment paper to avoid sticking. Label with the date so you don’t forget what’s inside later.
How to Reheat Without Losing Flavor
Reheating duck can be tricky—do it wrong, and you lose that crispy skin or end up with dry meat. Here’s how to get it right:
For the Oven:
- Preheat oven to 350°F (175°C)
- Place duck in a baking dish and cover loosely with foil
- Heat for 15–20 minutes until warmed through
- For crispy skin, remove foil and broil for the last 2–3 minutes
For the Skillet:
- Heat a nonstick pan over medium heat
- Place duck skin-side down for 4–5 minutes
- Flip and heat the meat side for another 2 minutes
Avoid microwaving unless you’re desperate—it steams the skin and can make it rubbery. If you do use the microwave, remove the skin first and re-crisp it in a pan separately.
Common Mistakes to Avoid
Overcooking or Undercooking
Duck isn’t like chicken—it has darker, fattier meat that tastes best when it’s cooked medium or medium-well. Overcook it, and it becomes dry and chewy. Undercook it, and you risk food safety.
Here’s how to avoid this mistake:
- Always use a meat thermometer.
- Target an internal temperature of 165°F (74°C) at the thickest point.
- Let it rest after cooking—this continues the cooking process gently without drying it out.
Not Prepping the Skin Properly
The hallmark of a great roasted duck? That crackly, golden-brown skin. Skipping the prep ruins the whole experience.
Avoid these skin-sabotaging slip-ups:
- Not drying the skin: Always pat the duck dry with paper towels and, if time allows, air-dry in the fridge overnight.
- Skipping the scoring: Failing to score the skin means the fat can’t render properly, resulting in soggy and greasy skin.
- Baking at the wrong temperature: Low and slow is key early on, then crank it up at the end to crisp everything up.
Trust us, take the time to do it right, and you’ll be rewarded with skin that crackles when you bite into it.
Nutritional Information
Health Benefits of Duck Meat
Duck often gets a bad rap for being fatty, but it’s also rich in nutrients and offers some unique health benefits when eaten in moderation.
- High in Protein: Duck is a great source of lean protein, helping with muscle repair and growth.
- Rich in Iron: Contains nearly double the iron of chicken, making it excellent for preventing anemia.
- Contains Healthy Fats: Yes, it’s fatty—but duck fat is largely monounsaturated, similar to olive oil. It can actually support heart health when used responsibly.
- B Vitamins Galore: Duck meat delivers a good amount of B6, B12, niacin, and riboflavin for energy and brain health.
So while it’s rich, it’s not necessarily “bad” for you—especially if you balance it with lighter sides and eat it as an occasional indulgence.
Calories and Macronutrients Breakdown
Here’s a basic nutritional estimate for 3 oz (85g) of roasted duck meat without skin:
| Nutrient | Amount |
|---|---|
| Calories | 170 |
| Protein | 24g |
| Fat | 7g |
| Carbohydrates | 0g |
| Iron | 15% DV |
| B12 | 20% DV |
With skin on, the calorie and fat count goes up significantly—more like 250–300 calories and 20g of fat per serving. Still, it’s a dish worth enjoying now and then.
FAQs about Roasted Duck Recipe
How long does it take to roast a duck?
The total roasting time depends on the size of your duck. For a 5–6 pound bird, you’ll generally need 2 to 2.5 hours at 350°F (175°C). Always use a meat thermometer to confirm the internal temperature has reached 165°F (74°C) at the thickest part of the thigh. For extra crispy skin, you can increase the oven temperature to 425°F (220°C) during the last 15 minutes of cooking.
Should I marinate the duck before roasting?
Marinating is optional, but it can enhance the flavor, especially if you’re going for a specific taste profile like Asian-inspired duck. A simple mix of soy sauce, ginger, garlic, and orange juice works well. However, even without a marinade, seasoning with salt, pepper, herbs, and stuffing the cavity with aromatics can provide rich flavor throughout the bird.
Can I use frozen duck?
Absolutely. Just make sure to thaw it properly before cooking. The safest method is to let the duck thaw in the refrigerator for 24 to 48 hours. Never try to roast a frozen or partially frozen duck—it won’t cook evenly and could pose a food safety risk.
What’s the internal temperature for perfectly roasted duck?
The USDA recommends cooking duck to a minimum internal temperature of 165°F (74°C) to ensure it’s safe to eat. This temperature should be taken at the thickest part of the thigh, avoiding any bone. If you prefer a slightly pinker, more tender breast, you can remove it a bit earlier at around 145–150°F (63–66°C), but make sure the legs and thighs are fully cooked.
Is duck healthier than chicken?
Duck has more fat and calories compared to chicken, especially if you eat it with the skin on. However, duck fat is rich in monounsaturated fats, which are considered heart-healthy in moderation. Duck also offers more iron, zinc, and B vitamins than chicken. So while it’s richer and more indulgent, it can be part of a balanced diet when enjoyed occasionally and prepared properly.
Conclusion
The reward? A beautifully roasted duck with rich flavor, juicy meat, and a crisp golden skin that rivals anything you’d find in a high-end restaurant. Whether you’re hosting a dinner party, celebrating the holidays, or just treating yourself to something extraordinary, roasted duck delivers an experience that’s both comforting and gourmet.
Let this guide be your go-to every time you want to impress your guests—or yourself—with a culinary masterpiece that’s not just delicious but also memorable. With all the flavor, aroma, and elegance packed into one dish, roasted duck truly earns its title as a show-stopping centerpiece.