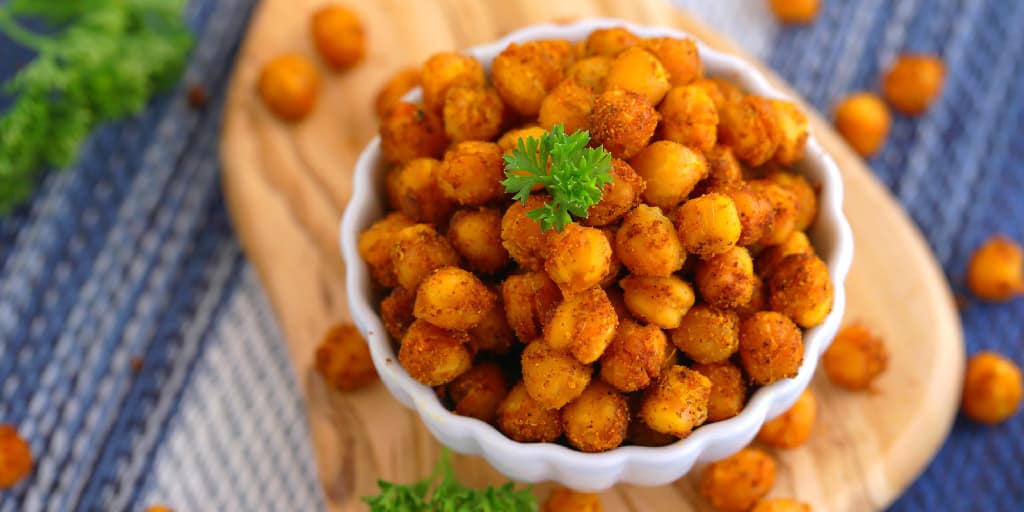
Roasted Chickpea Recipe: Roasted chickpeas are the underrated MVP of healthy snacking. They’re crunchy, satisfying, and incredibly versatile when it comes to flavors. Whether you’re craving something spicy, savory, or even a little sweet, roasted chickpeas can be tailored to suit your taste buds. They also offer a much healthier alternative to traditional processed snacks like chips or crackers. If you’re someone who likes snacking while working, binge-watching, or even just something crunchy on a hike, roasted chickpeas are going to be your new best friend.
Why Roasted Chickpeas are the Perfect Snack
Let’s be real—finding a snack that checks all the boxes (crunchy, healthy, easy to make, and tasty) is rare. That’s where roasted chickpeas come in. They’re plant-based, protein-packed, fiber-rich, and easy to customize. You can go from bold BBQ to zesty lemon-pepper in one batch.
Another major perk? They’re budget-friendly. A can of chickpeas costs under a dollar in most places. Compare that to fancy health snacks that cost an arm and a leg—roasted chickpeas save your wallet without compromising on taste.
Roasted chickpeas are also naturally gluten-free and vegan, making them a crowd-pleaser for almost any dietary lifestyle. They’re perfect for road trips, lunchboxes, or that post-gym munchie attack.
Health Benefits of Chickpeas
Chickpeas, also known as garbanzo beans, are a powerhouse of nutrition. They’re loaded with plant-based protein, making them ideal for vegetarians and vegans. One cup of cooked chickpeas contains roughly 15 grams of protein and 12 grams of fiber. That fiber helps with digestion and keeps you full longer—bye-bye, mindless munching!
They’re also rich in vitamins and minerals like:
- Folate
- Iron
- Phosphorus
- Magnesium
- Zinc
Regularly including chickpeas in your diet may help regulate blood sugar, support heart health, and even aid in weight management. So when you snack on roasted chickpeas, you’re not just curbing hunger—you’re fueling your body with essential nutrients.
Ingredients You’ll Need
Crafting the perfect batch of roasted chickpeas starts with selecting the right ingredients. The beauty of this recipe is its simplicity. You only need a handful of staples to make a basic version, and you can build out flavor from there.
Basic Ingredients
Here’s what you’ll need for a basic roasted chickpea recipe:
- 1 can (15 oz) chickpeas (garbanzo beans) – You can also use cooked dried chickpeas.
- 1–2 tablespoons olive oil – Helps crisp them up while adding healthy fats.
- ½ teaspoon salt – Enhances natural flavor.
- ¼ teaspoon black pepper – Adds a little depth.
You can stop here and still have a perfectly delicious snack. But let’s be honest, the fun part is in the customization.
Optional Seasonings and Flavor Variations
Want to level up your roasted chickpeas? Try some of these popular flavor add-ins:
Savory Options:
- Smoked paprika – For a smoky, BBQ-like flavor.
- Garlic powder – Adds a savory kick.
- Curry powder – A warm, complex twist.
- Cumin – Earthy and slightly nutty.
Spicy Options:
- Chili powder or cayenne pepper – For those who like it hot.
- Hot sauce drizzle post-roasting – Adds bold flavor without burning during the roast.
Sweet Options:
- Cinnamon and sugar – Great for a dessert-like snack.
- Maple syrup and sea salt – A perfect sweet-salty combo.
- Pumpkin pie spice – Seasonal twist that’s fall-perfect.
Mix and match flavors to discover your own signature roasted chickpeas. Don’t be afraid to experiment—chickpeas are forgiving and love bold seasoning.
Equipment You’ll Need
Roasted chickpeas don’t require a professional kitchen. Most of what you need is likely already in your home.
Must-Have Kitchen Tools
- Baking sheet – Go for a rimmed sheet to prevent spillover.
- Parchment paper or silicone baking mat – Prevents sticking and makes cleanup easier.
- Mixing bowl – For tossing the chickpeas with oil and seasonings.
- Strainer or colander – To rinse and drain canned chickpeas.
- Paper towels or a clean dish towel – For drying the chickpeas thoroughly.
Optional but Helpful Tools
- Salad spinner – A super effective way to dry chickpeas fast.
- Oven thermometer – Ensures you’re roasting at the correct temperature.
- Spice grinder or mortar and pestle – For blending your own unique spice mix.
- Air fryer – A faster alternative for roasting if you’re in a hurry.
These tools make the process smoother but aren’t essential. With just an oven, a pan, and a bit of time, anyone can make irresistible roasted chickpeas at home.
Prepping the Chickpeas
If you want roasted chickpeas that are actually crunchy (not mushy or chewy), the prep is just as important as the roasting. Chickpeas hold a lot of moisture, and too much water is the enemy of crunch.
Using Canned vs. Dried Chickpeas
- Canned chickpeas are the quickest route. Just drain, rinse, and dry thoroughly.
- Dried chickpeas require more time and planning but give you control over texture and sodium levels.
If you’re using canned, opt for a low-sodium version and rinse them well to remove excess salt and any preservatives.
How to Soak and Cook Dried Chickpeas
If you’re going the dried route, here’s a quick process:
- Soak 1 cup of dried chickpeas overnight in plenty of water.
- Drain and rinse, then transfer to a pot.
- Cover with fresh water and bring to a boil.
- Simmer for 60–90 minutes until tender but not mushy.
- Drain and let cool.
Once cooked, proceed as you would with canned—dry thoroughly before seasoning.
Draining and Drying for Perfect Roasting
This is the step that separates crunchy chickpeas from the soft and soggy ones:
- Drain chickpeas completely using a colander.
- Spread them out on a clean towel or paper towels.
- Pat gently and let air dry for 15–30 minutes.
- For even better results, remove the outer skins (optional but enhances crispiness).
Removing moisture = maximum crunch. Don’t skip this.
Step-by-Step Guide to Roasting Chickpeas
Now that your chickpeas are prepped, it’s time to roast them to perfection. The process is straightforward, but the key is attention to detail.
Step 1: Preheat Your Oven
Begin by preheating your oven to 400°F (200°C). A hot oven is key to achieving that irresistible crunch. While it heats, line a baking sheet with parchment paper for easy cleanup and to prevent the chickpeas from sticking.
Step 2: Toss Chickpeas with Oil and Seasonings
Drain and rinse a can of chickpeas thoroughly, then pat them completely dry with a kitchen towel. Transfer them to a bowl and drizzle with olive oil — just enough to coat lightly. Add salt, pepper, and your favorite spices like paprika, cumin, garlic powder, or chili flakes. Toss until evenly coated.
Step 3: Spread Evenly on a Baking Sheet
Spread the seasoned chickpeas out in a single layer on the prepared baking sheet. Make sure they’re not overlapping — space allows hot air to circulate, helping them roast evenly instead of steaming.
Step 4: Roast and Shake Every 10 Minutes
Place the tray in the oven and roast for 25–35 minutes, shaking the pan or stirring the chickpeas every 10 minutes. This prevents burning and ensures they brown evenly on all sides. Keep an eye on them near the end — they can turn from crispy to burnt quickly.
Step 5: Let Cool for Extra Crunch
Once golden and crisp, remove from the oven and let the chickpeas cool completely on the tray. They’ll continue to crisp up as they cool down. Store in an airtight container at room temperature for up to a week — if they last that long! Perfect as a snack, salad topper, or crunchy garnish.
Flavoring Ideas After Roasting
While pre-roast seasonings are common, adding flavors after baking opens up a whole new level of creativity. Why? Because some spices, sweeteners, or delicate herbs burn in the oven. Post-roast additions are how you keep things bold and fresh.
Sweet and Spicy Combos
- Cinnamon + Coconut Sugar: Toss roasted chickpeas with a bit of melted coconut oil, cinnamon, and a sprinkle of coconut sugar. Dessert snack goals.
- Honey Sriracha: Mix 1 tsp of honey with ½ tsp sriracha and drizzle lightly over warm chickpeas.
- Maple Chili: Combine maple syrup, cayenne, and a dash of sea salt for a flavor punch.
Savory and Herby Variations
- Garlic Parmesan: After roasting, add a dusting of garlic powder and freshly grated parmesan. Best when served warm!
- Lemon Herb: Squeeze lemon juice over roasted chickpeas and toss with chopped parsley or thyme.
- Ranch Seasoning: Use a homemade or store-bought ranch mix to coat the chickpeas after baking. Perfect for kids!
Global Flavors
- Za’atar Spice: This Middle Eastern blend adds earthy, tangy notes.
- Taco-Style: Think cumin, chili powder, and smoked paprika with lime zest post-roast.
- Indian-Inspired: Mix turmeric, garam masala, and a pinch of chili flakes for bold, aromatic flavor.
Flavoring after roasting lets you customize each batch, which means your chickpea game never has to get boring. Try making a “flavor flight” with three or four different seasoning combos from one batch!
Storage Tips for Maximum Crunch
So you’ve roasted the perfect batch of chickpeas—crunchy, golden, and flavorful. But how do you keep them from going soggy the next day? It’s all about how you store them.
Best Storage Containers
First things first: skip plastic containers or anything airtight right away. Yes, you read that right. While airtight containers are usually the go-to for preserving freshness, roasted chickpeas are a bit different. They need to breathe to maintain their crispiness.
Here’s what works best:
- Glass jars with loose-fitting lids (like mason jars)
- Brown paper bags
- Glass bowls with breathable lids or a towel cover
Avoid sealing them up too soon, especially if they’re still warm. Even a tiny bit of trapped heat = moisture = sogginess.
If you must use a plastic container, leave the lid slightly cracked or poke a few holes for airflow.
How Long Do Roasted Chickpeas Last?
When stored properly:
- At room temperature: Stays crunchy for 3–5 days
- In the fridge: Lasts up to 1 week, but loses some crunch
- In the freezer: Not recommended—chickpeas absorb moisture when defrosted and turn mushy
To refresh chickpeas that have gone soft, just pop them back in a 350°F (175°C) oven for 5–10 minutes to restore the crunch.
Pro tip: Only roast as much as you’ll eat in a few days. Smaller batches = fresher, crunchier results.
Common Mistakes to Avoid
Even though roasted chickpeas are easy to make, a few small mistakes can completely ruin the texture or flavor. Let’s break down the most common pitfalls and how to avoid them.
Overcrowding the Pan
Probably the most frequent issue—and it’s an easy fix. Chickpeas need space to roast. If they’re packed too tightly, they’ll steam each other and come out mushy. You’ll end up with half-roasted, half-soggy chickpeas, which nobody wants.
Fix: Use a large baking sheet and keep them in a single layer. If you’re doubling the recipe, use two trays.
Not Drying Chickpeas Properly
If your chickpeas still have moisture, you can forget about getting them crispy. Wet chickpeas steam in the oven instead of roasting.
Fix: After rinsing, pat them completely dry with a towel. Let them air-dry for at least 15–30 minutes or even longer. Removing skins can help reduce moisture and increase crispiness too.
Using Too Much Oil
Yes, oil is important, but too much oil = greasy and soft chickpeas. A little goes a long way.
Fix: Use just enough to coat them lightly. 1 to 2 tablespoons for a standard can of chickpeas is plenty.
Bonus tips:
- Don’t skip stirring every 10 minutes. Uneven roasting leads to half-burnt chickpeas.
- Let them cool on the tray. Taking them off too early can trap steam and ruin the crunch.
Follow these tips, and you’ll nail the crispy texture every time.
Nutritional Breakdown of Roasted Chickpeas
One of the best things about roasted chickpeas? They’re not just delicious—they’re genuinely good for you. Let’s look at what makes them such a powerhouse snack.
Macronutrient Profile (Per 1/2 Cup Serving):
| Nutrient | Amount |
|---|---|
| Calories | ~130 |
| Protein | 6–7 grams |
| Carbohydrates | 18–20 grams |
| Fiber | 6 grams |
| Fat | 4 grams |
Low in sugar, high in fiber, and packed with plant-based protein—roasted chickpeas are a great alternative to processed chips or crackers.
Calories Per Serving
Depending on your oil and seasoning choices, roasted chickpeas generally contain around 120–160 calories per half-cup serving. That’s a satisfying snack that fuels you without empty calories.
If you’re calorie-conscious, reduce oil slightly and skip sugar-based toppings. If you’re on a bulk-up plan, enjoy them with generous olive oil or nut-based coatings for more healthy fats.
Comparison to Other Snacks
Let’s compare:
- Potato Chips (1 oz): 150 calories, 10g fat, 1g fiber, 2g protein
- Roasted Chickpeas (1 oz): 130–140 calories, 4g fat, 6g fiber, 6–7g protein
Clearly, roasted chickpeas offer more nutritional bang for your bite. You get double the fiber and triple the protein of regular chips for similar calories—plus they’re gluten-free and plant-based.
Serving Suggestions
Roasted chickpeas are crazy versatile. They’re not just a snack—you can add them to all kinds of meals and even desserts (yes, really). Here’s how to get the most out of your batch:
As a Snack
The obvious one. Keep a jar on your kitchen counter or desk and grab a handful when hunger strikes. They’re great pre- or post-workout thanks to their protein and fiber combo.
Want to take them on the go? Pack them in:
- Reusable snack bags
- Mason jars
- Bento boxes
Perfect for road trips, hikes, or just running errands.
As a Salad Topper
Want to upgrade your salad game? Forget croutons—roasted chickpeas add crunch, flavor, and protein.
Toss them on:
- Caesar salads
- Greek salads
- Kale and quinoa bowls
- Mediterranean chickpea bowls (chickpea-on-chickpea magic)
They add texture and make even a simple bowl of greens feel satisfying.
In Lunchboxes or Meal Prep
Add a small bag or container of roasted chickpeas to:
- School lunches (kids love the crunch!)
- Office meal prep boxes
- Gym bags for post-workout snacks
They hold up well and don’t require refrigeration—great for meal preppers and busy families.
Bonus: Use flavored versions to theme your meals. BBQ chickpeas with a southern-style wrap? Yes, please.
Roasted Chickpeas for Special Diets
One of the biggest advantages of roasted chickpeas is how easily they fit into a wide range of special diets. Whether you’re vegan, gluten-free, or following a low-FODMAP plan, roasted chickpeas have you covered.
Vegan and Gluten-Free Friendly
Chickpeas are naturally vegan and gluten-free, which makes this snack accessible to most people. Just make sure to:
- Use certified gluten-free seasonings (some spice blends may contain hidden gluten)
- Stick to plant-based flavorings like nutritional yeast, olive oil, and herbs
Need a dairy-free cheesy flavor? Use nutritional yeast with garlic powder and smoked paprika for a cheesy umami kick without the dairy.
High-Protein Snack Option
Looking for a post-workout snack that’s not a protein bar full of additives? Roasted chickpeas are a great alternative. With 6–7 grams of protein per half cup, they help with muscle repair and keep you feeling full.
You can also boost their protein content by pairing them with:
- Nuts (almonds or cashews)
- Edamame
- Plant-based yogurt dips
They make a great protein-packed component for vegan meal prep or fitness-focused diets.
Low-FODMAP Tips
While chickpeas do contain FODMAPs, small amounts (like ¼ cup per serving) may be tolerated in low-FODMAP diets. Just avoid over-snacking and keep your portion in check.
Opt for dry-roasted versions with simple seasoning to avoid high-FODMAP ingredients like onion or garlic powder.
FAQs about Roasted Chickpea Recipe
1. Can I use other legumes instead of chickpeas for roasting?
Yes! Lentils, black beans, and edamame can also be roasted, but they require different cooking times and techniques. Chickpeas tend to hold up best in texture.
2. Are roasted chickpeas good for weight loss?
They can be. Thanks to their high fiber and protein content, they keep you full longer and help reduce overeating. Just watch portion sizes and avoid sugar-heavy coatings.
3. What flavors go best with sweet roasted chickpeas?
Try cinnamon + honey, maple + sea salt, or coconut sugar + cardamom. Pair with dark chocolate chips or dried fruit for a fun trail mix.
4. Can I use an air fryer for every roasted chickpea recipe?
Yes, just reduce the cooking time by half and monitor closely. The air fryer is perfect for smaller batches and delivers excellent crispiness.
5. Why do some roasted chickpeas pop in the oven?
It’s due to internal steam building up. Make sure chickpeas are fully dried before roasting, and roast at a consistent temperature to reduce popping.
Conclusion
Roasted chickpeas are the ultimate DIY snack—cheap, easy, and endlessly customizable. They check every box: crunchy, flavorful, healthy, and suitable for nearly every diet. Whether you’re making them for game night, road trips, or weekly meal prep, these little legumes deliver big-time.
Once you’ve mastered the basics, the possibilities are endless. Play around with spices, try different roasting methods (oven vs. air fryer), and most importantly—have fun with it. No more boring snack routines or relying on processed junk food.
Make a big batch today and see for yourself just how addictive healthy snacking can be.