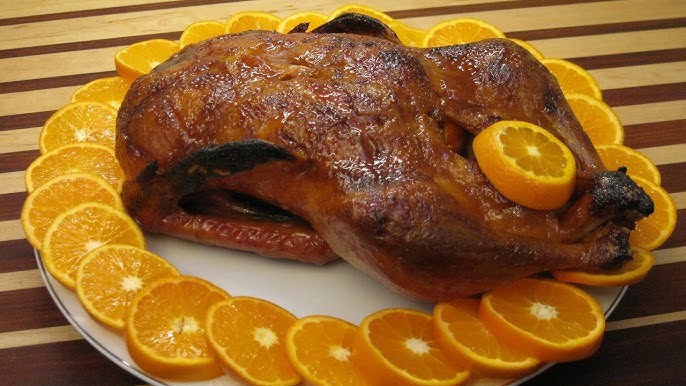
Roast Duck Recipe: Nothing beats the sight and smell of a perfectly roasted duck coming out of the oven. Golden, crispy skin, tender juicy meat, and a burst of savory, aromatic flavor make this dish a standout.
Whether you’re planning a festive holiday meal or just want to impress someone with your cooking chops, mastering a roast duck recipe is easier than you think.
This detailed guide walks you through everything you need—from choosing the duck to carving and serving it like a pro.
Let’s jump into the crispy, mouthwatering world of roast duck!
Why Roast Duck is a Showstopper Dish
Roast duck isn’t just food—it’s an experience. It stands out from the usual chicken or turkey because of its rich, bold flavor and the luxurious feel it brings to the table. The skin crisps up into a golden, crackly shell while the meat stays tender, fatty, and full of flavor. For many, it’s a celebratory dish, perfect for holidays, family gatherings, or romantic dinners.
But it’s not just about appearance or taste. Roast duck feels indulgent because it requires a bit more care and time than a basic roast chicken. That extra effort is what transforms it into a gourmet centerpiece. It also pairs incredibly well with all kinds of sides—from roasted vegetables to wild rice or fruity sauces like cherry, orange, or plum.
Duck may sound intimidating, but trust us—once you learn how to roast one, you’ll wonder why you waited so long.
Nutritional Value and Benefits
Duck is surprisingly nutritious, especially if you’re mindful about how it’s cooked. It contains a good amount of protein, iron, and essential B vitamins such as B6 and B12. While it’s higher in fat compared to chicken or turkey, much of this fat renders out during roasting, especially if you’re crisping the skin properly.
Here’s a breakdown of what you’re getting with duck meat:
- Protein: Helps in muscle repair and growth
- Iron: Supports healthy blood and oxygen flow
- Zinc and Selenium: Boost immune function and metabolism
- B Vitamins: Aid in energy production and brain health
Even the duck fat has its perks. It’s often considered a healthier fat because it’s rich in monounsaturated fats, similar to olive oil. You can save and reuse it for sautéing vegetables or frying potatoes for an added gourmet touch.
Ingredients You’ll Need
Duck and Basic Seasonings
You don’t need an overly complicated list to make roast duck shine. The star of the show is, of course, the duck itself. Look for a fresh or frozen whole duck, around 5-6 pounds. If you go the frozen route, make sure you give it enough time to thaw completely in the fridge—this can take 2-3 days.
Here’s your base ingredient list:
- 1 whole duck (5 to 6 lbs)
- Salt (Kosher or sea salt preferred)
- Freshly ground black pepper
- Garlic cloves (optional, but recommended)
- 1 onion (quartered)
- 1 lemon or orange (halved)
- Fresh thyme or rosemary (for stuffing or garnish)
That’s it! With these simple ingredients, you can create an aromatic and flavorful roast that doesn’t rely on artificial seasonings or shortcuts.
Optional Herbs and Flavor Additions
Want to elevate your duck to a whole new level? Here are some extras you can add for a deeper flavor:
- Five-Spice Powder: For a Chinese twist, rub this into the duck skin before roasting.
- Citrus Zest: Adds brightness and cuts through the richness.
- Honey or Maple Syrup Glaze: Gives the skin a gorgeous caramelized finish.
- Ginger and Soy Sauce: For a more umami-packed flavor, perfect for an Asian-inspired roast.
- Apples or Figs (for stuffing): Add a sweet, earthy note that pairs beautifully with the savory duck meat.
Mix and match according to your taste preferences or the occasion. These ingredients don’t just taste good—they fill your kitchen with a mouthwatering aroma as the duck roasts.
Prepping the Duck for Roasting
Cleaning and Drying the Duck
Before anything else, you need to prepare your duck properly. Start by removing any giblets from the cavity. These are usually packed inside and can be saved for making stock or gravy.
Rinse the duck under cold running water, both inside and out, then pat it completely dry with paper towels. The drier the duck skin, the crispier it will get in the oven. This drying step is non-negotiable—moist skin will just steam, not roast.
Some people even let the duck air-dry in the fridge overnight, uncovered. This extra step helps dry out the skin even more, giving you that signature crispy crust.
Pricking the Skin for Crispy Results
Duck skin is rich in fat, and while that’s part of what makes it delicious, it needs to be rendered out properly. Use a sharp knife or skewer to gently prick the skin all over—especially on the breasts and thighs—without piercing the meat underneath. This allows the fat to escape during roasting, ensuring your duck doesn’t end up greasy.
Pricking the skin helps in three major ways:
- Fat drains out: Keeps the meat from being overly fatty.
- Skin gets crispy: More exposure to heat and air.
- Flavors absorb better: Seasonings penetrate the duck more easily.
Seasoning Inside and Out
Now that your duck is clean and prepped, it’s time to season. Start by generously rubbing salt and pepper all over the duck, including the inside cavity. Don’t be shy—the salt helps to crisp the skin and boost flavor.
You can also stuff the cavity with aromatics like garlic cloves, a halved lemon or orange, onion quarters, and a few sprigs of thyme or rosemary. These will infuse the duck from the inside out, creating layers of flavor that permeate the meat.
Massage a little extra salt around the legs and wings where the skin is thickest. If you’re adding any dry rubs like five-spice or a citrus zest mix, now’s the time to do it.
The Roasting Process – Step by Step
Setting the Oven Temperature
Roasting a duck is a bit different from roasting chicken or turkey. You’ll need to approach it with care to ensure crispy skin and juicy meat. Preheat your oven to 300°F (150°C). This lower temperature helps slowly render the fat from the duck, allowing the skin to crisp up without drying out the meat.
You’ll also want to prepare a roasting pan with a rack. The rack lifts the duck so the rendered fat can drip below, keeping the bird from sitting in its own grease. If you don’t have a rack, crumple up some aluminum foil into a coil or place thick onion slices beneath the duck.
Place the duck breast-side up on the rack and put it in the center of the oven. Be sure to place a drip tray underneath—duck releases a lot of fat during cooking.
Roasting Timeline and Turning the Duck
The trick to the perfect roast duck is slow roasting followed by high-heat crisping. Here’s a simple timeline:
- Roast at 300°F (150°C) for 1 hour – This begins the fat rendering.
- Flip the duck over (breast-side down) and roast for another 1 hour – This keeps juices flowing into the breasts and evens out the cooking.
- Flip again (breast-side up) and increase oven temperature to 425°F (220°C). Roast for 30 to 45 minutes more until the skin is golden and crackly.
Turning the duck might sound fussy, but it helps distribute the juices and fat, keeping the breast meat from drying out. Use tongs or two wooden spoons—whatever gives you a solid grip without tearing the skin.
You’ll know it’s ready when a meat thermometer inserted into the thickest part of the thigh reads 165°F (74°C) and juices run clear.
Basting for Moisture and Flavor
Though duck is naturally fatty and doesn’t dry out easily, basting helps with even browning and adds flavor. During the last high-heat roast, use a spoon or turkey baster to ladle rendered fat over the duck every 10–15 minutes.
You can also get creative here:
- Add a tablespoon of honey or orange marmalade to the fat for a glossy, sweet glaze.
- Mix in a splash of soy sauce and ginger for an Asian-style finish.
- For a savory edge, try basting with a mix of duck fat and garlic butter.
Just don’t overdo it. Basting is all about enhancing flavor—not soaking the bird.
Creating a Rich Duck Sauce
Making a Simple Pan Sauce
The drippings in your roasting pan are culinary gold. Once the duck is done and resting, it’s time to turn those savory drippings into a beautiful sauce.
Here’s a basic method:
- Pour off most of the duck fat (save it for other recipes!).
- Place the roasting pan on the stove over medium heat.
- Add 1/2 cup of chicken or vegetable broth and a splash of white wine or vinegar to deglaze.
- Scrape up all the browned bits (called fond) from the bottom with a wooden spoon.
- Let it simmer and reduce by half.
- Finish with a knob of butter, a pinch of salt, and a touch of black pepper.
Strain if you want a smooth sauce, or keep it rustic with bits of garlic and onion.
Enhancing with Wine or Citrus
If you’re feeling a little fancy (and you should be—it’s roast duck!), elevate your sauce with bold flavors:
- Red Wine Sauce: Add 1/2 cup red wine instead of broth and reduce. Finish with butter and a sprig of thyme.
- Orange Glaze: Add fresh-squeezed orange juice, zest, and a spoon of honey. Let it simmer until syrupy.
- Balsamic Fig Reduction: Combine balsamic vinegar with chopped dried figs, simmer until thickened, then strain.
These sauces don’t just taste amazing—they bring a gourmet touch to your plate, balancing out the rich duck meat with acidity or sweetness.
Resting and Carving the Duck
Why Resting Is Essential
After all that roasting and basting, your duck needs a break—literally. Resting allows the juices to redistribute evenly throughout the meat. If you carve too soon, all those flavorful juices will spill out onto the cutting board instead of staying in the meat.
Place the roasted duck on a cutting board and tent it loosely with aluminum foil. Let it rest for at least 15 to 20 minutes. This short wait time makes all the difference between dry and juicy meat.
While it’s resting, use the time to prepare side dishes, pour wine, or finish off that rich sauce.
How to Carve a Whole Duck
Carving a duck can feel intimidating at first, but it’s similar to carving a chicken. Here’s a step-by-step breakdown:
- Remove the legs – Cut through the skin between the thigh and the body, then press the leg outward until the joint pops. Slice through the joint to separate.
- Slice off the breasts – Run your knife down one side of the breastbone, following the ribcage to lift the meat off the bone in one piece. Repeat on the other side.
- Cut wings off at the joint – Easy enough with a sharp knife or kitchen shears.
- Slice the breasts – For easy serving, cut the breast meat into thick slices.
- Serve with sauce – Drizzle your pan sauce over the top or serve it on the side.
Use a sharp chef’s knife or carving knife, and go slowly. The duck’s skin is thicker than chicken’s, so a good, clean cut is crucial for beautiful presentation.
Serving Suggestions and Side Dishes
Best Pairings for Roast Duck
Roast duck is rich and bold, so it shines with sides that balance those deep flavors. You want contrasts—think sweet, sour, and crunchy textures to cut through the richness. Here are some perfect pairings:
- Roasted root vegetables like carrots, parsnips, and sweet potatoes
- Sautéed greens such as kale or Swiss chard with garlic
- Fruity sauces like cherry, orange, or cranberry
- Wild rice or farro with herbs
- Mashed potatoes with a hint of horseradish
- Red cabbage slaw or a tangy apple salad
For a more elevated meal, consider pairing your duck with a glass of Pinot Noir or Zinfandel. These wines complement duck beautifully with their fruity and earthy notes.
How to Reheat and Store Leftovers
If you’re lucky enough to have leftovers, roast duck makes for fantastic next-day meals. But storing and reheating it properly ensures you don’t lose that signature flavor or crisp skin.
Storing:
- Cool the duck completely before refrigerating.
- Store in an airtight container or wrap tightly with foil.
- Keeps well for 3 to 4 days in the fridge.
Reheating:
- Preheat oven to 350°F (175°C).
- Place duck pieces on a baking sheet, skin side up.
- Cover loosely with foil and heat for 15 to 20 minutes.
- For crispy skin, remove foil for the last 5 minutes or broil briefly.
You can also repurpose duck meat in salads, wraps, or stir-fries. The rendered fat is excellent for frying eggs or roasting potatoes.
Duck Fat: How to Use the Leftovers
Why Duck Fat Is Liquid Gold
Don’t throw out that rendered duck fat! It’s one of the tastiest cooking fats you’ll ever use. It has a high smoke point and adds a luxurious, savory flavor to anything it touches. Best of all, it stores beautifully and has many uses.
Storage Tips:
- Strain the fat through cheesecloth or a fine sieve.
- Pour into a clean jar or container.
- Store in the fridge for up to 3 months or freeze for longer shelf life.
Delicious Ways to Use Duck Fat
Here’s where the fun really begins. Duck fat turns everyday dishes into something special:
- Duck Fat Potatoes: Toss parboiled potatoes in duck fat and roast until crispy.
- Fried Eggs: Fry eggs in duck fat for a rich, golden edge.
- Popcorn: Use duck fat in place of oil for gourmet movie night popcorn.
- Vegetables: Sauté carrots, Brussels sprouts, or green beans in duck fat.
- Pastry: Use chilled duck fat for flaky pie crusts or savory biscuits.
Duck fat’s rich flavor is similar to bacon grease but smoother and more refined. Keep it handy—you’ll want to use it again and again.
FAQs about Roast Duck Recipe
1. What is the best temperature to roast a duck?
For crispy skin and juicy meat, roast duck at 190°C (375°F). You may start at a higher temperature (220°C/425°F) for 20 minutes to crisp the skin, then reduce for the remainder of the cook time.
2. How long should I roast a whole duck?
A standard 2.5 kg (5.5 lb) duck takes about 2 to 2.5 hours at 190°C (375°F). Always check that the internal temperature reaches 74°C (165°F) in the thickest part of the duck.
3. Do I need to marinate the duck?
While not necessary, marinating the duck overnight with herbs, citrus, or Asian-style sauces enhances flavor and tenderness.
4. How do I get crispy duck skin?
Prick the duck skin (not the meat), render out fat by boiling or roasting at high heat first, and keep the skin dry before roasting.
5. What should I serve with roast duck?
Roast duck pairs well with roasted potatoes, red cabbage, orange glaze, or Asian plum sauce.
6. Can I use frozen duck?
Yes, but ensure it’s completely thawed in the refrigerator (usually takes 1–2 days) before roasting.
7. What do I do with the duck fat?
Duck fat is excellent for cooking—use it for roast potatoes, vegetables, or even to fry eggs for extra flavor.
Conclusion
Roasting a duck may seem like a high-stakes culinary challenge, but as you’ve seen, it’s totally manageable—and incredibly rewarding. With its crispy skin, juicy meat, and bold flavors, roast duck is more than just a meal; it’s a statement. Whether you’re hosting a holiday feast, planning a romantic dinner, or simply experimenting in the kitchen, mastering this recipe opens the door to unforgettable dining experiences.
Take your time with each step, savor the aroma as it fills your kitchen, and most importantly, enjoy the process. From prepping and seasoning to roasting and carving, every stage brings its own satisfaction. And don’t forget the golden duck fat—it’s a delicious bonus that keeps on giving.
Roast duck isn’t just food; it’s an event. Once you’ve done it, you’ll never look at poultry the same way again. So go ahead, grab that duck and let the magic begin.

