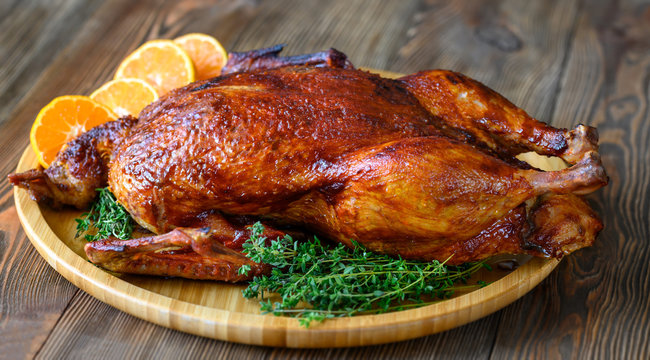
Roast Duck Recipe: Roast duck isn’t just another dish on the menu—it’s an experience. Rich, succulent, and dripping with flavor, duck offers a distinct alternative to your everyday chicken or turkey. Its dark meat is naturally juicier and more flavorful, and when roasted correctly, the skin becomes a golden, crispy crown that adds texture and taste. This luxurious poultry has roots in both Eastern and Western cuisines, from French Canard à l’Orange to Chinese Peking duck. No matter the culinary tradition, roast duck has always symbolized indulgence and celebration.
Unlike leaner birds, duck contains a layer of fat beneath the skin, which, when rendered properly, creates an incredibly moist and tender meat. The best part? This rendered fat, also known as duck fat, is liquid gold in the kitchen—perfect for roasting vegetables or making ultra-crispy potatoes. So when you roast a duck, you’re not just making a meal; you’re creating culinary magic.
Common Occasions for Serving Roast Duck
Roast duck is a showstopper, making it a popular centerpiece for special occasions. It’s often served during holidays like Christmas, Thanksgiving, and New Year’s Eve, particularly in Europe and Asia. Many families treat it as a once-a-year delicacy, while others prepare it as a part of traditional celebrations like Chinese New Year, where it’s believed to bring prosperity and joy.
Whether you’re hosting an intimate dinner party or looking to impress guests during the holidays, roast duck is the perfect dish. Its deep flavor profile pairs wonderfully with seasonal ingredients like apples, oranges, cranberries, or red cabbage, making it a flexible yet gourmet option. Even better, its richness means you won’t need massive portions to satisfy your guests—just a well-roasted bird and the right sides.
Ingredients Needed for Roast Duck
Primary Ingredients
The key to an amazing roast duck starts with quality ingredients. Here’s what you’ll need for the base recipe:
- 1 whole duck (about 5-6 lbs)
- Salt (kosher or sea salt is best)
- Black pepper
- 1 orange (quartered)
- 1 apple (quartered)
- Fresh herbs (thyme, rosemary, or sage)
- 4 cloves garlic (smashed)
- 1 onion (quartered)
Choosing a fresh, organic duck can make a noticeable difference in flavor. If you’re shopping frozen, ensure the duck is fully thawed before starting the prep process.
Optional Ingredients for Extra Flavor
For those who want to take the flavor up a notch, consider these additions:
- Soy sauce or hoisin sauce for an Asian twist
- Honey or maple syrup for a touch of sweetness
- Five-spice powder or Chinese seasoning blend
- Lemon zest for brightness
- A splash of white wine or orange juice in the roasting pan
These optional ingredients allow you to experiment and add your own signature to the dish. Whether you’re going for a sweet glaze or a herby crust, flavor customization is part of what makes this dish so special.
Step-by-Step Preparation of Roast Duck
Step 1 – Cleaning and Prepping the Duck
Start by removing the duck from its packaging. Check inside the cavity for giblets or excess fat. You can save the giblets for gravy or discard them if you prefer. Rinse the duck under cold water and pat it dry with paper towels—this step is crucial for crispy skin.
Next, trim any excess skin or fat around the neck and cavity. You don’t want too much fat pooling during roasting. Score the skin lightly with a sharp knife in a crisscross pattern, being careful not to cut into the meat. This helps render the fat beneath the skin and promotes even browning.
Let the duck air-dry in the fridge (uncovered) for a few hours or overnight. This drying process helps the skin crisp up beautifully when it hits the oven heat.
Step 2 – Seasoning and Marinating the Duck
Now it’s time to bring flavor into the mix. Start by rubbing the entire duck—inside and out—with a generous amount of salt and pepper. For an aromatic infusion, stuff the cavity with quartered orange, apple, garlic cloves, onion, and fresh herbs.
If you’re going for a marinade, mix your chosen flavoring (like soy sauce, honey, and garlic) in a bowl and brush it over the duck. Allow it to marinate in the fridge for at least an hour or overnight for deeper flavor. Remember, even a simple salt rub can yield extraordinary results when paired with the right roasting technique.
Step 3 – Trussing the Duck for Even Cooking
Trussing might sound fancy, but it’s simple and worth it. Using kitchen twine, tie the legs together tightly and tuck the wings under the body. This ensures the bird cooks evenly and maintains a neat, compact shape.
Trussing helps retain moisture and prevents the wings and legs from drying out before the rest of the bird is done. It’s a small step that makes a big difference, especially when presentation matters.
Step 4 – Roasting the Duck (Time, Temperature & Tips)
Now that your duck is seasoned and trussed, it’s time to get roasting. Preheat your oven to 350°F (175°C). Place the duck on a rack in a roasting pan, breast-side up. Using a rack is important—it allows the rendered fat to drip away from the duck, resulting in crispier skin and less sogginess.
For a 5 to 6-pound duck, you’ll want to roast it for about 2 to 2.5 hours. A general rule of thumb is 20 minutes per pound. About halfway through the cook, you’ll notice fat starting to collect in the pan. Carefully ladle it out or use a baster—this is your liquid gold. Save it for future recipes like duck-fat potatoes or as a base for gravies.
Pro tip: For super crispy skin, increase the oven temperature to 425°F (220°C) during the last 15-20 minutes of roasting. This final blast of heat crisps up the skin beautifully without drying out the meat.
Also, don’t forget to rotate the pan halfway through cooking for even browning, especially if your oven has hot spots. And remember—every oven is different, so use a meat thermometer. The duck is perfectly cooked when the thickest part of the thigh reaches 165°F (74°C).
Step 5 – Basting and Flipping the Duck
Basting the duck is optional but highly recommended if you’re aiming for next-level flavor and color. Every 30 to 45 minutes, spoon or brush the rendered fat and juices over the duck. This not only adds shine but helps develop that mouthwatering golden-brown skin.
About 1 hour into the roasting time, flip the duck carefully to cook breast-side down. This helps the fat from the back render more thoroughly and keeps the breast meat juicy. Roast it in this position for another 45 minutes, then flip it back breast-side up for the final crisping stage.
Some people even prick the skin (especially around the fattier areas like the thighs and back) with a toothpick or skewer to help more fat escape. Just make sure you don’t pierce the meat underneath.
The transformation during roasting is almost theatrical—the skin slowly darkens and crisps while the scent of roasted garlic, citrus, and duck fat fills the kitchen. It’s the kind of aroma that’ll have everyone lining up before it even hits the table.
Step 6 – Final Browning and Crisping the Skin
This is the home stretch. When your duck reaches the right internal temperature, and the juices run clear, crank up the heat or turn on the broiler for the last few minutes. Keep a close eye on it—this is not the time to multitask. You want deep golden-brown skin, not blackened bitterness.
If you’ve glazed the duck with honey, soy sauce, or another sugary marinade, the skin will caramelize beautifully. Just monitor it every minute to avoid burning. Once browned, remove the duck from the oven and let it rest for at least 15–20 minutes. This step is crucial for allowing the juices to redistribute, giving you that juicy, tender meat when you carve into it.
Place it on a wooden cutting board, tent it loosely with foil, and resist the temptation to cut too soon. The result? A duck that’s crisp on the outside, juicy on the inside, and packed with flavor.
Serving Suggestions and Pairings
Ideal Side Dishes
You’ve just roasted the perfect duck—now what do you serve it with? The richness of duck pairs wonderfully with ingredients that cut through the fat or complement its deep flavors. Here are some winning side dish ideas:
- Roasted or mashed potatoes – especially when cooked in the reserved duck fat
- Braised red cabbage – slightly tangy and sweet, balances the richness
- Wild rice or mushroom pilaf – earthy flavors that enhance the duck
- Roasted root vegetables – carrots, parsnips, and beets all roast beautifully
- Fruit compotes or sauces – like cherry, plum, or orange glaze
Want to go gourmet? Try a citrus salad with arugula and fennel, or sautéed green beans with almonds for a crunchy contrast. The idea is to balance the savory depth of the duck with brightness, acidity, or freshness.
Wine and Beverage Pairings
Duck is bold and flavorful, so it needs an equally expressive drink. Here are a few pairing recommendations that will elevate your meal:
- Red wines – Pinot Noir, Merlot, or Zinfandel. Their fruity notes and acidity complement the duck’s richness.
- White wines – A full-bodied Chardonnay or Gewürztraminer works well, especially with fruity sauces.
- Beer – Belgian ales or dark lagers can hold their own next to duck.
- Non-alcoholic – Try sparkling apple cider, pomegranate juice, or a citrus-infused iced tea.
The right pairing can enhance the flavors in every bite and make your roast duck dinner unforgettable.
FAQs about Roast Duck Recipe
What is the best temperature to roast a duck?
The ideal roasting temperature for duck is 350 degrees Fahrenheit (about 175 degrees Celsius). This moderate heat allows the fat to render slowly, ensuring the skin gets crispy without burning.
How long does it take to roast a duck?
A typical duck weighing around 5 to 6 pounds (approximately 2 to 2.7 kilograms) should roast for about 2 to 3 hours. Always check that the internal temperature at the thickest part of the thigh reaches 165 degrees Fahrenheit (74 degrees Celsius).
Should I baste the duck while roasting?
Basting a duck can help achieve a golden, crispy skin. Every 30 minutes, spoon the collected fat and juices from the bottom of the pan over the duck. However, don’t overdo it as opening the oven frequently can lead to heat loss and longer cooking times.
What seasonings go well with roast duck?
Roast duck pairs wonderfully with aromatic spices and herbs. Common choices include rosemary, thyme, and sage. For a touch of sweetness, consider adding orange zest or a hint of cinnamon.
How do I ensure the duck skin gets crispy?
To ensure crispy skin, score the skin lightly with a sharp knife, being careful not to cut into the meat. Rub salt into the skin, which helps draw out moisture. Roasting at the right temperature and allowing the duck to rest before carving also helps achieve a crispy skin.
Can roast duck be made ahead of time?
Yes, you can roast a duck ahead of time and reheat it. To maintain the texture, reheat it uncovered in a hot oven for about 15-20 minutes. This method helps keep the skin crispy and the meat warm without drying it out.
What should I do with leftover duck fat?
Don’t discard the rendered duck fat! It’s a flavorful fat that can be used for roasting vegetables, making confit, or even frying potatoes. Store it in the refrigerator for up to a month or freeze it for longer storage.
Conclusion
Roasting a duck might sound intimidating, but it’s surprisingly manageable—and incredibly rewarding. With a little prep, the right seasoning, and a bit of patience, you can create a restaurant-quality meal right in your own kitchen.
A few final tips:
- Don’t skip the resting time after roasting. It makes all the difference.
- Save the duck fat—you’ll thank yourself later.
- Experiment with flavors—glazes, marinades, and spices are your friends.
- Use a thermometer to avoid over- or undercooking.
Whether you’re preparing a holiday feast or just want to try something new and indulgent, this step-by-step roast duck recipe will make you feel like a culinary rockstar. From its crispy skin to its juicy meat and that luxurious duck fat, there’s just no beating a well-roasted duck.