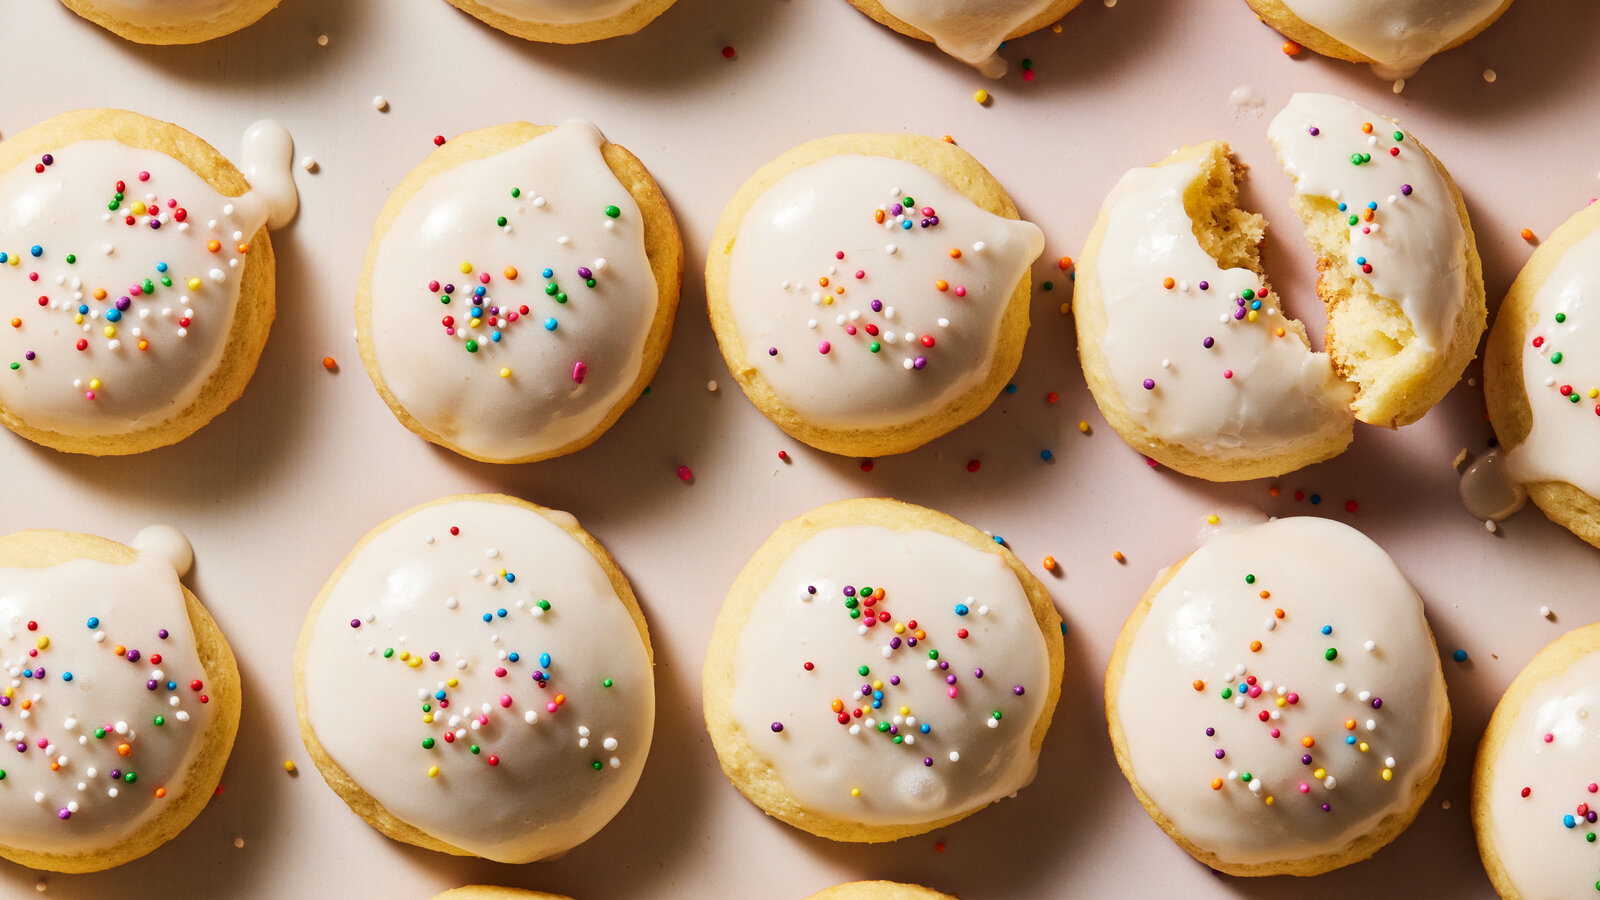
Ricotta Cookie Recipe: Have you ever taken a bite of a cookie that was so tender and moist it practically melted in your mouth? That, my friend, is the magic of ricotta cookies. These soft, cake-like delights are an Italian classic that’s been passed down through generations. While chocolate chip and sugar cookies usually steal the spotlight, ricotta cookies offer a refreshing twist that combines creamy richness with light citrusy notes. Think of them as the cookie world’s best-kept secret—until now.
What makes these cookies stand out is their unique texture. Thanks to the creamy ricotta cheese in the dough, they come out incredibly soft, fluffy, and rich. And don’t worry—if you’re not a fan of cheese, you won’t even taste it. The ricotta is subtle and simply acts as a magic ingredient that adds moisture and lightness to every bite.
Perfect for holidays, family gatherings, or just a cozy night at home, these cookies are as easy to make as they are delicious. This guide will walk you through every single step—from the ingredients you need to baking and glazing—to help you create the ultimate batch of homemade ricotta cookies.
Ingredients You’ll Need
Before we dive into the baking process, let’s get our ingredients lined up. It’s always a good idea to measure and prep everything ahead of time so the process goes smoothly. Here’s a full list of what you’ll need:
For the Cookie Dough:
- 2 cups (250g) all-purpose flour – This is the base of your dough. Make sure to spoon and level it to avoid dense cookies.
- 1 teaspoon baking powder – Helps the cookies puff up just enough to be soft and airy.
- 1/2 teaspoon salt – Balances out the sweetness.
- 1 cup (200g) granulated sugar – Sweetens the cookies without overpowering the other flavors.
- 1/2 cup (113g) unsalted butter, softened – Adds richness and structure.
- 1 cup (240g) whole-milk ricotta cheese – The star ingredient that makes these cookies so moist and tender.
- 1 large egg – Helps bind everything together and adds richness.
- 1 teaspoon pure vanilla extract – Enhances all the other flavors.
- 1 tablespoon lemon zest (or orange zest) – Optional, but adds a bright, citrusy flavor that pairs perfectly with ricotta.
Ingredient Tips:
- Ricotta Cheese: Always use whole milk ricotta for the best texture. Part-skim will work, but it won’t give the same creamy mouthfeel.
- Butter: Make sure it’s room temperature so it blends easily with the sugar.
- Citrus Zest: Fresh zest makes a world of difference. Don’t skip it if you love that little zing.
For the Glaze (Optional, but Recommended):
- 1 cup (120g) powdered sugar
- 2-3 tablespoons milk or lemon juice
- 1/2 teaspoon vanilla extract (optional)
The glaze adds a beautiful sheen and a hint of extra sweetness. You can get creative here—add lemon juice for a tangy glaze, or swap in almond extract for a nutty twist.
Tools and Equipment
You don’t need a professional kitchen setup to make ricotta cookies, but having the right tools can make the process easier and more enjoyable.
Must-Have Tools:
- Mixing Bowls: One large for the wet ingredients, and one medium for dry.
- Electric Mixer or Stand Mixer: Makes creaming the butter and sugar a breeze.
- Rubber Spatula: For scraping down the sides and folding in ingredients.
- Measuring Cups and Spoons: Precision matters!
- Baking Sheet(s): Use light-colored sheets for even baking.
- Parchment Paper or Silicone Baking Mat: Prevents sticking and promotes even baking.
- Cookie Scoop (Optional): Ensures uniform size and even baking.
Alternatives:
- Don’t have a stand mixer? A hand mixer or even a whisk and strong arm will work.
- No cookie scoop? Use a tablespoon or your hands to shape the dough into rounded balls.
How to Prepare Ricotta for Baking
A key step that many people overlook is how you prep your ricotta. The cheese itself contains quite a bit of moisture, and too much of it can make your dough runny or cause the cookies to spread too much.
Draining Ricotta:
If your ricotta looks watery or loose, you’ll want to drain it first:
- Line a fine mesh strainer with cheesecloth or paper towels.
- Spoon in the ricotta and let it sit over a bowl for 30 minutes to an hour.
- Gently press to release extra moisture.
Store-Bought vs. Homemade:
- Store-Bought Ricotta: Convenient, but often watery. Always drain it unless it’s labeled as “extra creamy” or “thick.”
- Homemade Ricotta: You control the texture, and it’s often creamier. Just make sure it’s not too warm when you mix it into the dough.
Well-drained ricotta gives your cookies a richer flavor and better structure. You don’t want them to fall apart!
Step-by-Step Guide to Making Ricotta Cookies
Let’s break it down! Here’s how to go from ingredients to warm, soft, melt-in-your-mouth ricotta cookies.
Step 1 – Prepping Your Ingredients
Gather all your essentials before you begin: flour, baking powder, salt, butter, sugar, eggs, ricotta cheese, and vanilla extract. Make sure your butter and ricotta are at room temperature — this helps them blend smoothly and gives your cookies that soft, melt-in-your-mouth texture.
Step 2 – Mixing the Dough
In a large bowl, cream together the butter and sugar until light and fluffy. Add the eggs one at a time, mixing well after each. Stir in the ricotta cheese and vanilla extract until smooth. In another bowl, whisk together the flour, baking powder, and salt, then gradually combine the dry and wet ingredients until you get a soft, slightly sticky dough.
Step 3 – Chilling the Dough (Optional but Recommended)
Cover the dough with plastic wrap and refrigerate for about 30 minutes to an hour. This step helps firm it up, making it easier to scoop and shape while also preventing the cookies from spreading too much during baking.
Step 4 – Scooping and Baking
Preheat your oven to 350°F (175°C) and line a baking sheet with parchment paper. Scoop small spoonfuls of dough onto the sheet, leaving space between each. Bake for 12–15 minutes, or until the edges are lightly golden and the tops look set.
Step 5 – Cooling and Glazing
Let the cookies cool on the baking sheet for a few minutes before transferring them to a wire rack. Once cooled, drizzle or dip them in a simple glaze made from powdered sugar, milk, and a hint of lemon juice or vanilla. Allow the glaze to set before serving — soft, sweet, and irresistibly delicate Ricotta Cookies are ready to enjoy!
Baking Tips for Soft, Fluffy Ricotta Cookies
Let’s be honest—baking isn’t just a science, it’s a bit of an art. And even though this ricotta cookie recipe is pretty foolproof, a few expert tips can make sure you absolutely nail it every single time.
1. Use Room Temperature Ingredients: This isn’t just a baking myth—softened butter, room-temp ricotta, and eggs blend better and create a more even dough.
2. Don’t Skip the Zest: Even if you’re not a citrus fan, a small amount of lemon or orange zest can enhance all the other flavors. It adds brightness that complements the creamy ricotta beautifully.
3. Chill When in Doubt: If your dough feels sticky or too soft to scoop, chilling it for 30-60 minutes firms it up. Cold dough holds its shape better in the oven, resulting in fluffier cookies.
4. Avoid Overmixing: Once you add flour, mix only until combined. Overmixing develops gluten, which can lead to dense or chewy cookies—not what you want here.
5. Don’t Overbake: These cookies should be pale on top with lightly golden bottoms. Take them out just when they’re set. Overbaking will dry them out and rob them of that signature softness.
6. Use Light-Colored Bakeware: Dark baking sheets can overcook the bottoms of cookies. If that’s all you have, reduce the baking time slightly or use a silicone baking mat.
Flavor Variations to Try
One of the best things about ricotta cookies is how adaptable they are. Once you’ve mastered the classic version, you can start playing with flavors to create your own signature cookie. Whether you’re in the mood for something citrusy, nutty, or even chocolatey, these variations will keep your ricotta cookie game exciting.
1. Lemon Ricotta Cookies
This is probably the most popular variation, and for good reason. The tanginess of lemon perfectly complements the creaminess of ricotta.
- How to make it: Add 1 tablespoon lemon zest and 1 tablespoon lemon juice to the dough. For the glaze, use lemon juice instead of milk to double up on that citrus zing.
- Optional: Sprinkle lemon zest over the glaze for an elegant finish.
2. Chocolate Chip Ricotta Cookies
If you’re a chocolate lover, this one’s a no-brainer. The chocolate adds richness and decadence, balancing the light texture of the cookie.
- How to make it: Fold ¾ cup mini chocolate chips into the dough just before baking.
- Pro Tip: Use mini chips rather than regular—they distribute more evenly without overpowering the dough.
3. Almond or Pistachio Infused
Add a sophisticated twist to your cookies with nutty flavors.
- Almond Variation: Replace vanilla extract with almond extract (use only ½ teaspoon—it’s strong!). Top with sliced almonds.
- Pistachio Variation: Add ¼ cup finely chopped pistachios to the dough. Sprinkle a few on top of the glaze for added texture.
4. Orange Spice Ricotta Cookies
For a warm, cozy flavor that’s perfect for the holidays:
- Add orange zest and a pinch of cinnamon or nutmeg to the dough.
- Use orange juice in the glaze and top with grated nutmeg or cardamom.
5. Berry or Jam-Filled Cookies
Add a fruity surprise to your cookies with jam or fresh berries.
- Make a small indentation in the dough before baking and fill with ½ teaspoon of raspberry, strawberry, or blueberry jam.
- For fresh berries, chop them finely and fold into the dough (don’t use more than ½ cup to avoid excess moisture).
Storing and Freezing Tips
So you’ve baked a batch of perfect ricotta cookies—now what? Whether you’re saving them for later or prepping in advance for a party, here’s how to keep them fresh and delicious.
Storing at Room Temperature
- Shelf Life: These cookies stay soft for up to 5 days.
- Storage Method: Place in an airtight container with a sheet of parchment between layers to prevent sticking. Keep in a cool, dry place.
- Avoid: Exposure to heat or sunlight. This can melt the glaze and dry out the cookies.
Refrigerating
Though not necessary, refrigeration can extend freshness.
- Store in an airtight container and consume within 7 days.
- Let cookies come to room temperature before serving to restore softness.
Freezing the Dough
Perfect for baking fresh cookies anytime!
- Scoop the dough into balls and place them on a baking sheet lined with parchment.
- Freeze until solid (about 1-2 hours), then transfer to a freezer bag.
- Label and store for up to 3 months.
- To bake from frozen: Add 1-2 minutes to the normal baking time.
Freezing Baked Cookies
Yes, even glazed cookies can be frozen!
- Place cooled cookies in a single layer in an airtight container.
- Use parchment between layers to prevent sticking.
- Freeze for up to 2 months.
- Thaw at room temperature for 1 hour before serving.
Ricotta Cookies for Every Occasion
These cookies are more than just a snack—they’re a celebration in every bite. Their soft texture, subtle sweetness, and ability to adapt to different flavors make them ideal for nearly any event.
1. Holiday Favorite
- Ricotta cookies are a staple on many Italian-American Christmas cookie trays.
- Dress them up with festive sprinkles, red and green glaze, or edible glitter.
- Package them in gift boxes or cookie tins for the perfect homemade holiday gift.
2. Birthdays and Baby Showers
- Add colorful sprinkles or pastel glazes to match your party theme.
- Stack them on tiered trays or serve them alongside other mini desserts.
3. Potlucks and Office Parties
- Easy to transport, and they stay soft for days—perfect for events.
- Make a large batch ahead of time and watch them disappear quickly.
4. Wedding Favors or Dessert Tables
- Glaze and sprinkle to match the wedding colors.
- Wrap individually in clear bags with a ribbon for a memorable favor.
5. Casual Baking Days
- Sometimes you just want a soft, homemade cookie with your coffee.
- These are the perfect “comfort cookie” for a lazy Sunday.
No matter the occasion, these cookies can be dressed up or down, and they’re always guaranteed to impress.
Nutritional Information (Approximate)
Here’s a general idea of what you’re consuming with each cookie. Keep in mind, values will vary based on portion size, glaze, and any added ingredients.
| Nutrient | Per Cookie (Unfrosted) |
|---|---|
| Calories | 120–140 kcal |
| Protein | 2g |
| Total Fat | 6g |
| Saturated Fat | 3g |
| Carbohydrates | 16g |
| Sugar | 8g |
| Fiber | <1g |
| Sodium | 60mg |
Ways to Make Them Healthier:
- Reduce sugar slightly without sacrificing too much flavor.
- Use whole wheat pastry flour for added fiber.
- Swap butter for coconut oil or a blend to reduce saturated fat.
- Use low-fat ricotta—but note, this may alter the texture slightly.
Common Mistakes to Avoid
Baking might seem simple, but even small missteps can lead to disappointing results. Here are some common pitfalls to watch out for when making ricotta cookies:
1. Not Draining Ricotta Properly
Excess moisture will make your dough too loose and the cookies might spread too much. Always check the texture of your ricotta before using.
2. Overmixing the Dough
Once you add the flour, stir just until combined. Overmixing can make the cookies dense and dry by over-developing the gluten.
3. Using Cold Butter or Ricotta
Cold ingredients don’t blend well and can lead to lumpy, uneven dough. Let your butter and ricotta sit out until they reach room temperature.
4. Overbaking
These cookies are supposed to be soft and cake-like. If they’re golden brown on top, they’re likely overdone. Always check the bottoms—they should just be turning golden.
5. Glazing While Warm
Wait until cookies are fully cooled before glazing. Warm cookies will melt the glaze and make a sticky mess.
Avoid these errors and you’ll be rewarded with soft, fluffy, bakery-quality ricotta cookies every time.
FAQs about Ricotta Cookie Recipe
Let’s tackle some of the most common questions bakers ask about ricotta cookies. Whether you’re new to baking or a seasoned pro, these tips will help you avoid surprises in the kitchen.
Can You Use Low-Fat Ricotta?
Yes, but it’s not ideal. Low-fat ricotta contains more moisture and less fat, which can lead to a thinner dough and less tender cookies. If it’s all you have, be sure to drain it thoroughly using cheesecloth or a fine mesh sieve before adding it to your batter.
How Long Do Ricotta Cookies Last?
Properly stored, they’ll stay fresh at room temperature for 4–5 days. If you refrigerate them, you can stretch that to about 7 days. For long-term storage, freeze them for up to 2 months.
Can You Add Fruit or Jam?
Absolutely! Add ½ cup chopped dried fruits (like cranberries or cherries), or use jam as a filling. To do this, press your thumb into the center of each dough ball and spoon in ½ teaspoon of jam before baking. Just avoid very watery fruit or jam, as it can affect baking.
Why Did My Cookies Spread Too Much?
This usually happens because:
- The ricotta had too much moisture.
- The dough wasn’t chilled before baking.
- You used too much sugar or butter.
Make sure your ricotta is well-drained, and chill the dough if it feels too soft.
Do I Need a Stand Mixer?
Nope! A hand mixer works just fine, and if you’ve got some elbow grease, you can mix by hand with a sturdy whisk or spatula. Just make sure everything is well incorporated and your butter is soft enough to cream.
Conclusion
Ricotta cookies are a little taste of heaven—pillowy soft, delicately sweet, and endlessly versatile. Whether you stick with the traditional vanilla-lemon version or experiment with chocolate chips, pistachios, or citrus glazes, these cookies never disappoint. They’re perfect for holidays, everyday indulgences, or impressing guests at your next get-together.
The best part? You don’t need any fancy equipment or rare ingredients. With just a few kitchen staples and a bit of love, you can whip up a batch of bakery-worthy cookies that’ll make your kitchen smell incredible and your taste buds sing.
So go ahead—try them today. Share them with loved ones. Or don’t… we won’t judge if you keep them all to yourself.