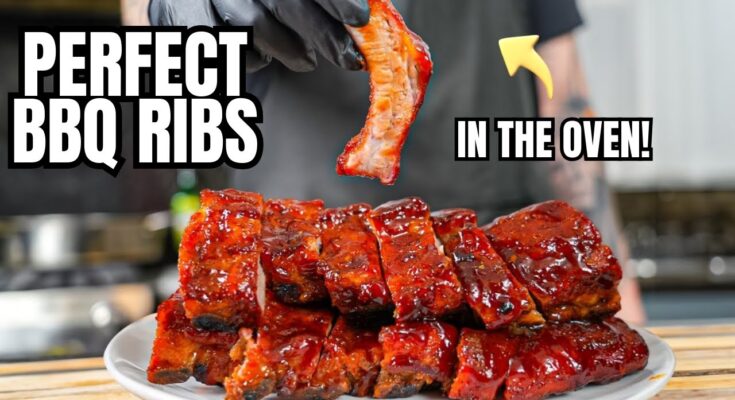
Rib Recipe: There’s something magical about the sight of ribs sizzling on the grill—smoke rising, meat caramelizing, and that aroma filling the air. Ribs are the undisputed kings of BBQ, loved for their juicy tenderness, smoky flavor, and finger-lickin’ goodness. Whether you’re a seasoned grill master or just getting started, ribs are the perfect way to impress guests at any backyard cookout or cozy family dinner.
Ribs have that unique ability to bring people together. You’ll find them everywhere—from high-end restaurants to local diners and summer barbecues. The beauty of ribs lies in their versatility. You can go spicy, sweet, tangy, or smoky depending on your mood. They soak up marinades and rubs like a sponge, offering endless flavor possibilities.
Another reason ribs are a crowd-pleaser? They’re fun to eat. No knife and fork required. Just pick them up, dive in, and enjoy every bite. They’re messy, sure—but in the best way possible.
Types of Ribs You Can Use
Before diving into the recipe, let’s talk rib types. Knowing your cuts will help you choose what works best for your cooking style.
- Baby Back Ribs – These come from the top of the ribcage, near the spine. They’re leaner, shorter, and cook quicker than other types. Baby back ribs are super tender and ideal for quick grilling or oven-baking.
- Spare Ribs – Cut from the belly area, these ribs are meatier and have more fat, which makes them incredibly flavorful when cooked low and slow. They’re perfect for smoking or slow roasting.
- St. Louis Style Ribs – A trimmed version of spare ribs, these are rectangular, meatier, and a favorite among competitive BBQ chefs.
- Beef Ribs – These bad boys are larger and beefier (pun intended). They take longer to cook but reward you with intense flavor and a meatier bite.
Each type has its own charm. Baby backs for the quick and easy crowd, and spare or St. Louis for those who want to take their time with rich, fall-off-the-bone deliciousness.
Ingredients You’ll Need
Essential Ingredients for Flavorful Ribs
A great rib recipe starts with simple but powerful ingredients. Here’s your no-fuss, go-to list:
- Ribs (Pork or Beef) – 2 to 3 pounds, depending on the number of servings
- Olive Oil or Mustard – Helps bind the rub to the meat
- Brown Sugar – Adds sweetness and helps with caramelization
- Salt and Pepper – Classic and essential
- Paprika (Smoked is Best) – Adds a smoky depth
- Garlic Powder – For that robust savory flavor
- Onion Powder – A subtle sweetness that enhances the rub
- Cayenne Pepper or Chili Powder – For heat, if you like it spicy
These are the basics. You can always tweak according to your taste. If you’re more into savory ribs, dial back the sugar. Want a spicy kick? Throw in more cayenne.
Optional Add-Ons for Extra Zing
Want to take things up a notch? Consider these flavor boosters:
- Apple Cider Vinegar – Tenderizes the meat and balances sweetness
- Honey or Maple Syrup – Brings out a glossy finish and sweet flavor
- Worcestershire Sauce – Adds umami and richness
- BBQ Sauce – Whether store-bought or homemade, it’s the cherry on top
- Liquid Smoke – A few drops go a long way for that smoky flavor without a smoker
Mix and match to create a custom rib experience that suits your mood.
Preparing the Ribs for Cooking
Trimming and Cleaning the Ribs
Before you dive into seasoning, give your ribs a little TLC. Trimming and cleaning are key to great results.
Start by rinsing your ribs under cold water. Pat them dry with paper towels—this helps the rub stick better. Now check for any bits of bone, extra fat, or loose meat. You want a uniform rack for even cooking.
Trimming might sound technical, but it’s really about removing excess fat and ensuring even thickness across the rack. You don’t have to go overboard—just clean up any ragged edges or thick fatty areas.
If you’re using spare ribs, consider squaring off the edges to make St. Louis style ribs. It’s a small step that makes a big difference in presentation and even cooking.
Removing the Membrane
Here’s a crucial but often skipped step: removing the membrane (that silver skin on the back of the ribs). If you leave it on, it can turn rubbery and block flavors from soaking in.
To remove it, slide a butter knife under the membrane on one end of the rack. Wiggle it gently to lift it, then grab it with a paper towel and pull it off. It might come off in one go, or you may need to peel it off in pieces. Either way, it’s worth the effort.
This one step can be the difference between “meh” ribs and melt-in-your-mouth ribs.
Marinating and Seasoning the Ribs
Dry Rub vs. Wet Marinade
There are two schools of thought when it comes to flavoring ribs: dry rubs and wet marinades.
- Dry Rub: A mixture of spices that’s massaged into the meat. It forms a flavorful crust when cooked. Perfect if you’re going for classic BBQ flavor.
- Wet Marinade: Usually includes an acidic base like vinegar or citrus juice along with oil and seasonings. It seeps deeper into the meat and tenderizes it over time.
For beginners, a dry rub is simpler and just as effective. Slather the ribs with olive oil or mustard (acts as a binder), then coat generously with your rub mixture.
Want both? Go for a marinade first, let it soak overnight, then pat dry and apply a rub before cooking. You’ll get the best of both worlds.
How Long Should You Marinate?
Marination is where the magic happens. For dry rubs, you can let the ribs sit for at least 1 hour, but overnight is best if you want deeper flavor.
For wet marinades, anywhere from 4 to 24 hours works. The longer it sits, the more flavor it absorbs. Just be careful with acidic marinades—too long and they can start to break down the texture of the meat too much.
Always marinate in the fridge, covered, and let the ribs come to room temperature before cooking. This ensures even cooking and juicier results.
Cooking Methods Explained
Oven-Baked Ribs
Want fall-off-the-bone ribs without a grill? The oven’s got your back. Preheat to 300°F (150°C), wrap your ribs in foil, and cook for 2.5 to 3 hours. Finish under the broiler or on a hot grill for a crispy crust.
Low and slow is the key—this method makes the meat tender, juicy, and flavorful.
Grilling Ribs
There’s nothing like the smoky, charred flavor of grilled ribs. If you’re aiming for that authentic BBQ vibe, this is the way to go. Grilling takes a bit more hands-on attention, but the result? Pure, smoky perfection.
Start by preheating your grill to medium-low heat—around 275°F (135°C). Use indirect heat for the best results, meaning your ribs should not be directly over the flames. This allows them to cook slowly and evenly without burning.
Wrap the ribs in foil and place them on the grill, away from direct heat. Cook for about 2 to 2.5 hours, then unwrap them and brush with BBQ sauce. Place them back on the grill, directly over the heat this time, to get that caramelized crust. Flip occasionally and keep basting for about 15–20 minutes.
Tips for success:
- Use a two-zone fire (hot and cool side).
- Add wood chips like hickory or applewood for deeper flavor.
- Keep the lid closed to trap heat and smoke.
With a little patience, you’ll have tender, smoky ribs that are better than any restaurant.
Slow Cooker Method
Don’t have a grill or oven handy? No worries—the slow cooker can work wonders on ribs too. It’s a “set it and forget it” method that delivers incredibly tender, fall-apart meat.
Here’s how:
- Prep your ribs with your dry rub or marinade.
- Place them in the slow cooker—curl them around the edge if needed.
- Add a bit of liquid (apple juice, broth, or a mix of BBQ sauce and vinegar).
- Cook on low for 6 to 8 hours, or on high for 3 to 4 hours.
After slow cooking, transfer them to a baking sheet, brush with BBQ sauce, and broil for 5-10 minutes. This gives you that essential caramelized glaze.
Perfect for busy days when you still want to eat like a BBQ pro!
Making Your Own BBQ Sauce
Sweet, Spicy, or Tangy: Choosing the Right Flavor
BBQ sauce is where you get to put your personal stamp on your ribs. There’s no one-size-fits-all formula—some like it sweet, others go for spicy, and then there’s that classic smoky tang.
Here are some common types:
- Sweet BBQ Sauce – Typically made with brown sugar, molasses, and ketchup. Great for caramelizing.
- Spicy BBQ Sauce – Adds heat using cayenne, chipotle, or hot sauce.
- Tangy Vinegar-Based Sauce – Popular in Carolina-style BBQ, using apple cider vinegar or mustard as a base.
- Smoky Sauce – Uses smoked paprika, chipotle peppers, or even a touch of liquid smoke.
Easy Homemade BBQ Sauce Recipe
Here’s a simple, tasty version you can whip up at home:
Ingredients:
- 1 cup ketchup
- 1/4 cup apple cider vinegar
- 1/4 cup brown sugar
- 1 tbsp Worcestershire sauce
- 1 tsp smoked paprika
- 1/2 tsp garlic powder
- 1/2 tsp onion powder
- Salt and pepper to taste
Instructions:
- Combine all ingredients in a saucepan.
- Simmer over medium heat for 15–20 minutes, stirring occasionally.
- Let it cool and store in a jar. Use it within a week or freeze for longer storage.
This sauce gives your ribs that rich, sticky glaze we all crave.
How to Know When Your Ribs Are Done
Temperature, Texture, and Timing
So, when are your ribs ready? You don’t want to undercook them (chewy and tough) or overdo it (falling apart too much). Here’s what to watch for:
- Internal Temperature: Aim for about 190°F to 203°F (88°C to 95°C). At this range, the collagen breaks down and the meat becomes tender.
- Flexibility Test: Pick up the rack with tongs in the middle. If the ends bend down easily and cracks appear in the crust, they’re good to go.
- Toothpick Test: Slide a toothpick between the bones. If it goes in with little resistance, the ribs are perfectly tender.
- Bone Peek Test: The meat should shrink back from the ends of the bones by about 1/4 inch.
Use a meat thermometer for accuracy and avoid cutting into the meat constantly—it dries them out. Trust the signs and enjoy the anticipation.
Resting and Slicing the Ribs
Why Resting Matters
Ribs, like any good piece of meat, need a few minutes to rest after cooking. This allows the juices to redistribute throughout the meat, ensuring every bite is juicy and flavorful.
Let the ribs rest for about 10-15 minutes, loosely tented with foil. This little pause makes a world of difference in texture and taste.
How to Slice Like a Pro
Use a sharp knife and flip the rack upside down so the bones are easier to see. Slice between the bones for even, clean cuts. Want to serve with flair? Arrange the ribs bone-side down on a platter and drizzle with extra sauce.
Boom. BBQ perfection served.
Serving Suggestions and Side Dishes
Perfect Pairings for Ribs
Now that you’ve got your ribs sizzling and sauced to perfection, it’s time to think about what to serve them with. Ribs are hearty and flavorful, so the best side dishes should complement that richness without overwhelming it.
Here are some classic and creative pairings to serve alongside your rib masterpiece:
Classic BBQ Sides
- Coleslaw: A cool, crunchy slaw balances the richness of ribs perfectly. Try a tangy vinegar-based slaw or go creamy with mayo and a hint of mustard.
- Cornbread: Slightly sweet, slightly crumbly—cornbread is a staple. Bonus points if you slather it with honey butter.
- Mac and Cheese: Rich, creamy, cheesy pasta? Yes, please. It’s indulgent, comforting, and always a hit.
- Baked Beans: Sweet and smoky beans are a BBQ essential. Throw in some bacon or brisket for extra depth.
- Grilled Corn on the Cob: Charred, buttery corn is both easy and delicious.
Fresh and Light Options
- Cucumber Salad: Crisp and refreshing, this salad adds a light, herby contrast to heavy ribs.
- Grilled Vegetables: Bell peppers, zucchini, onions, and mushrooms offer a smoky, savory side.
- Watermelon Slices: Sweet and hydrating, they’re the perfect fruity bite between rib sessions.
Whether you’re feeding a crowd or treating yourself, mix a few hearty and fresh sides for a well-rounded, finger-licking-good meal.
Storing and Reheating Leftover Ribs
How to Keep Ribs Tasting Fresh
Got leftovers? Lucky you! Ribs reheat well if stored and reheated properly.
Storage Tips:
- Fridge: Wrap tightly in foil or store in an airtight container. Use within 3–4 days.
- Freezer: Place in a freezer-safe bag or container. Label with the date and eat within 2–3 months for best flavor.
Pro tip: Store them with a bit of sauce or drippings to keep them moist.
Reheating Without Drying Them Out
No one wants dry ribs. Here’s how to bring them back to life:
- Oven Method: Wrap in foil, add a splash of water or broth, and bake at 250°F (120°C) for 20–30 minutes. Finish under the broiler for a bit of crispiness.
- Stovetop: Place in a covered skillet with a little water or sauce. Heat on low until warmed through.
- Microwave: Use this only in a pinch. Cover with a damp paper towel and heat in short bursts to avoid rubbery results.
Avoid the grill for reheating—it tends to overcook the already tender meat.
Common Mistakes to Avoid When Making Ribs
Pitfalls to Watch Out For
Ribs aren’t difficult, but a few missteps can turn your BBQ dreams into a chewy disaster. Here are some common mistakes and how to avoid them:
- Skipping the Membrane Removal
That thin layer blocks flavor and gets rubbery. Always take a few minutes to remove it. - Cooking Too Fast
Ribs need time. Cranking up the heat won’t speed things up—it’ll just dry them out. - Not Using Indirect Heat
Direct flame can burn the outside before the inside cooks. Indirect heat equals even cooking. - Skipping the Rest Period
Those juices need time to settle. Resting = juicier, tastier ribs. - Using Too Much Sauce Too Early
BBQ sauce has sugar, which can burn fast. Wait until the last 15–20 minutes to apply. - Over-salting or Over-spicing the Rub
Taste your rub before applying it. You want a balance of flavor, not a salt bomb. - Cutting Too Soon
Let them rest, then slice cleanly between the bones. Rushing ruins texture and presentation.
Avoid these, and you’ll be well on your way to rib perfection.
Tips for Hosting a Rib Cookout Party
Planning the Ultimate Rib Feast
Hosting a rib night? Here’s how to make it unforgettable:
Prep in Advance
- Season your ribs the night before.
- Prep sides early—cold salads, cornbread, or baked beans can all be made ahead.
- Make a big batch of BBQ sauce and keep it warm in a small pot or slow cooker.
Set the Mood
- Fire up some music—think blues, country, or classic rock.
- Add string lights and picnic tables for that BBQ joint vibe.
- Offer bibs or wet wipes—it’s gonna get messy, in the best way.
Cook in Batches
- Stagger your cooking so there’s always hot food coming out.
- Keep early batches warm in the oven on low heat.
Drink Pairings
- Beer and ribs? Match made in heaven. Try IPAs or lagers.
- Not a drinker? Sweet tea, lemonade, or flavored sparkling water works great.
Fun Extras
- Rib-eating contest, anyone?
- Have guests vote for their favorite sauce—sweet, spicy, or smoky.
With a little planning, your cookout can be the highlight of the summer.
Healthier Rib Options
Making Ribs That Are Just a Little Lighter
Love ribs but watching your health? You can still enjoy them without the guilt.
Trim the Fat
Start with leaner cuts like baby back ribs. Trim visible fat before cooking.
Healthier Cooking Methods
- Oven baking and slow cooking require less fat than grilling or frying.
- Use minimal oil and let the meat’s natural juices shine.
Low-Sugar Rubs and Sauces
- Skip brown sugar in your rub and use smoked paprika and herbs for flavor.
- Make your own BBQ sauce with natural sweeteners like honey or maple syrup.
Portion Control
Serve smaller portions of ribs and fill the rest of your plate with veggies or salads.
Pair with Smart Sides
- Swap mac and cheese for a quinoa salad.
- Try grilled zucchini or asparagus instead of fries.
Eating well doesn’t mean missing out—you can have your ribs and eat them too!
FAQs about Rib Recipe
1. What are the best types of ribs to cook?
The most popular types of ribs are baby back ribs, spare ribs, and St. Louis-style ribs. Baby back ribs are leaner and cook faster, while spare ribs are meatier and have more fat. St. Louis-style ribs are trimmed spare ribs with a more uniform shape, making them easier to cook evenly.
2. How long should I cook ribs in the oven?
For tender and juicy ribs, cook them in the oven at 275°F (135°C) for about 2-3 hours. If you prefer a quicker method, you can cook them at 350°F (175°C) for approximately 1.5-2 hours. Always use a meat thermometer to ensure they reach an internal temperature of 145°F (63°C).
3. Can I cook ribs on a grill instead of an oven?
Absolutely! Grilling ribs gives them a delightful smoky flavor. For best results, use indirect heat for cooking ribs on a grill. Cook them covered, over low heat (around 250°F to 300°F), for about 2 to 3 hours, depending on the rib type and grill model.
4. What are the best seasonings for ribs?
A basic rub for ribs includes ingredients like brown sugar, paprika, salt, pepper, garlic powder, and onion powder. For a kick, add cayenne pepper or chili powder. Experiment with different spices to match your taste preferences.
5. Should ribs be wrapped in foil when cooking?
Wrapping ribs in foil (sometimes referred to as the “Texas crutch”) can help them cook more evenly, retain moisture, and become more tender. This method is especially useful if you’re cooking at higher temperatures or want to ensure they don’t dry out.
6. How can I make my ribs fall off the bone?
For fall-off-the-bone tenderness, cook your ribs at a low temperature for a longer duration. Keeping them wrapped in foil for part of the cook time can also help achieve this texture. However, note that some rib aficionados prefer a little chew, arguing that if the meat falls off the bone, it’s overcooked.
7. What is the best way to store cooked ribs?
Store cooked ribs in an airtight container in the refrigerator for up to three to four days. For longer storage, you can freeze them for up to three months. When ready to eat, reheat them slowly in the oven or on the grill to maintain moisture and flavor.
8. Are there any tips for making ribs ahead of time?
Yes! You can bake or grill ribs a day ahead and refrigerate them overnight. Before serving, reheat them on the grill or in the oven. This method can enhance their flavor and make them even more tender.
Conclusion
If there’s one thing every backyard chef should master, it’s how to make a killer rack of ribs. From choosing the right cut to seasoning, cooking, and serving—this guide breaks it all down step by step. Whether you go for slow-cooked tenderness or that charred, smoky crust from the grill, ribs are always a good idea.
Remember, great ribs are more about patience and technique than fancy equipment. Give your ribs time, show them some love, and they’ll reward you with flavor that makes mouths water and fingers sticky.
So next time you’re planning a cookout or craving comfort food, follow this guide, fire up your grill (or oven), and dive into some of the best ribs you’ve ever had.


