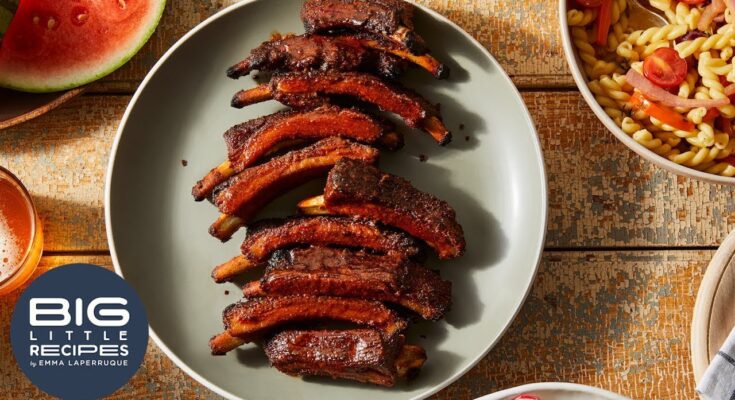
Rib Dry Rub Recipe: Ribs are one of those comfort foods that everyone seems to love, whether you’re slow-smoking them on the grill or baking them in the oven. But what truly makes ribs unforgettable isn’t just the cooking method—it’s the flavor-packed dry rub that brings them to life. A good dry rub is like a secret handshake for your taste buds, a perfect blend of spices that turns ordinary meat into something extraordinary.
What Is a Dry Rub?
A dry rub is a blend of herbs, spices, and seasonings that’s applied directly to meat before cooking. Unlike marinades, dry rubs contain no liquids (except maybe a small amount of oil or mustard if you’re prepping the meat for better adherence). Instead, the mix clings to the surface of the meat, creating a flavorful crust as it cooks. This crust locks in juices, enhances the taste, and adds a mouthwatering texture.
Dry rubs aren’t just for show—they’re fundamental to developing layers of flavor. The best part? They’re insanely easy to make. You control the ingredients, the intensity, and the flavor profile. Want more heat? Add cayenne. Crave sweetness? Increase the brown sugar. It’s customizable and simple.
Why Use a Dry Rub for Ribs?
When it comes to ribs, using a dry rub is practically a rite of passage. Here’s why:
- Flavor Penetration: The rub helps infuse the meat with seasoning, especially if allowed to rest for a few hours or overnight.
- Crust Formation: As the ribs cook, the dry rub caramelizes to form a crusty outer layer. This bark is what BBQ dreams are made of.
- No Need for Sauce (unless you want it): A good rub means you can skip the sauce. Or, if you’re a saucy kind of cook, it forms a fantastic base layer for later basting.
Think of a dry rub as your ribs’ first layer of personality—smoky, sweet, spicy, or all of the above. It’s what makes them memorable.
Key Ingredients for the Perfect Rib Dry Rub
A successful rib dry rub isn’t just about tossing spices together; it’s about balance. Each element brings its own role to the flavor game. Here’s how to layer your ingredients for a knockout blend.
Sweet Elements – Sugar and Balance
Sugar may not be the first thing you think of for meat, but it plays a crucial role. The sweetness balances out spice and helps with caramelization, creating that crave-worthy crust on the ribs.
- Brown Sugar: This is the backbone of most rib rubs. It adds sweetness and depth thanks to its molasses content.
- White Sugar: Use sparingly for extra sweetness and fine texture, though brown sugar usually dominates.
The sweetness should never overpower the rub—it should simply balance the savory and spicy notes.
Spicy Components – Heat That Bites
Here’s where you turn up the excitement. The spice level is entirely personal, but some options to add kick include:
- Cayenne Pepper: A pinch of cayenne goes a long way. It’s bold, fiery, and essential for heat lovers.
- Chili Powder: Adds warmth without being too overpowering.
- Crushed Red Pepper Flakes: Great for texture and added punch.
You can adjust the heat depending on your audience. For a family-friendly version, scale it back a bit. Want bold and wild? Double up on the cayenne.
Savory and Aromatic Ingredients
These ingredients build the base flavor—the stuff that really brings the meatiness forward and gives your rub that deep, satisfying flavor.
- Salt: Essential for bringing out the natural flavors of the meat. Kosher salt is often preferred because of its texture and purity.
- Black Pepper: Adds sharpness and bite.
- Garlic Powder: Provides a rich, savory undertone.
- Onion Powder: Enhances depth and roundness.
- Paprika: Smoky or sweet, paprika adds color and mild earthiness.
Combine these, and you get that classic BBQ flavor foundation. It’s the soul of your dry rub.
Optional Flavor Boosters
Want to get fancy? Add a few special touches:
- Cumin: Earthy and slightly bitter, perfect for complexity.
- Mustard Powder: Brings a tangy sharpness that works beautifully with pork.
- Ground Coriander: Offers a subtle citrusy note that brightens everything.
Experiment until you find your signature blend. Your dry rub should speak your flavor language.
Tools You’ll Need
You don’t need a kitchen full of gadgets to whip up a dry rub. Just a few basics will do the trick.
Mixing Tools
To blend everything evenly, you’ll want:
- Mixing Bowl: Go for glass or stainless steel to avoid absorbing spice smells.
- Measuring Spoons: Precision is key, especially when you want to replicate that perfect blend.
- Whisk or Spoon: To mix everything thoroughly.
Pro tip: Make extra. This stuff stores well, and you’ll want it on hand.
Storage Tips
After you’ve mixed your rub, keep it fresh and flavorful with proper storage:
- Airtight Container: A mason jar or plastic spice container works great.
- Cool, Dark Place: Pantry or cupboard—just keep it away from heat and sunlight.
Stored properly, your dry rub can last up to 6 months without losing potency. Label it with the date you made it for best results.
Step-by-Step Guide to Making Rib Dry Rub
Now that you’ve got your ingredients and tools, let’s walk through making your dry rub from scratch. This part is easy—and oddly satisfying.
Step 1: Measure Your Ingredients
Here’s a classic dry rub base to get started:
- 1/2 cup brown sugar
- 1/4 cup paprika
- 1 tbsp salt
- 1 tbsp black pepper
- 1 tbsp garlic powder
- 1 tbsp onion powder
- 1 tsp cayenne pepper
- 1 tsp chili powder
- 1 tsp mustard powder
- 1/2 tsp cumin
Adjust to taste. If you’re unsure, start light on the heat, and build as needed.
Step 2: Mix Everything Thoroughly
Add all your measured ingredients into a mixing bowl. Use a whisk or spoon to blend them until you get a uniform mix. No clumps, no streaks—just a smooth, even blend.
Want a finer texture? Pulse it in a spice grinder for a few seconds.
Step 3: Taste Test and Adjust
You won’t taste this with your ribs yet, but you can test a pinch on your tongue. Adjust salt, sugar, or spice to your liking.
Step 4: Store It Right
Transfer your rub to a sealed container and store it in a cool, dark place. Done right, this rub can last for months and tastes even better as the flavors meld.
How to Apply Dry Rub to Ribs
Applying the rub is just as important as mixing it. You want those ribs to be fully coated so every bite is bursting with flavor. The key is even application and a bit of patience.
Preparing the Ribs
Before anything else, you need to prep your ribs properly:
- Remove the Membrane: This is the thin, silvery skin on the bone side of the ribs. Slide a butter knife under it, grip with a paper towel, and pull it off. It blocks flavor absorption and can become tough when cooked.
- Pat Dry: Moisture is your enemy here. Use paper towels to dry the ribs thoroughly. Dry ribs allow the rub to stick better and create a good crust.
- Trim Excess Fat: Too much fat can prevent the rub from working its magic. Trim it down to leave just enough for flavor.
Once your ribs are trimmed, cleaned, and dried, you’re ready to rub.
Applying the Rub Evenly
The real fun begins here. Follow these tips to get the most out of your rub:
- Use a Binder (Optional): Lightly coat your ribs with olive oil or yellow mustard. It helps the rub adhere better and adds a subtle layer of flavor.
- Sprinkle, Don’t Dump: Evenly sprinkle your rub over the ribs. Cover both sides, including the edges. Use your hands to gently press the rub into the meat—don’t rub like you’re washing a dish. Pressing helps the seasoning stick without clumping.
- Don’t Skimp: It may feel like you’re over-seasoning, but ribs can handle a lot of flavor. A thick, generous coat is the way to go.
The rub should fully cover the ribs but not be caked on. Aim for a uniform layer that clings tightly to the surface.
Marinating Time Recommendations
Now it’s time to let the flavors settle in. You’ve got two main options:
- Quick Rub (30 minutes to 1 hour): If you’re short on time, this works well for last-minute meals. The rub will still create a flavorful crust.
- Overnight Rest (Ideal): Wrap the rubbed ribs in plastic wrap or foil and refrigerate overnight. This lets the seasoning penetrate deeper, infusing the meat with flavor.
Letting the ribs sit longer allows the salt and sugar to work their way in, creating a well-seasoned bite from edge to edge.
Cooking Tips After Applying the Rub
With your ribs seasoned and ready, it’s time to cook them to perfection. How you cook them matters just as much as how you season them. Here are three foolproof methods to try.
Smoking the Ribs
If you have a smoker, you’re already one step ahead. Smoking is the ultimate way to cook rubbed ribs—it enhances flavor and texture like no other method.
- Use Wood Chips Wisely: Hickory, apple, or mesquite wood chips are classic choices. Soak them in water for 30 minutes before using to get a slow, steady smoke.
- Temperature Matters: Aim for 225–250°F (107–121°C). Low and slow is the name of the game.
- Time Estimate: Spare ribs take about 5–6 hours; baby back ribs need around 4–5 hours.
- The 3-2-1 Method: Smoke for 3 hours, wrap in foil and cook for 2 hours, then unwrap and finish for 1 hour for caramelized bark.
You’ll know they’re done when the meat pulls back from the bones and has a slight bend when picked up.
Grilling Techniques
Don’t have a smoker? A grill works great too. You can still get that amazing flavor with the right setup.
- Set Up for Indirect Heat: Keep the coals or burners on one side, and place the ribs on the other. This mimics the “low and slow” environment of a smoker.
- Control the Temperature: Keep the grill at a steady 250°F.
- Add Wood Chips: Use a smoker box or wrap wood chips in foil with holes poked in it for added smoke flavor.
Grill for 3–5 hours depending on rib thickness. Check often, and spritz with apple juice or vinegar every 30 minutes to keep them moist.
Oven-Baked Rib Perfection
No grill? No problem. You can still make tender, delicious ribs in the oven.
- Preheat Oven to 275°F (135°C).
- Use Foil: Wrap your ribs in foil and place on a baking sheet. This traps in moisture.
- Cook Time: About 3 hours for baby backs, 4 hours for spare ribs.
- Finish with a Broil: Unwrap and broil the ribs for 5–10 minutes to crisp up the crust.
This method might not give you smoke, but it nails the tenderness and flavor every time.
Storing and Reusing Your Dry Rub
Made too much rub? That’s actually a win. Dry rubs are shelf-stable and perfect for meal prepping.
- Storage Containers: Use glass jars, airtight tins, or spice bottles with shaker tops.
- Label and Date: Mark the container with the date you made it.
- Shelf Life: Most dry rubs last 6 months to a year, though they’re best within 3–4 months for peak flavor.
- Avoid Contamination: Don’t use a spoon you’ve touched raw meat with to scoop rub out of the jar. Instead, shake or spoon out what you need ahead of time.
Want to switch it up next time? Use your leftover rub on chicken wings, pork chops, or even roasted vegetables for a smoky twist.
FAQs about Rib Dry Rub Recipe
1. What is a rib dry rub?
A rib dry rub is a flavorful blend of spices and herbs that is rubbed directly onto ribs before cooking. It enhances the meat’s flavor without the need for a marinade or sauce.
2. How long should I leave the dry rub on ribs?
For best results, apply the rub and let the ribs sit in the refrigerator for at least 1 hour—ideally overnight. This allows the spices to fully penetrate the meat.
3. Can I use a dry rub on any type of ribs?
Yes! Dry rubs work great on pork ribs, beef ribs, baby back ribs, and spare ribs. You can adjust the spice level to your taste.
4. Should I add a sauce after using a dry rub?
You can, but it’s optional. Many BBQ lovers enjoy ribs with just the rub for a bold, crusty bark. If you prefer saucy ribs, add your favorite barbecue sauce during the last few minutes of grilling or baking.
5. Can I make the dry rub in advance?
Absolutely. Mix and store your rib dry rub in an airtight container for up to 6 months in a cool, dry place.
6. Is it necessary to use sugar in a dry rub?
Sugar adds a caramelized crust and balances out the heat from spices. However, if you’re avoiding sugar, you can substitute with alternatives like monk fruit sweetener or leave it out entirely.
7. How much dry rub should I use per rack of ribs?
Typically, 2 to 3 tablespoons of dry rub are enough for one full rack of ribs. Make sure to coat both sides evenly.
Conclusion
There’s a reason dry-rubbed ribs are a staple in barbecue culture—they pack a ton of flavor, create a mouthwatering crust, and are incredibly easy to make with just a few pantry staples. From choosing the right ingredients to applying the rub properly and cooking the ribs with care, every step adds a layer of deliciousness.
Whether you prefer your ribs sweet and smoky, spicy and bold, or somewhere in between, the beauty of a homemade dry rub is its flexibility. You’re not locked into a store-bought blend with mystery ingredients. Instead, you’ve got full control over what goes into your mix, how intense the flavors are, and even how it complements your cooking method—be it smoking, grilling, or oven-baking.
Plus, dry rubs aren’t just limited to ribs. Once you’ve nailed your perfect mix, you’ll find yourself reaching for it to season chicken, pork chops, roasted veggies, and even popcorn if you’re feeling adventurous. It’s a flavor bomb waiting to go off in your kitchen.
So next time you’re planning a BBQ, skip the bottle of sauce and reach for your homemade rub. Your taste buds—and your guests—will thank you.


