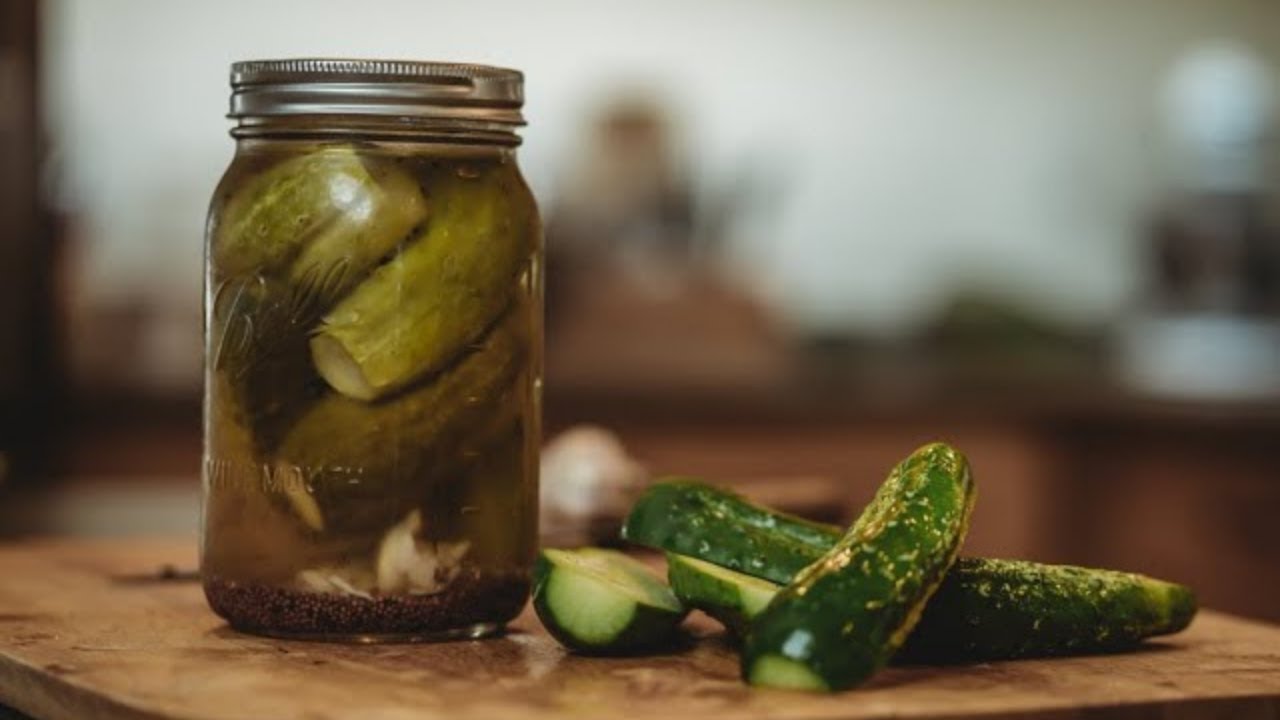
Refrigerator Dill Pickle Recipe: If you’ve ever bitten into a crisp, tangy dill pickle and thought, “I wish I could make these at home,” you’re in luck. Refrigerator dill pickles are the perfect solution for anyone wanting a quick, easy, and tasty homemade snack. Unlike traditional canned pickles, refrigerator pickles require no special equipment, no boiling water baths, and best of all—no waiting for weeks. Within just 24-48 hours, you can enjoy crunchy, flavorful pickles straight from your fridge.
Refrigerator pickles are essentially cucumbers preserved in a salty vinegar brine stored in the refrigerator instead of being shelf-stable. This method keeps the cucumbers fresher and crisper while still allowing them to soak up all that delicious dill and garlic goodness. It’s a fantastic entry point into the world of home pickling, especially for beginners.
Benefits of Making Your Own Pickles
Making pickles at home isn’t just a fun weekend kitchen project—it comes with a whole host of benefits that might surprise you.
Healthier Option
Store-bought pickles often contain preservatives, artificial colorings, and loads of hidden sugars. When you make your own, you control every ingredient. Want a low-sodium version? No problem. Avoiding added sugar? Easy. You know exactly what goes into each jar, and you can feel good about serving them to your family.
Save Money
Cucumbers are relatively cheap—especially when in season—and you likely already have vinegar, garlic, and salt in your pantry. Compared to buying high-end artisan pickles, homemade versions cost a fraction and can be just as gourmet with the right tweaks.
Customize the Flavor
Love your pickles extra garlicky? Prefer them with a spicy kick? When you’re the pickle master, the power is yours. You can experiment with herbs, spices, sweetness levels, and even the vinegar type to get that perfect bite.
Homemade pickles also make thoughtful gifts, crowd-pleasing BBQ sides, and a great way to preserve that garden cucumber harvest you didn’t see coming.
Essential Ingredients for Refrigerator Dill Pickles
Crafting your own batch of dill pickles starts with just a few simple ingredients, but each one plays a crucial role in the final flavor and texture.
Fresh Cucumbers
Not all cucumbers are created equal. For pickling, go for small, firm pickling cucumbers like Kirby or Persian varieties. Their skin is thin, they’re not too watery, and they hold their crunch after soaking in brine.
Vinegar
White distilled vinegar is the standard, giving pickles that classic sharp tang. You can also try apple cider vinegar for a slightly sweeter, more complex flavor. Just make sure your vinegar is at least 5% acidity to ensure proper preservation.
Dill
Fresh dill is the hero of this recipe, delivering that unmistakable dill pickle aroma and flavor. If fresh isn’t available, dried dill seed or weed can be used as a substitute, though the flavor may vary slightly.
Garlic
Crushed or sliced cloves bring a savory kick to your pickles. Use fresh garlic for the best results, and feel free to add as much or as little as your taste buds desire.
Salt and Sugar
Pickling salt (or kosher salt) helps draw moisture out of the cucumbers and adds flavor. Avoid iodized table salt, which can cloud your brine. A touch of sugar balances the acidity and enhances flavor, but it’s entirely optional.
Together, these ingredients create a brine that’s both tangy and aromatic, transforming your cucumbers into snackable gold.
Tools and Equipment You’ll Need
You don’t need a high-tech kitchen to make refrigerator pickles, but having the right tools can streamline the process.
- Mason Jars: Wide-mouth quart jars work best for easy packing and pouring. Clean them thoroughly before use.
- Saucepan: You’ll use this to heat your vinegar brine so the salt and sugar dissolve completely.
- Cutting Board and Knife: To slice your cucumbers to your desired shape—spears, slices, or halves.
- Measuring Cups and Spoons: Accuracy matters when balancing salt, sugar, and vinegar.
- Tongs or a Slotted Spoon: Helpful for packing cucumbers and garlic into jars without touching everything with your hands.
Clear out a spot in your fridge ahead of time, because once these jars are filled and sealed, they’ll need a cool home to work their magic.
Step-by-Step Guide to Making Refrigerator Dill Pickles
Now that we’ve covered the ingredients and tools, let’s dive into the fun part—making the pickles!
Step 1: Preparing the Cucumbers
Wash your cucumbers thoroughly to remove any dirt or debris. Trim off both ends—especially the blossom end—as it contains enzymes that can cause soft pickles. You can slice them into spears, halves, chips, or even leave them whole if they’re small enough.
Step 2: Creating the Brine
In a saucepan, combine 1 1/2 cups of water, 1 cup of white vinegar, 1 tablespoon of pickling salt, and 1 teaspoon of sugar (optional). Bring the mixture to a boil, stirring until the salt and sugar are fully dissolved. Once done, remove from heat and let it cool slightly.
Step 3: Packing the Jars
Place a few sprigs of fresh dill, a couple of garlic cloves (crushed), and any optional spices (like peppercorns or chili flakes) at the bottom of your jars. Then, tightly pack the cucumber slices in upright or layered, depending on the shape. Leave about half an inch of headspace.
Step 4: Pouring the Brine
Carefully pour the warm brine over the cucumbers in each jar, covering them completely. Tap the jars gently to release any trapped air bubbles, and seal them tightly with lids.
Step 5: Refrigeration and Wait Time
Pop the jars into the fridge and let them sit for at least 24 hours. For best flavor, wait 2-3 days. These pickles are good to eat for up to 2 months if kept refrigerated.
Tips for Perfect Pickles Every Time
Making refrigerator pickles is simple, but like anything in the kitchen, a few insider tips can help you level up your results from “pretty good” to “pickle perfection.”
Choose the Right Cucumbers
The type of cucumber you use can make or break your pickles. As mentioned earlier, stick with Kirby, Persian, or any small, firm variety with thin skin. Avoid large slicing cucumbers—they tend to be watery, soft, and full of seeds, which won’t yield that satisfying crunch.
Keep Everything Clean
Even though you’re not canning, cleanliness is key. Wash your jars, tools, and cucumbers thoroughly. Any lingering bacteria can spoil your pickles early or cause funky flavors.
Salt Matters
Always use pickling salt or kosher salt. Table salt contains anti-caking agents that can cloud your brine or leave a metallic taste. If you must substitute, reduce the amount slightly and test for flavor.
Pack Tightly, but Not Too Tight
You want the cucumbers packed snugly to prevent floating, but not crushed. If they’re squeezed too hard into the jar, they might bruise or break during the pickling process.
Flavor Customization is Key
This is your pickle kingdom! Add mustard seeds, coriander, chili flakes, peppercorns, or even a bay leaf. Just don’t go overboard with strong spices like cloves unless that’s the flavor profile you’re after.
Wait for the Flavor
While it’s tempting to dive in right away, patience pays off. The longer the cucumbers sit in the brine (within reason), the deeper and more developed the flavors will be. For that classic pickle taste, give it 48–72 hours.
How Long Do Refrigerator Pickles Last?
One of the best parts about refrigerator pickles—besides their incredible taste—is their long shelf life. Properly stored in a clean, airtight jar in the fridge, your pickles can stay fresh and safe to eat for up to two months. In fact, the flavor often continues to deepen and mellow with time.
But how do you know if your pickles are still good? Here are a few telltale signs to watch for:
- Cloudy Brine: Some cloudiness is normal, especially from garlic or dill particles. But if it becomes overly murky or slimy, toss it.
- Off Smell: Pickles should smell sharp and vinegary. Any sour, rotten, or yeasty odors mean it’s time to let go.
- Mold: This is rare, but if you see any signs of mold inside the jar or floating on the brine, discard the entire batch.
- Soft or Mushy Texture: Over time, pickles will soften slightly, but if they lose their crisp entirely or become mushy, they’re past their prime.
To help extend shelf life:
- Always use clean utensils when removing pickles.
- Keep the pickles fully submerged in brine.
- Seal the jar tightly after each use.
Refrigerator pickles are meant to be a fresh, quick option—not a long-term preservation method—so enjoy them while they’re at their best!
Common Mistakes and How to Avoid Them
Even though refrigerator pickles are pretty forgiving, a few common pitfalls can affect the flavor or texture. Avoid these mistakes, and you’ll be well on your way to pickle glory.
Using the Wrong Cucumbers
As discussed earlier, large, watery cucumbers result in soggy pickles. Stick with varieties meant for pickling, like Kirby or Persian.
Over-Packing Jars
While it’s tempting to squeeze in as many cucumbers as possible, doing so can prevent the brine from circulating evenly. This leads to uneven pickling or spoiled spots.
Improper Brine Ratios
Don’t wing it with your vinegar and salt ratios. Stick to trusted recipes with tested proportions. Too little vinegar means not enough acidity to preserve the pickles.
Brine Too Hot or Too Cold
Pouring boiling brine directly onto cucumbers can cook them, causing a mushy texture. Let the brine cool slightly before pouring. On the other hand, don’t wait too long—lukewarm is just right.
Skipping Fresh Ingredients
Old garlic, wilted dill, or bruised cucumbers won’t improve with pickling. Use the freshest ingredients you can get your hands on for the best results.
Not Letting Them Sit
A good pickle takes time. If you taste them after 4 hours and think they’re “meh,” give them another day or two. The transformation is worth the wait.
Variations on the Basic Recipe
Once you’ve mastered the basic dill pickle, the sky’s the limit when it comes to variations. Whether you like things spicy, sweet, or extra garlicky, you can tailor your pickles to your taste buds.
Spicy Dill Pickles
Add a few slices of jalapeño or red chili flakes to your brine or jars. You can also toss in black peppercorns or a dried chili for some heat that builds slowly with each bite.
Sweet & Tangy Pickles
Add 1–2 tablespoons of sugar to your brine and toss in a few mustard seeds or cloves. These are great on burgers or in tuna salad.
Garlic Explosion Pickles
If you’re a garlic lover, double or triple the cloves in your jars. Just make sure the brine covers everything, and prepare for strong flavor! For even more punch, crush the garlic slightly to release oils.
Lemon Dill Pickles
Add a few lemon slices and a touch of lemon juice to the brine. The citrus gives a bright, refreshing twist that’s ideal for summer.
Asian-Inspired Pickles
Try adding rice vinegar, ginger slices, and sesame seeds for a totally different flavor profile that pairs well with stir-fry or grilled meats.
The more you experiment, the more fun you’ll have creating your perfect pickle jar. Just remember—when trying new ingredients, start with small batches and take notes so you can replicate your favorites later.
FAQs about Refrigerator Dill Pickle Recipe
1. Can I reuse the brine for another batch?
Technically yes, but it’s not recommended. After soaking cucumbers, the brine loses potency and may not have the same acidity or flavor strength. For best results, make a fresh batch of brine for each round.
2. What kind of cucumbers are best for pickling?
Kirby cucumbers are ideal—small, bumpy, and crunchy. Persian cucumbers work well too. Avoid large salad cucumbers as they’re too watery and soft.
3. Do I have to use fresh dill?
Fresh dill provides the most authentic flavor, but you can substitute with dried dill or dill seeds if necessary. Just remember, a little goes a long way with dried herbs.
4. Can I make these pickles sugar-free?
Absolutely! The sugar in the recipe is optional and mostly used to balance the vinegar’s acidity. If you’re avoiding sugar, simply skip it.
5. How do I keep my pickles crispy?
Use fresh, firm cucumbers, trim the blossom ends, and don’t overheat the brine before pouring. Letting the pickles soak for the right amount of time (24-48 hours) without rushing also helps maintain that satisfying crunch.
Conclusion
The beauty of refrigerator pickles lies in their versatility. You can adjust the brine to suit your taste, play with spices, and try different cucumber shapes. There’s something incredibly satisfying about opening your fridge, seeing a gleaming jar of pickles you made yourself, and knowing exactly what went into them.
Plus, refrigerator pickles make for excellent gifts, meal-prep staples, and creative additions to charcuterie boards. If you’ve never ventured into the world of homemade pickling before, this is your perfect entry point. Start simple, follow the steps, and don’t be afraid to get creative once you get the hang of it.
So the next time you’ve got a bunch of cucumbers and a craving for something salty and satisfying, skip the grocery store aisle and grab a jar—your own jar. Happy pickling!