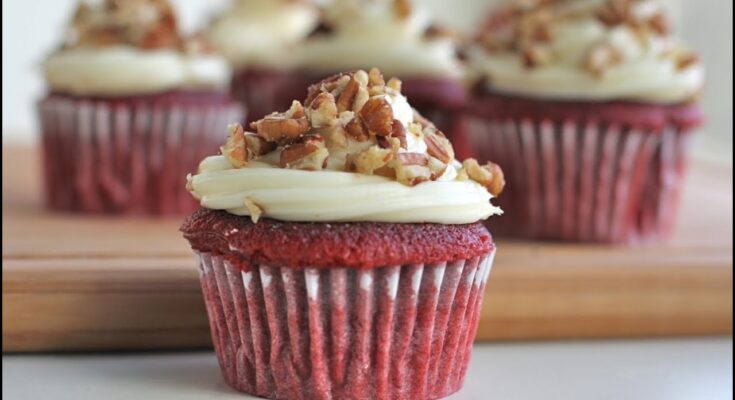
Red Velvet Cupcake Recipe: If you’ve ever taken a bite of a red velvet cupcake, you know it’s not just about the color. Red velvet has a distinctive character — a rich, velvety texture that’s incredibly moist and soft, with a flavor profile that dances between a mild cocoa base and a slightly tangy twist. What makes it really special is the combination of buttermilk, vinegar, and a hint of cocoa that brings a balance of sweet and tangy, while the vibrant red color adds a visual delight to every bite. The cupcake isn’t overpoweringly chocolatey; instead, it delivers a subtle cocoa essence wrapped in a buttery, rich flavor.
The texture is another winning aspect — think soft and plush like velvet (hence the name), yet still sturdy enough to hold a generous swirl of cream cheese frosting. Red velvet isn’t just a dessert; it’s a sensory experience. Its balance of flavors and luxurious feel make it stand out from your everyday chocolate or vanilla cupcakes.
A Brief History of Red Velvet
Believe it or not, red velvet cupcakes have quite an interesting backstory. Originating in the early 1900s, the “velvet” cake concept was first introduced as a softer, finer-crumbed alternative to the traditional pound or butter cakes of the time. It wasn’t until the 1940s, during World War II, that red velvet gained popularity, partially thanks to the Adams Extract Company, which began selling red food coloring and promoting red velvet recipes.
Back in the day, the red hue was more of a natural result of the reaction between the acidic vinegar and buttermilk with cocoa powder. Today, we add red coloring to enhance the vibrancy, but the essence of what made it popular — its unique flavor and luxurious texture — remains unchanged.
Whether served at weddings, birthdays, or just a cozy weekend treat, red velvet cupcakes have cemented their place as a beloved classic in the world of baking.
Essential Ingredients You’ll Need
Dry Ingredients
Before diving into the baking process, let’s break down what you’ll need. The dry ingredients form the base of your cupcake structure:
- All-purpose flour: This is your main base. Go for unbleached flour for better texture.
- Granulated sugar: White sugar keeps the flavor clean and classic.
- Cocoa powder: Just a tablespoon or two — not enough to make it a chocolate cupcake, but enough to give depth.
- Baking soda: Helps the cupcakes rise beautifully.
- Salt: Essential for balance and enhancing other flavors.
These ingredients need to be sifted properly to avoid lumps and to create a smooth batter. It also ensures that the cocoa is evenly distributed, which is key in getting that uniform taste and color.
Wet Ingredients
The wet ingredients are where the flavor and texture magic really happen:
- Buttermilk: This is non-negotiable. It brings that signature tang and keeps the cake moist.
- Eggs: They bind everything together and help with structure.
- Unsalted butter: For that rich, creamy texture.
- Vegetable oil: Adds moistness — a combination of butter and oil works best here.
- Vanilla extract: A little goes a long way in balancing flavors.
- White vinegar: Reacts with baking soda to give the cupcakes their rise and subtle tang.
- Red food coloring: Use gel coloring for vibrant results without watering down the batter.
Getting the wet-to-dry ratio right is critical for that signature soft yet structured crumb. Don’t skip or alter these ingredients too much — red velvet is a delicate balance.
For the Cream Cheese Frosting
Now for the crowning glory — the frosting! A red velvet cupcake without cream cheese frosting is like a burger without the bun. Here’s what you need:
- Cream cheese: Softened, full-fat for best texture.
- Unsalted butter: Adds richness and helps with structure.
- Powdered sugar: For sweetness and smooth texture.
- Vanilla extract: Enhances the flavor without overpowering the tang of the cream cheese.
Optional: A pinch of salt to cut through the sweetness or even a splash of heavy cream if you want it a little lighter.
Equipment and Tools Required
Must-Have Baking Tools
You don’t need a bakery’s worth of equipment, but having the right tools makes everything smoother:
- Cupcake pan (12-cup standard): You’ll need this to shape and bake your cupcakes evenly.
- Cupcake liners: Make cleanup easier and give your cupcakes that professional look.
- Mixing bowls: At least two — one for wet and one for dry ingredients.
- Hand mixer or stand mixer: Saves time and gets that smooth batter.
- Rubber spatula: For scraping down the sides without deflating the mix.
These essentials will get you through the entire baking process without hiccups.
Optional Tools for Better Results
If you want to level up your baking game:
- Ice cream scoop or cupcake batter dispenser: Ensures even-sized cupcakes.
- Piping bags and tips: For frosting that looks as good as it tastes.
- Cooling rack: Helps the cupcakes cool evenly and quickly.
- Oven thermometer: Because not all ovens run true to temperature.
These extras aren’t must-haves, but they definitely make the baking process more enjoyable and the results more consistent.
Step-by-Step Red Velvet Cupcake Recipe
Step 1 – Prepping Your Oven and Ingredients
Let’s kick things off by setting the stage. Preheat your oven to 350°F (175°C) — it’s the sweet spot for baking cupcakes evenly without drying them out. Line your cupcake tray with paper liners and set it aside.
Take out all your cold ingredients — eggs, butter, cream cheese — and let them come to room temperature. This makes mixing easier and helps everything combine more smoothly. Measure out all your ingredients carefully and sift the dry ones together in a medium bowl.
Pro tip: Organize everything in the order you’ll use it. It might sound extra, but it’ll save you from scrambling mid-recipe.
Step 2 – Mixing the Dry Ingredients
In a medium-sized mixing bowl, combine your all-purpose flour, cocoa powder, baking soda, and salt. It’s important to sift these ingredients together. Why? Sifting not only removes lumps but also helps evenly distribute the cocoa throughout the flour. That’s key for achieving that consistent red hue and smooth texture in every bite.
Once sifted, give the dry ingredients a gentle whisk to ensure everything is fully integrated. Don’t skip this step thinking it’s a minor detail — baking is a science, and even small inconsistencies can throw off the final texture of your cupcakes. The cocoa should be subtle and balanced, not overwhelming or clumpy.
Set the dry mix aside for now, and get ready to start working on the heart of the cupcake — the buttery, sugary base.
Step 3 – Creaming Butter and Sugar
Now let’s bring out the hand mixer or stand mixer. In a large mixing bowl, add your softened unsalted butter and granulated sugar. Beat them together on medium-high speed for about 3 to 5 minutes. You’re looking for a light, fluffy texture. This step is crucial for incorporating air into the batter, which helps your cupcakes bake up soft and tender.
Once the butter and sugar are perfectly creamed, it’s time to add the eggs. Add them one at a time, mixing thoroughly after each addition. This ensures a stable batter and helps the mixture emulsify properly. You’ll notice the texture becoming even smoother and creamier.
Next, add in your vanilla extract for flavor, and continue beating for another minute. The mix should now have a silky, light consistency — a perfect base to blend with the wet ingredients.
Step 4 – Adding Wet Ingredients
This is where things get really interesting. In a separate small bowl, combine your buttermilk, vinegar, and red food coloring. Stir it gently until it’s well mixed. The combination of buttermilk and vinegar is what gives red velvet its iconic tangy flavor and soft crumb. The red coloring adds that signature dramatic look that makes these cupcakes pop.
Now, gradually add this mixture into the butter-sugar-egg blend, alternating with the dry ingredients. It’s best to do this in batches — about one-third of the wet mix, then one-third of the dry mix, and repeat until everything is combined. Don’t rush it. Mix on low speed to avoid overworking the batter, which can make cupcakes dense instead of fluffy.
Your batter should now be smooth, silky, and vividly red. Scrape down the sides of the bowl with a spatula to ensure there’s no dry flour hiding in corners.
Step 5 – Combining Everything
Once all your ingredients are mixed, take a final moment to check the consistency. It should be thick but pourable — not too runny, but not dry either. If it feels a bit thick, you can add a tablespoon of buttermilk to loosen it slightly.
Do a quick taste test (optional, of course, since there’s raw egg). You should notice a mellow chocolate note, a hint of tang, and a lovely smooth texture. The color should be a vibrant red, not overly dark or dull. That means you nailed it!
At this stage, don’t let the batter sit too long. The vinegar and baking soda reaction is time-sensitive and helps the cupcakes rise properly, so get ready to transfer the batter into your cupcake liners.
Step 6 – Filling the Cupcake Liners
Grab your prepared cupcake tray with liners. Using an ice cream scoop or a spoon, fill each liner about 2/3 full. You don’t want to overfill, as the batter needs space to rise without overflowing.
Make sure each cup has roughly the same amount of batter. This helps your cupcakes bake evenly and come out the same size — super important for both looks and consistency. Give the tray a gentle tap on the counter to release any air bubbles.
Now you’re ready for the magic moment — baking!
Step 7 – Baking to Perfection
Pop your tray into the preheated oven and bake for 18 to 22 minutes. Ovens can vary, so keep an eye on them after the 18-minute mark. You’ll know they’re ready when the tops spring back lightly when touched, or when a toothpick inserted into the center comes out clean.
Resist the urge to open the oven door too often. Sudden temperature drops can cause your cupcakes to collapse. Once done, remove the tray and let the cupcakes cool for about 5 minutes in the pan, then transfer them to a wire rack to cool completely.
Do not frost them while they’re still warm, or the cream cheese frosting will melt into a gooey mess — patience pays off here!
Making the Perfect Cream Cheese Frosting
Tips for Smooth and Tangy Frosting
Cream cheese frosting is the crowning glory of any red velvet cupcake. Start by combining softened cream cheese and unsalted butter in a mixing bowl. Beat them on medium speed until the mixture is completely smooth and creamy.
Gradually add powdered sugar, a cup at a time, while continuing to mix. Once incorporated, add a splash of vanilla extract and a pinch of salt to balance the sweetness. If your frosting is too thick, add a teaspoon of milk or cream; if too runny, add more powdered sugar.
Keep mixing until you have a fluffy, pipeable frosting. Chill it briefly if you need it to firm up more before decorating.
Frosting Application Techniques
You can go simple with a spoon or take it up a notch with a piping bag. Use a star tip or round tip for a professional swirl. For a bakery-style finish, start from the outside and work your way to the center.
Top with a sprinkle of red velvet crumbs, chocolate shavings, or even edible pearls to elevate the presentation. The contrast of creamy white against the vibrant red makes for stunning visuals.
Decorating and Serving Suggestions
Creative Decoration Ideas
Let’s be honest: part of what makes red velvet cupcakes so irresistible is how stunning they look. Once you’ve frosted your cupcakes with that luscious cream cheese frosting, the fun really begins — it’s time to decorate.
Start by sprinkling some red velvet crumbs on top for a classic touch. You can make these by crumbling one extra cupcake or trimming the tops of a few before frosting. They add both texture and a visual nod to what’s inside.
Feeling fancy? Add chocolate curls, white chocolate chips, or even a drizzle of ganache. A few edible flowers or gold leaf flakes can give a luxe vibe, perfect for events or gifting. For a festive twist, add colored sprinkles — red and green for Christmas, pastel hues for Easter, or heart shapes for Valentine’s Day.
You can also pipe your frosting in creative designs — roses, ruffles, or even a simple dollop with a maraschino cherry on top. The possibilities are endless, and decorating is a great chance to show off your personal style or match the theme of your event.
Presentation Tips
When it comes to serving, presentation goes a long way. Arrange your cupcakes on a cake stand or a tiered dessert tray to create a bakery-style display. Use matching or themed cupcake liners to tie into the occasion — like floral patterns for spring or gold foil for weddings.
Consider serving them with small forks or dessert spoons, especially if you’re adding rich toppings like ganache or fruit. A few small garnish items like fresh mint leaves or strawberries on the side of the plate can make them feel restaurant-worthy.
Hosting a party? Create a cupcake station where guests can decorate their own — lay out toppings like nuts, sprinkles, mini marshmallows, and fruit. It’s interactive and makes your cupcakes the star of the dessert table.
Tips for Storing and Reheating
Keeping Your Cupcakes Fresh
Red velvet cupcakes are best enjoyed fresh, but they store pretty well with the right techniques. If you’re not serving them right away, let them cool completely before storing. Unfrosted cupcakes can be stored in an airtight container at room temperature for up to 2 days.
For longer storage, place them in an airtight container and refrigerate — they’ll stay fresh for up to 5 days. Just be sure to bring them back to room temperature before serving, as the cold can firm up the texture too much.
Once frosted, the cupcakes must be refrigerated because of the cream cheese frosting. Place them in a deep container so the frosting doesn’t get smushed. Layer wax paper between rows if stacking is necessary.
Reheating Without Ruining Texture
Want that fresh-from-the-oven warmth? Reheating red velvet cupcakes is totally possible, but you need to be gentle. Here’s how:
- Microwave Method: Unfrosted cupcakes can be microwaved for 10–15 seconds. If they’re frosted, use a microwave-safe cover and heat in 5-second bursts, checking frequently.
- Oven Method: Preheat your oven to 300°F (150°C) and warm the cupcakes for about 5 minutes. This works best for unfrosted or lightly frosted cupcakes.
Avoid overheating — too much heat can dry them out. If you’re planning to reheat and serve, consider storing the frosting separately and adding it fresh before serving for the best taste and look.
FAQs About Red Velvet Cupcake Recipe
1. What makes red velvet cupcakes different from regular chocolate cupcakes?
Red velvet cupcakes contain a small amount of cocoa powder, but what sets them apart is the addition of vinegar and buttermilk, which react with the cocoa and give the cupcakes their unique texture and slightly tangy flavor. The red coloring also gives them their signature look.
2. Can I make red velvet cupcakes without buttermilk?
Yes, you can make a quick buttermilk substitute by mixing 1 cup of milk with 1 tablespoon of vinegar or lemon juice. Let it sit for 5–10 minutes before using.
3. What type of food coloring is best for red velvet cupcakes?
Liquid or gel red food coloring works well. Gel provides a more intense color with less quantity, making it a popular choice for vibrant red results.
4. How do I store red velvet cupcakes?
Store your cupcakes in an airtight container at room temperature for up to 2 days. For longer freshness, refrigerate them for up to 5 days or freeze (unfrosted) for up to 2 months.
5. Can I use cream cheese frosting with red velvet cupcakes?
Absolutely! Cream cheese frosting is the classic and most loved pairing for red velvet cupcakes. Its tangy and creamy taste balances the subtle cocoa flavor perfectly.
6. Why did my red velvet cupcakes turn brown instead of red?
This could be due to not using enough red food coloring or using natural cocoa powder with a higher pH. Stick with a Dutch-processed cocoa for a better red hue and enhance the color with sufficient food coloring.
Conclusion
Red velvet cupcakes aren’t just a treat — they’re an experience. From their rich, velvety texture and eye-catching red hue to that tangy cream cheese frosting, every bite is a delicious balance of flavor and elegance. Whether you’re a seasoned baker or trying this recipe for the first time, following this step-by-step guide ensures you’ll end up with cupcakes that don’t just look amazing but taste absolutely divine.
They’re perfect for celebrations, romantic occasions, or even a solo indulgence on a cozy afternoon. With a little planning, the right ingredients, and a touch of creativity, you can make bakery-worthy red velvet cupcakes right from your own kitchen.
So grab your apron, preheat that oven, and let the sweet magic begin!


