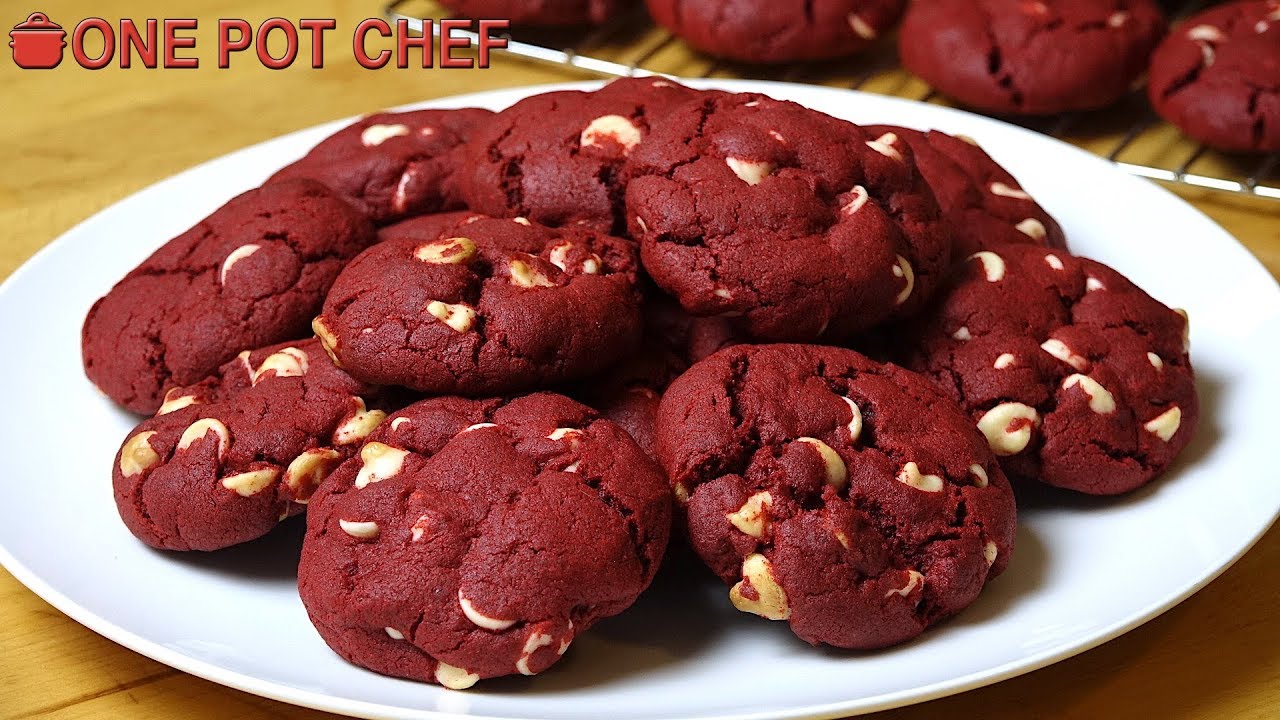
Red Velvet Cookie Recipe: Red velvet cookies have a charm that’s hard to resist. They’re rich, moist, slightly tangy, and have a beautiful deep red hue that makes them perfect for any occasion—especially romantic ones like Valentine’s Day or festive holidays. The distinct flavor profile combines the mild cocoa taste with the tang of buttermilk or vinegar, and when done right, they deliver a chewy texture that melts in your mouth. What truly makes them stand out is their eye-catching color paired with a creamy white chocolate or cream cheese contrast, making every bite a delightful experience.
These cookies bring the beloved taste of red velvet cake into a bite-sized format. They’re easy to customize with add-ins like white chocolate chips, nuts, or even stuffed centers. Whether you’re baking for a crowd or treating yourself, red velvet cookies bring sophistication and comfort together.
Origins of Red Velvet Flavor
The red velvet flavor dates back to the early 1900s when cocoa powder was first introduced into cakes. Back then, a chemical reaction between cocoa and acidic ingredients like buttermilk gave the cake a reddish hue. Food coloring wasn’t even part of the original recipe! But during the Great Depression, food coloring companies began marketing red food dye as a way to make cakes more visually appealing—and thus, the red velvet cake as we know it today was born.
Cookies came much later, as bakers sought new ways to translate the red velvet trend into different desserts. The result? A chewy, vibrant cookie that quickly became a favorite for both kids and adults alike. Its iconic color and unique flavor have made it a staple in bakeries and home kitchens around the world.
Ingredients You’ll Need
Dry Ingredients
To start your red velvet cookie journey, you’ll first need to gather the essential dry ingredients:
- 1 ¾ cups all-purpose flour
- 2 tablespoons unsweetened cocoa powder (Dutch-processed is ideal)
- 1 teaspoon baking soda
- ½ teaspoon salt
These components work together to create the cookie’s structure and subtle chocolate flavor. Be sure to measure your flour carefully; too much can make your cookies dry and dense. Sift the cocoa powder if it’s clumpy for a smoother batter and more even chocolate flavor.
Wet Ingredients
Now, let’s talk about what brings the moisture, richness, and color:
- ½ cup (1 stick) unsalted butter, softened
- ¾ cup packed light brown sugar
- ¼ cup granulated sugar
- 1 large egg
- 1 tablespoon milk or buttermilk
- 2 teaspoons vanilla extract
- 1 tablespoon red food coloring (gel or liquid)
- 1 teaspoon white vinegar
The butter gives the cookies a rich flavor, while brown sugar adds moisture and a subtle molasses depth. The combination of milk and vinegar mimics buttermilk’s tang, crucial for that signature red velvet taste. And of course, red food coloring provides the visual punch that makes these cookies unforgettable.
Optional Add-ins for Extra Flavor
Want to jazz up your cookies a bit? Consider adding:
- 1 cup white chocolate chips (for creamy contrast)
- ½ cup chopped pecans or walnuts (for crunch)
- A handful of mini marshmallows (for a gooey surprise)
These extras are completely optional but can elevate your cookie game. White chocolate chips are the most popular pairing with red velvet, offering a sweet, creamy bite that contrasts beautifully with the slightly tangy dough.
Tools and Equipment Required
Essential Baking Tools
Having the right tools can make baking red velvet cookies a breeze. Here’s what you’ll need:
- Mixing bowls (one large, one medium)
- Electric mixer or stand mixer
- Rubber spatula
- Measuring cups and spoons
- Baking sheet
- Parchment paper or silicone baking mat
- Cooling rack
These are all fairly standard kitchen tools, but using high-quality versions will yield better results. For example, a good silicone baking mat ensures even heat distribution and easy cookie removal.
Measuring Tips for Perfect Results
Precision is key in baking. A digital kitchen scale can be a game changer for measuring flour and cocoa accurately. If you’re using measuring cups, always spoon your flour into the cup and level it off with a knife—never scoop directly from the bag, as this packs it down and leads to using too much.
Liquid ingredients should be measured in a clear, graduated liquid measuring cup at eye level to ensure accuracy. And for sticky ingredients like food coloring or vanilla, spraying the spoon lightly with cooking spray beforehand can help them slide right out.
Step-by-Step Instructions
Step 1: Prepping Your Baking Space
Before diving into mixing, start by setting up your baking station. Preheat your oven to 350°F (175°C). Line your baking sheet with parchment paper or a silicone mat—this prevents sticking and encourages even baking. Make sure your butter is softened (not melted) and eggs are at room temperature. This small step helps the wet and dry ingredients blend better, giving your cookies a uniform texture.
Clear some counter space for mixing and shaping dough. Having everything within arm’s reach reduces stress and mess. Double-check your ingredient list to ensure nothing is forgotten, and rinse out your mixing bowls if they’ve collected dust in the cabinet. With everything in place, you’re ready for baking bliss.
Step 2: Mixing the Dry Ingredients
In a medium bowl, whisk together the flour, cocoa powder, baking soda, and salt. This ensures the cocoa and leavening agents are evenly distributed. Don’t skip this step—improperly mixed dry ingredients can result in uneven flavor pockets and flat cookies.
Use a whisk rather than a spoon to aerate the flour and help break up any lumps. This will also help you spot clumps of cocoa powder, which should be broken up by sifting if needed. Set the bowl aside once everything looks uniform.
Step 3: Creaming the Butter and Sugar
In a large mixing bowl, use a hand mixer or stand mixer to cream the softened butter, brown sugar, and granulated sugar until the mixture is light and fluffy—about 2–3 minutes on medium speed. This process incorporates air into the dough and gives the cookies a softer, chewier texture.
Creaming correctly is key to avoiding dense cookies. If the mixture still looks gritty, mix a little longer. Once the sugars are fully blended with the butter, you’ll have a light and smooth base that’s perfect for building flavor.
Step 4: Adding Eggs and Flavor
Crack in the egg and continue beating until incorporated. Then, add the vanilla extract, milk or buttermilk, white vinegar, and red food coloring. Beat until the mixture is smooth and evenly colored.
This is where your dough starts to resemble red velvet. If you’re using gel food coloring, you may need less than a tablespoon—adjust according to the brand and your preferred shade of red. Make sure to scrape the sides of the bowl occasionally to incorporate every bit of flavor.
Step 5: Combining Dry and Wet Mixtures
Now slowly add the dry ingredients into the wet ingredients. Do this in batches to avoid flour flying everywhere and to ensure a consistent dough. Mix until just combined—overmixing can lead to tough cookies.
You’ll notice the dough getting thicker as the flour gets incorporated. Use a spatula to scrape down the bowl and fold in any dry pockets. The finished dough should be soft but not overly sticky. If it feels too wet, you can chill it for 15–20 minutes before the next step.
Step 6: Folding in White Chocolate or Chips
Now for the fun part—folding in the add-ins. Add about 1 cup of white chocolate chips (or chunks) into the dough and gently fold them using a spatula. This ensures they’re evenly distributed without overworking the dough.
The white chocolate balances the tangy cocoa notes and brings a creamy texture to each bite. Want to mix it up? Add dark chocolate chips or chopped pecans for a nutty crunch. Just don’t overload the dough, or the cookies won’t bake evenly. Keep total mix-ins around 1 to 1½ cups.
Make sure every scoop of dough has a few chips so each cookie delivers a perfect bite. And if you’re really feeling creative, add a few chips on top right before baking to make them bakery-beautiful.
Step 7: Chilling the Dough
This is the step that separates good cookies from great ones. Cover your dough with plastic wrap and chill it in the fridge for at least 1 hour—longer if you can. Chilling solidifies the butter and allows the flour to hydrate fully, resulting in thicker, chewier cookies.
Don’t skip this, especially if your kitchen is warm. Warm dough spreads too much in the oven and gives you flat, sad cookies. If you’re short on time, you can pop the dough in the freezer for 30 minutes.
Chilling also intensifies the red velvet flavor. The cocoa melds better, and the cookies develop a more rounded taste. Trust the process—it’s worth the wait.
Step 8: Baking to Perfection
Once the dough is chilled, scoop it into tablespoon-sized balls and place them about 2 inches apart on your lined baking sheet. This spacing prevents the cookies from merging as they spread.
Bake in the preheated oven for 10–12 minutes. The edges should be set, but the centers might look slightly soft—that’s okay. They’ll firm up as they cool. Overbaking makes them dry and crumbly, so keep a close eye during the last few minutes.
After baking, let the cookies rest on the baking sheet for 5 minutes before transferring them to a cooling rack. This extra step allows them to finish cooking without becoming overdone.
Tips for the Perfect Red Velvet Cookies
Here’s where the pros shine. First, always use room-temperature ingredients to ensure they mix evenly. Cold eggs or butter can cause curdling and uneven textures. Second, don’t skip the vinegar—it reacts with the baking soda and helps create that soft, puffy finish red velvet is known for.
Also, measure your flour carefully. Too much flour = cakey, dry cookies. Too little and they’ll spread too thin. Use a scale if possible. And always cream your butter and sugars well—it’s the backbone of the texture.
Finally, don’t rush the cooling process. Cookies need time to set and firm up. Cutting corners here will give you broken, messy results when you try to move them too soon.
Avoiding Common Mistakes
Mistake #1: Using too much food coloring. A little goes a long way. Too much can give the cookies a chemical taste or weird aftertaste.
Mistake #2: Overmixing the dough. Stirring too much develops the gluten in the flour, resulting in tough cookies.
Mistake #3: Skipping the chill time. Your cookies will spread too much, and you’ll lose that chewy center everyone loves.
Mistake #4: Not adjusting for altitude or humidity. If you live at a high altitude, decrease your baking soda slightly and increase the flour by 1–2 tablespoons. In humid climates, chill the dough longer.
Mistake #5: Baking on a hot pan. Always let pans cool between batches. Otherwise, your second batch may spread too fast and bake unevenly.
How to Store and Preserve Your Cookies
Short-Term Storage
Once your red velvet cookies have cooled completely, store them in an airtight container at room temperature. They’ll stay fresh and chewy for about 4–5 days. If you want to keep that just-baked softness, toss in a slice of bread—yes, bread! It helps maintain moisture without changing the flavor.
Stack cookies with parchment paper between each layer to avoid sticking, especially if you’ve added chocolate chips or fillings that could get gooey. Keep the container in a cool, dry place—away from direct sunlight or heat sources.
Want a quick tip? Microwave a cookie for 10 seconds before eating to bring back the gooey texture and make those white chocolate bits melt again. It’s like fresh from the oven every time.
Freezing for Later
Want to save some for later? Red velvet cookie dough freezes beautifully. Scoop the dough into balls and flash-freeze them on a baking sheet for about 1 hour. Once frozen, transfer them into a ziplock bag or airtight container and freeze for up to 3 months.
When you’re ready to bake, there’s no need to thaw—just pop the frozen dough balls onto a lined baking sheet and bake. Add 1–2 extra minutes to the baking time, and you’re good to go.
You can also freeze the baked cookies. Wrap them individually in plastic wrap, place them in a freezer-safe bag, and they’ll last up to 3 months. Thaw at room temperature or warm in the microwave for a quick treat.
Variations You Can Try
Cream Cheese Filled Red Velvet Cookies
Imagine biting into a red velvet cookie and finding a gooey, tangy cream cheese center. It’s next-level indulgence—and it’s easier than it sounds. Just mix 4 oz cream cheese with 2 tablespoons powdered sugar and chill until firm. Scoop a small amount and roll into balls. Then, wrap each ball of cookie dough around a cream cheese center, sealing the edges.
Bake as usual and enjoy the dreamy contrast between rich cookie and soft filling. These are a crowd-pleaser and make great holiday or special occasion treats.
Red Velvet Crinkle Cookies
For a snowy twist, roll your dough balls in powdered sugar before baking. As the cookies bake and spread, they’ll develop beautiful crackles on top—hence the name crinkle cookies.
The powdered sugar adds sweetness and gives them a unique texture and appearance. You can also add a pinch of cinnamon or nutmeg to the dough for a warm, spicy touch that’s perfect for winter.
Crinkle cookies are especially popular for cookie exchanges or gift boxes. They’re visually stunning and taste just as good as they look.
FAQs about Red Velvet Cookie Recipe
1. Can I use natural food coloring instead of artificial red dye?
Yes! Beetroot powder or natural red food coloring alternatives work, though the color may be slightly less vibrant. They’re a great option for anyone looking to avoid artificial dyes.
2. Why are my cookies turning brown instead of red?
This could be due to too much cocoa powder or not enough red food coloring. Also, using natural cocoa instead of Dutch-processed can affect the final color.
3. Can I make these cookies gluten-free?
Absolutely. Just swap the all-purpose flour for a 1:1 gluten-free flour blend. Make sure the blend contains xanthan gum for the best texture.
4. How do I make my cookies thicker?
Chill the dough longer and use a slightly higher oven temperature (around 375°F). This helps the cookies set faster and reduces spreading.
5. Are red velvet cookies supposed to be soft or crunchy?
They’re meant to be soft and chewy in the center with lightly crisp edges. Overbaking can make them hard, so keep a close eye on the timer.
Conclusion
Red velvet cookies are a decadent fusion of rich cocoa, tangy vanilla, and creamy sweetness—all wrapped in a stunning red hue. Whether you prefer them plain, filled with cream cheese, or studded with white chocolate chips, there’s no denying the charm these cookies bring to the table.
With a few pantry staples and a little patience, you can whip up a batch that rivals any bakery. Follow this guide step-by-step, avoid common mistakes, and don’t be afraid to experiment with add-ins or variations.
The result? A treat that’s as beautiful as it is delicious—perfect for sharing, gifting, or indulging all on your own.