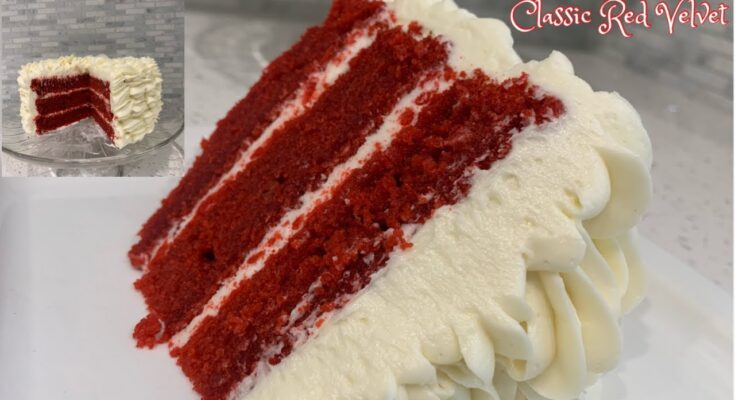
Red Velvet Cake Recipe: Red Velvet Cake is a classic, with its unique color, subtle cocoa flavor, and smooth cream cheese frosting. It’s a popular choice for celebrations, thanks to its impressive appearance and delicious taste.
Known for its vibrant red hue, the cake gets its color from food coloring (and historically, from certain reactions in the ingredients). Perfect for gatherings, Red Velvet Cake is both eye-catching and rich in flavor—a combination sure to delight any crowd.
Ingredients
For the Cake:
- 2 ½ cups of all-purpose flour
- 1 ½ cups of granulated sugar
- 1 cup of buttermilk
- 1 cup of vegetable oil
- 2 large eggs, at room temperature
- 2 tbsp cocoa powder
- 1 tsp baking soda
- 1 tsp white vinegar
- 1 tsp vanilla extract
- 1 tsp salt
- 1-2 tbsp red food coloring
For the Cream Cheese Frosting:
- 8 oz cream cheese, softened
- ½ cup unsalted butter, softened
- 4 cups powdered sugar
- 1 tsp vanilla extract
- A pinch of salt
Ingredient Tips:
- Use high-quality cocoa powder for the best flavor.
- Ensure the buttermilk and eggs are at room temperature for a smooth batter.
- Liquid or gel food coloring works well, though gel offers a more intense color.
Essential Equipment
- Mixing Bowls – Large and medium bowls for mixing ingredients.
- Electric Mixer – Handheld or stand mixer for beating ingredients.
- Measuring Cups and Spoons – For precise measurements.
- Sifter – Helps blend dry ingredients smoothly.
- 8-Inch Cake Pans – Two pans for layering the cake.
- Wire Rack – For cooling the cakes evenly.
Step-by-Step Red Velvet Cake Recipe
Step 1: Preparing Your Oven and Pans
- Preheat the oven to 350°F (175°C) to ensure it’s ready when the batter is.
- Grease the cake pans thoroughly with butter, then lightly dust with flour, tapping out any excess. This prevents sticking and helps the cakes come out cleanly after baking.
Step 2: Mixing the Dry Ingredients
- In a large bowl, sift together the flour, cocoa powder, and salt.
- Add the baking soda and whisk well to combine. Sifting ensures there are no lumps, and whisking helps the dry ingredients blend evenly.
Step 3: Mixing the Wet Ingredients
- In another bowl, beat the sugar and vegetable oil until well combined.
- Add the eggs, one at a time, mixing well after each addition. The mixture should be smooth.
- Pour in the buttermilk, vanilla extract, and vinegar, and mix again until fully combined.
Step 4: Creating the Red Color
- Add the red food coloring to the wet ingredients and mix until the color is uniform.
- Adjust the intensity of the color to your liking, keeping in mind that some of it may bake out slightly.
Step 5: Combining Dry and Wet Mixtures
- Gradually add the dry ingredients to the wet mixture in batches.
- Use a spatula to fold them together, taking care not to overmix, as this can make the cake dense.
- Once the batter is smooth, stop mixing—overmixing can lead to a tough texture.
Step 6: Baking the Cake
- Divide the batter evenly between the prepared cake pans.
- Place the pans in the preheated oven and bake for 25-30 minutes, or until a toothpick inserted into the center comes out clean.
- Let the cakes cool in the pans for 10 minutes, then carefully transfer them to a wire rack.
Step 7: Cooling the Cakes
- Allow the cakes to cool completely on the wire rack before frosting. Warm cakes can cause the frosting to melt.
- For an even layer, level the tops of the cakes with a serrated knife if needed.
Step 8: Making the Cream Cheese Frosting
- In a mixing bowl, beat the cream cheese and butter together until smooth and creamy.
- Gradually add the powdered sugar, one cup at a time, beating until smooth after each addition.
- Add vanilla extract and a pinch of salt, and mix until fully incorporated.
Step 9: Assembling the Cake
- Place one layer of the cake on a plate or cake stand. Spread a generous amount of frosting over the top.
- Place the second cake layer on top and spread frosting evenly over the entire cake, including the sides.
- For a polished look, apply a thin crumb coat first, refrigerate for 15 minutes, and then finish with a second layer of frosting.
Step 10: Decorating Tips
- Decorate the cake with extra frosting using a piping bag for swirls or rosettes if desired.
- Add red cake crumbs, fresh berries, or edible flowers for a classic and beautiful look.
Serving Suggestions
- Ideal Serving Temperature: Red Velvet Cake tastes best at room temperature, allowing the frosting to soften slightly.
- Beverage Pairings: Try serving with a cup of coffee, tea, or even a glass of cold milk.
Storage Tips
- At Room Temperature: Store in an airtight container for up to 2 days.
- In the Refrigerator: Red Velvet Cake can be refrigerated for up to a week, though it’s best enjoyed within a few days.
- Freezing: Wrap slices in plastic wrap, then foil, and freeze for up to 2 months. Thaw before serving.
Troubleshooting Common Issues
- Dry Cake: This can happen if overbaked. Check for doneness early.
- Uneven Color: Ensure thorough mixing of the food coloring.
- Lumpy Frosting: Make sure the cream cheese and butter are softened before mixing.
FAQs about Red Velvet Cake Recipe
1. What makes red velvet cake different from chocolate cake?
Red velvet cake has a distinct flavor and texture that sets it apart from traditional chocolate cake. It’s a light chocolate cake with added tang from buttermilk and a hint of acidity from vinegar, which creates a soft, tender crumb. The red color, traditionally from beet juice or cocoa reactions, is now often enhanced with food coloring.
2. Can I make red velvet cake without food coloring?
Yes! While red food coloring is commonly used, you can skip it for a natural look. Some recipes use beetroot powder for a subtle red tint, maintaining the classic red velvet cake’s texture and flavor.
3. What type of frosting goes best with red velvet cake?
Cream cheese frosting is the traditional choice for red velvet cake, adding a smooth, tangy contrast to the cake’s sweetness. This pairing enhances the cake’s flavors, creating a perfect balance of rich and light.
4. Can I use this recipe for red velvet cupcakes or a layered cake?
Absolutely! Red velvet cake batter works well for cupcakes, layered cakes, and even cake pops. Just adjust the baking time accordingly to suit the size and shape of your treats.
5. How can I ensure my red velvet cake stays moist?
To keep red velvet cake moist, use the right amount of oil and buttermilk, and avoid overbaking. Check for doneness with a toothpick; once it comes out clean, remove the cake from the oven and let it cool.
Conclusion
In summary, making a red velvet cake is an enjoyable journey through rich flavors and vibrant colors. From mixing the perfect balance of ingredients to achieving that velvety texture, each step brings you closer to a classic treat that’s always a hit.
Whether for a celebration or a sweet indulgence at home, this red velvet cake is sure to please. So go ahead, savor each bite, and share it with those you love. Enjoy your delicious creation!


