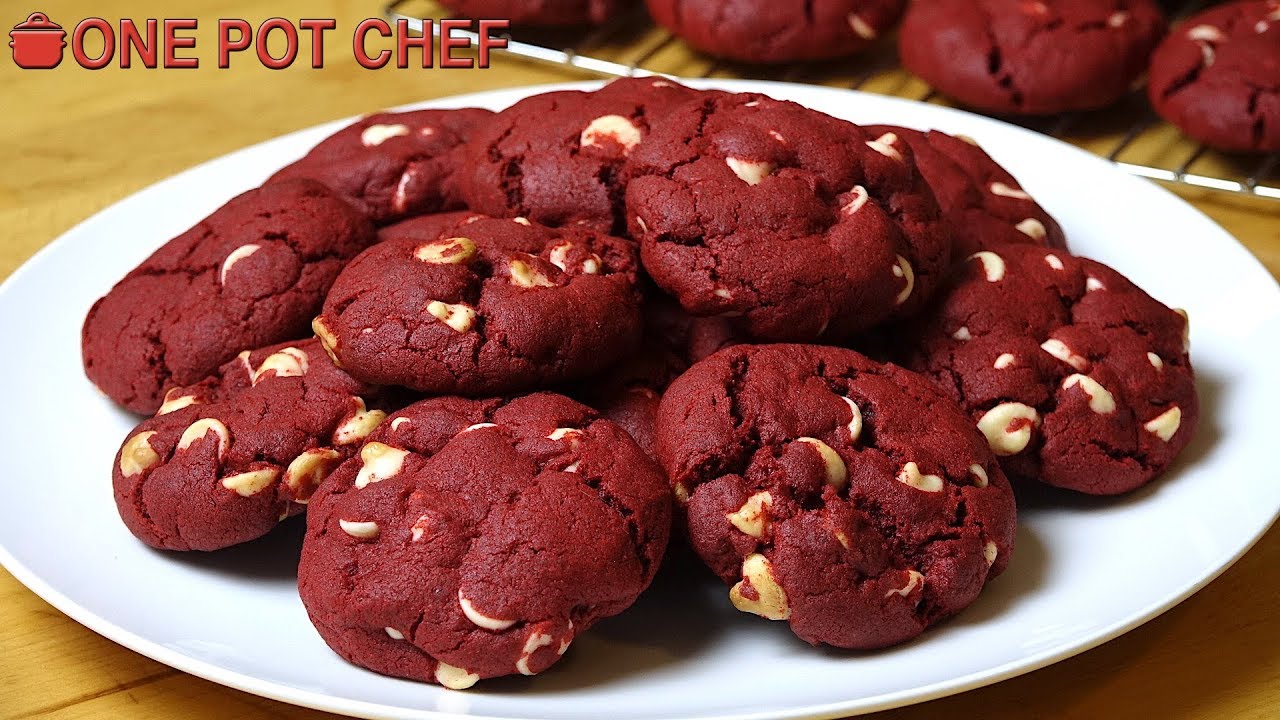
Red Velvet Biscuit Recipe: Who doesn’t love the charming look and taste of red velvet? While most of us are familiar with red velvet cakes and cupcakes, turning this classic flavor into a biscuit is a game changer. Think buttery, flaky layers, infused with a hint of cocoa and that signature red hue – sounds dreamy, right?
What Makes Red Velvet Unique?
Red velvet isn’t just about its red color – it’s about a perfect balance between mild cocoa flavor, a touch of tang from buttermilk, and a slightly sweet taste. That delicate combination makes red velvet feel rich and comforting. The biscuits carry all that goodness, with the added bonus of a flaky texture and crispy tops.
Why You’ll Love This Recipe
If you love easy baking recipes that look fancy but come together quickly, this one’s for you. These biscuits are perfect for brunch, dessert, or as a unique side at dinner. They’re tender, flavorful, and super versatile – you can eat them with butter, honey, cream cheese frosting, or even use them for breakfast sandwiches.
Ingredients You’ll Need
Making these delightful biscuits doesn’t require anything too fancy – most of the ingredients are probably already in your pantry or fridge. Here’s everything you need for about 8-10 biscuits.
Dry Ingredients
- 2 cups all-purpose flour
- 1 tablespoon granulated sugar
- 1 tablespoon unsweetened cocoa powder
- 1 tablespoon baking powder
- ½ teaspoon baking soda
- ½ teaspoon salt
These are your base ingredients. Cocoa powder gives it that signature red velvet kick, while the leavening agents (baking powder and soda) ensure a fluffy rise.
Wet Ingredients
- ½ cup cold unsalted butter (cut into small cubes)
- ¾ cup buttermilk (plus a little more for brushing)
- 1 teaspoon white vinegar or apple cider vinegar
- 1 tablespoon red food coloring
- 1 teaspoon vanilla extract
Cold butter is crucial for those flaky layers, and buttermilk adds the perfect tang. The vinegar and food coloring give red velvet its iconic flavor and look.
Optional Add-ins for Flavor
- ¼ cup mini chocolate chips or white chocolate chips
- 2 tablespoons cream cheese (cubed and folded into the dough)
These extras aren’t necessary, but they can add some delightful texture and depth.
Kitchen Tools Required
- Mixing bowls (one large, one small)
- Pastry cutter or fork
- Biscuit cutter or round cookie cutter
- Rolling pin (or use your hands)
- Baking sheet
- Parchment paper
- Pastry brush (for brushing tops with buttermilk)
Simple tools, but each one plays a role in making your biscuits as delicious as possible.
Step-by-Step Preparation Instructions
Step 1 – Prepping Your Oven and Ingredients
Start by preheating your oven to 425°F (220°C). Line your baking sheet with parchment paper or a silicone baking mat. This step ensures your biscuits don’t stick and bake evenly.
Measure out all your ingredients ahead of time. This “mise en place” approach helps prevent mistakes and speeds up the process.
Step 2 – Mixing the Dry Ingredients
In your large mixing bowl, whisk together the flour, sugar, cocoa powder, baking powder, baking soda, and salt. Make sure everything is evenly combined – you don’t want a pocket of salt ruining one of your biscuits!
Step 3 – Incorporating the Wet Ingredients
Using a pastry cutter or fork, cut the cold butter into the dry mix until it resembles coarse crumbs. Don’t overwork it – little butter chunks are good. They create steam in the oven, making your biscuits extra flaky.
In a separate bowl or measuring cup, mix the buttermilk, vinegar, food coloring, and vanilla extract. Stir until well blended and vibrant.
Pour the wet ingredients into the dry mixture and gently mix with a spatula or your hands until just combined.
Step 4 – Bringing the Dough Together
Turn the dough out onto a floured surface and gently knead 2-3 times. Pat or roll it out to about 1-inch thickness. Overworking the dough can make the biscuits tough, so go easy.
Step 5 – Shaping and Cutting the Biscuits
Use a biscuit cutter (or the rim of a glass) to cut out your biscuits. Press straight down without twisting – twisting seals the edges and prevents a good rise. Place each biscuit on the prepared baking sheet, touching slightly for softer edges or spaced out for crispier sides.
Brush the tops with a little extra buttermilk to encourage browning.
Step 6 – Baking to Perfection
Pop them in the preheated oven and bake for 12–15 minutes or until the tops are golden and the centers are cooked through. Let them rest on the baking sheet for a few minutes before transferring to a wire rack to cool.
Tips for the Best Red Velvet Biscuits
Even though the recipe is simple, a few pro tips can elevate your red velvet biscuits from good to bakery-worthy.
- Use cold ingredients: Keep your butter and buttermilk chilled until the moment you need them. Cold butter is essential for those signature flaky layers.
- Don’t overmix the dough: Mix until everything is just combined. Overworking the dough activates the gluten and can result in tough biscuits.
- Use high-quality cocoa powder: The cocoa flavor is subtle, but it shines through. Using a good-quality cocoa gives a deeper, more luxurious flavor.
- Handle the dough gently: Too much kneading or pressure can compress the dough, which limits the rise.
- Chill the cut biscuits before baking: If you have time, pop the tray of cut biscuits in the fridge for 10–15 minutes before baking. This solidifies the butter again, resulting in more lift.
Want your biscuits extra fluffy? Try layering the dough – fold it over itself a few times before cutting. It’s like homemade puff pastry with half the effort.
Serving Suggestions
Red velvet biscuits are incredibly versatile – you can enjoy them at breakfast, dessert, or as a savory side dish. Here are some tasty serving ideas:
- With cream cheese glaze: A light drizzle of sweetened cream cheese glaze can turn these biscuits into a decadent dessert.
- Spread with whipped butter or honey: Keep it classic with a generous slather of honey butter or cinnamon-spiced whipped butter.
- Make biscuit sandwiches: Cut them in half and fill with scrambled eggs, sausage, or even fried chicken for an indulgent breakfast sandwich.
- Serve with fresh fruit and whipped cream: Think shortcake style – strawberries and a dollop of cream pair beautifully with the subtle cocoa of the biscuit.
- Add savory toppings: Want a twist? Serve with bacon, egg, and cheddar for a salty-sweet contrast.
These biscuits can match nearly any meal or vibe – from Sunday brunch to cozy winter desserts.
Storing and Reheating
Have leftovers? No worries – red velvet biscuits store beautifully if handled right.
To store:
- Allow the biscuits to cool completely.
- Place them in an airtight container or zip-top bag.
- Keep at room temperature for up to 2 days or refrigerate for up to a week.
To freeze:
- Wrap each biscuit in plastic wrap and place in a freezer-safe bag.
- They’ll stay fresh for about 2 months.
- Thaw overnight in the fridge or at room temp for a couple of hours.
To reheat:
- Pop them in a 300°F (150°C) oven for 8–10 minutes.
- Or microwave for 15–20 seconds if you’re short on time.
- Brush with a little butter before reheating to keep them moist.
Freshly baked is best, but these biscuits hold up wonderfully with the right storage.
Troubleshooting Common Issues
Red velvet biscuits are easy to make, but here are a few common problems and how to fix them:
1. My biscuits didn’t rise enough.
- Make sure your baking powder and soda are fresh.
- Don’t twist your cutter when shaping biscuits – it seals the edges.
- Letting the dough rest in the fridge helps with puff.
2. They turned out too dry.
- You may have overbaked them. Try reducing the baking time slightly next time.
- Make sure to measure your flour correctly (spoon and level, don’t scoop).
- Adding a touch more buttermilk can fix a crumbly dough.
3. The color wasn’t vibrant.
- You might need more food coloring, especially if your cocoa is dark.
- Use gel food coloring for the brightest red with less liquid.
4. The texture was dense.
- Avoid overmixing and over-kneading.
- Cold butter and quick handling are key to light layers.
Even if you mess up a bit, they’ll still taste amazing. Practice makes perfect.
FAQs about Red Velvet Biscuit Recipe
1. Can I make red velvet biscuits without food coloring?
Yes, they’ll still taste great! The food coloring is mainly for that traditional red look, not flavor.
2. Can I use milk instead of buttermilk?
You can, but the texture and flavor will change. For a quick buttermilk substitute, add 1 tbsp vinegar to ¾ cup milk and let it sit for 5 minutes.
3. What’s the best cocoa powder to use?
Use unsweetened natural cocoa powder for that mild chocolate taste that complements the red velvet flavor.
4. Can I freeze the dough before baking?
Absolutely! Cut the biscuits, freeze them on a tray, then store in a bag. Bake from frozen, adding 2-3 extra minutes.
5. Can I add cheese to make it savory?
Definitely! Fold in shredded sharp cheddar or cream cheese for a savory twist on this classic biscuit.
Conclusion
Red velvet biscuits are a fun, flavorful twist on a Southern classic. They’re buttery, soft, and rich with just a hint of cocoa – perfect for everything from lazy weekend breakfasts to showstopping desserts. With simple ingredients and a straightforward method, anyone can whip these up in under an hour.
So the next time you’re craving something cozy yet classy, give this recipe a try. Trust me, once you bite into that warm, tender, flaky red biscuit, you’ll be hooked.