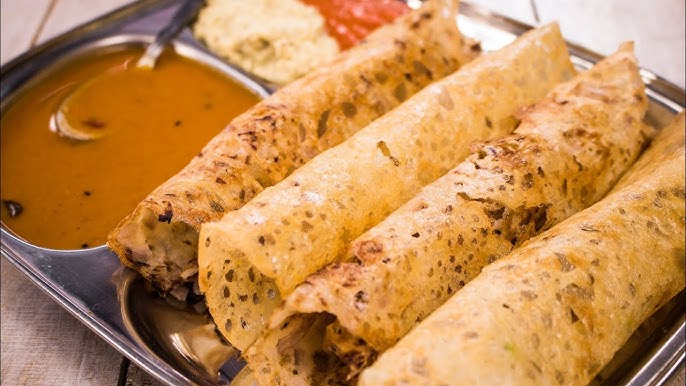
Rava Dosa Recipe: If you’re craving something crispy, flavorful, and effortless to whip up, then Rava Dosa is exactly what you need. Hailing from the heart of South India, Rava Dosa is a lacy, golden-brown dosa made from semolina (also known as rava or sooji), rice flour, and all-purpose flour. Unlike the traditional dosa that needs soaking, grinding, and fermenting, rava dosa is instant—perfect for busy mornings or sudden cravings.
What makes Rava Dosa extra special is its unique texture—it’s thin, crunchy, and full of savory bites from chopped chilies, onions, and spices. It pairs beautifully with coconut chutney, tomato chutney, or hot sambar. Plus, you don’t need to be a professional chef to nail this recipe. With the right tips and a little patience, anyone can achieve the restaurant-style crispiness at home.
Health Benefits of Rava Dosa
Rava Dosa isn’t just a treat for your tastebuds—it’s also light on the stomach and packed with nutrition. Made with semolina, rice flour, and minimal oil, it’s a good source of carbohydrates and provides quick energy. Semolina, especially when made from durum wheat, contains protein, fiber, and B-vitamins that support digestion and energy metabolism.
Another bonus? You can control the amount of oil and add vegetables like grated carrots or spinach to boost the nutrition. Compared to traditional fermented dosas, Rava Dosa is lower in prep time, making it a convenient yet healthy option.
If you’re someone who’s watching your diet, you can always make small tweaks—like using whole wheat flour instead of all-purpose flour or opting for less oil while cooking. Either way, it’s a wholesome, versatile dish that works well for breakfast, lunch, or dinner.
Ingredients You’ll Need
Here’s a quick glance at what you’ll need for making authentic Rava Dosa at home:
Dry Ingredients
- ½ cup fine rava (semolina/sooji)
- ¼ cup rice flour
- ¼ cup all-purpose flour (maida)
Spices and Aromatics
- 1 teaspoon cumin seeds
- 1-2 green chilies (finely chopped)
- 1 teaspoon crushed black pepper (optional)
- 1 tablespoon chopped coriander leaves
- 1 tablespoon chopped curry leaves
Veggies (Optional but Recommended)
- ¼ cup finely chopped onions
- 1 tablespoon grated ginger
Liquids
- 2½ cups water (adjust for consistency)
- Salt to taste
- Oil or ghee for roasting
Substitutions
- Use whole wheat flour in place of maida for a healthier version.
- Skip green chilies if you’re cooking for kids.
- Add grated carrot, chopped spinach, or even cheese for variety.
The beauty of Rava Dosa is its flexibility—feel free to experiment and make it your own!
Kitchen Tools Required
To get started, make sure you have these tools ready:
- Mixing bowl – to prepare the batter
- Whisk or spoon – to mix and break any lumps
- Ladle – for pouring batter
- Flat non-stick dosa tawa or cast-iron skillet – must be well-seasoned
- Spatula – to gently flip the dosa
- Small bowl with oil or ghee and a spoon/brush – for spreading on the dosa
A well-heated, non-stick tawa is key to achieving that signature crispy texture. If using a cast-iron pan, make sure it’s properly seasoned to avoid sticking.
Understanding Rava (Semolina)
Rava is a coarse flour made from wheat, and it plays the starring role in this dish. But not all rava is created equal. You’ll commonly find:
- Fine Rava (Bombay Rava) – perfect for Rava Dosa as it blends smoothly into batter.
- Coarse Rava – best reserved for upma or idli as it doesn’t spread well in batter.
Using fine rava ensures the batter stays lump-free and the dosa forms a delicate lacy texture on the pan. Avoid roasted rava unless the recipe calls for it specifically—it changes the water absorption and cooking time.
Rava acts like a sponge. When mixed with water, it swells slightly and contributes to the dosa’s crunchiness. But if you let it sit too long, the batter may thicken. So, adjusting water right before pouring is a smart move.
Batter Preparation: The Key to Crispy Dosas
Creating the perfect batter is half the battle won. Here’s how to get it just right:
Steps to Prepare Batter
- In a large mixing bowl, combine:
- ½ cup fine rava
- ¼ cup rice flour
- ¼ cup maida
- Add salt, cumin seeds, black pepper, green chilies, chopped onions, curry leaves, coriander, and ginger.
- Slowly pour in 2½ cups of water while stirring continuously.
- Let the batter rest for 15-20 minutes.
- Before cooking, check the consistency—it should be very thin and watery, like buttermilk.
If the batter is too thick, the dosa won’t have holes and lace-like edges. If it’s too thin, you’ll struggle to get an even spread. The batter shouldn’t coat the ladle like pancake batter—it should flow freely.
Add-ons to Enhance Flavor
One of the best things about Rava Dosa is how easy it is to customize. You can elevate the flavor and texture of your dosa by adding a few common yet powerful ingredients. These add-ons don’t just bring taste—they also give your dosa personality.
Flavor-Boosting Add-ons
- Finely chopped green chilies – Adds a sharp kick, perfect for spice lovers.
- Crushed black pepper – Gives a mild heat and complements the crispy texture.
- Cumin seeds – Adds earthiness and a warm aroma.
- Curry leaves – Brings that unmistakable South Indian flavor.
- Chopped coriander – For freshness and color.
You can also experiment with:
- Finely grated coconut – Adds a mild sweetness.
- Asafoetida (hing) – For depth and digestion benefits.
- Chopped cashews – Adds crunch and richness.
Want to go fusion? Sprinkle in some Italian herbs or cheddar cheese before flipping. It’s a game-changer! If you’re making this for kids, reduce the spice and add a bit of grated carrot or beetroot for natural sweetness and color.
These ingredients don’t need to be pre-cooked. Simply mix them into the batter or sprinkle directly on the tawa before pouring the batter. It’s that flexible!
Step-by-Step Guide to Making Rava Dosa
Now, let’s get to the real action! Making Rava Dosa isn’t hard, but it does require technique and timing. Here’s how to master it, step by step.
Step 1: Mixing the Batter
In a bowl, combine semolina (rava), rice flour, all-purpose flour, salt, cumin seeds, chopped onions, green chilies, and water. Mix into a thin, watery batter—this is key for crisp dosa. Rest for 10–15 minutes.
Step 2: Prepping the Pan
Heat a non-stick or cast-iron tawa on medium-high heat. Lightly grease with oil and wipe off excess. The pan should be hot before pouring.
Step 3: Pouring Technique for Perfect Texture
Stir the batter well. Using a ladle, pour from the outer edge toward the center in a circular motion. Do not spread like regular dosa—the holes create crispness.
Step 4: Cooking Time and Flipping Tips
Drizzle oil around the edges. Cook until the base turns golden and crisp (2–3 minutes). Flip only if needed and cook briefly. Serve hot with coconut chutney or sambar.
Troubleshooting Common Mistakes
Even pros mess up sometimes. If your Rava Dosa isn’t coming out as expected, here’s how to fix it:
Problem 1: Batter is too thick
Fix: Add more water gradually until it reaches a watery, runny consistency.
Problem 2: Dosa sticks to the pan
Fixes:
- Make sure the pan is hot enough.
- Don’t use a new or unseasoned cast iron pan.
- Avoid cooking spray or butter—it can create sticky spots.
Problem 3: No holes in dosa
Fix:
- Batter might be too thick.
- Pour from a height and don’t spread it manually.
Problem 4: Dosa breaks or turns soft
Fix:
- Cook longer on a consistent medium flame.
- Make sure you’re not flipping too early.
Understanding these common issues can save your dosa day. Every pan behaves differently, so a little practice goes a long way.
Tips for Crispy and Golden Rava Dosa
Who doesn’t love that perfectly crisp, golden, restaurant-style Rava Dosa? Here are some expert tips to make it happen:
- Watery Batter is Key: The thinner the batter, the crispier the dosa. Think of it as painting the pan with flavor!
- Always Stir Before Pouring: Rava settles at the bottom quickly—if you don’t stir, the consistency is off.
- Use Cast-Iron Pan for Best Results: A well-seasoned cast-iron pan gives unbeatable crispness and that signature golden-brown finish.
- Don’t Skimp on Oil: A light drizzle of oil or ghee around the edges helps achieve a deep-fried crisp without deep frying.
- Let It Cook!: Don’t rush to flip or remove the dosa. Wait until the edges lift naturally.
- Serve Immediately: Rava Dosa loses its crispiness as it cools, so serve hot right off the tawa.
Serving Suggestions
A hot, crispy Rava Dosa is only half the story—the real magic happens when you pair it with the right sides. Here are some classic combinations:
Best Side Dishes
- Coconut Chutney – Creamy and cooling; balances the spice.
- Tomato Chutney – Tangy with a kick.
- Mint-Coriander Chutney – Refreshing and zesty.
- Sambar – A lentil-based stew with vegetables; hearty and flavorful.
- Onion Chutney – Sweet, spicy, and bold.
Plating Tips
- Fold the dosa in half or roll it into a cone.
- Add a dollop of ghee or butter on top before serving.
- Garnish the plate with a lemon wedge and some chopped coriander for color.
Make it a full meal by serving with a hot filter coffee or spiced buttermilk on the side.
Rava Dosa Variations
Once you’ve mastered the basic Rava Dosa, it’s time to get creative. This recipe is incredibly versatile and welcomes all sorts of delicious variations. Whether you’re spicing it up or making it more filling, here are a few popular and mouthwatering options:
1. Onion Rava Dosa
This is probably the most famous variation—and for good reason! Adding finely chopped onions directly into the batter or sprinkling them on the pan before pouring the batter creates a sweet and savory flavor with added crunch.
Tips:
- Use red onions for a sweeter taste.
- Sprinkle some before pouring the batter and some on top for balance.
- Pair with spicy chutney for contrast.
2. Masala Rava Dosa
Want something more filling? Add a scoop of traditional potato masala (similar to masala dosa) inside your Rava Dosa.
How to do it:
- Prepare a simple mashed potato masala with mustard seeds, curry leaves, turmeric, green chilies, and onions.
- Once the dosa is crisp, place the masala in the center and fold over.
3. Cheese Rava Dosa
Yes, cheese! Kids (and adults) love it. Once you pour the batter and it starts cooking, sprinkle grated mozzarella or cheddar on top. The cheese melts beautifully into the crisp surface.
Pro tip: Add a pinch of oregano or chili flakes for a fusion twist.
4. Mixed Vegetable Rava Dosa
Add grated carrots, chopped spinach, cabbage, or even beetroot to the batter. It boosts both nutrition and color!
5. Ragi Rava Dosa
Replace a portion of rice flour or maida with ragi (finger millet) flour. This makes the dosa more fiber-rich and diabetic-friendly.
With these variations, Rava Dosa transforms from a simple snack to a complete, customized meal. The possibilities are endless!
Storage and Reheating Tips
While Rava Dosa is best enjoyed fresh, there are ways to plan ahead without compromising on flavor or crispness.
Storing the Batter
- You can store the batter in an airtight container in the refrigerator for up to 2 days.
- Since rava absorbs water, the batter will thicken over time. Always add some extra water and mix well before making dosas.
Prepping Ahead
- You can chop your onions, green chilies, and curry leaves ahead of time and store them separately in the fridge. Just mix into the batter before use.
- Make spice blends or chutneys in advance to save time in the morning.
Reheating Dosas
Reheating Rava Dosa is tricky—it tends to lose its crispness.
Best Method:
- Heat a flat pan or tawa on medium flame.
- Place the dosa on the pan and press it gently with a spatula.
- Reheat for 2-3 minutes without flipping.
Avoid microwaving, as it makes the dosa soft and soggy. If you must, use a convection microwave with a crispy tray.
Rava Dosa for Special Diets
Cooking for someone with dietary preferences or restrictions? No problem. Rava Dosa is incredibly adaptable.
1. Gluten-Free Version
While rava (semolina) contains gluten, you can try this:
- Replace semolina with gluten-free oats flour or besan (chickpea flour).
- Use rice flour and millet flour for structure.
Note: The texture may differ, but it’s still tasty!
2. Vegan Rava Dosa
This recipe is naturally vegan—no eggs or dairy required. Just make sure to use oil instead of ghee.
3. Low-Carb or Diabetic-Friendly
- Use ragi or almond flour instead of rice flour and maida.
- Avoid adding starchy potatoes or high-carb vegetables.
- Pair with protein-rich chutneys like peanut or moong dal chutney.
These tweaks allow everyone to enjoy this crispy treat, guilt-free.
FAQs about Rava Dosa Recipe
1. Can I make Rava Dosa without rice flour?
Yes, but the crispiness will be affected. Rice flour adds crunch. If you skip it, increase semolina slightly and reduce water for better texture.
2. What’s the best pan for making Rava Dosa?
A well-seasoned cast-iron skillet gives the best results. However, a high-quality non-stick dosa tawa works great for beginners.
3. Can I ferment the batter for Rava Dosa?
No fermentation is needed! That’s the beauty of this recipe. But resting the batter for 15–20 minutes helps the flavors blend.
4. Why is my dosa turning out soft instead of crispy?
Your batter might be too thick, or you’re using low heat. Thin it down and use medium-high heat to get those crispy edges.
5. Can I add vegetables directly into the batter?
Absolutely! Grated carrots, chopped spinach, onions, and even corn can be added directly. Just don’t overload it or the dosa might tear.
Conclusion
Rava Dosa is more than just a dish—it’s a celebration of South Indian flavor, simplicity, and creativity. Whether you’re a beginner cook or a dosa enthusiast, this recipe is your gateway to mastering crispy, lacy dosas without any fermentation fuss.
From its easy prep to endless customization, Rava Dosa is a must-have in your kitchen arsenal. Want something quick for breakfast? Hosting guests for brunch? Craving a midnight snack? Rava Dosa always delivers.
So grab your ingredients, heat up your tawa, and start pouring your way to golden perfection. With a little practice, you’ll be dishing out restaurant-style dosas right from your home kitchen.