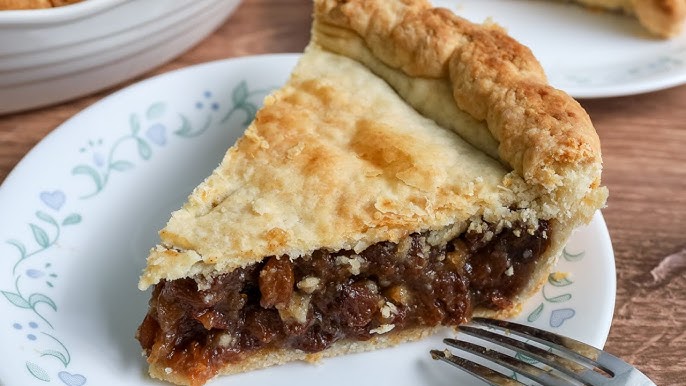
Raisin Pie Recipe: Raisin pie is one of those old-school, comforting desserts that brings back memories of grandma’s kitchen. With its sweet, gooey filling packed with plump raisins and a buttery, flaky crust, it’s a treat that stands the test of time. Though it might not be as famous as apple or pumpkin pie, raisin pie holds a special place in the hearts of those who grew up enjoying it. Whether you’re making it for the holidays or just to satisfy a sweet craving, this pie is a rich, flavorful choice that deserves more love.
What’s great is that it’s surprisingly simple to make from scratch. No fancy ingredients or complicated steps—just basic pantry staples and a little bit of patience. In this guide, we’ll break everything down for you step by step, from choosing the right raisins to baking it just right. Let’s bring back this vintage dessert in all its glory.
Why You’ll Love This Classic Dessert
You might be wondering, “Raisin pie? Really?” But once you try it, you’ll understand. Here’s why it’s a dessert worth making again and again:
- Nostalgic Flavor: It tastes like something out of a vintage cookbook or family recipe box.
- Simple Ingredients: No need for hard-to-find items or special tools.
- Perfect for All Seasons: Warm and comforting in the winter, but also great with ice cream in summer.
- Customizable: You can tweak the spices, add nuts, or change the crust to suit your taste.
Plus, it’s a great make-ahead dessert, as the flavors deepen even more after a day or two. If you love recipes that combine texture, flavor, and tradition, raisin pie checks all the boxes.
The History Behind Raisin Pie
Raisin pie has roots that go deep into American and European food traditions. Sometimes referred to as “funeral pie,” it was commonly served at post-funeral gatherings, especially among the Amish and Mennonite communities. Why? Because the ingredients didn’t spoil easily, and it could be made ahead of time and transported without refrigeration.
Over time, it became a staple at holidays, potlucks, and family gatherings. The pie symbolizes comfort—both in taste and tradition. And while it may not be as trendy as some modern desserts, raisin pie continues to win hearts one slice at a time.
Choosing the Right Raisins
The star of the show? Raisins. But not all raisins are created equal.
Types of Raisins: Golden vs. Regular
- Golden Raisins (Sultanas): These are light in color, slightly tangy, and often plumper. They’re treated with sulfur dioxide to maintain their color and are dried using controlled heat.
- Regular (Dark) Raisins: These are sun-dried, darker in color, and have a more robust, caramelized sweetness.
Both work beautifully in raisin pie, but golden raisins give a brighter, fruitier flavor, while dark raisins bring that deep, rich taste you’d associate with classic raisin desserts.
Organic vs. Non-Organic
While not required, using organic raisins can reduce your intake of pesticides and chemicals. They also tend to have a fresher, more natural flavor.
Pro tip: Try soaking your raisins in warm water (or rum for an adult twist) for 10-15 minutes before cooking. This plumps them up and makes the filling extra juicy.
Other Ingredients You’ll Need
Essential Pie Crust Ingredients
For a flaky, buttery crust, here’s what you’ll need:
- 2 ½ cups all-purpose flour
- 1 tsp salt
- 1 cup (2 sticks) unsalted butter, chilled and cubed
- 6–8 tbsp ice water
You can also use store-bought crust if you’re short on time, but homemade always wins for flavor and texture.
Classic Raisin Filling Ingredients
- 2 cups raisins
- 1 ½ cups water
- ¾ cup sugar
- 2 tbsp cornstarch
- 1 tsp cinnamon
- ¼ tsp nutmeg
- ¼ tsp salt
- 1 tbsp lemon juice
- 1 tsp vanilla extract
- 1 tbsp butter
Optional Add-ins for Extra Flavor
- ½ cup chopped walnuts or pecans
- 2 tbsp rum or bourbon (for soaking)
- Orange or lemon zest
- A pinch of cloves
These additions can take your raisin pie from classic to gourmet.
Kitchen Tools and Equipment Checklist
Before we dive into baking, gather these tools:
- Mixing bowls
- Saucepan
- Rolling pin
- Measuring cups and spoons
- 9-inch pie dish
- Whisk
- Pastry cutter or fork
- Knife (for venting the pie)
- Cooling rack
Having everything ready before you start makes the process smoother and more enjoyable.
How to Make Raisin Pie – Step-by-Step Guide
Let’s get to the fun part. Here’s how to make a perfect, homemade raisin pie.
Step 1: Prepare the Pie Dough
Make or use prepared pie dough. Divide into two discs, wrap, and chill for at least 30 minutes to keep the crust flaky.
Step 2: Soak and Simmer the Raisins
Place raisins in a saucepan with water. Simmer over medium heat for 10–15 minutes until plump and soft.
Step 3: Thicken the Raisin Filling
Stir sugar, cornstarch, cinnamon, a pinch of salt, and lemon juice into the raisins. Cook gently, stirring, until the mixture thickens and becomes glossy. Remove from heat and cool slightly.
Step 4: Roll Out and Fill the Pie Crust
Roll out one dough disc and fit it into a pie dish. Pour in the raisin filling and spread evenly.
Step 5: Add the Top Crust and Vent
Roll out the second dough disc and place over the filling. Seal and crimp the edges. Cut small slits on top to vent steam.
Step 6: Bake to Perfection
Bake at 375°F (190°C) for 40–45 minutes until golden brown. Cool before slicing for best texture.
Tips for the Perfect Raisin Pie
Want to level up your raisin pie game? Keep these tips in mind:
- Always soak the raisins. Dry raisins can lead to a chewy, dry filling.
- Don’t skip the lemon juice. It balances the sweetness and adds brightness to the flavor.
- Cool before cutting. A warm pie will fall apart when sliced.
- Use quality butter. The crust flavor really matters in this pie—go with unsalted, high-quality butter for the best taste.
Little details make a big difference in baking, especially in a pie that’s all about texture and balance.
Serving Suggestions
Raisin pie is delicious all on its own—but it’s even better with the right toppings or sides.
Here are some tasty ideas:
- Vanilla ice cream – A warm slice + cold scoop = heaven.
- Whipped cream – Light and airy, perfect contrast to the rich filling.
- Drizzle of caramel sauce – For an extra indulgent touch.
- Sprinkle of cinnamon sugar – Just before serving, adds crunch and spice.
You can serve this pie warm, at room temperature, or chilled. It’s versatile, making it great for any time of year.
How to Store Raisin Pie
This pie stores like a dream—perfect for making ahead.
- Room temperature: Store covered on the counter for up to 2 days.
- Refrigerator: Keep it in the fridge (covered) for up to 5 days.
- Reheating: Warm individual slices in the microwave for about 20–30 seconds.
Always make sure the pie is fully cooled before covering to avoid sogginess from steam.
How to Freeze Raisin Pie
Want to make it ahead for the holidays or a party? Freezing is totally doable.
To freeze a baked pie:
- Let the pie cool completely.
- Wrap it tightly in plastic wrap and then foil.
- Freeze for up to 3 months.
- Reheat in the oven at 350°F for 20–30 minutes.
To freeze an unbaked pie:
- Assemble the pie as usual (but don’t bake it).
- Wrap well and freeze.
- When ready to bake, go straight from freezer to oven—just add 10–15 extra minutes to the bake time.
Freezing doesn’t affect the texture much, especially if wrapped and stored properly.
Common Mistakes to Avoid
Even seasoned bakers can hit a few bumps. Here’s what to watch out for:
- Skipping the soak: Dry raisins = dry pie.
- Using too much cornstarch: Over-thickening can lead to a gluey filling.
- Cutting too soon: Let it cool or it’ll be a runny mess.
- Underbaking: A pale crust means underdone flavor—wait for golden brown.
Stay patient, follow each step, and you’ll end up with a gorgeous, crowd-pleasing pie.
Variations and Twists
Want to make the recipe your own? Try one of these fun variations:
- Rum Raisin Pie – Soak raisins in dark rum before cooking.
- Nutty Raisin Pie – Add a handful of toasted pecans or walnuts to the filling.
- Cranberry-Raisin Mix – Mix dried cranberries with raisins for a tart twist.
- Spiced Raisin Pie – Add cloves, cardamom, or allspice for a holiday vibe.
- Oatmeal Raisin Pie – Top the filling with a streusel made from oats, butter, and brown sugar.
Each version adds a new layer of flavor and texture to the classic raisin pie.
Gluten-Free or Vegan Options
Need to adapt the recipe for dietary needs? No problem.
Gluten-Free
- Use a gluten-free flour blend for the crust.
- Make sure your cornstarch is certified gluten-free.
Vegan
- Use vegan butter or coconut oil in the crust.
- Replace the egg wash with plant-based milk.
- Ensure the sugar you use is vegan-friendly (some sugars are processed with bone char).
These swaps still give you a tasty, satisfying pie that everyone can enjoy.
FAQs about Raisin Pie Recipe
1. Can I use other dried fruits besides raisins?
Yes! Dried cranberries, currants, or chopped dates work well. Just keep the total quantity the same.
2. Why is my pie filling runny?
It likely didn’t cook long enough or wasn’t cooled before slicing. Be sure to let it set completely after baking.
3. What’s the best way to prevent a soggy crust?
Chill your dough, don’t overfill the pie, and bake until deeply golden brown. You can also pre-bake the bottom crust for extra crispness.
4. Can I make this pie in advance?
Absolutely. Raisin pie keeps well for several days and tastes even better the next day.
5. Is raisin pie supposed to be super sweet?
It’s meant to be rich and sweet, but you can reduce the sugar slightly or balance it with extra lemon juice if you prefer it less sugary.
Conclusion
There’s something timeless about raisin pie. It’s warm, cozy, and packed with rich flavor that only gets better as it sits. While it might not be as trendy as some modern desserts, this humble pie delivers old-fashioned comfort in every bite. Whether you’re making it for the holidays, a family gathering, or just because—raisin pie never disappoints.
Now that you’ve got a full step-by-step guide, all that’s left is to roll up your sleeves and start baking. Who knows? This might just become your new favorite pie recipe.