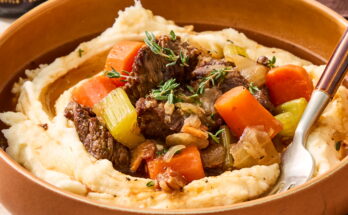
Quesabirria Recipe: Quesabirria is a Mexican taco hybrid that combines the deep, savory flavors of traditional Birria—a stewed meat dish from Jalisco, Mexico—with the melty cheese of a quesadilla. Think of it as the lovechild of a taco and a grilled cheese sandwich, dunked into a rich consommé (a flavorful broth made from the meat’s own juices). This dish hits all the right notes—cheesy, crunchy, meaty, spicy, and savory.
Traditionally made with goat meat, modern recipes often use beef chuck roast or short ribs for a more accessible twist. The meat is slow-cooked until it’s tender enough to fall apart with a fork, then layered with melted cheese on a crispy tortilla. But the real kicker? That consommé. It’s used for dipping and adds a layer of juicy richness you won’t forget.
The Origin and Evolution of Quesabirria Tacos
The Quesabirria craze is actually a relatively new culinary phenomenon. Though Birria has been around since the 16th century, the cheesy taco version first exploded in Tijuana before making its way across the border into the U.S., especially in food truck scenes around Los Angeles.
Social media, particularly Instagram and TikTok, helped catapult this dish into the foodie spotlight. Videos of crispy tacos being dipped into steaming consommé are enough to make anyone’s stomach growl. From there, the Quesabirria trend spread like wildfire, and now it’s a staple in street food culture from coast to coast.
Why Everyone is Obsessed with Quesabirria
Flavor Explosion in Every Bite
Let’s be real—Quesabirria isn’t just another taco. It’s a full-blown experience. You’ve got multiple textures and layers of flavor working together like a culinary symphony. The meat is rich, spiced with chilies and aromatic herbs. The cheese melts into every crevice of the tortilla, while the consommé adds moisture and depth. When fried on a skillet, the tortilla becomes crispy on the outside but stays soft inside thanks to the cheesy meat filling. It’s messy, it’s indulgent, and it’s absolutely addicting.
Instagram-Worthy Appeal
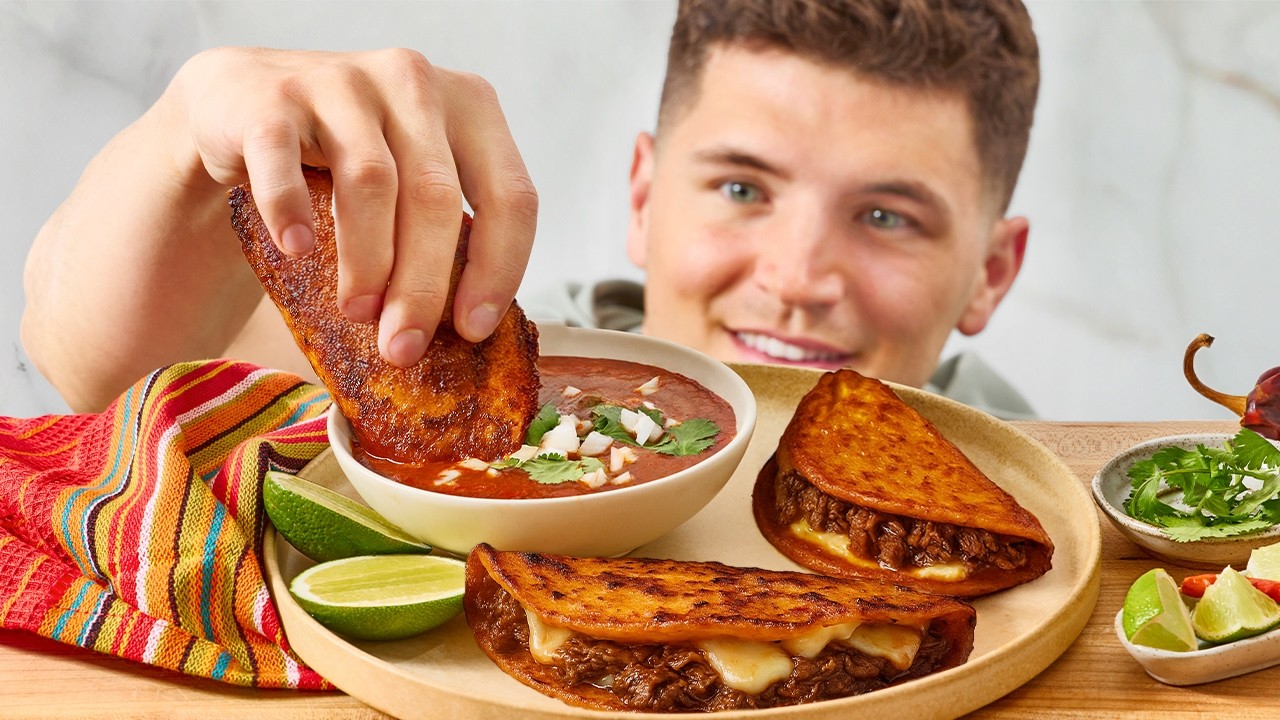
There’s a reason why Quesabirria tacos dominate food feeds. They’re visually stunning—the fiery red shell from the consommé oil, the pull of melted cheese, and the steamy dip into broth make for a perfect food porn moment. Add to that a squeeze of lime, some chopped onions, and cilantro on top, and you’ve got a taco that not only tastes like heaven but looks like it too.
Whether you’re a seasoned foodie or someone who just loves trying new recipes at home, Quesabirria ticks all the boxes. It’s indulgent, exciting, and surprisingly doable once you break it down step by step. Speaking of which…
List of Ingredients You’ll Need
Main Ingredients for the Birria Meat
Here’s where the magic starts. To make tender, juicy Birria meat, you’ll need a mix of spices, chilies, and aromatics. Here’s the full list:
- 3–4 lbs beef chuck roast (you can also use short ribs or oxtail)
- 2 dried guajillo chilies (mild, fruity flavor)
- 2 dried ancho chilies (adds smokiness and color)
- 2 dried pasilla chilies (optional, for a deeper flavor)
- 1 chipotle pepper in adobo sauce
- 1 white onion (quartered)
- 6 garlic cloves
- 3 tomatoes (roasted or boiled)
- 2 tsp cumin
- 2 tsp dried oregano
- 1 tsp ground cinnamon
- 1 tsp paprika or smoked paprika
- 3–4 whole cloves
- 1–2 bay leaves
- 2 tbsp vinegar (apple cider or white)
- Salt and pepper (to taste)
- Beef broth or water (for cooking, about 4–5 cups)
Ingredients for the Quesabirria Tacos
Once the meat is ready, it’s taco time! Here’s what you’ll need to build those golden, cheesy tacos:
- Corn tortillas (the smaller, taco-sized kind)
- Oaxaca cheese or Mozzarella (shredded, for meltability)
- Fresh cilantro (chopped)
- White onion (finely chopped)
- Lime wedges (for serving)
- Oil (for frying the tortillas, ideally a neutral oil like canola)
Optional Toppings and Garnishes
You can always jazz it up even more! Here are a few add-ons to take your Quesabirria to the next level:
- Pickled red onions
- Avocado slices
- Sour cream or Mexican crema
- Hot sauce or salsa verde
- Radishes (sliced thin)
Pro tip: don’t skip the fresh lime. That acidity cuts through the richness of the meat and cheese, making everything pop.
Tools and Equipment You’ll Need
Kitchen Essentials for Perfect Quesabirria
You don’t need a fancy kitchen, but having the right tools will make this process smoother:
- Large Dutch oven or slow cooker (for simmering the Birria)
- Blender or food processor (to blend the chili sauce)
- Fine mesh strainer (to strain the sauce)
- Cast iron skillet or non-stick pan (to fry the tacos)
- Tongs and spatula (for flipping without mess)
- Chopping board and sharp knife
Time-Saving Tips
- Marinate overnight: You can prep the marinade and meat the day before. It’ll intensify the flavor.
- Make extra: Birria freezes beautifully. Make a double batch and enjoy it all week.
- Pre-shred cheese and chop toppings: Do this while the meat simmers to streamline taco assembly.
Step-by-Step Guide to Make Quesabirria
Let’s break down the entire cooking process into foolproof steps. No skipping, no stress—just juicy, melty perfection by the end.
Step 1: Prepare the Birria Marinade
Start by removing the stems and seeds from your dried chilies. Toast them lightly in a dry skillet for a few seconds to release their natural oils, then soak them in hot water for 15 minutes until soft.
In a blender, combine the soaked chilies, roasted tomatoes, chipotle in adobo, onion, garlic, cumin, oregano, cinnamon, paprika, cloves, vinegar, salt, and pepper. Add about 1/2 cup of the soaking liquid or beef broth to help blend everything into a smooth paste. This deep red mixture is your flavor bomb. You should taste it—it’s smoky, spicy, tangy, and loaded with complexity.
Pour this marinade over your meat, making sure every chunk is fully coated. Cover it tightly and let it sit overnight in the fridge for the flavors to meld.
Step 2: Marinate the Meat Overnight
This is the make-or-break step that separates an okay Quesabirria from a mind-blowing one. Once you’ve blended your marinade, the next move is to pour it generously over your chosen cut of beef—preferably a fatty, tough cut like chuck roast or short ribs. These cuts love a slow cook and soak up all that flavor like a sponge.
Place the meat and marinade in a large bowl or zip-top bag. Massage it well with your hands (or tongs if you’re not into messy hands) to ensure every inch of the meat is coated. Then cover it and let it chill in the refrigerator overnight—at least 8 hours, but 12–24 hours is ideal. This resting period does two important things:
- Breaks down the fibers of the meat so it becomes ultra-tender when cooked.
- Infuses deep flavor into every bite—you’ll taste that slow build of spices and chilies in the final product.
If you’re tight on time, even 4 hours of marinating can still deliver solid results, but trust us—the longer it rests, the better it gets. Just imagine the anticipation building as your fridge quietly preps your meat with every passing hour. It’s worth the wait.
Once marinated, you’re ready for the real magic—slow cooking that brings it all together.
Step 3: Cook the Birria Until Tender
Time to get that meat meltingly soft. There are three common ways to cook Birria:
- Stovetop (Dutch oven) – About 3–3.5 hours
- Slow cooker (Crockpot) – Low for 8 hours or high for 4–5 hours
- Instant Pot (Pressure cooker) – About 1.5 hours on high pressure
Whichever method you choose, the steps are similar.
- In a large Dutch oven or pot, heat a tablespoon of oil over medium heat.
- Sear the marinated beef chunks for a couple of minutes on each side until browned. This locks in flavor.
- Pour in any leftover marinade and add about 3–4 cups of beef broth or water, just enough to cover the meat. Drop in a bay leaf or two for extra aroma.
- Bring it all to a gentle boil, then reduce to a low simmer and cover.
Let it cook slowly until the meat is fork-tender and practically falling apart. This is when your kitchen will start to smell like a Mexican taquería. After cooking, remove the meat from the pot and shred it with two forks. It should come apart with almost no effort.
Don’t discard the cooking liquid—we’re about to turn that into gold.
Step 4: Make the Consomé
Consomé is the dipping broth that makes Quesabirria an entirely different beast than your average taco. It’s rich, spicy, and packed with all the flavor from the stewed meat and chilies.
Here’s how to make it shine:
- After removing the meat, skim off the excess fat floating at the top of the pot—but don’t toss it! Reserve it to fry your tortillas. That chili-infused oil adds color and crispiness.
- Taste the broth and adjust seasoning. Want it spicier? Add a bit of the adobo sauce or a chopped chipotle. Need a touch of brightness? A splash of lime juice or vinegar does wonders.
- If you want a clearer broth, strain it through a mesh sieve. But for maximum flavor, most people keep it chunky.
Serve the consomé hot in small bowls alongside the tacos. Sprinkle in some chopped onions and cilantro for garnish. A squeeze of lime? Absolutely. This broth is made for dunking—once you try it, you’ll never go back to dry tacos again.
Want to go next-level? Some people even add a spoonful of consommé inside the taco itself before folding and frying. Messy, but ridiculously good.
Step 5: Assemble and Cook the Quesabirria Tacos
Now for the grand finale—assembling your cheesy, crispy, golden-brown Quesabirria tacos. This step turns your slow-cooked stew into handheld bites of heaven.
Here’s how to do it like a pro:
- Heat a skillet over medium heat and drizzle in some of that reserved chili oil skimmed from the consomé.
- Dip a corn tortilla briefly into the consommé so it absorbs flavor and turns red. Don’t soak it too long or it’ll fall apart.
- Place the tortilla on the skillet, then layer one side with shredded beef and a generous sprinkle of cheese—Oaxaca or Mozzarella works best for that epic cheese pull.
- Fold the tortilla over like a quesadilla and press lightly with a spatula.
- Cook each side for 2–3 minutes until the outside is golden and crispy and the cheese is melted.
Repeat with more tortillas. You’ll want to make plenty—these disappear fast.
Serve the tacos with a bowl of hot consomé for dipping, plus chopped onion, cilantro, and lime wedges on the side. Want extra heat? Bring on the hot sauce or salsa.
This is the moment where all your hard work pays off—the cheese melts into the meat, the tortilla crisps up to perfection, and the consommé ties everything together in one delicious bite.
Pro Tips for the Best Quesabirria Tacos
Don’t Skip the Marinating Time
We’ve already talked about how marinating overnight adds serious depth of flavor—but let’s double down on that. This isn’t just about convenience or prepping ahead. It’s about unlocking the full potential of your ingredients. The acid from the vinegar breaks down the muscle fibers in the meat, making it more tender, while the chilies and spices work their way into every crevice. The result? Every bite bursts with flavor, not just the surface of the meat.
If you’re in a hurry, you can use a pressure cooker to shave off cooking time, but please don’t rush the marinade. Even if you can only manage 4–6 hours, it’s better than nothing. And if you’re planning this for a party or weekend meal, prepping the day before ensures you’re stress-free when it’s taco time.
Use the Right Cheese
Quesabirria tacos are nothing without that iconic cheese pull. The type of cheese you use makes a big difference. Oaxaca cheese is traditional—it’s stringy, melts beautifully, and has a mild flavor that doesn’t overpower the meat. If you can’t find Oaxaca, Mozzarella is a solid substitute, but go for the low-moisture kind to avoid soggy tacos. Some folks mix in Monterey Jack for an extra creamy bite. Avoid cheddar—it doesn’t melt the same and the flavor clashes with the consommé.
Another tip: shred the cheese yourself. Pre-shredded cheese is coated in anti-caking agents that can mess with the melt factor. Trust us, it’s worth the extra couple of minutes.
Tortilla Type Matters
Corn tortillas are the go-to for Quesabirria, but not all are created equal. You want fresh, pliable tortillas that won’t crack when folded. Look for thick, hand-pressed varieties if you can find them, or give them a quick steam to soften before dipping into the consommé. Some chefs even make their own tortillas for ultimate flavor and durability—but that’s optional.
Serving Suggestions and Side Ideas
Quesabirria tacos are already a full-flavored, filling meal—but adding the right sides can elevate your spread from great to unforgettable. Whether you’re making these for Taco Tuesday, a family get-together, or a party platter, here are some killer additions to round out your meal:
Classic Sides
- Mexican Rice – A fluffy, tomato-based side that balances the richness of the tacos.
- Refried Beans or Charro Beans – Creamy and comforting; go with black or pinto beans for authentic flavor.
- Grilled Street Corn (Elote) – Smothered with mayo, cheese, lime, and chili powder—it’s a must.
- Pico de Gallo – Adds a fresh, zesty kick.
- Guacamole and Chips – Because why not? Avocado is never a bad idea.
Creative Twists
- Birria Ramen: Use leftover meat and consommé to make a fiery, fusion noodle bowl.
- Quesabirria Pizza: Yes, it’s a thing—cheesy birria meat on a crispy pizza crust.
- Birria Nachos: Tortilla chips topped with shredded birria, cheese, jalapeños, and crema.
And don’t forget the drinks. Agua frescas like hibiscus (jamaica), tamarind, or horchata pair perfectly. Or go all-in with a cold Mexican beer or margarita for the adults.
Pro Tip: Serve everything buffet-style so guests can build their tacos and dip to their heart’s content.
How to Store and Reheat Quesabirria
Quesabirria is best eaten fresh off the skillet, but it also makes for excellent leftovers—if you have any, that is.
Storing the Birria Meat and Consomé:
- Refrigerate: Store the meat and broth separately in airtight containers. They’ll last for up to 4–5 days.
- Freeze: You can freeze both the meat and the consommé for up to 3 months. Let them cool completely before transferring to freezer-safe bags or containers. Label with the date.
Reheating Tips:
- Stovetop: Warm the consommé in a saucepan over medium heat. Reheat the meat in a covered skillet with a splash of broth to keep it moist.
- Microwave: Not ideal for texture, but it works in a pinch. Cover with a damp paper towel and heat in 30-second bursts.
- Recrisp the Tacos: If you’ve already assembled and cooked the tacos, reheat them in a skillet with a touch of oil to restore the crispiness.
Avoid reheating in the oven unless you’re baking a big batch at once—it tends to dry out the meat and cheese.
Bonus: Use leftovers for a Birria Grilled Cheese Sandwich or Birria Egg Breakfast Tacos the next morning. You’re welcome.
Variations of Quesabirria You Should Try
You’ve mastered the classic beef Quesabirria, but why stop there? The beauty of this dish is how adaptable it is. Once you understand the base method, the flavor combinations are endless.
1. Chicken Quesabirria
Don’t eat red meat? No problem. Swap in chicken thighs or even rotisserie chicken. Use the same marinade and simmer until tender. It cooks faster and is just as satisfying.
2. Lamb Quesabirria
Going back to the roots—traditional birria is often made with goat or lamb. The gaminess of lamb pairs beautifully with the bold spices in the chili marinade. Expect richer, deeper flavors.
3. Vegetarian Quesabirria
Yes, it’s possible! Replace the meat with jackfruit, mushrooms, or seitan. The secret is in the marinade. Roast your veggies for extra depth and don’t skip the cheese—it’s what holds it all together.
4. Birria Tacos Dorados
Also called “crispy tacos,” these are deep-fried after being filled. They hold their shape and crunch longer, making them a hit for parties.
5. Quesabirria Grilled Cheese
It’s exactly what it sounds like—shredded birria meat and cheese between buttery slices of bread, grilled to crispy perfection. Dip in consomé and prepare to have your mind blown.
Experimenting keeps things exciting. Who knows? You might invent the next viral food trend.
FAQs about Quesabirria Recipe
1. Can I make Quesabirria with chicken?
Yes! Chicken thighs work great. Use the same marinade and simmer until tender—usually about 30–40 minutes on the stovetop or an hour in a slow cooker.
2. What’s the best cheese for Quesabirria tacos?
Oaxaca cheese is traditional, but mozzarella or Monterey Jack also work well. Avoid sharp cheeses like cheddar, which overpower the dish and don’t melt as smoothly.
3. Can I freeze Birria meat and consommé?
Absolutely. Store them separately in airtight containers or freezer bags. Freeze for up to 3 months and reheat slowly on the stovetop.
4. How do I keep tortillas from tearing when frying?
Make sure they’re warm and pliable. Dip briefly in the consommé—don’t soak. Using thicker, high-quality corn tortillas helps too.
5. Is Quesabirria spicy?
It has a mild to medium heat depending on the chilies used. You can adjust the spice by adding or reducing the chipotle or using milder chilies like guajillo.
Conclusion
Quesabirria tacos aren’t just a trend—they’re a full-on flavor experience. From the deeply marinated, fall-apart tender beef to the cheesy, crispy tortilla dipped in that glorious consommé, every bite hits like a fiesta in your mouth. Sure, it takes a little effort, but it’s so worth it. Whether you’re making them for the first time or turning it into a weekly ritual, this recipe is bound to impress.
Try it once, and you’ll be hooked. Don’t forget to tag your taco pics—this is one dish you’ll want to show off.