Pumpkin Crunch Recipe: There’s something magical about fall—the leaves change colors, the air becomes crisp, and pumpkin flavors take over our kitchens. If you’re looking to elevate your dessert game this season, you’ve got to try this homemade Pumpkin Crunch recipe. It’s got the creaminess of pumpkin pie, the crumbly goodness of a crisp topping, and the cozy warmth of spices that scream autumn. Whether you’re baking for Thanksgiving, a fall get-together, or simply satisfying your pumpkin cravings, this guide will walk you through every single step with ease.
Let’s dive into this rich, buttery, and delightfully spiced dessert!
What Is Pumpkin Crunch?
Pumpkin Crunch is like the lovechild of a pumpkin pie and a crumble dessert. At the base, you have a creamy, spiced pumpkin filling that closely resembles traditional pumpkin pie. But what sets it apart is the crunchy, buttery topping—usually made with cake mix, pecans, and melted butter—that bakes into a golden crust.
This dessert is layered, baked in a large baking dish (no need for a pie crust!), and often topped with whipped cream or even vanilla ice cream. It’s incredibly easy to make, uses pantry staples, and is a real crowd-pleaser during the holiday season.
Unlike the classic pie, there’s no need to fuss with rolling dough or worrying about a soggy bottom. It’s a no-fail recipe even beginners can master on the first try.
Why Pumpkin Crunch Is the Perfect Fall Dessert
Fall desserts need to hit a few key notes: warm, comforting, spiced, and just a little indulgent. Pumpkin Crunch checks every box.
- Easy to Make: You don’t need to be a seasoned baker. Everything comes together in a single pan.
- Make-Ahead Friendly: Great for preparing a day ahead—just reheat or serve cold.
- Feeds a Crowd: Ideal for parties, potlucks, and family dinners.
- Customizable: Go nut-free, add chocolate chips, or make it vegan—there are endless ways to tweak this to your liking.
If fall had a flavor, it would be pumpkin crunch. Now let’s get those ingredients together.
Ingredients You’ll Need
Getting the ingredients right is crucial for any recipe, but with Pumpkin Crunch, it’s all about balancing the creamy filling and the crunchy topping. Below is everything you’ll need to make the magic happen.
For the Pumpkin Filling
Here’s what you’ll need for that rich, flavorful pumpkin base:
- 1 can (15 oz) pumpkin puree – NOT pumpkin pie filling.
- 1 can (12 oz) evaporated milk
- 3 large eggs
- 1 cup granulated sugar
- 1 tsp ground cinnamon
- 1/2 tsp ground ginger
- 1/4 tsp ground cloves
- 1/4 tsp nutmeg
- 1/2 tsp salt
This combination gives you that classic pumpkin pie flavor—smooth, spiced, and sweet without going overboard.
For the Crunch Topping
Here comes the fun part—the crunch! This topping gives the dessert its signature texture.
- 1 box yellow cake mix (about 15 oz)
- 1 cup chopped pecans or walnuts (optional but recommended)
- 1 cup (2 sticks) melted butter
- 1/4 cup brown sugar (for extra caramelized flavor)
This topping bakes into a buttery, golden crust that contrasts perfectly with the soft pumpkin base.
Optional Ingredients for Extra Flavor
Want to level it up? Try adding:
- 1 tsp vanilla extract – to enhance flavor depth
- 1/4 tsp allspice – for added spice complexity
- A sprinkle of sea salt on top – to balance sweetness
Every ingredient plays a role, and even a small tweak can turn this dish from great to unforgettable.
Tools and Equipment Required
Don’t worry—you don’t need fancy equipment to make Pumpkin Crunch. Most of these tools are probably already in your kitchen.
Must-Have Kitchen Tools
Here’s the basic lineup:
- Mixing bowls (2) – One for the filling, one for the topping.
- Whisk or electric hand mixer – To blend the pumpkin mixture thoroughly.
- 9×13-inch baking dish – A must for even baking and proper layering.
- Measuring cups and spoons – Accuracy matters, especially for baking.
- Spatula or spoon – For spreading the layers evenly.
These are the essentials. With just these tools, you’re all set to start.
Optional Tools to Make It Easier
Want to speed things up?
- Food processor or nut chopper – For quickly chopping nuts.
- Parchment paper or non-stick spray – Helps with easy removal and cleanup.
- Cooling rack – To cool the dessert evenly post-baking.
Having the right tools can make your baking smoother and more enjoyable—but don’t sweat it if you don’t have every item. This recipe is super forgiving.
Prepping Before You Start
Before we dive into the step-by-step baking process, it’s important to get everything set up. A little prep can go a long way in making this process smooth and stress-free.
How to Prepare Your Ingredients
- Measure ahead of time: Lay out all your ingredients on the counter and measure them before mixing.
- Room temperature eggs: Take them out 20 minutes early—this helps them mix more easily.
- Melt the butter: Do it gently on the stove or in short bursts in the microwave. You don’t want it too hot.
- Preheat the oven: Always preheat to 350°F (175°C) before starting anything else.
- Grease the baking dish: Use non-stick spray or a thin layer of butter to prevent sticking.
When you prep like a pro, baking becomes a breeze.
Tips for Prepping Efficiently
- Use small bowls or ramekins to portion out spices, sugar, and vanilla.
- Keep a damp towel under your cutting board or mixing bowl to prevent slipping.
- Clean as you go—nothing worse than post-dessert chaos!
All set? Let’s get to the baking part now.
Step-by-Step Guide to Making Pumpkin Crunch
Step 1: Preheat the Oven and Prep the Pan
Preheat your oven to 350°F (175°C). Lightly grease a 9×13-inch baking pan with butter or non-stick spray, or line it with parchment paper for easy removal.
Step 2: Mix the Pumpkin Filling
In a large bowl, whisk together pumpkin puree, evaporated milk, eggs, sugar, cinnamon, nutmeg, and salt until smooth and creamy. This becomes the flavorful base of your dessert.
Step 3: Prepare the Crunch Topping
Sprinkle a box of yellow cake mix evenly over the pumpkin mixture. Drizzle melted butter on top, letting it soak in naturally. For extra texture, add chopped pecans or walnuts.
Step 4: Assemble the Dessert
Pour the pumpkin filling into the prepared pan, then top it with the buttery cake mix layer.
Step 5: Bake to Perfection
Bake for 50–60 minutes, or until the top is golden brown and crisp, and the filling is set.
Step 6: Cool and Serve
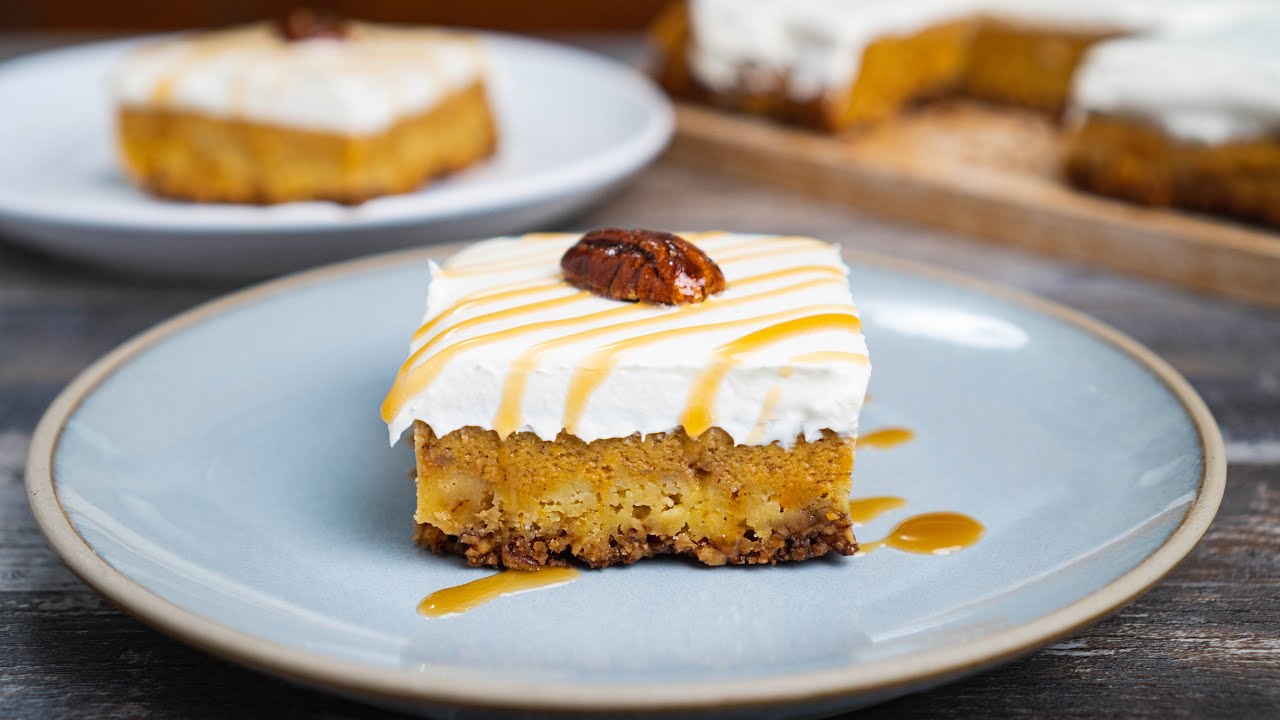
Let it cool completely before slicing. Serve plain, with whipped cream, or a scoop of vanilla ice cream for the perfect fall treat.
Tips and Tricks for the Best Pumpkin Crunch
Texture Tips
Texture can make or break a dessert, especially with something like Pumpkin Crunch where contrast is key. Here’s how to make sure every bite hits the mark:
- Don’t overmix the pumpkin filling. You want it smooth but not airy. Too much air can create bubbles that cause uneven baking.
- Evenly spread the cake mix. Don’t dump it in one spot and try to spread it later. Sprinkle it across the pumpkin layer right from the start.
- Distribute butter properly. Uneven butter coverage can lead to dry, floury patches on top. Pour it slowly and methodically.
- Use chopped nuts, not whole. This ensures even distribution and a more pleasant bite.
- Cool before cutting. Cutting into the dessert too soon will result in a sloppy mess. Cooling helps the filling firm up and the topping set.
Want your crunch topping extra crispy? Broil it for 1–2 minutes at the very end, but watch closely to avoid burning.
Flavor Enhancements
Sometimes the smallest tweaks can bring massive flavor payoffs. Here are a few flavor-boosting ideas:
- Brown the butter before adding it to the topping. It adds a nutty, deep flavor.
- Add a dash of maple syrup to the filling for a fall-forward twist.
- Sprinkle flaked sea salt on top after baking to enhance the sweetness.
- Use pumpkin spice blend instead of separate spices for simplicity.
Feel free to experiment, but taste as you go. Pumpkin Crunch is super forgiving, which makes it the perfect playground for your baking creativity.
Variations You Can Try
Gluten-Free Version
Want to make this recipe gluten-free without compromising flavor or texture? Here’s how:
- Use a gluten-free yellow cake mix—there are many great options on the market now.
- Double-check all other ingredients (especially spices and canned goods) to ensure they’re certified gluten-free.
That’s it. This dessert adapts beautifully, and no one will even notice the switch.
Vegan-Friendly Alternative
Making this recipe vegan is surprisingly easy. Here’s what you’ll need to swap:
- Replace eggs with flax eggs (1 tbsp ground flax + 3 tbsp water per egg).
- Use plant-based butter instead of regular butter.
- Substitute evaporated milk with full-fat coconut milk or any rich plant milk.
Stick to these swaps and you’ll have a completely plant-based version that’s just as indulgent.
Nut-Free Options
If you or someone in your home has a nut allergy, skip the pecans or walnuts. Here’s what you can use instead:
- Rolled oats – for a similar crunch without the allergens.
- Toasted pumpkin seeds (pepitas) – nut-free and very fitting for a pumpkin dessert.
- Crushed graham crackers or granola – these can add crunch and extra flavor.
Pumpkin Crunch is incredibly versatile, making it ideal for dietary modifications without sacrificing its wow factor.
How to Store and Reheat Pumpkin Crunch
Refrigeration Guidelines
Pumpkin Crunch contains eggs and dairy, so it needs to be stored properly.
- Allow the dessert to cool completely after baking.
- Cover the dish tightly with plastic wrap or foil.
- Store in the fridge for up to 4–5 days.
Pro tip: Use a glass container with a lid for easy reheating.
Freezing Instructions
Yes, you can freeze Pumpkin Crunch!
- Cool the dessert fully.
- Cut into portions or freeze whole.
- Wrap tightly with plastic wrap and foil or use an airtight container.
- Freeze for up to 3 months.
To reheat, thaw overnight in the fridge and warm it in the oven at 300°F for about 15 minutes.
Reheating Without Losing Texture
Want to revive that just-baked crunch? Here’s how:
- Avoid microwaving—it makes the topping soggy.
- Use a toaster oven or regular oven.
- Bake at 325°F for 10–15 minutes uncovered.
The topping will re-crisp, and the filling will warm up just right. Serve with fresh whipped cream for a second-day encore.
Serving Suggestions
Best Toppings to Add
Pumpkin Crunch is already a knockout, but the right toppings can elevate it to legendary status.
- Whipped cream – classic and light.
- Vanilla ice cream – hot-and-cold contrast is irresistible.
- Caramel drizzle – rich and indulgent.
- Toasted pecans – more crunch, more flavor.
- A dusting of powdered sugar – simple but elegant.
Stack on two or three of these, and you’ve got yourself a bakery-worthy dessert.
Pairing with Drinks
Pairing the right drink can take your Pumpkin Crunch experience to the next level.
- Coffee or espresso – balances the sweetness perfectly.
- Chai tea latte – complements the spices in the dessert.
- Mulled wine or spiced cider – festive and flavorful.
- Bourbon or dark rum – for an adult twist.
Whether it’s brunch, dessert after dinner, or a holiday gathering, these pairings complete the experience beautifully.
Common Mistakes to Avoid
Overbaking or Undermixing
These are two major pitfalls that can ruin the perfect Pumpkin Crunch:
- Overbaking makes the filling dry and the topping too hard.
- Undermixing the pumpkin filling leads to uneven flavor and texture.
How to avoid them?
- Follow baking times, but rely more on visual cues: golden brown topping and set filling.
- Stir the pumpkin mixture thoroughly until fully combined—no streaks or lumps.
Also, keep a close eye during the last 10 minutes of baking. That’s when things can go from perfect to overdone real quick.
Choosing the Wrong Ingredients
Using the wrong kind of pumpkin is a common issue. You need 100% pure pumpkin puree, not pumpkin pie mix. The latter already contains sugar and spices, which throws off your recipe.
Also:
- Use real butter, not margarine, for better flavor.
- Don’t substitute milk for evaporated milk—the texture won’t be as creamy.
- Stick with a yellow cake mix, unless experimenting (and know what to expect).
Precision matters. The better your ingredients, the better your results.
Nutritional Information
Calorie Breakdown
Pumpkin Crunch may not be the lightest dessert on the table, but it’s totally worth the indulgence. Here’s an approximate nutritional breakdown for a standard serving (based on 12 servings per 9×13 pan):
| Nutrient | Amount per Serving |
|---|---|
| Calories | ~350–400 kcal |
| Total Fat | ~20–24g |
| Saturated Fat | ~10g |
| Cholesterol | ~60mg |
| Sodium | ~300–350mg |
| Total Carbohydrate | ~40–45g |
| Dietary Fiber | ~2–3g |
| Sugars | ~28–30g |
| Protein | ~4–5g |
Note: These values can vary depending on your exact ingredients and any substitutions.
Healthier Substitutes
If you’re watching your calorie intake or prefer lighter desserts, you can still enjoy Pumpkin Crunch with a few smart swaps:
- Use light evaporated milk instead of the full-fat version.
- Swap out half the sugar for a sugar substitute like monk fruit or erythritol.
- Use half the butter in the topping and add some oats for crunch.
- Opt for a low-sugar cake mix or make your own topping from scratch using almond flour and oats.
- Add extra pumpkin puree for fiber and richness.
These changes can reduce calories while still delivering that sweet, spiced flavor you crave.
FAQs about Pumpkin Crunch Recipe
1. Can I use fresh pumpkin instead of canned?
Absolutely! Just roast, puree, and strain your fresh pumpkin until smooth. You’ll need about 1 3/4 cups of fresh puree to match one 15-ounce can. Make sure it’s not watery—too much moisture can mess with the texture.
2. Can I make Pumpkin Crunch ahead of time?
Yes! It’s one of those desserts that gets better as it sits. You can make it a day in advance, store it in the fridge, and reheat before serving. Just follow proper storage and reheating steps mentioned earlier.
3. What if I don’t have cake mix?
No problem. You can create a homemade substitute:
- 1 cup flour
- 1/2 cup sugar
- 1 tsp baking powder
- A pinch of salt
Mix these and use as you would the cake mix. It won’t be exactly the same but still delicious.
4. How do I know when it’s done baking?
The top should be golden brown and the edges firm. Insert a toothpick into the center—it should come out mostly clean. If the topping starts to burn before the filling sets, cover loosely with foil for the last 10–15 minutes.
5. Can I freeze leftovers?
Yes! Let it cool completely, then freeze in an airtight container or wrap individual slices tightly in foil. It’ll stay good for up to 3 months. Just thaw and reheat in the oven when ready to serve.
Conclusion
Pumpkin Crunch is the kind of dessert that wins hearts wherever it goes. It combines the creamy, comforting vibe of pumpkin pie with the irresistible crisp of a crumble topping—all without the hassle of a pie crust. Whether you’re baking it for the holidays, a weekend treat, or just because pumpkin sounds good today, you can count on this recipe to deliver.
It’s easy, flexible, and completely addictive. With simple ingredients, minimal prep, and a flavor that screams fall, this is one dessert that deserves a permanent spot in your baking rotation.
So grab that can of pumpkin, turn on the oven, and get ready to fall in love with your new favorite seasonal dessert.