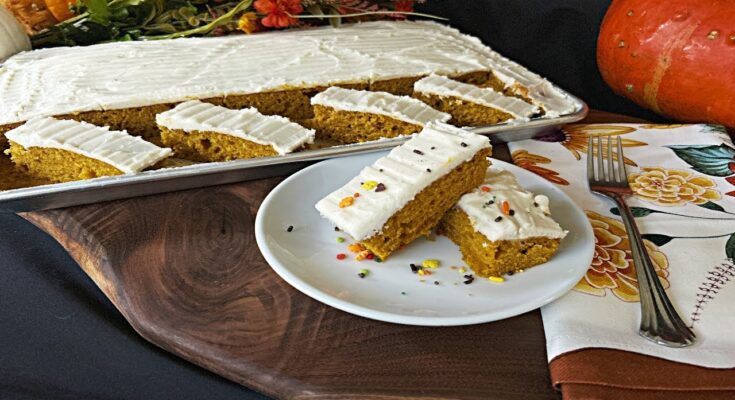
Pumpkin Bar Recipe: Pumpkin bars are one of those timeless treats that scream autumn. These delicious, moist bars are like a soft cross between cake and a chewy cookie, with the rich, spiced flavor of pumpkin that brings comfort with every bite. Imagine walking into a cozy kitchen filled with the aroma of cinnamon, nutmeg, and cloves—yep, that’s what a good batch of pumpkin bars delivers.
They’re the perfect dessert for anyone who loves a quick and easy sweet treat that doesn’t require frosting skills or delicate decorating. Great for potlucks, Thanksgiving dinners, or just your average Tuesday when you need something a little sweet, pumpkin bars are a surefire crowd-pleaser. They’re also incredibly versatile—toss in some chocolate chips, top with cream cheese frosting, or make them into breakfast bars with oats.
Why do people love them so much? Probably because they’re ridiculously easy to make and pack a ton of flavor. Plus, you don’t need to be a baking expert to nail this recipe. It’s forgiving, fun, and makes your house smell amazing. Ready to get started? Let’s break it all down.
Ingredients Needed
Let’s start by gathering the ingredients. This recipe keeps things simple but flavorful. Here’s what you’ll need:
Dry Ingredients:
- 1 3/4 cups all-purpose flour – Gives structure to your bars.
- 1 teaspoon baking soda – Helps the bars rise and stay fluffy.
- 1/2 teaspoon baking powder – Adds lightness.
- 1/2 teaspoon salt – Balances the sweetness.
- 1 1/2 teaspoons ground cinnamon – Key to that cozy flavor.
- 1/2 teaspoon ground nutmeg – Adds depth.
- 1/4 teaspoon ground cloves – Brings out the warm spice.
- 1/4 teaspoon ground ginger – A gentle heat for that pumpkin pie spice blend.
Wet Ingredients:
- 4 large eggs – Bind everything together.
- 1 cup granulated sugar – Sweetens the bars.
- 1/2 cup brown sugar – Adds moisture and a molasses richness.
- 1 cup vegetable oil – Keeps the bars moist.
- 1 can (15 ounces) pumpkin puree – The star of the show.
Optional Add-ins:
- 1/2 cup chopped walnuts or pecans – Adds a nutty crunch.
- 1/2 cup mini chocolate chips – For a dessert-style variation.
- Raisins or dried cranberries – For a chewy, tart contrast.
These ingredients combine to create a rich, moist texture and that unmistakable pumpkin flavor. You can always adjust the spice levels based on your personal taste, but this blend will give you a classic, well-balanced result.
Tools and Equipment Required
Before we dive into mixing, let’s make sure you have everything you need:
Baking Essentials:
- 9×13-inch baking pan – Ideal for a traditional pumpkin bar batch.
- Parchment paper or non-stick spray – To prevent sticking.
- Measuring cups and spoons – Accuracy matters in baking!
Mixing Tools:
- Mixing bowls (large and medium) – You’ll need separate bowls for dry and wet ingredients.
- Whisk or electric mixer – Makes combining ingredients easier.
- Rubber spatula – Great for folding and scraping the sides of the bowl.
- Cooling rack – To cool the bars properly before cutting.
Having these tools prepped and ready will make the entire process smoother and quicker. Don’t skip the parchment paper—it’ll save you a lot of cleanup time later.
Preparing for the Recipe
Let’s do a little prep work before we jump into the mixing and baking. A few small steps can make a big difference in your baking results.
Prepping the Ingredients:
Start by measuring out all your ingredients in advance. It sounds simple, but this trick—called “mise en place”—is what professional chefs swear by. It not only speeds up your workflow but helps avoid mistakes like forgetting baking soda or adding too much flour.
Crack your eggs into a small bowl before adding them to the mix. This helps avoid any shell fragments or bad eggs ruining your whole batch.
If your brown sugar has hardened, a quick tip: microwave it for about 15 seconds with a damp paper towel to soften it up.
Preheating the Oven:
Set your oven to 350°F (175°C). Preheating is critical—if your oven isn’t hot enough when the bars go in, they won’t bake evenly. This step also gives your batter time to rest and absorb all those flavors while the oven gets ready.
Now that everything is in place and your kitchen smells like fall spices, it’s time to get into the real action.
Step-by-Step Instructions
Here comes the fun part—actually making the pumpkin bars!
Step 1: Mixing the Dry Ingredients
In a medium bowl, whisk together the flour, baking soda, baking powder, salt, cinnamon, nutmeg, cloves, and ginger. Make sure everything is evenly combined. This not only ensures even flavor but prevents clumps of spice or leavening agents in your final bars.
Mixing the dry ingredients separately before adding them to the wet mixture helps maintain a smooth texture and even rise.
Step 2: Mixing the Wet Ingredients
Now grab a large mixing bowl. Add the eggs, granulated sugar, brown sugar, and vegetable oil. Use a hand whisk or an electric mixer to blend them until smooth and creamy. This step is all about building the base for your moist, rich bars. Once everything looks well-mixed and the sugar is dissolved into the oil and eggs, fold in the pumpkin puree.
The puree brings not only flavor but moisture, acting as the key ingredient that makes pumpkin bars so incredibly soft. Mix until it’s fully incorporated—you should have a rich, orange-colored batter that smells like fall already.
Make sure you don’t overmix, though. Just stir enough to combine the ingredients thoroughly. Overmixing can create a tougher texture, and we’re going for moist and tender here.
Step 3: Combining Everything
Next, it’s time to bring the wet and dry together. Slowly add your dry mixture into the wet mixture. Don’t dump it all in at once—do it in batches. Stir gently until there are no dry streaks, and you get a smooth, unified batter.
If you’re adding nuts, chocolate chips, or dried fruit, this is the time to fold them in gently with a spatula. This helps distribute them evenly throughout the batter without sinking to the bottom.
Don’t be alarmed if the batter feels a little thick—that’s exactly what we want. It will bake up beautifully into soft, fluffy bars.
Step 4: Baking the Pumpkin Bars
Now it’s time to transfer that glorious batter into your prepared baking pan. Spread it out evenly using a spatula to make sure every corner is filled. You want a consistent thickness across the pan for even baking.
Pop it into the preheated oven and bake at 350°F (175°C) for 25 to 30 minutes. Around the 25-minute mark, do the toothpick test: insert a toothpick into the center. If it comes out clean or with just a few crumbs (not wet batter), it’s done.
Let the pan cool on a wire rack for at least 30–40 minutes. Don’t try to cut the bars while they’re still warm—they’ll fall apart. Letting them cool completely helps them set up into perfect, sliceable bars.
Step 5: Cooling and Cutting
Once cooled, it’s time to cut the bars. Use a sharp knife and wipe it clean between cuts to keep the edges neat. You can slice them into squares, rectangles, or even triangles—get creative with it!
Want that professional bakery look? Let the bars cool further in the fridge for 15–20 minutes before slicing. It firms them up just enough to create clean lines.
If you plan on frosting them (and we highly recommend it), don’t skip the cooling step. Spreading frosting on warm bars leads to a melted, messy layer instead of that beautiful, creamy topping.
Making the Cream Cheese Frosting
This is where things go from great to spectacular. Cream cheese frosting on top of pumpkin bars is like the cherry on a sundae—it just makes everything better.
Ingredients for Frosting:
- 8 oz cream cheese, softened
- 1/2 cup unsalted butter, softened
- 2 cups powdered sugar
- 1 teaspoon vanilla extract
- Pinch of salt
Mixing and Application:
In a medium bowl, beat the softened cream cheese and butter together until smooth and creamy. Add the powdered sugar one cup at a time and mix until light and fluffy. Finish with vanilla extract and a pinch of salt to balance the sweetness.
Spread this luscious frosting evenly over your cooled pumpkin bars using an offset spatula or the back of a spoon. It’s rich, tangy, and perfectly complements the spiced pumpkin base.
For an extra flair, dust the top with a little cinnamon or nutmeg, or even sprinkle some crushed pecans for a fancy finish.
Tips for Perfect Pumpkin Bars
Want to take your pumpkin bars to pro level? These little tricks make a big difference:
Texture Tips:
- Don’t overmix the batter once you combine wet and dry ingredients. It can lead to a rubbery texture.
- Use room-temperature eggs and pumpkin puree. It helps everything blend smoothly.
- Add a spoonful of sour cream or Greek yogurt for extra richness.
Storage and Shelf Life:
- Store in an airtight container in the fridge for up to 5 days.
- For longer storage, freeze individual bars wrapped in plastic wrap and foil. They’ll last up to 3 months.
- Let frozen bars thaw at room temperature or in the fridge overnight before serving.
Variations of Pumpkin Bars
Pumpkin bars are a blank canvas for creativity. Here are some fun ways to switch things up:
Gluten-Free Version:
Swap the all-purpose flour with a 1:1 gluten-free flour blend. Make sure your baking powder and other ingredients are also labeled gluten-free.
Vegan Pumpkin Bars:
Replace the eggs with flax eggs (1 tbsp flaxseed + 2.5 tbsp water = 1 egg) and use plant-based butter and cream cheese for the frosting.
Pumpkin Chocolate Chip Bars:
Fold in 1/2 to 1 cup of mini chocolate chips into the batter before baking for a sweeter, dessert-forward bar.
Serving Suggestions
Pumpkin bars are incredibly versatile, which means they can be served in multiple delightful ways depending on the occasion. Whether you’re making them for a cozy family night, a potluck party, or a Thanksgiving dessert table, here are some creative and mouthwatering serving ideas:
Best Pairings:
- With Coffee or Chai: The warm spices in pumpkin bars pair wonderfully with a steamy cup of coffee, chai tea, or even a pumpkin spice latte. It’s the perfect fall treat combo.
- With a Scoop of Vanilla Ice Cream: Serve your bars warm with a scoop of creamy vanilla or caramel swirl ice cream on top. The contrast of warm and cold is divine.
- With Whipped Cream: Don’t feel like making frosting? A dollop of whipped cream (homemade or store-bought) on top is light, fluffy, and still adds richness.
- With a Caramel Drizzle: Drizzle a bit of warm caramel sauce over the bars for a decadent finish. You can even sprinkle a touch of sea salt on top for a salted caramel twist.
Presentation Tips:
- Dress Them Up: Add a pinch of cinnamon, nutmeg, or pumpkin spice on top of the frosting for a beautiful finishing touch.
- Use a Decorative Plate or Cake Stand: Elevate the look of your dessert table by presenting the bars on a tiered cake stand or a decorative plate lined with parchment paper.
- Cut Clean, Even Squares: To make them look bakery-perfect, use a warm knife to cut the bars. Clean the blade between each slice for neat edges.
These serving ideas don’t just make your pumpkin bars more delicious—they make them unforgettable.
FAQs about Pumpkin Bar Recipe
Here are some common questions people ask about pumpkin bars—along with clear, helpful answers.
1. Can I use fresh pumpkin instead of canned pumpkin puree?
Absolutely! Just roast, mash, and puree fresh pumpkin until smooth. Make sure it’s well-drained and not watery. Canned puree is more consistent, but fresh pumpkin offers a homemade touch if you’re up for the extra step.
2. Why did my pumpkin bars turn out dry?
This can happen if you overbake them or measure the flour incorrectly. Always spoon the flour into your measuring cup and level it off with a knife—don’t scoop straight from the bag. Also, don’t forget to check your oven’s temperature with an oven thermometer if things seem off.
3. Can I make pumpkin bars ahead of time?
Yes, and they actually taste better the next day! Store them in an airtight container in the fridge. They’ll stay moist and flavorful, and the frosting will have time to set perfectly.
4. Can I freeze pumpkin bars?
You bet! Freeze the bars (frosted or unfrosted) by wrapping them tightly in plastic wrap and then foil. Store in a freezer-safe container for up to 3 months. Thaw overnight in the fridge before serving.
5. Are pumpkin bars healthy?
They’re definitely a treat, but you can make them healthier. Try cutting the sugar, using applesauce instead of some oil, or using whole wheat flour for added fiber. There are also vegan and gluten-free variations that make them more diet-friendly.
Conclusion
There you have it—a full, step-by-step guide to making the best pumpkin bars you’ll ever taste. These bars are soft, moist, packed with warm spices, and topped with an irresistibly creamy frosting. Whether you’re baking for a cozy fall day, a family gathering, or just because you’re craving something delicious, this recipe is your new go-to.
With simple ingredients and easy instructions, you don’t need to be a seasoned baker to pull this off. And the best part? You can tweak and twist the recipe however you like to match your taste. Add chocolate chips, skip the frosting, go gluten-free—the pumpkin bar possibilities are endless.
So grab that can of pumpkin, preheat your oven, and let the magic happen. Once you make these once, they’ll become a seasonal staple in your kitchen for years to come.


