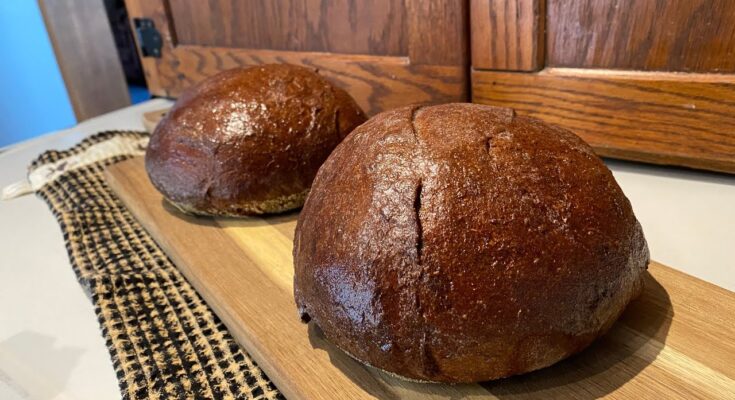
Pumpernickel Bread Recipe: Pumpernickel bread is a dark, dense, and hearty loaf known for its earthy flavor and chewy texture. Traditionally made with coarse rye flour and a slow-baking process, it has deep German roots and a taste that sets it apart from lighter, airier loaves. Unlike your standard white or whole wheat bread, pumpernickel brings a bold flavor profile to the table, often tinged with molasses, cocoa, or even coffee for a deeper color and complexity.
This bread isn’t just for the rye lovers—it’s also for anyone who enjoys a slice that’s rich in flavor and texture. The flavor is slightly sweet with a subtle tang, and the dense crumb makes it perfect for robust toppings like cured meats, sharp cheeses, or even avocado. It’s a bread that holds up and doesn’t back down.
Beyond its flavor, pumpernickel’s health perks include high fiber, vitamins from whole grains, and a lower glycemic index, making it ideal for people who are conscious about blood sugar. It’s not only a classic but also a smart choice for healthy eating.
A Brief History of Pumpernickel
The story of pumpernickel dates back to 15th-century Germany, specifically to the Westphalia region. Its name, often believed to mean “devil’s fart” in German folklore, stems from its heavy nature and how tough it was on the digestive system due to its unrefined flour. But don’t let that scare you away—the modern version is far easier on the stomach and much more delicious.
Traditionally, pumpernickel was baked for up to 24 hours in low-heat steam ovens, giving it that unmistakable deep brown color and slightly sour flavor without the use of coloring agents or sweeteners. German bakers used only rye flour and sourdough starter, producing a bread that was nutritious, long-lasting, and ideal for storage.
Today, while some bakers stick to that age-old method, many home bakers and bakeries have adopted quicker, more accessible methods. These use dark rye flour, wheat flour, instant yeast, and often a bit of molasses or brown sugar to replicate the classic taste and color in a fraction of the time.
Ingredients Needed for Pumpernickel Bread
Main Ingredients Breakdown
To get that classic pumpernickel flavor at home, you’ll need a mix of traditional and pantry-friendly ingredients. Here’s a breakdown of the core components that form the base of a good loaf:
- Rye flour (preferably medium or dark): This is the soul of pumpernickel bread. Rye brings the dense texture and unique flavor.
- All-purpose or bread flour: Helps lighten the loaf a bit and adds structure.
- Cocoa powder (unsweetened): Not for sweetness, but for a rich dark color and a deep earthy note.
- Molasses: Adds sweetness and color. Choose unsulphured molasses for the best taste.
- Instant yeast: Makes the rise quicker and more reliable than a sourdough starter for beginners.
- Warm water: Activates the yeast and binds the dough.
- Salt: Enhances all the other flavors.
- Caraway seeds (optional): Adds that classic rye bread aroma and a slightly spicy, nutty flavor.
Most of these ingredients are easy to find, and if you’re a frequent baker, they’re probably already in your kitchen.
Optional Add-Ins for Flavor Enhancement
While the base recipe is plenty flavorful, you can elevate your loaf even further with a few smart additions:
- Coffee (brewed, cooled): Swap part of the water with strong coffee for an even deeper flavor.
- Onions (dried or sautéed): Adds a savory note that pairs beautifully with the rye.
- Sunflower or pumpkin seeds: For a crunchy contrast in texture.
- Wheat bran or cracked rye: Boosts fiber and gives a rustic, hearty feel.
These tweaks are optional but fun to experiment with once you’ve mastered the core recipe.
Tools and Equipment Required
Kitchen Tools Checklist
To make your pumpernickel bread at home, you won’t need a bakery’s worth of gear—just a few basic tools:
- Large mixing bowl: For combining ingredients.
- Wooden spoon or dough whisk: To mix the dough before kneading.
- Measuring cups and spoons: Accuracy is key in bread making.
- Bench scraper: Handy for kneading and shaping.
- Loaf pan or Dutch oven: Depending on your preferred shape and baking method.
- Kitchen scale (optional but recommended): For precise measurements, especially when using rye flour.
- Plastic wrap or clean towel: For covering the dough during rising.
- Cooling rack: To allow airflow after baking and prevent sogginess.
Alternative Options for Home Bakers
If you don’t have all of the above, no worries! You can make do with:
- A mixing bowl and your hands for kneading
- A regular baking sheet if you don’t own a loaf pan
- An oven-safe pot with lid (like a cast iron pot) instead of a Dutch oven
- A clean kitchen towel instead of plastic wrap
The goal is rustic homemade bread, not perfection. With a little improvisation, you’ll still get amazing results.
Preparing the Dough
Mixing Dry and Wet Ingredients
Start by combining your dry ingredients: rye flour, bread flour, cocoa powder, salt, and caraway seeds if using. Give them a good mix to evenly distribute everything.
In another bowl or measuring cup, mix your warm water (or coffee), molasses, and instant yeast. Let it sit for 5 minutes until foamy—this means the yeast is activated and ready to work.
Now pour the wet mixture into the dry ingredients. Stir until a shaggy dough forms. It might be sticky at first—that’s okay. Rye flour doesn’t develop gluten like wheat, so it’ll always feel a bit different. If it’s too dry, add a splash of water. Too wet? A bit more bread flour does the trick.
Once mixed, transfer it to a lightly floured surface for kneading.
Kneading Techniques for Better Texture
Kneading rye dough is a bit different. You’re not aiming for the same stretchy gluten windowpane you’d get in a white loaf. Instead, you want to develop enough structure so the dough holds shape but stays moist and dense.
Use the “push, fold, turn” method for about 8–10 minutes. You’ll know it’s ready when the dough is smooth, springy, and no longer sticky.
Now it’s time for the first rise.
First Rise and Shaping the Loaf
How Long Should You Let the Dough Rise?
Once your dough is kneaded to the right texture, it’s time for the first rise—a crucial step for flavor and structure development. Transfer your dough to a greased bowl and cover it with a clean towel or plastic wrap. This helps retain moisture and keeps the top from drying out.
Place the bowl in a warm, draft-free area of your kitchen. If your house is on the cooler side, turn on your oven for a minute, then turn it off and let the dough rise inside with the door closed.
Let the dough rise for 90 minutes to 2 hours, or until it has doubled in size. You’ll notice a slightly puffed appearance and a spongy feel when gently poked. Don’t rush this part—it’s where all that yeasty magic happens, developing flavor and preparing the dough for baking.
One thing to note: Rye dough doesn’t rise as dramatically as wheat-based dough, so don’t worry if it’s not towering. As long as it’s noticeably bigger and feels lighter, you’re good to go.
Shaping for a Traditional Look
Once the first rise is done, gently deflate the dough by pressing it down lightly. This removes large air pockets and prepares it for shaping. Turn it out onto a floured surface and shape it based on how you want the final loaf to look.
For a classic loaf, shape it into a tight log and place it into a greased loaf pan. Press it in gently so it settles evenly.
Prefer a more rustic, free-form shape? Form the dough into a round boule or oval and place it on a parchment-lined baking sheet or inside a Dutch oven.
Let it rise again—this second rise (called “proofing”) takes about 30–45 minutes. The dough should puff up slightly but not double in size.
Before baking, you can slash the top with a sharp knife or lame for that artisan-style finish. This also allows the steam to escape while baking and prevents cracking in unexpected places.
Baking the Pumpernickel Bread
Ideal Baking Temperatures and Times
Now it’s time to turn that raw dough into beautiful, aromatic pumpernickel bread. Preheat your oven to 375°F (190°C) at least 20 minutes before baking. If you’re using a Dutch oven, place it inside to preheat as well—this creates a steamy environment perfect for a crusty finish.
Place your dough inside the oven and bake for 35–45 minutes. If you’re baking in a loaf pan, the sides should pull away slightly, and the top will be firm and dark brown. For round loaves or Dutch oven baking, look for a firm crust and hollow sound when you tap the bottom.
For an extra check, insert a food thermometer into the center. A finished loaf should read 200°F (93°C) internally.
If the top is browning too fast, you can loosely tent it with aluminum foil during the last 15 minutes. This helps avoid over-darkening while ensuring the inside is cooked through.
How to Know When It’s Done
Knowing when your pumpernickel bread is perfectly baked can feel like a guessing game, but here are some foolproof signs:
- Color: It should have a deep, rich brown hue.
- Crust: Firm and slightly crisp, not soft or pale.
- Sound: Tap the bottom—if it sounds hollow, it’s ready.
- Smell: Your kitchen will smell amazing. That nutty, toasted aroma is a sure sign.
Once done, remove it from the oven and immediately transfer it to a cooling rack. Leaving it in the pan too long can lead to a soggy bottom due to trapped steam.
Cooling and Storing the Bread
Cooling Tips to Retain Moisture
As tempting as it is to slice into that warm, fresh-baked loaf, patience pays off here. Let your bread cool for at least 1–2 hours before slicing. Cutting too soon can ruin the texture and release moisture that should stay inside.
Place your bread on a wire rack to cool. This allows air to circulate all around, preventing a soggy bottom and helping the crust set properly. If you’ve baked in a Dutch oven, be sure to remove it from the pot to avoid overcooking or sweating.
During cooling, the internal structure of the bread stabilizes, and the flavors develop even more. Trust the process—you’ll get clean slices and a better bite if you wait.
Best Storage Practices for Freshness
To keep your pumpernickel bread fresh for days, follow these storage tips:
- Short-term (1–3 days): Wrap it in a clean kitchen towel or paper bag. Store at room temperature away from direct sunlight.
- Mid-term (3–5 days): Use a bread box or wrap it in plastic wrap or foil to retain moisture.
- Long-term (1–2 months): Slice and freeze it. Use freezer-safe bags and remove as much air as possible. You can toast slices directly from frozen.
Avoid refrigerating fresh bread—it dries it out faster due to the cold environment. If you want to revive slightly stale bread, just warm it in the oven at 300°F for about 10 minutes.
Serving Suggestions
Best Ways to Enjoy Pumpernickel Bread
Pumpernickel bread is incredibly versatile. Its bold flavor pairs wonderfully with a range of toppings, making it a go-to for any meal or snack. Here are some delicious ways to enjoy it:
- Toasted with butter: Simple, hearty, and satisfying.
- With cream cheese and smoked salmon: A classic that never fails.
- Avocado and poached egg: The perfect brunch toast.
- Ham and Swiss sandwich: Bold flavors call for bold meats and cheeses.
- Nut butter and banana: A sweet-savory treat for breakfast or a snack.
You can also use it for croutons in salads or to make a killer grilled cheese sandwich. The dense structure holds up well under heat and pressure.
Pairing Ideas with Meals or Toppings
Looking for full meal pairings? Try these:
- Soups: Perfect with lentil, split pea, or tomato soups.
- Charcuterie boards: Add slices of pumpernickel alongside cured meats, pickles, and cheeses.
- Eggs and breakfast dishes: Use it as a side or toast base for scrambled eggs and sausage.
The bold taste and chewy texture of pumpernickel stand up to intense flavors, so don’t be shy about getting creative.
Common Mistakes to Avoid
Overproofing or Underbaking
When making pumpernickel bread at home, a few common mistakes can mess with your results—and the biggest ones are overproofing and underbaking.
Overproofing happens when the dough is left to rise too long, causing the yeast to exhaust itself. When that happens, the dough can collapse, giving you a dense, sunken loaf with a sour, off-putting flavor. To avoid this, set a timer during both the first and second rises. Keep an eye on how much the dough grows—remember, rye flour won’t puff up as much as white flour, so don’t expect massive expansion.
Underbaking is another common issue. Pumpernickel’s dark color can be deceiving—it might look done on the outside, while still doughy inside. Always check the internal temperature (aim for around 200°F or 93°C), and give it a tap test to listen for that hollow sound. If in doubt, give it an extra 5 minutes in the oven.
A pro tip? Let the bread rest after baking. Cutting it while too warm can lead to a gummy texture, ruining the effort you’ve put in.
Ingredient Substitutions to Watch
Swapping ingredients might sound harmless, but with pumpernickel bread, it can drastically affect the flavor, color, and structure. Here’s what to watch out for:
- Rye flour: Don’t substitute it entirely with all-purpose or whole wheat. Rye is what gives the bread its signature taste. If you must reduce it, keep at least 50% rye for that authentic flavor.
- Molasses: Avoid replacing it with honey or maple syrup unless you’re okay with a big change in flavor. Molasses brings both sweetness and a deep color.
- Cocoa powder: Don’t skip it. It adds a rich tone—not chocolatey flavor, but depth and color.
- Yeast: Use active dry or instant, not sourdough unless the recipe is specifically adapted for it.
Changing one or two elements is okay for experimenting, but go easy—this bread is all about balance.
Nutritional Benefits of Pumpernickel Bread
High Fiber Content
Pumpernickel bread isn’t just tasty—it’s good for your body, too. Thanks to the use of rye flour and whole grains, it’s naturally rich in dietary fiber. A single slice can offer more fiber than most white breads or store-bought sandwich loaves.
Why does fiber matter?
- It keeps your digestive system moving smoothly.
- Helps you feel full longer, which can support weight management.
- Slows the absorption of sugar, reducing blood sugar spikes.
For people trying to manage conditions like diabetes, high cholesterol, or IBS, high-fiber diets are often recommended—and pumpernickel is a smart way to incorporate that.
Rye flour contains a special type of soluble fiber that also supports gut health by feeding good bacteria. It’s like a built-in prebiotic!
Low Glycemic Index
The glycemic index (GI) measures how quickly foods raise blood sugar. Pumpernickel bread ranks low on the GI scale, which means it releases energy slowly and steadily.
That’s great news if you:
- Are managing blood sugar levels.
- Want long-lasting energy without crashes.
- Need a satisfying, sustaining carb in your diet.
Unlike white bread, which causes quick spikes in glucose, pumpernickel keeps things steady. Pair it with protein or healthy fats, and you’ve got a powerhouse combo for stable energy throughout the day.
Variations of Pumpernickel Bread
German-Style vs American-Style
While all pumpernickel bread shares a few key traits—dark color, rye base, and hearty texture—there are distinct differences between German and American styles.
German-style pumpernickel is as traditional as it gets. It’s made with:
- 100% rye flour
- Sourdough starter (not commercial yeast)
- Slow baking (up to 24 hours at low temps)
- No sweeteners or coloring agents
The result? A super-dense, slightly sour, naturally dark bread that’s chewy and filling. It has an almost cake-like texture from the extended baking process, and it’s often sold in thin, brick-like slices.
American-style pumpernickel, on the other hand, is a more accessible version for everyday home bakers. It often includes:
- Rye + wheat flour combo
- Molasses or caramel coloring
- Cocoa powder
- Faster baking times
- Yeast for quicker rising
This style is lighter, fluffier, and a bit sweeter than the original but still retains that classic rye flavor.
Gluten-Free Alternatives
Going gluten-free? Don’t worry—you can still enjoy the pumpernickel experience with a few smart swaps:
- Use a gluten-free flour blend that includes buckwheat or sorghum to mimic rye’s earthy notes.
- Add psyllium husk powder or xanthan gum to replicate gluten’s binding ability.
- Consider using gluten-free sourdough starter if you’re baking the traditional way.
Keep in mind: gluten-free loaves may not rise as much and will be more delicate, but they can still deliver amazing flavor with the right balance of ingredients.
Troubleshooting Tips
Dense Loaf? Here’s Why
If your pumpernickel bread comes out dense, heavy, or gummy, don’t panic. This is a common issue, especially when working with rye. Let’s troubleshoot:
- Not enough kneading: While rye doesn’t need as much kneading as wheat dough, it still requires a bit of work to build structure.
- Weak yeast or poor rise: Make sure your yeast is fresh, and your dough gets enough time to ferment and rise.
- Too much moisture: Rye flour absorbs water differently. If your dough is too wet, it won’t rise properly and can stay gummy.
- Not baked long enough: Always check for that hollow sound or use a thermometer to be sure it’s baked through.
Experimenting with ratios and rest times will help you find the perfect balance.
Dealing with Cracked Crusts
A cracked crust can look rustic, but sometimes it’s a sign of an issue:
- Dry surface during proofing: Always cover your dough to retain moisture.
- Too much oven spring: Slash the top before baking to give steam a place to escape.
- High oven temp without steam: Try adding a pan of hot water to the oven for the first 10 minutes to soften the crust as it forms.
Embrace the imperfections—cracks can add character! But if you want that smooth, bakery-style finish, hydration and proper slashing are key.
FAQs about Pumpernickel Bread Recipe
What is pumpernickel bread?
Pumpernickel bread is a type of dense and dark rye bread that originates from Germany. It’s known for its rich, slightly sweet flavor, which comes from a long baking process that caramelizes the sugars in the dough.
What ingredients do I need for pumpernickel bread?
Typical ingredients for homemade pumpernickel bread include rye flour, whole wheat flour, cocoa powder, molasses, yeast, salt, and warm water. Some recipes might also include coffee or chocolate for added depth of flavor.
Is pumpernickel bread gluten-free?
No, pumpernickel bread is not gluten-free as it contains rye flour and often wheat flour as well. Those with gluten sensitivities or celiac disease should avoid pumpernickel unless it is specifically made with gluten-free substitutes.
How long does it take to make pumpernickel bread?
Pumpernickel bread generally requires a longer baking time to achieve its characteristic dark color and flavor. The process, including preparation and baking, can take up to 24 hours, although active cooking time might be only a few hours.
Can I make pumpernickel bread in a bread machine?
Yes, you can make pumpernickel bread in a bread machine. Many machines have settings for rye bread, which can be adapted for pumpernickel by adjusting ingredients like molasses and cocoa to suit your taste.
What can I pair with pumpernickel bread?
Pumpernickel bread pairs wonderfully with strong cheeses, smoked meats, and hearty stews. It’s also great with creamy spreads like hummus or used as a base for robust sandwiches.
How should I store pumpernickel bread?
To keep pumpernickel bread fresh, wrap it tightly in plastic wrap or keep it in an airtight container. It can be stored at room temperature for several days or frozen for longer storage.
Does pumpernickel bread have any health benefits?
Yes, pumpernickel bread is rich in fiber due to its high rye content. It also contains a lower glycemic index than white bread, making it a more favorable option for maintaining stable blood sugar levels.
Conclusion
There you have it—a complete, step-by-step guide to baking perfect pumpernickel bread at home. From its rich, cultural roots to its deep, earthy flavor and amazing health benefits, this bread is a rewarding choice for any baker.
Whether you’re going traditional with German methods or opting for a quicker American-style bake, pumpernickel is hearty, flavorful, and unforgettable. It’s a bit of a project, sure, but one that pays off with every dense, delicious slice.
So roll up those sleeves, preheat the oven, and get ready to impress yourself (and maybe a few lucky guests) with your homemade loaf. Happy baking!


