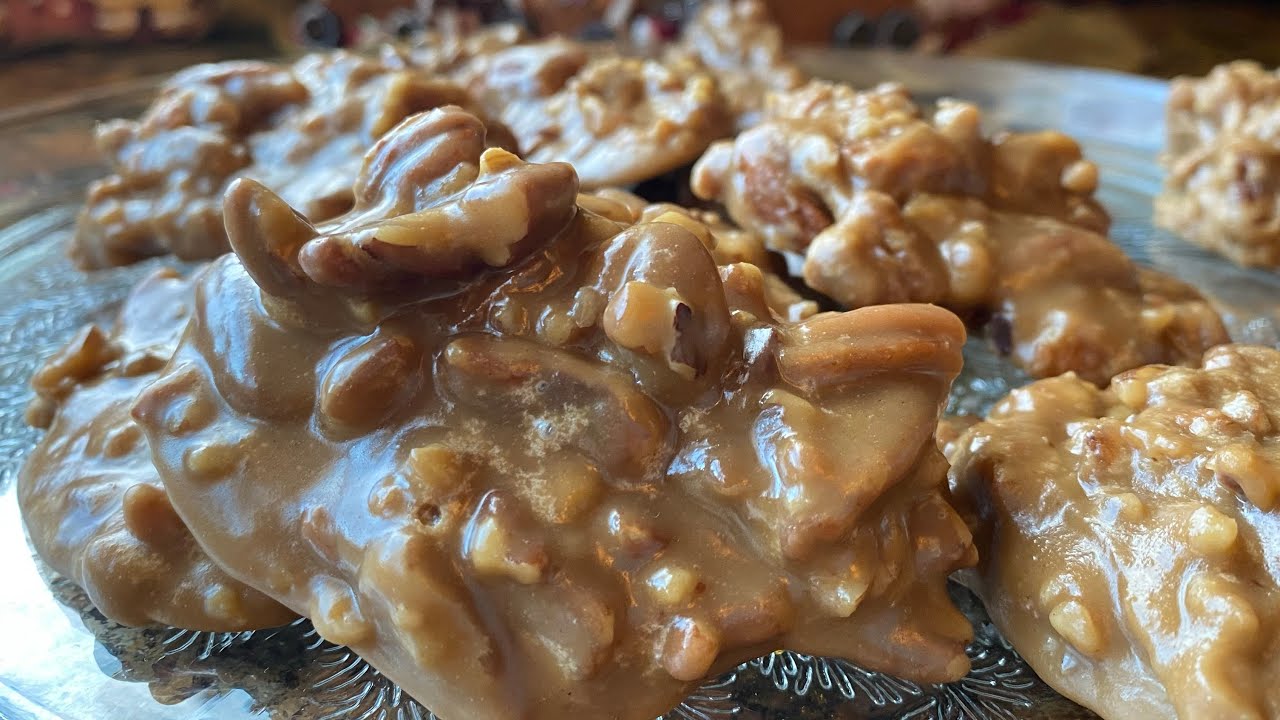
Praline Recipe: Pralines are one of those irresistible southern sweets that melt in your mouth and leave you craving more. Traditionally made from sugar, butter, cream, and pecans, pralines are rich, nutty confections that are somewhere between a candy and a fudge. They’re soft, creamy, and just the right amount of chewy—ideal for dessert lovers who appreciate bold flavors and old-fashioned charm.
While many people associate pralines with the American South, particularly New Orleans, there are actually different styles of pralines around the world. French pralines are hard and nutty, often used as a candy base or topping. The Southern-style praline, which we’re diving into today, is softer, creamier, and brimming with that luscious pecan crunch.
Whether you’re preparing them as holiday gifts, after-dinner treats, or simply indulging your sweet tooth, making pralines at home is easier than you think—and way more delicious than any store-bought variety.
History and Origin of Pralines
The story of pralines begins in France, where a chef working for César, Duke of Choiseul, Count of Plessis-Praslin, invented the first version in the 17th century. The original praline was a mixture of almonds and caramelized sugar, designed to be a luxurious treat for nobility.
When French settlers came to Louisiana, they brought the recipe with them, and over time, it evolved. Instead of almonds, locals used the more abundant pecans. They also added cream to the mix, which resulted in the softer, richer texture that Southern pralines are known for today.
Pralines quickly became a regional specialty, sold in candy shops across the South and often handcrafted in small batches. Today, pralines are a must-try treat for anyone visiting New Orleans—and for good reason. They’re sweet, buttery, and utterly addictive.
Ingredients You’ll Need
Core Ingredients for Traditional Pralines
The beauty of pralines lies in their simplicity. With just a few ingredients, you can create a treat that’s packed with flavor. Here’s what you’ll need:
- 1½ cups granulated sugar
- 1½ cups packed light brown sugar
- 1 cup heavy cream
- ¼ cup unsalted butter
- 2 cups pecan halves or pieces
- 1 tsp vanilla extract
- Pinch of salt
These ingredients form the foundation of the praline’s rich flavor and creamy texture. The combination of two sugars creates a deep caramel profile, while the heavy cream and butter make the candy soft and melt-in-your-mouth good. Pecans provide the signature crunch and earthy contrast to the sweetness.
Optional Add-ins for Creative Variations
Want to take your pralines to the next level? Here are a few ways to jazz them up:
- A dash of cinnamon or nutmeg – Adds warmth and spice.
- A splash of bourbon or rum – Introduces a complex depth of flavor.
- Chocolate chips – Swirl them in for a chocolate-praline fusion.
- Maple syrup – Replace some sugar with this for a maple twist.
- Toasted coconut – For a tropical note.
The great thing about pralines is how customizable they are. Once you’ve mastered the base recipe, you can experiment to match your personal taste.
Tools Required
Essential Kitchen Tools
Making pralines doesn’t require a fancy setup, but having the right tools makes the job much smoother. Here’s what you’ll need:
- Heavy-bottomed saucepan – Crucial for even heating and preventing burning.
- Wooden spoon or silicone spatula – For consistent stirring without scratching your pot.
- Candy thermometer – Absolutely necessary to monitor the sugar temperature accurately.
- Baking sheet lined with parchment or wax paper – Where the pralines will cool and set.
- Measuring cups and spoons – Precision matters in candy making.
- Spoon or small scoop – To portion out the pralines evenly.
Tips for Using a Candy Thermometer
A candy thermometer ensures you hit the perfect temperature for pralines—typically around 235°F (soft-ball stage). Here are a few pointers:
- Clip it to the pot securely, so it doesn’t touch the bottom.
- Keep it clean and dry before using, as moisture can give false readings.
- Double-check accuracy by placing it in boiling water—it should read 212°F.
Missing the right temperature can lead to undercooked, runny pralines or overcooked, grainy ones. Don’t skip this tool!
Step-by-Step Praline Recipe
Step 1 – Preparing Your Ingredients
Before you turn on the stove, it’s smart to get everything in place. Measure out all your ingredients and have them ready to go—this process moves quickly once the heat is on. Line a baking sheet with parchment paper and set it aside.
Chop your pecans if you’re using halves and prefer smaller bites, or leave them whole for a more traditional look. Set the butter, cream, and vanilla within reach, as you’ll need to add them in quick succession during cooking.
Having a mise en place (French for “everything in its place”) approach here can save you from a sticky situation—literally. You don’t want to scramble for vanilla extract while your sugar is bubbling dangerously close to burning.
Step 2 – Melting and Mixing
Now comes the magic. In a large, heavy-bottomed saucepan, combine the granulated sugar, brown sugar, and heavy cream. Set your heat to medium and start stirring. You’ll want to keep stirring consistently to prevent the sugar from sticking to the bottom and burning.
As the mixture heats up, it will begin to thicken and bubble. This process should take about 10–15 minutes. The key here is patience. Resist the urge to crank up the heat—it’s tempting, but pralines are a slow-cooked delicacy. High heat can cause scorching or a gritty texture.
Once everything is well combined and the sugar has completely dissolved, toss in your butter and salt. Stir until the butter is fully melted and integrated into the mixture. You’re looking for a smooth, creamy consistency.
At this stage, your kitchen will be filled with the warm, rich aroma of caramel and butter. You might feel like dipping a spoon in for a taste—but hold off. Hot sugar is no joke and can burn your mouth faster than you can say “praline.”
Step 3 – Cooking to the Right Temperature
Now it’s time to bring in the candy thermometer. Continue cooking the mixture until it reaches 235°F (soft-ball stage). This step is absolutely critical to getting that perfect praline texture—not too soft and not too brittle.
You’ll notice the mixture becoming glossier and more syrupy as it gets closer to temperature. Stir occasionally but gently to avoid crystallization. Once you hit that magic number, quickly remove the pot from the heat.
Immediately stir in your pecans and vanilla extract. This is when things start to get real. Stir vigorously for a minute or two—this helps the praline mixture thicken and become creamy. The pecans will begin to coat nicely, and you’ll see the mixture turning opaque and losing its shine.
This step also determines how your pralines will set. If you stir too little, they might spread too much. Stir too long, and you could end up with a hard-to-scoop mass. Aim for that sweet spot where it’s thick enough to scoop but still soft enough to shape.
Step 4 – Forming the Pralines
Now, using a spoon or small scoop, drop generous mounds of the mixture onto your prepared baking sheet. Work quickly—the pralines will begin to set as soon as they hit the cooler surface.
Leave a little space between each one. They won’t spread much, but you want them to have their own space to firm up properly.
Try to get uniform sizes, especially if you’re giving them as gifts. You’ll end up with about 18 to 24 pralines, depending on how large you make each portion. Don’t worry if they’re not perfectly round—pralines are rustic by nature, and a little imperfection adds charm.
Let them sit at room temperature until fully cooled and firm. This usually takes 30 to 60 minutes. You’ll know they’re ready when you can lift them off the paper without them sticking or bending.
Step 5 – Cooling and Storing Properly
Once your pralines have cooled and hardened, it’s time to enjoy the fruits of your labor—or stash them away for later. Store them in an airtight container at room temperature. They’ll keep for about 7 to 10 days, although they rarely last that long!
To prevent sticking, place a piece of wax or parchment paper between layers. If your home is especially humid, consider storing them in the fridge to maintain their texture.
If you want to save some for gifting or later indulgence, pralines also freeze beautifully. Wrap them individually in wax paper and place them in a zip-top bag or airtight container. When you’re ready to enjoy, let them come to room temperature before unwrapping for the best taste and texture.
Tips and Tricks for Perfect Pralines
Avoiding Common Mistakes
Pralines can be a little tricky the first time, but once you know what to look for, they become second nature. Here are some common pitfalls and how to avoid them:
- Grainy texture? You may have stirred too little or cooked over too high heat.
- Too runny? The mixture didn’t reach the proper temperature.
- Rock-hard candy? You overcooked the sugar—aim for 235°F, no more.
- Didn’t set up? You might’ve added the pecans too early or didn’t stir enough after removing from heat.
Use a candy thermometer every time, especially when you’re starting out. As you get more experienced, you’ll be able to tell by the look and feel, but for now—rely on the thermometer.
Adjusting for Humidity and Temperature
Believe it or not, weather can affect your candy-making success. Humidity in the air can cause pralines to be sticky or not set properly. If you live in a humid area, try making pralines on a dry, cooler day—or use a dehumidifier in your kitchen if you’re feeling fancy.
Also, keep your ingredients at room temperature. Cold butter or cream can cause the mixture to seize or separate during cooking.
One last tip—avoid making pralines when it’s raining. No joke. Many seasoned candy makers swear that pralines made on rainy days just don’t turn out right!
FAQs about Praline Recipe
1. What are pralines made of?
Pralines are typically made from sugar, butter, cream, and pecans. The mixture is cooked until it thickens, then dropped onto parchment paper to cool and harden into candy.
2. Can I use other nuts instead of pecans?
Yes! While pecans are traditional, you can use almonds, walnuts, or cashews depending on your taste preferences.
3. Why didn’t my pralines harden?
This usually happens if the sugar mixture wasn’t cooked to the right temperature. Aim for the “soft-ball” stage, around 235–240°F (113–116°C), for perfect results.
4. How do I store homemade pralines?
Store them in an airtight container at room temperature. They stay fresh for up to 2 weeks and don’t need refrigeration.
5. Can pralines be frozen?
Yes. Place them in a freezer-safe container with parchment between layers. Thaw at room temperature before serving.
6. Are pralines the same as toffee or caramel?
Not exactly. Pralines are softer and creamier than toffee and have a grainier texture compared to smooth caramel.
7. Can I make pralines without a candy thermometer?
While it’s easier with a thermometer, you can use the cold water method: drop a bit of the mix into cold water—if it forms a soft ball, it’s ready.
8. Are pralines gluten-free?
Yes, traditional pralines are naturally gluten-free. However, always double-check the ingredients to be sure.
Conclusion
Pralines are more than just a sweet treat—they’re a delicious dive into Southern heritage and homemade charm. Whether you’re crafting them for a holiday gathering, a gift basket, or just a cozy night in, nothing beats the satisfaction of stirring up a batch of buttery, nutty perfection in your own kitchen.
What makes pralines so special is their simplicity. A handful of basic ingredients, a bit of patience, and a watchful eye are all it takes to create something that feels luxurious and nostalgic all at once. From the moment that sugar starts to caramelize, your kitchen fills with an aroma that hints at something magical. And by the time you scoop out those rich, golden dollops onto parchment, you’re more than just cooking—you’re crafting a little piece of culinary history.
So, whether you stick to the classic or explore creative variations, making pralines at home is a skill worth mastering. It’s the kind of recipe that, once perfected, becomes a signature—a go-to dessert that family and friends will beg you to make again and again.


