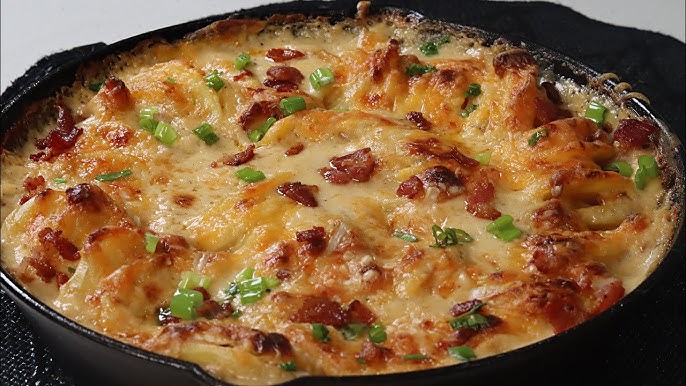
Potato Gratin Recipe: Potato Gratin, also known as Gratin Dauphinois, is a creamy, cheesy, and utterly indulgent French dish made with layers of thinly sliced potatoes baked in a garlic-infused cream sauce. Traditionally, it features simple ingredients—potatoes, cream, butter, cheese—but the result is anything but basic. This dish is baked until bubbling and golden, creating a crispy crust on top with soft, melt-in-your-mouth layers beneath. It’s rich, hearty, and makes a perfect side for everything from roast chicken to grilled steak.
Gratin might sound fancy, but it’s actually quite simple to prepare. The beauty of this recipe lies in its balance of textures and flavors. The starch from the potatoes thickens the cream as it bakes, while the cheese adds both saltiness and richness. It’s comfort food at its finest, capable of transforming humble ingredients into something spectacular.
Why This Dish Is a Comfort Food Classic
There’s just something about potato gratin that speaks to the soul. It’s warm, creamy, and deeply satisfying. Whether you’re cooking for a family dinner, a holiday gathering, or just treating yourself to something cozy on a cold night, gratin is the kind of dish that always delivers. It’s loved for its creamy texture, cheesy goodness, and the way the edges get just a bit crispy and caramelized in the oven.
It’s also incredibly versatile—you can keep it classic or spice it up with garlic, herbs, or even bacon. The layers look impressive, but it’s easy enough for even beginner cooks. Plus, it’s a great make-ahead dish that tastes even better the next day. This combination of ease, elegance, and flavor is what keeps potato gratin on tables across the world.
Ingredients Needed for Potato Gratin
Essential Ingredients
To make a traditional potato gratin, you only need a handful of ingredients. Each one plays a crucial role in building flavor and texture:
- Potatoes: Russet or Yukon Gold are best. They’re starchy, which helps thicken the sauce.
- Heavy Cream: Provides the base of the sauce. You can also use a mix of cream and milk.
- Garlic: Adds a deep, aromatic layer of flavor.
- Butter: For greasing the dish and adding richness.
- Salt and Pepper: Enhances and balances the flavor.
- Nutmeg (optional): A pinch of nutmeg adds warmth and depth.
- Cheese (typically Gruyère, Swiss, or Parmesan): Adds sharpness and melts beautifully.
These basic ingredients are easy to find but combine to create something truly special. Don’t skimp on the cheese—it’s the magic ingredient that brings it all together.
Optional Add-Ins for Extra Flavor
Want to elevate your potato gratin? Here are a few ingredients you can throw into the mix for added depth and flair:
- Caramelized Onions: Adds sweetness and complexity.
- Fresh Herbs (thyme, rosemary, chives): Brighten up the flavor profile.
- Bacon or Ham: For a smoky, savory twist.
- Leeks or Shallots: Add subtle oniony notes.
- Mustard or Horseradish: Introduces a little zing to cut through the richness.
Feel free to experiment. The base recipe is solid, but there’s plenty of room for creativity.
Tools and Equipment You’ll Need
Kitchen Tools Required
Making a potato gratin doesn’t require a lot of fancy equipment, but having the right tools will make things smoother:
- Sharp Knife or Mandoline: To get even, thin slices of potato. A mandoline makes the job quick and precise.
- Cutting Board: For safe slicing.
- Mixing Bowl: To combine cream, seasonings, and other ingredients.
- Whisk: For mixing the cream sauce evenly.
- Baking Dish (ceramic or glass preferred): A 9×13 inch dish works well.
- Foil: To cover the gratin while it bakes (prevents over-browning).
- Oven Mitts: That dish will get hot!
With these tools in hand, you’ll breeze through the prep process and focus on what really matters—making something delicious.
Prep Tips to Make Cooking Easier
Prepping ahead is key to an easy cooking experience. Here are some quick tips:
- Use a mandoline for uniform slices; this helps them cook evenly.
- Soak sliced potatoes in cold water for 10 minutes to remove excess starch and prevent sticking.
- Grease the baking dish generously with butter to keep the potatoes from sticking and add flavor.
- Pre-shred your cheese or buy high-quality shredded varieties for convenience.
- Use warm cream—cold cream can slow down the cooking process and affect consistency.
These little tips can make a big difference in both the cooking experience and final result.
Step-by-Step Guide to Making Potato Gratin
Step 1: Preheat and Prep
First things first: preheat your oven to 375°F (190°C). This ensures your gratin cooks evenly from the start. While the oven heats up, take a minute to prep your baking dish. Grease it generously with butter—this not only prevents sticking but adds flavor to the outer layer of your gratin.
Peel and rinse your potatoes, then pat them dry with a paper towel. You don’t want excess moisture in the dish. Use a mandoline or sharp knife to slice them into uniform rounds about 1/8 inch thick.
If you’re planning to add garlic or herbs to the cream, now’s the time to do it. Mix your cream with pressed garlic, salt, pepper, and a pinch of nutmeg in a bowl. You can even warm it gently on the stove to infuse the flavors.
Step 2: Slice the Potatoes Thinly
Thinly sliced potatoes are the backbone of a good gratin. The thinner the slices, the more tender the dish becomes. Using a mandoline slicer ensures the slices are consistent in thickness, which is crucial for even cooking. You’re aiming for about 1/8-inch slices—any thicker, and the potatoes may not soften properly in the oven.
As you slice, place the potatoes in a bowl of cold water. This prevents them from browning and removes excess starch, which can make your gratin gluey. After slicing all the potatoes, drain and pat them dry with a kitchen towel. Dry slices absorb the creamy sauce better and cook more evenly.
If you’re adding any layered ingredients like onions, leeks, or cooked bacon, now’s the time to prepare those as well. This stage is all about setting up your layers for success. The more prep you do now, the smoother the rest of the process will go.
Step 3: Make the Creamy Sauce
This is where the magic happens. In a saucepan, warm up your heavy cream over low heat. Add minced garlic, salt, black pepper, and a pinch of nutmeg for depth. Stir constantly so the cream doesn’t scorch. Once warmed, take the sauce off the heat.
You can also add grated cheese directly into the sauce if you want it extra creamy and cheesy—just be sure it melts fully before pouring over the potatoes. Some people like to mix in a bit of Dijon mustard or a splash of white wine for added complexity.
If you’re aiming for a lighter version, substitute half of the heavy cream with whole milk. The sauce won’t be quite as rich, but it will still deliver that comforting texture.
Once your sauce is ready, set it aside while you start assembling the layers. The aroma alone will have you counting down the minutes until it’s done baking.
Step 4: Layering the Potatoes and Sauce
Now comes the fun part—assembling your gratin. Start by placing a single layer of potato slices in your buttered baking dish, slightly overlapping like shingles on a roof. Sprinkle with salt, pepper, and a little cheese. Then pour a small amount of your cream sauce over the layer.
Repeat this process, layering potatoes, seasoning, cheese, and cream until you’ve used all your ingredients. Make sure each layer is evenly distributed so every bite is creamy and flavorful. If you’re adding extras like herbs or onions, space them evenly between layers.
Finish with a final layer of potatoes topped with the remaining sauce and a generous amount of cheese. This top layer will form a crispy, golden crust that’s the hallmark of any great gratin.
Tap the baking dish gently on the counter to settle the layers and release air pockets. Cover with foil and you’re ready to bake.
Step 5: Baking to Perfection
Place your dish in the preheated oven and bake at 375°F (190°C) for 45 minutes covered. This allows the potatoes to cook evenly without burning the top. After 45 minutes, remove the foil and continue baking for another 20–25 minutes, or until the top is golden brown and bubbly.
You’ll know it’s done when a knife slides easily through the layers and the top has a nice crispy crust. If it starts to brown too quickly, lightly tent it with foil again.
Once out of the oven, let the gratin rest for 10–15 minutes. This allows the sauce to thicken slightly and makes serving easier. If you cut into it too soon, it might be too runny.
That’s it! You’ve just made a classic potato gratin—creamy, cheesy, and baked to perfection. It’s a showstopper side dish that’ll steal the spotlight at any meal.
Pro Tips for the Perfect Gratin
How to Get a Golden Top
Everyone loves that crispy, golden-brown crust on top of a good gratin. Achieving that mouthwatering finish isn’t hard, but it does require a few smart techniques. First, make sure to use the right cheese—Gruyère, Parmesan, or a mix of both are ideal. These cheeses melt well and create that bubbly, crispy texture when baked.
During the last 10–15 minutes of baking, remove the foil so the top has time to brown properly. If you notice the top isn’t as golden as you’d like, switch on the broiler for the last 2–3 minutes. But keep a close eye on it—cheese can go from golden to burnt in a flash.
Also, don’t forget to add that final layer of cheese just before baking. Some people like to mix breadcrumbs with a bit of melted butter and sprinkle that on top for added crunch. The result? A gratin that’s not just creamy underneath but perfectly crisp on top.
Making It Ahead of Time
Potato gratin is a dream when it comes to prepping ahead. If you’re planning a big dinner or holiday meal, make your gratin the night before. Just assemble all the layers, cover the dish tightly with plastic wrap or foil, and refrigerate. When you’re ready to cook, let it come to room temperature for about 30 minutes, then bake as directed.
Already baked it? No worries. Gratin reheats beautifully. Simply cover with foil and warm in a 350°F (175°C) oven for 20–30 minutes. You can also reheat individual portions in the microwave, though the texture will be softer.
Freezing is another option, although it’s best to freeze after baking. Wrap it tightly in foil, then freeze. When ready to serve, thaw overnight in the fridge and reheat in the oven. Just keep in mind that freezing might slightly change the texture of the cream.
Variations of Potato Gratin
Cheesy Variations
While traditional gratin uses Gruyère or Parmesan, there’s no rule saying you can’t experiment. Try mixing in cheddar for a sharper taste, or mozzarella for extra gooeyness. Blue cheese fans might love a sprinkle of Gorgonzola for an earthy punch.
You can also add layers of shredded cheese between the potato slices for a super cheesy version. Think of it like a lasagna—but with potatoes and cheese instead of pasta and sauce. Some fun cheese blends include:
- Gruyère and Fontina: Creamy and rich with a nutty flavor.
- Cheddar and Monterey Jack: Perfect for a bold, sharp twist.
- Brie and Goat Cheese: Elegant and creamy with a bit of tang.
Add a sprinkle of fresh herbs like thyme or parsley for a pop of color and freshness.
Healthier Alternatives
Looking for a lighter take? You can still enjoy gratin without all the heavy cream. Here are some healthier options:
- Use half-and-half or low-fat milk instead of heavy cream.
- Skip the cheese or use a smaller amount of a strong-flavored cheese like Parmesan.
- Add veggies like cauliflower, zucchini, or spinach for more nutrition.
- Try sweet potatoes for a slightly sweet, fiber-rich variation.
For a vegan version, substitute dairy cream with coconut cream or cashew milk and use nutritional yeast instead of cheese for that umami flavor.
With a few swaps, you can tailor your potato gratin to suit nearly any diet—without sacrificing taste.
Serving Suggestions
What to Pair with Potato Gratin
Potato gratin is incredibly versatile and pairs beautifully with a wide range of main dishes. Here are some ideas to help you build the perfect plate:
- Roast Chicken: The crispy skin and savory flavors balance out the richness of the gratin.
- Grilled Steak: A hearty match made in comfort food heaven.
- Baked Salmon: A lighter option that still holds its own against the creamy potatoes.
- Pork Chops: Juicy, savory pork chops and gratin are a classic duo.
- Vegetarian Mains: Think roasted mushrooms, lentil loaf, or stuffed peppers.
Don’t forget a side salad with a light vinaigrette. The acidity helps cut through the richness and adds a refreshing contrast. You can also serve it with crusty bread or steamed green beans to round out the meal.
For drinks, a crisp white wine like Chardonnay or a light red like Pinot Noir pairs beautifully. If you’re skipping alcohol, a sparkling water with lemon or a tart apple cider works just as well.
Storage and Reheating Tips
How to Store Leftovers
If you find yourself with leftover potato gratin (lucky you!), you’ll be happy to know it stores exceptionally well. Let the gratin cool to room temperature before storing to prevent condensation, which can make the dish soggy. Transfer it to an airtight container or simply wrap the baking dish tightly with plastic wrap or aluminum foil.
Refrigerate your leftovers for up to 4 days. This dish often tastes even better the next day, as the flavors have more time to meld. If you plan on storing it longer, freezing is also an option.
Best Way to Reheat
Reheating potato gratin is easy and preserves both texture and taste if done correctly. Here’s how:
- Oven Method (Recommended): Preheat your oven to 350°F (175°C). Cover the dish with foil and bake for about 20–25 minutes, or until heated through. Remove the foil during the last few minutes to restore that golden crust.
- Microwave Method: For a quick fix, reheat single portions in the microwave. Place a slice on a microwave-safe plate, cover loosely with a paper towel, and heat on medium for 2–3 minutes. Keep in mind that the crust might not stay crisp using this method.
If reheating from frozen, it’s best to thaw overnight in the refrigerator first. Then reheat using the oven method. Avoid reheating more than once, as it can dry out the potatoes and compromise the texture.
FAQs about Potato Gratin Recipe
Can I use other types of potatoes?
Yes! While Russet and Yukon Gold are ideal for their starch content and texture, you can also use red potatoes or even sweet potatoes for a unique twist. Just make sure they’re sliced thinly and evenly.
Can I freeze potato gratin?
Absolutely. Let it cool completely, wrap it tightly with foil or place in a freezer-safe container, and freeze for up to 2 months. Thaw overnight in the fridge before reheating in the oven.
What’s the difference between gratin and scalloped potatoes?
Gratin usually includes cheese, while scalloped potatoes traditionally do not. Also, gratin often uses cream, while scalloped potatoes may use a roux-based sauce. Both are delicious, but gratin is creamier and more indulgent.
How can I make it vegan?
Use plant-based cream (like cashew cream or coconut milk), vegan butter, and nutritional yeast or vegan cheese. You’ll still get that creamy, cheesy flavor without the dairy.
Can I add meat to this recipe?
Yes! Cooked bacon, ham, or ground sausage make excellent additions. Just layer them between the potatoes before adding the cream and cheese.
Conclusion
Potato gratin isn’t just a side dish—it’s the kind of comfort food that brings people together around the table. With its creamy layers, gooey cheese, and crisp, golden top, this French classic is as satisfying as it is simple to make. Whether you stick to the traditional recipe or add your own twist with herbs, cheese blends, or protein, this dish never disappoints.
Perfect for cozy family dinners, elegant holiday meals, or casual weeknight indulgences, gratin is a versatile crowd-pleaser. And once you try making it from scratch, you’ll realize just how easy it is to turn basic ingredients into something extraordinary.
Don’t be afraid to get creative, and most importantly—enjoy every bite.