Pork Spare Ribs Recipe: Pork spare ribs are one of the most iconic cuts in barbecue culture. Taken from the belly side of the pig, just above the breastbone, these ribs are meatier, longer, and have more fat than baby back ribs. That extra fat renders down beautifully during the cooking process, making them incredibly flavorful and juicy.
When cooked low and slow, the connective tissue and fat in spare ribs break down into a tender, melt-in-your-mouth experience that’s hard to beat. Whether you’re new to ribs or a seasoned pitmaster, understanding this cut is the key to mastering it.
Why They’re a BBQ Favorite
What makes pork spare ribs so popular is their balance between meat, fat, and bone. They soak up marinades and dry rubs like a sponge, making them perfect for smoking, baking, or grilling. That rich, porky flavor pairs perfectly with everything from sweet and sticky sauces to spicy dry rubs.
Their popularity also stems from how versatile they are—you can make them Asian-style with soy and hoisin, go southern with a smoky dry rub, or even bake them in the oven with a honey glaze. No matter the cooking method, pork spare ribs are a surefire crowd-pleaser.
Ingredients You’ll Need
Meat and Marinade Essentials
To get started, you’ll need the star of the show: pork spare ribs—look for a slab that’s meaty, with an even distribution of fat. Here’s a breakdown of essential ingredients:
- 1 rack of pork spare ribs (about 3–4 pounds)
- 2 tablespoons brown sugar
- 1 tablespoon paprika (smoked if possible)
- 1 tablespoon salt
- 1 teaspoon black pepper
- 1 teaspoon garlic powder
- 1 teaspoon onion powder
- 1 teaspoon chili powder
- 2 tablespoons olive oil (for rub adhesion or marinade base)
These basics form a solid foundation, allowing you to build layers of flavor that penetrate deep into the meat during cooking.
Optional Flavor Enhancers and Tools
Want to kick it up a notch? Consider these additions:
- 1 tablespoon mustard (to bind the rub to the ribs)
- 1/2 cup apple cider vinegar (for moisture in the cooking process)
- Barbecue sauce of your choice (for glazing)
- Wood chips (if smoking)
- Aluminum foil (for the “Texas Crutch” wrap)
- Rib rack (for grilling or oven use)
Don’t forget your kitchen tools: sharp knife, cutting board, paper towels, basting brush, and a reliable meat thermometer. These help ensure safety, precision, and that perfect rib texture.
Prepping the Ribs
Removing the Membrane
One of the most overlooked steps in rib prep is removing the membrane—a thin, silvery skin on the bone side of the ribs. This tough layer can prevent seasonings from fully penetrating the meat and leads to a chewier bite.
To remove it:
- Flip the ribs so the bones face up.
- Slide a butter knife under the membrane along one edge.
- Wiggle the knife until you can grip the membrane with a paper towel.
- Pull it off in one clean sweep. If it tears, just repeat the process.
Removing the membrane makes a huge difference in texture and flavor absorption. Skipping this step can result in ribs that are chewy and lack that fall-off-the-bone quality.
Trimming and Cleaning
After you’ve removed the membrane, inspect the ribs for excess fat or loose pieces of bone. Use a sharp knife to trim these away. You want a uniform slab so it cooks evenly. Give the ribs a quick rinse under cold water, then pat them completely dry with paper towels. This ensures your rub or marinade sticks properly and helps form a better crust during cooking.
Creating the Perfect Marinade or Dry Rub
Sweet and Smoky Dry Rub Recipe
A good dry rub is the backbone of amazing ribs. Here’s a foolproof mix you can whip up in seconds:
Dry Rub Ingredients:
- 2 tbsp brown sugar
- 1 tbsp paprika
- 1 tsp salt
- 1 tsp black pepper
- 1 tsp chili powder
- 1 tsp garlic powder
- 1 tsp onion powder
- 1/2 tsp cayenne pepper (optional for heat)
Mix all ingredients in a bowl. Pat the ribs dry, lightly coat them in olive oil or mustard, then apply the rub liberally on both sides. Massage it in so the flavors penetrate deep into the meat. Wrap the ribs in plastic wrap or place them in a covered container in the fridge to marinate.
Tangy Marinade Blend
Prefer a juicy, saucy finish? Go for a liquid marinade:
Marinade Ingredients:
- 1/2 cup soy sauce
- 1/4 cup apple cider vinegar
- 2 tbsp honey
- 2 tbsp Worcestershire sauce
- 1 tbsp minced garlic
- 1 tsp black pepper
Combine all ingredients and pour over the ribs in a large resealable bag or container. Marinate in the fridge for 4 to 12 hours, flipping occasionally. This will break down the meat fibers while infusing every inch with flavor.
Marinating Time – Letting the Flavors Soak In
Refrigeration Tips
Once you’ve applied your rub or marinade, time becomes your best friend. Wrap the ribs tightly in plastic wrap or place them in a resealable plastic bag. Keep them in the coldest part of your fridge, ideally between 34°F and 38°F. This slows down bacterial growth while allowing the flavors to develop.
If using a marinade, place the bag on a shallow tray or plate to catch any leaks. Make sure the ribs are fully submerged or flipped halfway through to ensure even flavoring.
How Long Should You Marinate?
For optimal flavor penetration, let your ribs marinate for at least 4 hours, but overnight (8–12 hours) is even better. If you’re short on time, even 30 minutes will make a difference, but the longer, the tastier.
Dry rubs, on the other hand, should ideally sit on the ribs for at least 1 hour, and like marinades, benefit from an overnight rest. This resting period allows the salt and sugar to draw moisture out and then reabsorb into the meat, creating that juicy, tender texture once cooked.
Cooking Methods: Oven, Grill, or Smoker
Oven-Baked Spare Ribs
Don’t have a grill or smoker? No problem—your oven can produce finger-licking ribs. Here’s how:
- Preheat your oven to 300°F (150°C).
- Place the ribs on a baking sheet lined with foil. For extra tenderness, wrap them in foil using the “Texas Crutch” method.
- Bake for 2.5 to 3 hours, depending on thickness.
- In the last 30 minutes, remove the foil, baste with barbecue sauce, and raise the temperature to 375°F to caramelize the surface.
The result? Tender, juicy ribs with a slightly crispy exterior. No smoke, no fuss—just amazing flavor from your kitchen.
Grilled Ribs: Flame-Kissed Perfection
If you want that smoky-charred taste without a smoker, your grill has you covered.
Two-zone grilling method:
- Light one side of the grill and leave the other unlit.
- Place the ribs on the cooler side, bone-side down.
- Close the lid and cook for 2–2.5 hours, flipping once halfway.
- Finish over direct heat for that gorgeous sear.
You can add a drip tray filled with water or apple juice beneath the ribs to maintain moisture and prevent flare-ups.
Smoked Spare Ribs: The Low and Slow Way
This is the ultimate method for barbecue purists.
- Preheat your smoker to 225°F (107°C).
- Add wood chips—hickory, apple, or cherry work great.
- Place ribs bone-side down, and smoke for 5 to 6 hours.
Use the 3-2-1 method for perfect results:
- 3 hours unwrapped smoke
- 2 hours wrapped in foil
- 1 hour unwrapped with sauce
You’ll get that deep smoke ring, succulent meat, and unforgettable taste.
The Texas Crutch: Wrapping Ribs for Tenderness
What Is the Texas Crutch?
The “Texas Crutch” is a barbecue technique where ribs are wrapped in foil partway through cooking. This traps moisture and heat, dramatically tenderizing the meat while speeding up the cooking process. It’s commonly used in competition BBQ to create ribs that nearly fall off the bone.
How to Do It Right
- After smoking or baking your ribs for 2–3 hours, remove them and lay them on a sheet of heavy-duty aluminum foil.
- Add a liquid inside the wrap—try apple juice, beer, or melted butter mixed with brown sugar and honey.
- Tightly seal the foil and return the ribs to the smoker or oven for 1.5 to 2 hours.
The result? Incredibly moist, tender ribs that still hold together but pull apart effortlessly when you bite in.
Glazing and Searing for a Flavorful Finish
Choosing the Right BBQ Sauce
Whether you like your sauce sweet, tangy, smoky, or spicy, glazing is what gives ribs that glossy, finger-licking finish. Some popular options:
- Sweet & Smoky: Brown sugar, molasses, ketchup, and liquid smoke.
- Carolina Tangy: Apple cider vinegar, mustard, black pepper.
- Spicy Kick: Chipotle, cayenne, honey.
Brush the sauce on the ribs during the last 30 minutes of cooking, turning and reapplying every 10 minutes. This builds layers of sticky flavor without burning the sugars.
The Final Sear
After saucing, consider giving your ribs a quick sear on high heat—either under a broiler or on a grill. Just 5 minutes per side will caramelize the sugars, thicken the sauce, and form that irresistible crust.
Be careful not to burn the sauce. Keep a close eye and rotate the ribs frequently.
How to Tell When Your Ribs Are Done
Visual and Tactile Clues
Knowing when your ribs are perfectly cooked is part science, part intuition. Look for these signs:
- Meat pulled back from the bone ends
- Bend test: Pick up the rack with tongs—if it bends and cracks slightly, it’s ready
- Juices running clear
- Internal temp of 190–203°F (88–95°C)
Avoid overcooking, which can make them dry and mushy. Properly cooked ribs will be tender but still have some bite to them.
Using a Meat Thermometer
Insert the thermometer into the thickest part of the meat (not touching bone). When the ribs hit 195°F, you’re in prime territory. Go up to 203°F for fall-off-the-bone texture, but don’t go higher—you’ll risk dryness.
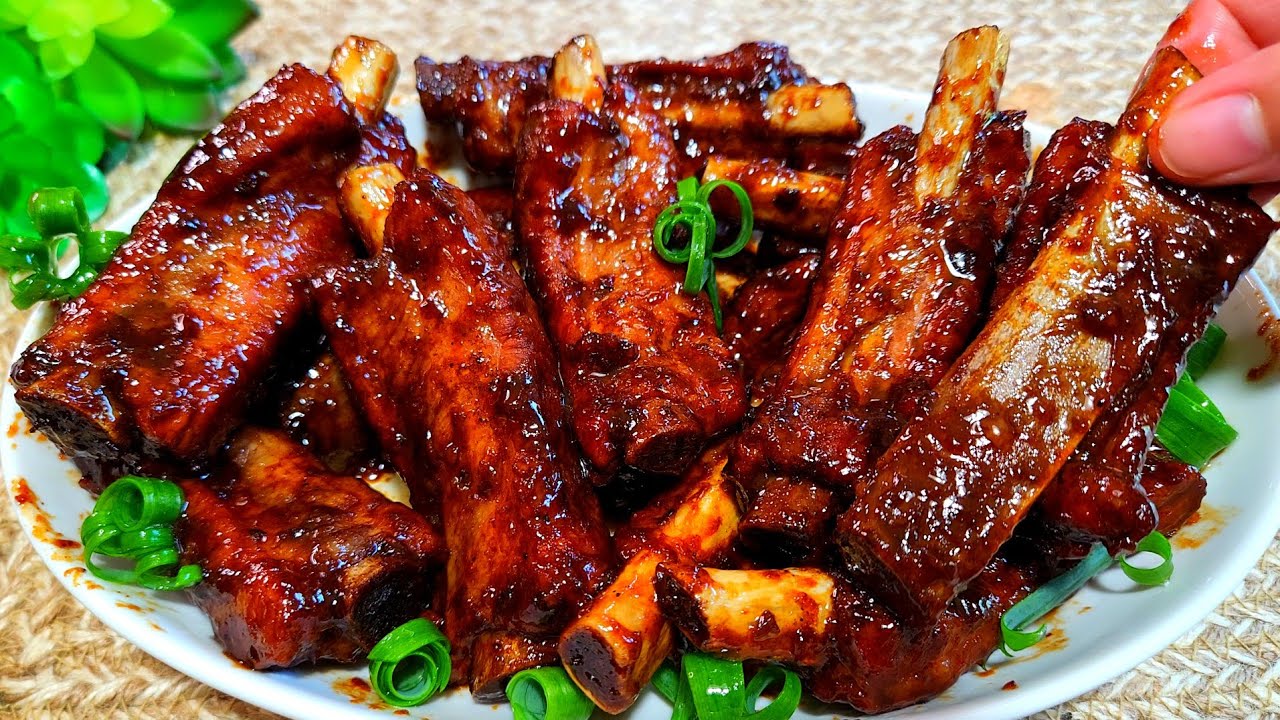
Serving Your Pork Spare Ribs
Plating Like a Pro
After your ribs rest for 10–15 minutes, slice them between the bones using a sharp knife. Serve them bone-side down, with the meat facing up to show off that beautiful crust and glaze.
Pair them with classic BBQ sides like:
- Coleslaw
- Cornbread
- Mac & cheese
- Pickles and onions
- Grilled corn on the cob
Presentation matters—stack them in a rustic wooden tray or a clean white platter for that Instagram-worthy BBQ look.
Garnishing Tips
- Sprinkle chopped parsley or green onions for color.
- Serve with extra BBQ sauce on the side.
- Add lemon wedges or pickled jalapeños for contrast.
Storing and Reheating Leftover Ribs
Best Practices for Storage
Got leftovers? Lucky you! Pork spare ribs keep well if you store them right. Here’s how to maintain that flavor and texture:
- Refrigerate: Place ribs in an airtight container or wrap tightly in aluminum foil or plastic wrap. Store in the fridge for up to 4 days.
- Freeze: For long-term storage, wrap each portion in plastic wrap and then foil. Place in a freezer-safe bag and freeze for up to 3 months. Don’t forget to label the date.
Before refrigerating or freezing, allow the ribs to cool completely to avoid condensation buildup, which can affect taste and texture.
Reheating Without Drying Out
To bring those ribs back to life without turning them into rubber:
- Oven Method (Best): Preheat oven to 275°F (135°C). Add a splash of broth, water, or apple juice to the ribs, wrap in foil, and bake for 20–30 minutes.
- Microwave (Quickest): Use a microwave-safe dish with a lid. Add a little moisture, cover loosely, and heat in 1-minute intervals.
- Grill or Stovetop (Great for Crisping): Reheat over medium heat, brushing with fresh BBQ sauce and flipping frequently to avoid burning.
Always make sure reheated ribs hit 165°F (74°C) internally to be safe for consumption.
Tips for First-Time Rib Cooks
Avoiding Common Mistakes
Cooking ribs can be intimidating the first time, but here are some common pitfalls to avoid:
- Skipping membrane removal: Leads to tough, chewy ribs.
- Cooking too hot or too fast: Results in dry meat and uneven doneness.
- Not resting the meat: Cuts down on juiciness—always rest 10–15 minutes after cooking.
- Using too much sauce too early: Sugar can burn. Apply sauce in the last 30 minutes only.
Pro Tips for Better Results
Want to cook like a pitmaster?
- Use a spray bottle: Mist your ribs with apple juice or vinegar every 30–45 minutes during smoking or baking to keep them moist.
- Invest in a good thermometer: Internal temperature matters more than time.
- Don’t overcrowd the grill or oven: Airflow is crucial for even cooking.
Practice makes perfect. Once you get the hang of it, ribs are one of the most rewarding BBQ dishes to master.
FAQs about Pork Spare Ribs Recipe
1. What’s the best way to cook pork spare ribs?
The most popular methods are grilling, baking, or slow-cooking. For juicy, tender ribs, slow-cooking or oven baking at low temperatures is often best.
2. Should I boil ribs before cooking?
Boiling is optional. Some cooks boil ribs briefly to tenderize and remove excess fat, but it can also reduce flavor. Marinating and slow-roasting are flavorful alternatives.
3. How long should I bake pork spare ribs in the oven?
Bake ribs at 300°F (150°C) for 2.5 to 3 hours, covered with foil. Then uncover, sauce them, and bake for another 30 minutes for that sticky, caramelized finish.
4. How do I know when spare ribs are done?
They’re done when the meat is tender and pulls away from the bone easily. Internal temperature should reach about 190°F–203°F (88°C–95°C) for perfect doneness.
5. Can I use store-bought BBQ sauce?
Yes! Store-bought BBQ sauce works great. You can also customize it with honey, chili, vinegar, or spices to enhance flavor.
6. Should ribs be cooked bone-up or bone-down?
Cook ribs bone-side down first. This helps keep the meat juicy and allows the fat to render properly.
7. Can I make pork spare ribs ahead of time?
Absolutely. Cook them a day in advance, refrigerate, and reheat with sauce before serving. The flavors often deepen overnight.
8. What sides go best with pork spare ribs?
Classic pairings include coleslaw, cornbread, potato salad, baked beans, or grilled vegetables.
Conclusion
There’s something deeply satisfying about cooking pork spare ribs—maybe it’s the smell of smoky meat, the anticipation as the glaze caramelizes, or the moment you sink your teeth into that perfectly cooked, fall-off-the-bone rib. Whether you’re baking in the oven, firing up the grill, or going the full-smoke route, ribs are more than just a meal—they’re an experience.
With this step-by-step guide, you’ve got everything you need to conquer your first (or fiftieth) rack of pork spare ribs. From choosing the right cut, crafting a flavorful rub or marinade, mastering different cooking techniques, and knowing how to store and reheat, every stage matters.
So grab your tongs, light that fire (or oven), and get ready to serve up ribs that will impress your family, wow your guests, and satisfy your soul. Happy cooking!


