Pizza Sliders Recipe: If you’re craving a quick, crowd-pleasing meal or snack, look no further than pizza sliders. Imagine all your favorite pizza flavors—cheese, sauce, toppings—packed into a warm, buttery slider roll.
Sounds delicious, right? Whether you’re planning a game night, family dinner, or just looking for a fun twist on classic pizza, these sliders check every box. They’re easy to make, fun to eat, and incredibly versatile.
Let’s dive into how to make them from scratch with a step-by-step guide that anyone—even a total kitchen newbie—can follow.
Why You’ll Love These Pizza Sliders
These pizza sliders are seriously addictive, and here’s why. First off, they’re ultra cheesy and gooey—thanks to a generous layer of mozzarella that melts perfectly in the oven. Secondly, the garlic butter topping adds that golden, crisp bite on top that makes these sliders feel extra indulgent. You can fully customize them with your favorite pizza toppings, whether you’re into pepperoni, mushrooms, or want to go full veggie. Best part? They’re made in under 30 minutes, making them perfect for weeknights or impromptu hangouts. They also reheat like a dream, so don’t be afraid to make a big batch.
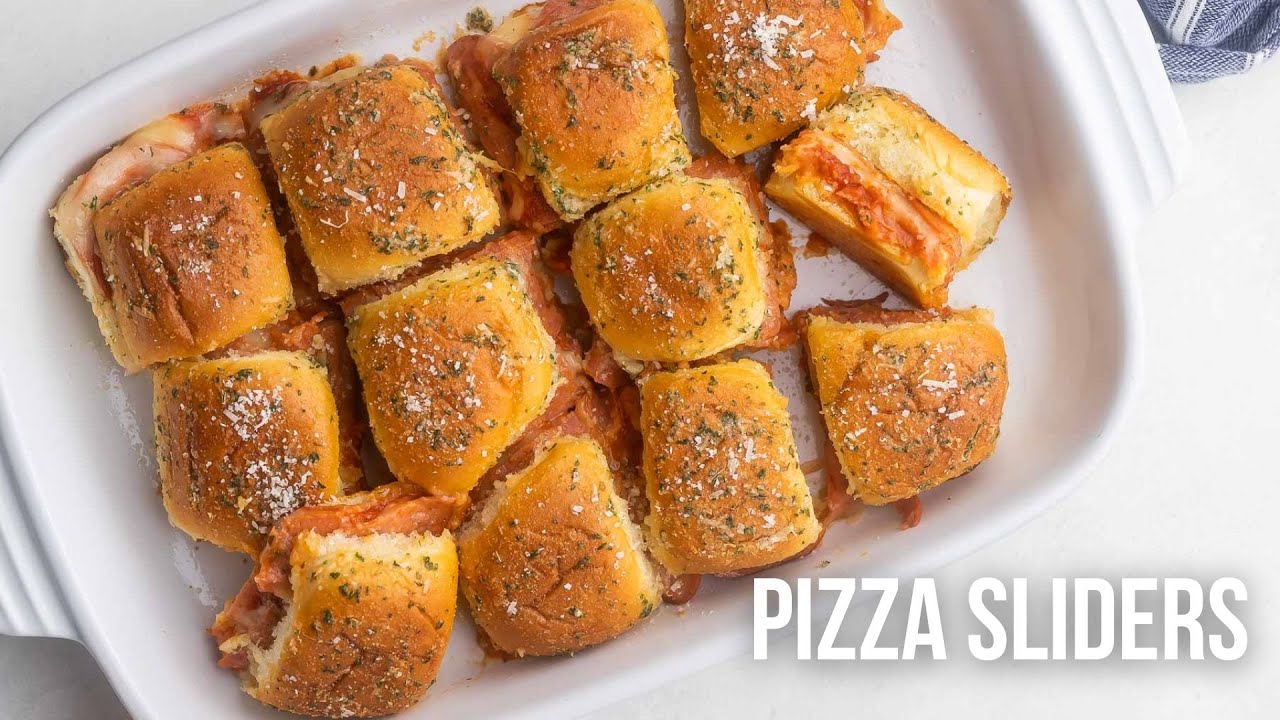
What Are Pizza Sliders?
Pizza sliders are essentially mini sandwiches made with slider buns that are layered with classic pizza ingredients—pizza sauce, cheese, toppings—and baked until hot and melty. They’re sliced and served like a pull-apart bread, so they’re easy to grab and eat. Think of them as a fun, portable version of pizza that’s ideal for parties, potlucks, or even school lunches. They’re usually brushed with a flavorful butter mixture before baking, which gives them that irresistible crust on top. You can customize them in endless ways—just like pizza.
List of Ingredients You’ll Need
Let’s get to the good stuff: the ingredients. These are broken down into three parts—base, toppings, and finishing touch.
For the Sliders:
- 12-pack of Hawaiian sweet rolls or any slider buns
- 1 cup pizza sauce or marinara sauce
- 2 cups shredded mozzarella cheese
- 20–24 slices of pepperoni (or your favorite topping)
For the Topping:
- 4 tablespoons unsalted butter
- 1 teaspoon garlic powder
- 1 teaspoon Italian seasoning
- 2 tablespoons grated Parmesan cheese (optional)
- Chopped parsley for garnish
Optional Add-Ons:
- Cooked sausage crumbles
- Sliced olives
- Mushrooms
- Bell peppers
- Jalapeños
- Red pepper flakes (for a spicy kick)
Tools and Equipment You’ll Need
To make the perfect batch of pizza sliders, you’ll need a few basic tools:
- 9×13 baking dish or sheet pan
- Serrated knife (for slicing buns)
- Pastry brush (for butter topping)
- Mixing bowl
- Aluminum foil
- Oven mitts
You probably already have these in your kitchen, so no fancy gadgets needed!
Prepping Before You Start
Before diving into the actual cooking, a little prep work goes a long way. First, preheat your oven to 350°F (175°C) so it’s ready when you are. Lay out all your ingredients and tools—this helps streamline the whole process. If you’re adding extra toppings like mushrooms or sausage, cook them ahead of time. Trust me, prepping everything before assembly keeps things mess-free and stress-free.
Step-by-Step Instructions for Pizza Sliders
Step 1: Preheat the Oven
Start by preheating your oven to 350°F (175°C). This ensures that once your sliders are assembled, the oven is hot and ready to go—no waiting around.
Step 2: Slice the Slider Rolls
Using a serrated knife, slice the entire pack of slider rolls horizontally. Don’t separate them; just slice them like one big loaf. Place the bottom half in your greased or lined baking dish.
Step 3: Add Pizza Sauce
Spread a generous amount of pizza sauce across the bottom half of the rolls. You want enough to flavor the sliders but not so much that they get soggy. Use the back of a spoon to spread it evenly from corner to corner.
Step 4: Layer on the Cheese
Next up: cheese time! Sprinkle 1 cup of shredded mozzarella evenly over the sauce layer. This first cheese layer acts as the gooey foundation of your sliders.
Step 5: Add Your Toppings
Now comes the fun part—toppings! Lay down your slices of pepperoni, cooked sausage, veggies, or whatever your heart desires. Feel free to mix and match! Don’t overload the sliders, though—too many toppings can make them hard to handle.
Step 6: Cover with Top Half of Rolls
Place the top half of the slider rolls over your assembled layers. Gently press them down to help everything stick together and stay in place.
Step 7: Brush with Garlic Butter Mixture
In a small bowl, melt the butter and mix in garlic powder, Italian seasoning, and Parmesan (if using). Use a pastry brush to generously brush this mixture over the tops of the rolls. Make sure you get into all the nooks and crannies—this is what gives your sliders that crave-worthy flavor and crunch.
Step 8: Bake Until Golden
Cover your dish loosely with foil and bake in the preheated oven for 15 minutes. Then, remove the foil and bake for another 5–7 minutes until the tops are golden brown and crispy. Your kitchen should smell like a pizzeria at this point!
Step 9: Slice and Serve
Once baked, let the sliders sit for about 5 minutes so they’re easier to handle. Then, use a sharp knife or spatula to slice them into individual pieces. Serve warm and watch them disappear fast!
Pro Tips for the Best Pizza Sliders
Want to make your sliders restaurant-worthy? Here are some pro tips to help you nail the flavor and texture every single time:
- Don’t skip the garlic butter topping. It adds flavor and makes the tops golden and slightly crispy.
- Use pre-shredded mozzarella for ease, but if you want next-level meltiness, grate it fresh.
- Lightly toast the bottom buns before adding sauce if you’re worried about sogginess.
- Layer smart. Put cheese under and over the toppings for a sandwich that holds together better.
- Cover while baking so they stay moist, and uncover at the end to get that golden-brown crust.
- Let them rest for 5 minutes before slicing—this prevents everything from sliding out when you cut into them.
- Want spicy? Add red pepper flakes or jalapeños for a kick.
Best Slider Breads to Use
Not all slider buns are created equal. The bread can seriously make or break your pizza sliders. Here are the top choices:
- Hawaiian Sweet Rolls – The go-to for most people. Soft, sweet, and perfectly squishable.
- Brioche Slider Buns – Richer and a bit more buttery; excellent for a more decadent taste.
- Plain Dinner Rolls – Simple and neutral; lets the toppings shine more.
- Whole Wheat Rolls – A healthier alternative with a more nutty flavor.
- Gluten-Free Buns – Ideal for dietary restrictions, just make sure they’re soft enough to hold together.
Pro tip: Always choose buns that are soft and slightly dense—flimsy bread will fall apart once baked.
Top Topping Combinations to Try
This is where things get fun and creative. Try out these popular topping combos—or invent your own!
- Classic Pepperoni
- Pizza sauce, mozzarella, pepperoni
- Meat Lovers
- Pepperoni, sausage, bacon bits, ham, mozzarella
- Veggie Delight
- Mushrooms, bell peppers, red onions, olives, spinach
- BBQ Chicken
- BBQ sauce instead of pizza sauce, chicken, red onions, cheddar + mozzarella
- Margherita Style
- Fresh mozzarella, sliced tomatoes, basil, olive oil drizzle
Mix, match, and get creative with whatever you’ve got in the fridge.
Making Pizza Sliders Ahead of Time
Need to prep in advance? You’re in luck—pizza sliders are totally make-ahead friendly.
- Assemble the sliders completely, but stop before brushing on the garlic butter.
- Wrap the baking dish tightly in foil or plastic wrap and refrigerate for up to 24 hours.
- When ready to bake, let them sit at room temp for 10–15 minutes, then brush with the butter mixture and bake as usual.
You can even prep and freeze them—just assemble, wrap well, and freeze for up to a month. When baking from frozen, add an extra 10–15 minutes.
How to Store and Reheat Leftovers
Got leftovers (rare, but it happens)? Here’s how to store and revive them:
- Store in an airtight container in the fridge for up to 3–4 days.
- Reheat in the oven at 325°F (160°C) for 10 minutes for best texture.
- Or microwave for about 45 seconds, though they might be a bit softer this way.
- You can even toss them in the air fryer for 5 minutes at 350°F to crisp them back up.
Avoid reheating more than once for food safety and quality reasons.
Making Them Kid-Friendly
Kids are going to love pizza sliders, but here’s how to make them even more appealing for young taste buds:
- Stick to simple toppings like just cheese or cheese and pepperoni.
- Let the kids help with assembly—they’ll have fun adding sauce and cheese.
- Cut the sliders into smaller portions for little hands.
- Avoid spicy toppings or strong flavors like jalapeños or olives if your kid is picky.
These sliders also work great for school lunchboxes—just wrap them in foil and pack with a small dipping sauce container.
Low-Carb or Gluten-Free Options
If you’re eating low-carb or gluten-free, you can still enjoy pizza sliders with a few tweaks:
- Use gluten-free slider buns available at most health food stores.
- For low-carb, try keto rolls or even use thick-cut zucchini rounds or portobello mushrooms as your “buns.”
- Skip the sugar in the pizza sauce or use a sugar-free marinara to keep carbs low.
- Use full-fat mozzarella for a keto-friendly version.
They won’t taste exactly like the original, but they’ll still scratch that pizza itch—without messing up your diet.
Common Mistakes to Avoid
Even though pizza sliders are pretty foolproof, there are a few common mistakes to watch out for:
- Using too much sauce. It’ll soak into the bread and make everything soggy.
- Overstuffing with toppings. Less is more—too much makes them fall apart.
- Forgetting to preheat the oven. It can affect how evenly they bake.
- Not covering while baking. They’ll dry out and the tops might burn.
- Skipping the rest time after baking. It helps the cheese settle and makes slicing easier.
Stick to the process and you’ll have golden, cheesy, delicious sliders every time.
Nutrition Facts (Per Serving)
Here’s a rough estimate based on 1 slider (with pepperoni and cheese):
| Nutrient | Amount |
|---|---|
| Calories | 220–250 kcal |
| Protein | 10g |
| Carbs | 18g–20g |
| Fat | 12g |
| Saturated Fat | 5g |
| Sodium | 450mg |
| Sugar | 4g |
Note: Nutrition varies based on toppings, sauce, and type of rolls used.
FAQs about Pizza Sliders Recipe
1. Can I use different types of cheese?
Absolutely! Mozzarella is the classic choice, but you can also try provolone, cheddar, or even a little parmesan for extra flavor.
2. How do I make vegetarian pizza sliders?
Skip the meat and go for mushrooms, bell peppers, onions, olives, or spinach. You can even add plant-based meat alternatives.
3. Can I freeze pizza sliders?
Yes! Assemble them, wrap tightly in foil or plastic, and freeze. Bake directly from frozen, adding an extra 10–15 minutes to the bake time.
4. What sides go well with pizza sliders?
Serve with a side of marinara, garlic parmesan fries, a fresh green salad, or even mozzarella sticks for a full pizza-night experience.
5. Are these good for parties or gatherings?
They’re perfect for parties! Easy to make in big batches, easy to serve, and everyone loves them—kids and adults alike.
Conclusion
Pizza sliders are the ultimate comfort food, combining all the crave-worthy elements of pizza with the convenience of finger food. They’re easy to make, fun to customize, and perfect for just about any occasion—whether you’re feeding a crowd or just looking to switch up your dinner routine. With this step-by-step guide, you’ll be making pizza sliders like a pro in no time. So grab your favorite toppings, preheat the oven, and get ready to wow everyone at the table.