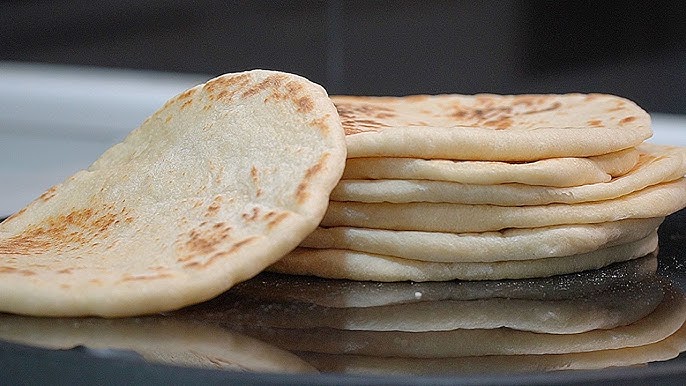
Pita Bread Recipe: Pita bread is a soft, round flatbread that has been a staple in Middle Eastern and Mediterranean cuisines for centuries. Known for its signature pocket that forms when baked, pita bread is perfect for stuffing with delicious fillings or scooping up dips like hummus or tzatziki.
A Brief History of Pita Bread
Originating in the Middle East, pita bread is one of the oldest known bread types, with references dating back over 4,000 years. Its simplicity and versatility made it a favorite among ancient civilizations, and it remains a beloved bread worldwide today.
Why Make Pita Bread at Home?
Homemade pita bread is fresher, more flavorful, and often healthier than store-bought versions. Plus, it’s surprisingly easy to make and allows you to customize flavors and textures to suit your preferences.
Ingredients for Pita Bread
Core Ingredients
To make classic pita bread, you’ll need:
- Flour (all-purpose or bread flour)
- Water (lukewarm for activating the yeast)
- Yeast (active dry or instant yeast)
- Sugar (to feed the yeast)
- Salt (for flavor)
- Olive Oil (for richness)
Optional Add-ins for Flavor Variation
For a twist, you can add:
- Garlic powder or onion powder
- Herbs like thyme or oregano
- A touch of honey for sweetness
Essential Equipment for Making Pita Bread
Tools You’ll Need
- Mixing bowls
- Measuring cups and spoons
- Rolling pin
- Cast iron skillet or baking stone
- Kitchen towel
Alternative Tools for a No-Fuss Approach
Don’t have a rolling pin? A clean bottle works too! No cast iron skillet? Try using a non-stick pan or a regular oven tray.
Preparing the Dough
Mixing the Ingredients
Start by combining the yeast, sugar, and lukewarm water in a bowl. Let it sit for 5-10 minutes until it becomes frothy. This step ensures the yeast is active. Mix in the flour, salt, and olive oil gradually, stirring until a shaggy dough forms.
Kneading the Dough
Turn the dough out onto a floured surface and knead for about 8-10 minutes until it becomes smooth and elastic. Proper kneading is essential for the pita bread to puff up while cooking.
Letting the Dough Rise
Place the dough in a lightly oiled bowl, cover it with a damp towel, and let it rise in a warm spot for 1-2 hours until it doubles in size.
Shaping the Pita Bread
Dividing the Dough
Once the dough has risen, punch it down and divide it into equal portions. Typically, one batch yields 8-10 pieces.
Rolling the Dough into Discs
Roll each portion into a smooth ball, then flatten it into a ¼-inch-thick disc using a rolling pin. Uniform thickness is key to achieving the perfect puff.
Cooking Pita Bread
Cooking on a Stovetop
Using a stovetop is one of the simplest methods to cook pita bread:
- Heat a heavy skillet or cast iron pan over medium-high heat. Ensure it’s hot before placing the dough.
- Place one rolled-out disc into the pan. Cook for 30 seconds until bubbles start to form, then flip it.
- Cook the other side for about 1-2 minutes until the bread puffs up and turns golden brown in spots.
- Flip back to the first side for another 30 seconds if needed.
- Remove from the pan and wrap in a clean kitchen towel to keep warm and soft.
Repeat this process for all the pita discs.
Baking in an Oven
Baking is another great option, especially for making multiple pitas at once:
- Preheat your oven to its highest temperature (450–500°F or 230–260°C). Place a baking stone or inverted baking tray inside to heat up.
- Carefully place a few dough discs onto the hot baking stone.
- Bake for 2-3 minutes until they puff up. Watch closely as this happens quickly!
- Remove from the oven and cover with a kitchen towel to keep warm.
Tips for Perfect Pita Bread
Getting the Right Puff
- Ensure proper kneading: A well-kneaded dough develops the gluten structure needed for the iconic puff.
- Roll evenly: Uniform thickness helps the bread puff evenly during cooking.
- High heat is key: Both stovetop and oven methods require very high heat for the pocket to form.
Avoiding Common Mistakes
- Avoid over-flouring while rolling the dough; excess flour can make the bread tough.
- Don’t let the dough dry out during resting; always cover it with a damp towel.
- If the pitas don’t puff, check that the skillet or oven was hot enough.
Serving Suggestions
Pairing with Dips and Spreads
Pita bread is the perfect companion to:
- Hummus: A creamy and savory chickpea dip.
- Baba Ghanoush: A smoky roasted eggplant dip.
- Tzatziki: A refreshing cucumber-yogurt dip.
Using Pita Bread in Meals
- Stuffed Pita Pockets: Fill with falafel, grilled chicken, or fresh veggies.
- Pita Pizza: Use as a base for quick, personal-sized pizzas.
- Side for Soups and Salads: A hearty accompaniment to round out any meal.
Storing and Reheating Pita Bread
Proper Storage Techniques
- Room Temperature: Store in an airtight bag for up to 2 days.
- Refrigeration: Extend freshness by refrigerating in a sealed bag for up to 1 week.
- Freezing: Freeze pitas individually wrapped in plastic for up to 3 months.
How to Reheat Without Losing Freshness
- For soft pitas, wrap in foil and warm in an oven at 350°F for 5-7 minutes.
- To restore the puff, place on a hot skillet for 30-60 seconds per side.
Nutritional Information
Calories and Macronutrients
A typical 6-inch pita bread contains:
- Calories: 170-200
- Carbohydrates: 36g
- Protein: 6g
- Fat: 1g (if made with olive oil)
Pita Bread as Part of a Balanced Diet
Pita bread is a versatile option for a balanced diet, offering a low-fat, fiber-rich alternative to traditional bread. Opt for whole wheat versions for additional nutrients and fiber.
FAQs about Pita Bread Recipe
1. What ingredients do I need to make pita bread?
To make pita bread, you will need basic ingredients such as all-purpose flour, yeast, warm water, salt, and olive oil. These ingredients come together to create the perfect pita bread with a pocket.
2. How do I get my pita bread to puff up?
The key to getting pita bread to puff up lies in the rolling and cooking process. Roll the dough evenly and not too thin, then cook it at a high temperature. Ensure your oven is preheated to at least 450°F (232°C) or use a hot cast-iron skillet on the stovetop.
3. Can I make pita bread without yeast?
Yes, you can make pita bread without yeast by using baking powder as a leavening agent. However, the texture and taste might slightly differ from the yeast-based version.
4. Is pita bread healthy?
Pita bread can be a healthy option, especially when made with whole grain flour. It is low in fat and can be a good source of dietary fiber if whole grains are used.
5. How long does homemade pita bread last?
Homemade pita bread can last for up to a week when stored in an airtight container at room temperature. For longer storage, you can freeze it for up to 3 months.
6. Can I use gluten-free flour to make pita bread?
Yes, gluten-free flour can be used to make pita bread. Look for a gluten-free flour blend that is meant for bread baking to get the best results.
7. What can I serve with pita bread?
Pita bread is incredibly versatile. Serve it with dips like hummus or baba ganoush, stuff it with a filling of your choice for sandwiches, or cut it into pieces and bake for homemade pita chips.
Conclusion
Making pita bread at home is a rewarding experience that brings a taste of tradition to your kitchen. With simple ingredients, basic tools, and a little practice, you can create soft, fluffy, and flavorful pita bread perfect for any meal. Whether cooked on a stovetop or baked in the oven, homemade pita bread is sure to impress your family and friends.


