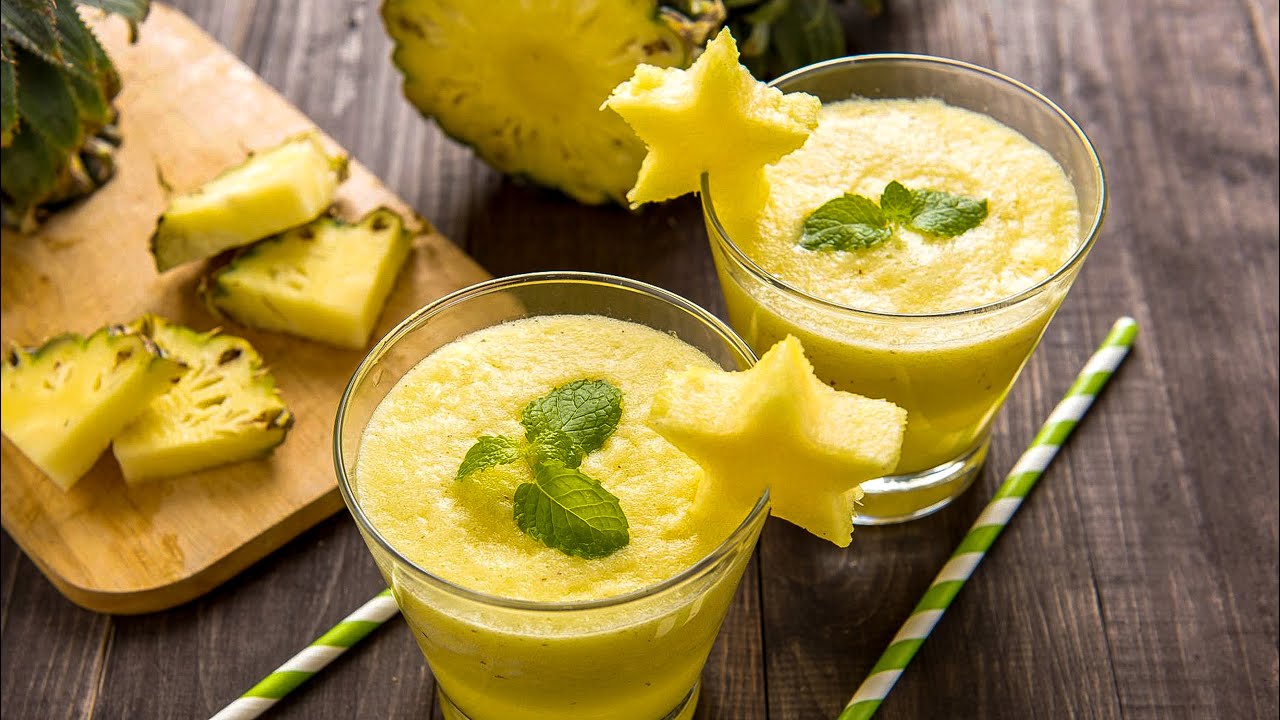
Pineapple Smoothie Recipe: Pineapple isn’t just a tropical delight—it’s a smoothie superstar. Its juicy sweetness and refreshing tartness bring a bold burst of flavor that instantly uplifts any blend. Whether you’re going for a breakfast smoothie or a post-workout refresher, pineapple fits right in. What makes it even better is its natural sweetness, which can help you cut down on added sugars. Plus, its high water content makes it an excellent choice for a hydrating drink.
Pineapple has a texture that blends beautifully, especially when frozen. When you toss frozen pineapple chunks into the blender, you get that thick, ice-cream-like consistency without needing any actual ice cream. And let’s not forget the vibrant yellow color—it just screams sunshine in a cup.
Moreover, its tropical vibe pairs well with a wide variety of ingredients, from bananas and mangoes to coconut and even leafy greens. So, whether you’re a beginner or a smoothie pro, pineapple gives you the versatility and flavor needed to create the perfect drink.
Health Benefits of Pineapple Smoothies
Not only do pineapple smoothies taste amazing, but they also pack a serious nutritional punch. Pineapple is loaded with vitamin C, which boosts your immune system and keeps your skin glowing. Just one cup provides over 100% of your daily recommended intake. That’s right—you’re practically drinking your way to better health.
But that’s not all. Pineapple contains bromelain, a unique enzyme known for its anti-inflammatory properties and ability to aid digestion. If you’ve ever felt bloated or heavy after a meal, a pineapple smoothie can help settle your stomach and get things moving.
When combined with other healthy ingredients like Greek yogurt, almond milk, or spinach, pineapple smoothies turn into nutrient powerhouses. You get a mix of vitamins, minerals, fiber, and protein—all blended into one easy-to-consume drink. And the best part? You don’t even feel like you’re eating something “healthy.” It’s like dessert that’s secretly good for you.
Ingredients You’ll Need
Core Ingredients
To make the perfect pineapple smoothie, you don’t need a long grocery list. In fact, the core ingredients are quite simple:
- 1 cup fresh or frozen pineapple chunks – Frozen is ideal for texture.
- 1 banana – Adds natural sweetness and creaminess.
- 1/2 cup Greek yogurt – For protein and a creamy texture.
- 1/2 cup almond milk (or any milk of choice) – Helps blend everything smoothly.
- 1 tsp honey or maple syrup (optional) – Only if you want it sweeter.
These ingredients strike the right balance of flavor, creaminess, and nutrition. They’re also easily adjustable based on what you have on hand. For example, you can swap out the banana for mango, or use regular milk instead of almond milk.
Optional Add-ons for Extra Flavor and Nutrition
Want to take your pineapple smoothie to the next level? Here are some great add-ons you can experiment with:
- Spinach or kale – A handful adds nutrients without changing the flavor much.
- Chia seeds or flaxseeds – Great for fiber and omega-3s.
- Protein powder – Ideal for post-workout smoothies.
- Coconut water – For extra hydration and a tropical twist.
- Ice cubes – If you’re using fresh pineapple and want a colder, thicker texture.
Feel free to mix and match. The beauty of smoothies is their flexibility. You can tailor them to your taste and dietary needs while keeping them delicious.
Equipment Required
Best Blender for Smoothies
To get that silky-smooth texture, a good blender is key. While you don’t need a top-of-the-line model, something with enough power to handle frozen fruit and seeds is essential. Here are a few things to look for:
- Power: At least 600 watts for best results.
- Blade design: Multi-level blades work best for smooth blending.
- Ease of cleaning: Removable parts or dishwasher-safe features are a big plus.
- Capacity: A blender with a large jar (32 oz or more) is ideal for making multiple servings.
Brands like Vitamix, Ninja, and NutriBullet consistently get high marks from smoothie lovers. They’re powerful, durable, and designed specifically for tasks like this.
Other Handy Tools
Besides a blender, having a few other kitchen items can make your smoothie experience smoother (pun intended):
- Measuring cups and spoons – To get your proportions right.
- Silicone spatula – Perfect for scraping out every last drop.
- Glass jars or to-go cups – For storing or taking your smoothie on the road.
- Reusable straws – Because sipping from a straw just feels more fun.
Even if you’re a smoothie rookie, having the right tools can make the whole process faster, easier, and more enjoyable.
Step-by-Step Guide to Making a Pineapple Smoothie
Step 1: Prepare Your Ingredients
Before you even touch the blender, it’s prep time. Having everything ready makes the blending process smoother and quicker. Start by measuring out your ingredients. If you’re using fresh pineapple, peel, core, and cut it into chunks. Frozen pineapple is a time-saver and delivers a thick, frosty smoothie—just take it straight from the freezer.
Next, peel the banana and break it into smaller pieces for easier blending. If you’re going for a creamier consistency, make sure your banana is ripe. For a dairy base, scoop out your Greek yogurt. If you want a vegan version, coconut or almond yogurt works beautifully too.
Measure out your liquid base—almond milk, coconut milk, or even plain water. The liquid not only helps blend the ingredients but also determines the drink’s texture. Less liquid equals a thicker smoothie, more liquid makes it thinner. Toss in your sweetener (if using), and gather any extras like chia seeds or greens.
Having everything prepped and within reach streamlines the blending process. Think of it like setting the stage before the show—it’s all about making magic happen with minimal mess.
Step 2: Add to Blender in the Right Order
Believe it or not, the order in which you add ingredients to your blender matters. It can mean the difference between a smooth blend and a chunky mess. Start with the liquids. Pour your almond milk (or other liquid of choice) into the blender first. This creates a whirlpool effect and helps the blades do their job.
Next, add your yogurt and banana. These softer ingredients form a creamy base and cushion the harder, frozen items. Then, toss in your pineapple chunks. Frozen pineapple goes in last to prevent the blades from jamming. If you’re adding extras like spinach or seeds, place them on top.
The right layering ensures everything blends evenly and prevents your motor from overworking. It also cuts down on blending time, so you’re sipping your smoothie in minutes.
Step 3: Blend to Perfection
Now it’s showtime! Secure the blender lid tightly—nobody wants pineapple smoothie all over the walls. Start at a low speed to get things moving, then gradually increase to high. This step-by-step ramp-up helps everything incorporate smoothly.
Blend for about 45–60 seconds, depending on the power of your blender. You’re aiming for a velvety texture without any visible chunks. If your blender has a “smoothie” setting, go ahead and use it.
If the mixture seems too thick, pause and add a splash more liquid. Then blend again until smooth. You want that perfect consistency—not too runny, not too icy. Once done, give the blender a gentle shake (while it’s off!) to make sure everything has mixed evenly.
Pro tip: For extra fluffiness, let it blend an extra 10 seconds even after it looks smooth. This incorporates more air and gives your smoothie a lighter texture.
Step 4: Taste and Adjust
This is the most fun part—tasting! Give your smoothie a quick sip before pouring it out. Is it sweet enough? Too thick? Not pineapple-y enough? Now’s your chance to tweak.
- If it needs more sweetness, add a touch of honey or maple syrup.
- If it’s too thick, blend in a bit more almond milk or even orange juice for a citrus kick.
- If it’s too thin, toss in a few ice cubes or more frozen fruit and blend again.
Customizing your smoothie ensures it’s tailored to your taste. Everyone’s flavor preference is different, so don’t be afraid to adjust. The more you tweak, the better you get at creating the perfect blend.
Step 5: Serve and Enjoy
Once your smoothie is just right, it’s time to serve it up. Pour it into a tall glass or a to-go tumbler if you’re heading out the door. Want to elevate the presentation? Garnish with a pineapple wedge, a sprinkle of chia seeds, or a mint leaf. It’s those little touches that turn a regular smoothie into something Instagram-worthy.
If you made a large batch, store the extra in an airtight container in the fridge. Just remember, smoothies are best enjoyed fresh. After a few hours, they can start to separate—but a quick stir usually fixes that.
Now sip, smile, and enjoy the tropical flavor explosion. You just made a refreshing, nutrient-packed pineapple smoothie, all by yourself.
Tips and Tricks for the Perfect Pineapple Smoothie
How to Make It Creamier
Want your smoothie to be ultra-rich and creamy, almost like a tropical milkshake? It’s easier than you think. Creaminess often comes down to the right ingredients and blending technique. Start by using frozen banana instead of fresh. Frozen bananas act like a natural thickener and bring that smooth, velvety texture you usually find in professional smoothies.
Next, go for full-fat Greek yogurt or coconut yogurt. Both are thicker and creamier than their low-fat or dairy-free alternatives. If you’re avoiding dairy, canned coconut milk is a game-changer—it’s thick, luscious, and gives your smoothie that beachy, indulgent twist.
Avocado is another secret weapon. Just a quarter of an avocado blends seamlessly into the mix, adding creaminess without changing the taste. Nut butters like almond or cashew also help, plus they give you healthy fats and protein.
Lastly, make sure you’re blending long enough. Under-blending can leave you with a gritty texture. Give your smoothie a full 60 seconds on high for the creamiest result. Bonus tip: chill your glass before pouring—because a cold glass keeps your smoothie colder and more refreshing.
Sweetness Control
Not everyone has the same sweet tooth, and luckily, pineapple smoothies are super flexible when it comes to sweetness. Pineapple itself is naturally sweet, especially when ripe, so you might not need any added sugar at all. But if you do prefer a sweeter touch, you’ve got plenty of healthy options.
Add half a ripe banana, a few soaked dates, or a splash of orange juice. These not only sweeten your smoothie naturally but also add nutrients and depth of flavor. Steer clear of refined sugar—your taste buds and your body will thank you.
If your pineapple is a bit tart, you can mellow it out with a spoonful of honey or agave syrup. Maple syrup also works, especially if you’re going for a richer flavor profile.
The key is to start small. Blend your smoothie, taste it, and then decide if it needs a bit more sweetness. This way, you avoid over-sweetening and keep it perfectly balanced.
Best Time to Drink Pineapple Smoothies
When’s the ideal time to enjoy a pineapple smoothie? Honestly, anytime is a good time—but certain moments can really amplify the benefits.
Morning smoothies are a classic choice. They’re quick to make, easy to digest, and give you a burst of energy to start your day. Pineapple, with its natural sugars and vitamin C, wakes up your system like a tropical alarm clock.
Post-workout is another great time. Pineapple’s anti-inflammatory properties, plus the added protein from yogurt or protein powder, help with muscle recovery and hydration.
If you’re someone who deals with digestive issues, afternoon or post-meal smoothies can help. The bromelain in pineapple supports digestion, especially after a heavy lunch.
And let’s not forget those hot summer days. A cold pineapple smoothie in the mid-afternoon feels like a mini-vacation in a cup. It cools you down, satisfies your sweet cravings, and keeps you refreshed without the crash that sugary sodas cause.
So whether it’s breakfast, post-gym, or snack time, pineapple smoothies fit in perfectly.
FAQs about Pineapple Smoothie Recipe
Can I use canned pineapple for smoothies?
Yes, you can! Just make sure to choose canned pineapple in 100% juice rather than syrup to avoid added sugars. Rinse it briefly if you’re concerned about sweetness, and it blends just as well as fresh or frozen.
Are pineapple smoothies good for weight loss?
Absolutely! Pineapple is low in calories but high in fiber and water, which helps keep you full. Combine it with protein and healthy fats in your smoothie, and you’ve got a meal that supports weight management without sacrificing flavor.
Can I store pineapple smoothies in the fridge?
Yes, but they’re best consumed fresh. If you must store it, keep your smoothie in an airtight container in the fridge for up to 24 hours. Shake or stir before drinking, as some separation is normal.
What fruits mix well with pineapple in a smoothie?
Lots! Banana, mango, orange, strawberries, and coconut are all great partners. Pineapple’s bright, tart flavor blends well with both sweet and citrusy fruits, giving you tons of mix-and-match options.
How do I make a dairy-free pineapple smoothie?
Simple—just skip the yogurt and use a plant-based milk like almond, coconut, or oat. You can add a spoonful of nut butter or a bit of avocado for creaminess. Coconut yogurt is a great alternative, too.
Conclusion
Pineapple smoothies aren’t just drinks—they’re an experience. They combine tropical flavor, creamy texture, and powerful nutrition all in one glass. With the right ingredients, a solid blender, and a few smart techniques, you can whip up a smoothie that tastes like it came from a beachside juice bar.
From prepping your fruits to blending like a pro, this guide has walked you through every step to pineapple smoothie perfection. Whether you’re looking to boost your health, stay hydrated, or simply enjoy something delicious, this tropical blend has you covered.
So next time you’re craving something sweet and refreshing, skip the soda or sugary snacks—reach for your blender and go pineapple. Your body and taste buds will thank you.