Pineapple Bread Recipe: There’s something about the tropical sweetness of pineapple that instantly lifts your mood, right? Now, imagine combining that fruity punch with the comforting warmth of freshly baked bread. That’s what pineapple bread is all about—a perfect fusion of soft, moist texture and bold pineapple flavor that makes your taste buds dance. Whether you’re looking for a breakfast treat, a quick snack, or a dessert that doesn’t feel over-the-top, pineapple bread is your answer.
This isn’t just any regular banana bread or zucchini loaf—pineapple bread has its own charm. It’s slightly tangy, naturally sweet, and incredibly moist. Plus, it’s a great way to use up that leftover pineapple sitting in your fridge. This step-by-step guide will walk you through everything—from prepping your ingredients to baking that golden loaf of tropical delight. Whether you’re a seasoned baker or a first-timer in the kitchen, you’re going to love how easy and foolproof this recipe is.
Health Benefits of Pineapple
Pineapple isn’t just tasty—it’s also packed with health benefits that make this recipe even more appealing. This tropical fruit is loaded with vitamin C, a powerful antioxidant that supports your immune system, skin health, and even helps reduce inflammation. That’s already a win, right?
But there’s more. Pineapple contains bromelain, an enzyme that helps with digestion by breaking down protein. It can also act as a natural anti-inflammatory agent. So, not only does pineapple bread satisfy your sweet tooth, but it also gives your body a bit of a health boost in the process. And let’s not forget—it’s naturally sweet, which means you can cut down on refined sugar in your recipes.
Whether you go with fresh or canned pineapple, you’re still getting a solid dose of nutrients. Just be sure to pick the no-sugar-added canned variety if you’re watching your intake. All in all, pineapple brings more than just flavor—it adds a healthy twist to your favorite baked goods.
List of Ingredients You’ll Need
Making pineapple bread doesn’t require anything fancy. Most of the ingredients are pantry staples, and you might already have them on hand. Here’s everything you’ll need for this delicious loaf:
Main Ingredients:
- 1 ¾ cups all-purpose flour
- 1 tsp baking soda
- ½ tsp salt
- ½ tsp ground cinnamon (optional but adds great flavor)
- 2 large eggs
- ¾ cup granulated sugar
- ½ cup vegetable oil (can substitute with melted coconut oil or butter)
- 1 tsp vanilla extract
- 1 ½ cups crushed pineapple (drained if using canned)
- ¼ cup pineapple juice (reserved from can or fresh)
Optional Add-ins:
- ½ cup chopped walnuts or pecans
- ½ cup shredded coconut for a tropical twist
- ½ cup raisins or dried cranberries
- 2 tbsp brown sugar (for sprinkling on top)
That’s it! Simple, right? You can also play around with flavors and textures by adding a bit of lemon zest or a touch of nutmeg.
Kitchen Tools Required
Before you dive into baking, make sure you’ve got the right tools in place. Having the proper kitchen gear makes the whole process smoother—and a lot more enjoyable!
Must-Have Tools:
- Mixing bowls – At least two: one for wet ingredients, one for dry
- Measuring cups and spoons – Accuracy is key in baking
- Whisk and spatula – For mixing without overworking the batter
- Loaf pan (9×5 inch) – The standard size for this recipe
- Cooling rack – Helps your bread cool evenly and prevents soggy bottoms
Nice-to-Have Tools:
- Electric hand mixer or stand mixer – Speeds things up, especially if you’re doubling the recipe
- Fine mesh strainer – Useful for draining canned pineapple
- Toothpick or cake tester – Ensures your bread is baked through
Having everything ready before you start mixing saves time and prevents you from scrambling mid-recipe. It’s the little prep steps that make the biggest difference.
Before You Begin: Tips for the Perfect Pineapple Bread
Before jumping straight into mixing and baking, there are a few tips that can make or break your loaf—literally.
- Drain Your Pineapple Well: If you’re using canned pineapple, don’t skip this step. Excess liquid can make the batter too wet, leading to a dense or undercooked loaf. Save a bit of juice for flavor but strain the rest thoroughly.
- Use Room Temperature Ingredients: Eggs and pineapple at room temp mix more easily and help create a smoother batter. Cold ingredients can shock the batter and affect the final texture.
- Don’t Overmix the Batter: This is crucial. Once you combine the wet and dry ingredients, stir just until everything is incorporated. Overmixing develops gluten, which can make your bread tough and chewy.
- Grease Your Loaf Pan Well: Use butter, oil spray, or even parchment paper to make sure your bread doesn’t stick. There’s nothing worse than a perfect loaf that breaks while trying to get it out of the pan.
A little prep goes a long way. These tips may seem simple, but they’re the secret to baking a loaf that’s moist, fluffy, and full of flavor.
Step-by-Step Pineapple Bread Recipe
Let’s get down to the good stuff—baking your pineapple bread! Follow these easy steps, and you’ll have a warm, tropical loaf in no time.
Step 1: Preheat & Prepare
Start by preheating your oven to 350°F (175°C). Grease your 9×5-inch loaf pan or line it with parchment paper. This prevents sticking and ensures an easy release after baking.
Step 2: Mix Dry Ingredients
In a large mixing bowl, whisk together:
- 1 ¾ cups flour
- 1 tsp baking soda
- ½ tsp salt
- ½ tsp cinnamon (if using)
Mix thoroughly to evenly distribute the leavening agents.
Step 3: Blend Wet Ingredients
In another bowl, combine:
- 2 eggs
- ¾ cup sugar
- ½ cup oil
- 1 tsp vanilla extract
- ¼ cup pineapple juice
Whisk until smooth. Then, fold in your 1 ½ cups crushed pineapple.
Step 4: Combine Wet and Dry
Pour the wet mixture into the dry ingredients. Gently stir with a spatula or wooden spoon until just combined. The batter should be thick but pourable.
Step 5: Fold in Extras
This is where you can get creative. Fold in nuts, coconut, or dried fruits if you like. Don’t overmix—just a few folds will do.
Step 6: Pour Into Loaf Pan
Transfer the batter into your prepared loaf pan. Smooth out the top with your spatula. Optional: Sprinkle brown sugar or more shredded coconut on top for added texture.
Step 7: Bake to Perfection
Place your pan in the center of the oven and bake for 55–65 minutes, or until a toothpick inserted into the center comes out clean. If the top browns too quickly, cover it loosely with foil for the last 15 minutes.
Step 8: Cooling and Serving
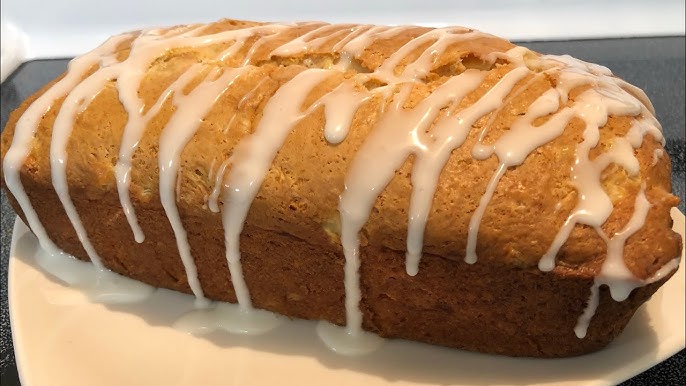
Let the bread cool in the pan for 15 minutes, then transfer it to a wire rack to cool completely. Slice and serve warm or at room temperature. It’s fantastic plain, with butter, or even cream cheese!
Expert Tips for Success
Let’s be real—anyone can follow a recipe, but what really makes a loaf memorable is those little insider tips that take your baking from good to unforgettable. Here’s how to make your pineapple bread the kind that disappears from the plate in minutes:
- Use Crushed Pineapple, Not Chunks: Crushed pineapple distributes evenly through the batter, giving you consistent flavor and moisture in every bite. Chunks can sink or clump, throwing off the texture.
- Don’t Skip the Pineapple Juice: Adding a bit of pineapple juice gives the bread extra tropical flavor. It also helps keep the crumb tender and moist. Just don’t go overboard, or you’ll mess up the moisture balance.
- Add Coconut for a Flavor Punch: Want to take your pineapple bread to the next level? Fold in some unsweetened shredded coconut. It enhances the tropical vibe and adds a bit of texture.
- Toaster Test: Day-old pineapple bread is amazing toasted with a little butter. Try it—you might like it even better than fresh!
- Use Greek Yogurt or Sour Cream: If your batter seems a little dry (depending on your flour or pineapple brand), adding 2-3 tablespoons of Greek yogurt can boost moisture without thinning it out too much.
If you keep these little tips in mind, you’re not just baking—you’re crafting a tropical masterpiece.
Substitutions and Variations
One of the best things about this pineapple bread recipe is how flexible it is. Whether you’ve got dietary restrictions or just want to shake things up a bit, here are a few fun ways to customize your loaf:
Gluten-Free Option
Swap out the all-purpose flour for a 1:1 gluten-free flour blend. Look for ones that contain xanthan gum or add ½ teaspoon yourself to help with binding. The texture may be slightly different but still totally delicious.
Vegan Version
Skip the eggs and use flaxseed or chia eggs (1 tbsp ground flax + 3 tbsp water per egg). Replace the oil with melted coconut oil or any neutral vegetable oil, and use plant-based yogurt or milk in place of any dairy if your variation includes it.
Tropical Twist: Pineapple Coconut Bread
Add ½ cup of shredded coconut and a teaspoon of lime zest for an ultra-tropical flavor. You can even drizzle with a simple lime glaze (powdered sugar + lime juice) once it’s cooled.
Nut-Free Option
Just skip the nuts! Pineapple bread is naturally flavorful and moist, so nuts are totally optional.
Extra Fruity
Mix in chopped dried mango or even small bits of banana. Just be careful not to overload the batter or it could become too wet.
Pineapple bread is super forgiving and loves a little creativity. As long as you keep the basic structure of the batter balanced, you can personalize it however you want.
What to Serve with Pineapple Bread
This bread is a star on its own, but if you want to dress it up or pair it with something to round out a meal or occasion, here are some tasty ideas:
Sweet Pairings
- Cream Cheese or Honey Butter: A spread of whipped cream cheese or a little honey butter on a warm slice? Heavenly.
- Fresh Fruit Salad: Serve with a chilled bowl of fruit for a fresh breakfast or brunch.
- Yogurt Parfait: Add a slice to a plate with Greek yogurt, granola, and berries for a filling and colorful meal.
Savory Combos
- With Cheese & Charcuterie: It might surprise you, but pineapple bread works on a tropical-inspired cheese board. Think brie, prosciutto, or a bit of aged cheddar.
- Soup Sidekick: Slightly sweet pineapple bread pairs well with savory soups, especially coconut curry or creamy tomato.
Whether you’re serving it for breakfast, dessert, or as an afternoon snack with coffee or tea, this bread holds its own and makes every bite memorable.
Storing and Freezing Pineapple Bread
You’ll probably want to keep this loaf around for a few days—and good news: it stores beautifully.
Storing at Room Temperature
- Wrap tightly in plastic wrap or place in an airtight container.
- Store in a cool, dry place.
- It stays fresh for about 3–4 days at room temp.
Refrigerating
- Not necessary, but if your kitchen is humid, you can refrigerate.
- Just make sure it’s well-wrapped to prevent it from drying out.
- Lasts up to a week in the fridge.
Freezing Instructions
- Let the bread cool completely first.
- Wrap the whole loaf or individual slices in plastic wrap, then aluminum foil.
- Store in a freezer-safe bag or container.
- Good for up to 3 months in the freezer.
To thaw, just leave it at room temp for a few hours or pop individual slices in the microwave or toaster. It’s just as moist and delicious as the day you made it.
Common Mistakes to Avoid
Even the simplest recipes can go sideways if you’re not careful. Here are some common slip-ups people make with pineapple bread—and how to avoid them:
- Using Too Much Pineapple Juice: Yes, it adds flavor, but too much will throw off your batter and make the bread soggy or undercooked in the middle.
- Not Draining Pineapple Well Enough: Whether it’s canned or fresh, excess liquid from the pineapple can turn your bread from fluffy to gummy fast.
- Overmixing the Batter: Stirring too much activates the gluten in the flour, leading to a dense loaf. Mix until just combined—lumps are okay!
- Underbaking: Pineapple bread is super moist, so it needs the full bake time. Use a toothpick to test the center; if it comes out wet, it needs more time.
- Skipping Preheating: Don’t put your bread in a cold oven! Always preheat to the full 350°F to get that perfect rise and even baking.
Keep these in mind, and you’ll be well on your way to pineapple bread perfection.
How to Make Pineapple Bread Moist and Fluffy
Getting that perfect balance of moist and fluffy is what separates an average loaf from an amazing one. Here’s how to get it just right:
- Use Oil Instead of Butter: Oil gives your bread a softer crumb and retains moisture better than butter. It also keeps well for days.
- Add a Bit of Yogurt or Sour Cream: A couple of tablespoons can do wonders. It enriches the batter and keeps it moist without being greasy.
- Don’t Overbake: The longer it bakes, the more moisture it loses. Watch your loaf in the last 10 minutes and test with a toothpick for doneness.
- Cool It Right: Let the bread sit in the pan for about 10–15 minutes after baking, then move it to a rack. Cooling too long in the pan can make the bottom soggy.
- Cover Loaf Once Cool: To lock in moisture, wrap your loaf once it’s cooled. Don’t cover it while it’s hot—it’ll trap steam and make the crust rubbery.
These little moisture-saving hacks make a huge difference when you’re going for that bakery-style texture at home.
Can You Use Canned Pineapple?
Short answer? Yes, absolutely! Canned pineapple is actually a convenient and fantastic option for pineapple bread—just make sure you use it the right way.
Fresh vs. Canned Pineapple
| Feature | Canned Pineapple | Fresh Pineapple |
|---|---|---|
| Convenience | Ready to use, pre-crushed | Requires peeling and chopping |
| Texture | Soft, consistent | Can be fibrous or chunky |
| Flavor | Sweeter due to juice/syrup | Slightly tangier and brighter |
| Shelf Life | Long in pantry | Short; needs refrigeration |
Both work well, but if you’re looking for ease, canned is the way to go. Crushed canned pineapple is ideal because it integrates smoothly into the batter.
Tips for Using Canned Pineapple
- Drain It Well: This is crucial! Even if it’s labeled as “in its own juice,” canned pineapple tends to have excess moisture. Use a fine mesh sieve to drain it properly.
- Save the Juice: Don’t toss it! A few tablespoons of pineapple juice in your batter boosts flavor and tenderness.
- Avoid Syrup-Soaked Pineapple: Choose pineapple canned in juice, not heavy syrup. The syrup adds too much sugar and can throw off the balance of the bread.
Using canned pineapple correctly can actually make your loaf even more moist and flavorful without all the prep time.
FAQs about Pineapple Bread Recipe
How long does pineapple bread stay fresh?
Pineapple bread lasts about 3–4 days at room temperature if stored properly. For longer shelf life, refrigerate it for up to a week or freeze it for up to 3 months.
Can I use pineapple juice instead of whole pineapple?
Not really. Pineapple juice alone doesn’t provide the texture or moisture content that crushed pineapple does. It’s great as a flavor booster but not a full substitute.
Can I make muffins instead of a loaf?
Absolutely! Just divide the batter into muffin tins (about ¾ full) and bake at 350°F for 18–22 minutes. Check doneness with a toothpick.
Do I need to refrigerate it?
Not unless your kitchen is very warm or humid. It’s fine on the counter for a few days, but refrigeration can help extend its freshness.
Can I add bananas to this recipe?
Sure thing! You can swap out part of the pineapple (about ½ cup) for mashed banana. It adds an extra layer of sweetness and moisture.
Conclusion
Pineapple bread is one of those magical recipes that’s simple to make yet totally unforgettable. It combines everything we love about comfort baking—moist texture, warm flavors, and a hint of tropical flair. Whether you’re baking it for Sunday brunch, sharing it with friends, or enjoying it as a midweek snack, it always delivers.
This step-by-step guide should leave you feeling confident and inspired to bake your own loaf, no matter your skill level. You’ve got the tips, the tricks, the variations—and the encouragement. Now all that’s left is to preheat that oven and start baking.
Trust me: once you try homemade pineapple bread, you’ll wonder why it took you so long to discover this tropical treasure. So go ahead—bake it, slice it, and enjoy every bite.