Pickled Radish Recipe: Pickled radish is a tangy, crunchy, and colorful side dish that has deep roots in many Asian cuisines—especially Korean and Japanese. Whether you’ve had it tucked into sushi rolls or served as a banchan (side dish) alongside Korean barbecue, it adds a punch of flavor that’s hard to miss. At its core, pickled radish is just what it sounds like: radishes preserved in a vinegar-based brine. But the magic lies in the balance of sweet, sour, and salty notes that develop during the pickling process.
One of the standout varieties is the Korean yellow pickled radish, also known as “danmuji.” It’s bright, bold, and brings a slightly sweet tang to your taste buds. Unlike cucumber pickles, pickled radish has a denser texture and a sharper bite, making it a standout condiment or snack on its own. But beyond flavor, pickling also extends the shelf life of radishes, making it a practical and delicious preservation method.
If you’ve ever thought about pickling at home but felt intimidated, don’t worry. This guide is designed to walk you through each step clearly and simply, so you can create your own jar of crunchy goodness without breaking a sweat.
Why Pickled Radish is a Must-Try
If you’ve never made pickled radish before, you’re in for a treat. First of all, it’s incredibly easy to prepare—even for kitchen newbies. Unlike fermented pickles, which can take weeks to develop flavor, quick pickled radish can be ready to eat in as little as an hour (though waiting 24 hours brings out the best taste).
Pickled radish is a versatile ingredient that elevates almost any meal. You can enjoy it as a palate cleanser, a salad topping, in sandwiches, or as part of a rice bowl. Its crisp texture and vibrant taste add a refreshing contrast to rich, fatty dishes like grilled meats or fried foods.
Besides the culinary benefits, pickled radish is packed with nutrients. Radishes are low in calories, high in fiber, and rich in antioxidants. Plus, the vinegar used in pickling has its own set of health perks, including aiding digestion and supporting blood sugar control.
So whether you’re looking to impress dinner guests, jazz up your weekly meal prep, or just try something new, pickled radish is definitely worth adding to your kitchen repertoire.
Ingredients You’ll Need
Essential Ingredients
Before you dive into pickling, let’s gather the core ingredients. Luckily, most of them are pantry staples or easy to find at your local grocery store. Here’s what you’ll need:
- Fresh radishes – You can use daikon radish (for a milder, sweeter flavor) or red radishes (for a peppery punch). For authentic Korean-style pickles, daikon is the best choice.
- Vinegar – White vinegar is the most common choice for its neutral flavor, but rice vinegar adds a subtle sweetness that works beautifully with Asian flavors.
- Sugar – Granulated sugar balances the tanginess of the vinegar. You can adjust the amount based on your preference for sweetness.
- Salt – Non-iodized salt (like kosher or pickling salt) works best. It helps draw moisture out of the radish and enhances the overall flavor.
- Water – Used to dilute the vinegar and balance the acidity.
Here’s a basic ratio to get you started (for about one large jar of pickled radish):
- 2 cups daikon radish (sliced)
- 1 cup white vinegar
- 1 cup water
- ½ cup sugar
- 1 tablespoon salt
This simple blend creates a harmonious mix of sour, sweet, and salty, perfect for beginner picklers.
Optional Add-ons for Extra Flavor
Want to spice things up a bit? Add these optional ingredients to infuse your pickled radishes with new dimensions of flavor:
- Garlic cloves – Adds a robust, savory note.
- Ginger slices – For a zesty kick.
- Chili flakes or fresh chili – Bring in the heat!
- Turmeric powder – Not only adds a subtle earthy flavor but also gives the radish that iconic yellow hue found in Korean pickles.
- Bay leaves or peppercorns – Boost complexity with these aromatics.
These additions aren’t mandatory, but they give you a chance to experiment and make the recipe your own. You can also mix and match depending on the dish you’ll pair the pickled radish with.
Equipment Needed for Pickling
Basic Kitchen Tools
You don’t need a ton of fancy gear to get started with pickling. In fact, you probably already have everything you need:
- Sharp knife or mandoline – For even, thin slices of radish.
- Cutting board – Helps keep your prep area clean and efficient.
- Measuring cups and spoons – Accuracy matters when it comes to pickling brine.
- Medium saucepan – To heat and dissolve the sugar and salt in the vinegar mixture.
- Mixing bowl – Useful for salting the radishes before pickling.
- Glass jar with lid – Mason jars work great; just make sure they’re clean and sterilized.
These tools are all you need to start your pickling journey without investing in anything new. Just keep things clean and organized, and you’ll be in good shape.
Optional Equipment for Advanced Picklers
If you find yourself falling in love with pickling (which is easy to do), you might want to upgrade your toolkit. Here are a few extras to consider:
- Pickling weights – Help keep vegetables submerged in the brine for even pickling.
- Fermentation lids or airlocks – Useful if you ever venture into long-term fermenting.
- pH strips – To check the acidity level for safe preservation.
- Mandoline slicer – Ensures paper-thin, uniform slices, which makes for prettier and more consistent pickles.
While none of these are required, they can make the process more efficient and enjoyable as you gain confidence and try new recipes.
Preparing the Radish
Choosing the Right Radish
The foundation of any great pickled radish is—obviously—the radish itself. The type you choose will impact the flavor, color, and crunch of your final product.
- Daikon radish: Long, white, and slightly sweet. Perfect for Korean and Japanese-style pickles. It’s juicy and holds its shape well during pickling.
- Red radish: Smaller and spicier, with a more peppery bite. They make beautiful pickles thanks to their vibrant color.
- Watermelon radish: Has a green skin and a pink center, creating stunning visual appeal in jars.
When shopping, look for radishes that are firm to the touch with smooth, blemish-free skin. Avoid any that feel soft or show signs of rot.
Cleaning and Cutting Techniques
Cleanliness is key to safe pickling. Start by rinsing your radishes thoroughly under cool water. Scrub away any dirt, especially if you’re using daikon, which can have a bit of soil residue. Trim off the leafy tops and roots.
Once cleaned, decide on your cut:
- Thin rounds: Perfect for sandwiches or rice bowls.
- Half-moons: Great for snacking and easier to fit in jars.
- Sticks or matchsticks: Ideal for Korean banchan-style presentation.
Use a sharp knife or mandoline to ensure uniform slices. This not only looks nicer but also helps the radish pickle evenly.
Once cut, you may want to salt the radish slices lightly and let them sit for 15–20 minutes. This draws out excess water and ensures a crunchier final product.
Making the Pickling Brine
Classic Brine Recipe
The brine is the heart and soul of your pickled radish—it’s what transforms a crunchy raw root into a tangy, crave-worthy snack. The classic brine recipe we’re using is simple, balanced, and incredibly versatile. Here’s how to make it:
Ingredients:
- 1 cup white vinegar
- 1 cup water
- ½ cup granulated sugar
- 1 tablespoon kosher salt
Steps:
- Combine ingredients: In a medium saucepan, combine vinegar, water, sugar, and salt.
- Heat it up: Place the pan over medium heat and stir until the sugar and salt are completely dissolved. No need to boil—just a gentle simmer will do.
- Cool the brine: Let the brine cool slightly. You want it warm, not hot, when pouring over the radishes. Hot brine can cook the radishes slightly and make them too soft.
This basic brine creates that perfect sweet-sour balance that brings out the best in radishes. It’s suitable for quick pickling (aka “refrigerator pickling”), meaning you don’t need to worry about canning or fermenting.
The beauty of this recipe lies in its simplicity. You can double or halve the batch depending on how much radish you’re pickling. Just remember to keep the ratio the same to maintain that flavor balance.
Flavor Variations to Try
Once you’ve mastered the basic brine, why not explore some creative twists? Here are a few exciting flavor variations that take your pickled radish from good to unforgettable:
1. Spicy Pickled Radish
- Add sliced jalapeños or chili flakes to the brine for heat.
- Use rice vinegar instead of white vinegar for a subtle sweetness.
2. Korean-Style Yellow Pickles (Danmuji)
- Add 1 teaspoon turmeric powder for that iconic yellow hue.
- Include a few peppercorns and a small slice of ginger for extra depth.
3. Japanese Tsukemono Style
- Use rice vinegar and mirin for a sweeter, umami-rich taste.
- Add kombu (dried kelp) or a piece of dried chili for added complexity.
4. Herbal and Citrus Blend
- Add lemon or lime zest to the brine.
- Include sprigs of thyme, dill, or rosemary for an herbaceous twist.
Flavoring your brine is an excellent way to customize your pickled radishes to suit different meals or cuisines. Experimenting with spices, herbs, and sweeteners lets you control the outcome, and that’s half the fun of pickling at home.
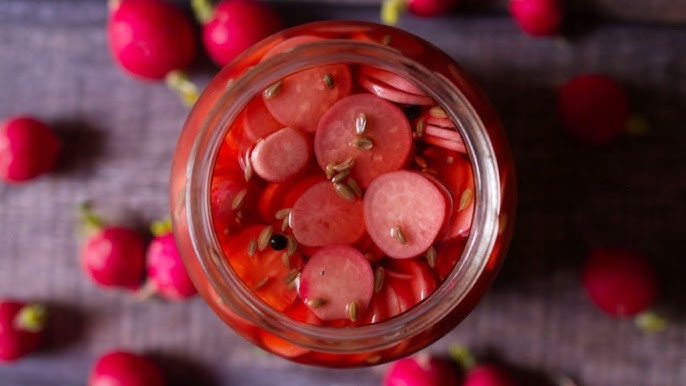
Packing and Pickling the Radish
Layering the Jars Like a Pro
When it comes to packing your jars, presentation matters—especially if you’re making these for gifts or sharing with guests. First, make sure your glass jars are squeaky clean. A quick rinse in hot soapy water followed by boiling for a few minutes does the trick for sterilization.
Once your radish slices are ready and your brine is warm (not hot), follow these steps:
- Pack tightly: Start by placing radish slices into the jar. Layer them in neatly for visual appeal. If you’re using sticks or matchsticks, try to stand them vertically—it looks great and helps with even pickling.
- Add extras: Tuck in garlic slices, chilies, or herbs if you’re going for a flavored version.
- Pour the brine: Carefully pour the warm brine over the radishes, ensuring they’re fully submerged.
- Remove air bubbles: Use a clean knife or chopstick to poke around the edges and release trapped air.
- Seal and cool: Seal the jar with a tight lid and let it cool to room temperature before placing it in the fridge.
Storing for Best Results
Once your jar is packed and sealed, place it in the refrigerator. While you can technically eat your pickled radish after just an hour, the best flavor develops after 24–48 hours. Here’s how to get the most out of your homemade pickles:
- Short-term pickles: These are refrigerator pickles, so they aren’t shelf-stable. Keep them cold and consume within 2–3 weeks.
- Label your jars: Write the date on the jar so you know when they’ll be at peak flavor.
- Shake occasionally: Gently shaking the jar every couple of days helps distribute the brine evenly.
Pickled radishes stored in vinegar-based brine generally last a long time if refrigerated properly, but always check for any signs of spoilage like off-smells or discoloration.
Serving Suggestions for Pickled Radish
Traditional Dishes Featuring Pickled Radish
Pickled radish might seem like a humble side dish, but in many cultures, it’s an essential part of the meal. Let’s look at a few traditional ways people enjoy it:
Korean Cuisine:
- Kimbap: Those bright yellow strips you see inside Korean sushi rolls? That’s pickled radish.
- Banchan: Served alongside grilled meats or stews, it cuts through richness and refreshes your palate.
Japanese Cuisine:
- Tsukemono platter: A small dish of assorted pickled vegetables served with rice and miso soup.
- Bento boxes: Adds a crunchy, flavorful punch to lunch boxes.
Chinese Dishes:
- Cold noodle salads: Thinly sliced pickled radish adds a tangy contrast.
- Congee toppings: Chopped pickled radish sprinkled over rice porridge adds texture and zing.
These traditional uses highlight how essential pickled radish is in various culinary traditions—proof that simple ingredients can go a long way.
Creative Ways to Use Pickled Radish at Home
You don’t have to stick to traditional dishes to enjoy pickled radish. It’s an incredibly versatile ingredient that can jazz up all kinds of modern meals. Here are some creative ideas:
- Tacos and wraps: Add a few strips for a crunchy, tangy bite.
- Burgers and sandwiches: Swap out your usual pickles for radish slices.
- Salads and grain bowls: Toss in chopped pickled radish for an extra layer of flavor.
- Charcuterie boards: Serve alongside cheeses and cured meats for a tangy contrast.
Pickled radish also makes an excellent snack on its own. Just pull a few pieces from the jar and enjoy with a cold drink—it’s refreshingly addictive!
Health Benefits of Pickled Radish
Nutritional Profile of Radishes
Before we dive into the health perks of pickled radish, let’s take a quick look at what makes radishes such a nutritional powerhouse. These root vegetables may be small, but they’re packed with vital nutrients and minerals. Here’s a quick breakdown of what you get in a typical serving (100g of raw radish):
- Calories: 16
- Carbohydrates: 3.4g
- Fiber: 1.6g
- Vitamin C: 25% of the Recommended Daily Intake (RDI)
- Folate: 4% of the RDI
- Potassium: 233mg
What makes radishes so good for you is their high water content and low-calorie density, making them a refreshing, diet-friendly option. They’re also rich in antioxidants like catechin, pyrogallol, and vanillic acid, which fight oxidative stress in the body.
When you pickle radish, most of these nutrients are retained. The brine may dilute some of the water-soluble vitamins slightly, but you still get a good dose of fiber, antioxidants, and other healthful compounds.
How Pickled Radish Supports Gut Health
One of the biggest benefits of eating pickled radish is how it can aid your digestive system. While quick pickles like these aren’t fermented (and therefore don’t contain probiotics like kimchi or sauerkraut), they still offer gut-friendly advantages.
- Improved digestion: The vinegar in pickled radish helps stimulate digestive juices and enzymes, aiding in the breakdown of food.
- Prebiotic potential: Radishes contain fiber that feeds the good bacteria already present in your gut.
- Appetite regulation: The combination of fiber and vinegar can help you feel fuller for longer, which may support weight management goals.
Plus, the crisp texture encourages chewing, which is the first step in good digestion. So while they may not be probiotic superstars, pickled radishes are still a smart addition to a balanced diet.
Common Mistakes to Avoid
Avoiding Soft or Mushy Pickles
No one likes a limp pickle. Here’s how to keep your pickled radishes crisp and satisfying:
- Use fresh, firm radishes: This is non-negotiable. Old or limp radishes won’t improve with pickling.
- Salt before pickling: Lightly salting and draining the radish slices helps draw out excess moisture, preserving their crunch.
- Avoid hot brine: Pouring boiling hot brine over the radishes can slightly cook them, softening their texture. Aim for warm, not scalding.
- Keep refrigerated: Always store your pickles in the fridge to prevent them from going soggy or spoiling prematurely.
Balancing Flavors in Your Brine
Getting the brine right is half the battle. If your pickled radish is too sour or too sweet, it can throw off the whole dish. Here’s how to strike the right balance:
- Taste before pouring: Once your brine is mixed, taste it. You can adjust sugar, vinegar, or salt to get it just right.
- Don’t skip measurements: Always use proper measuring tools for consistency.
- Experiment cautiously: While experimenting is encouraged, go slow with powerful flavors like garlic, chili, or turmeric.
If your first batch isn’t perfect, take notes. Next time, you’ll know exactly what to tweak.
Tips for Scaling and Storing
Making Bigger Batches
Once you get the hang of pickling radish, you might want to scale things up. Making a larger batch can be more efficient and great for gifting or meal prepping. Here’s how to do it:
- Stick to the ratio: As long as you keep the vinegar, water, sugar, and salt ratios consistent, you can multiply the recipe without issues.
- Use larger jars: Quart-sized mason jars are perfect for bulk pickling.
- Batch prep: Clean and slice all your radishes at once, and prep your brine in one large pot to save time.
You can also prepare different variations in one session—classic, spicy, and turmeric-infused—so you’ve got a variety to choose from.
How Long Pickled Radish Lasts
When stored correctly, your homemade pickled radish will last quite a while in the fridge. Here’s a simple guide:
- Refrigerated pickled radish: Up to 3–4 weeks
- Always use clean utensils: Don’t double-dip or use fingers; this can introduce bacteria and reduce shelf life.
- Watch for signs of spoilage: If the brine becomes cloudy, smells off, or the radish changes color or texture dramatically, it’s time to toss it.
Homemade pickles may not last forever, but with proper care, they stay fresh and flavorful for weeks.
Why Homemade is Better Than Store-Bought
Customizing Flavor to Your Taste
Let’s be real—store-bought pickled radish can be hit or miss. They’re often loaded with preservatives, food coloring, and too much sugar. When you make it at home, you’re in control:
- Sugar levels: Make it sweet, tangy, or anywhere in between.
- Spice levels: Add a mild kick or go full-on fire with chili flakes.
- Herbal notes: Fresh herbs like dill or rosemary can give a unique twist.
You’re also free to experiment with fun ingredients like citrus zest, whole spices, or even fruit-infused vinegars. The sky’s the limit!
Saving Money and Reducing Waste
Homemade pickled radish is not only tastier—it’s cheaper too. Here’s how it saves you cash and helps the environment:
- Buy in bulk: Fresh radishes are super affordable, especially in season.
- Use what you have: That half-bag of radishes sitting in your fridge? Turn them into gold.
- Reusable jars: No more tossing plastic containers—just clean, refillable glass jars.
Plus, making your own pickles means fewer grocery runs and less plastic packaging. Small steps like these make a big difference over time.
FAQs About Pickled Beet Recipe
Q1: How long do pickled beets last?
Properly stored in an airtight container in the fridge, homemade pickled beets can last up to 3 months. Always use a clean spoon to avoid contamination.
Q2: Can I pickle beets without boiling them first?
Technically yes, but boiling or roasting first helps soften the beets and brings out their natural sweetness. Raw pickled beets tend to stay crunchier but may take longer to absorb flavors.
Q3: Do I have to peel the beets before pickling?
Yes, it’s best to peel the beets after cooking. The skins slide off easily once they’re boiled or roasted, and removing them improves texture and flavor.
Q4: Can I reuse the pickling liquid?
You can reuse it once, especially for quick fridge pickles—but make sure to boil it again before reuse to kill off any potential bacteria.
Q5: Are pickled beets healthy?
Absolutely! Pickled beets are packed with antioxidants, fiber, and essential nutrients like folate and potassium. Just watch the sugar if you’re keeping an eye on carbs.
Q6: Can I water-bath can pickled beets for long-term storage?
Yes, as long as you’re following a tested recipe with the right vinegar-to-water ratio for acidity. Always use sterilized jars and follow proper canning guidelines.
Conclusion
Pickling radish at home is one of those simple joys that delivers a huge return. In just a few easy steps, you can transform a humble root vegetable into a zesty, crunchy condiment that elevates every meal. Whether you’re going for traditional Korean danmuji or experimenting with your own flavors, the process is flexible, forgiving, and incredibly satisfying.
Plus, with all the health perks, cost savings, and creative potential, there’s really no reason not to try it. So grab some radishes, whip up that brine, and start your pickling adventure today.