Pickled Okra Recipe: Pickled okra is a Southern delicacy that’s become increasingly popular for its crisp texture, tangy flavor, and versatile use in everything from snacks to cocktails. Unlike the slimy stereotype many associate with cooked okra, pickling transforms this veggie into a crunchy, zesty treat. Whether you’re new to pickling or an experienced home canner, pickled okra is one of the easiest and most rewarding recipes you can make at home.
The key to pickled okra’s appeal lies in the pickling process. By soaking fresh okra pods in a seasoned vinegar brine, the vegetable not only gets preserved but also absorbs the bold, aromatic spices added to the mix. This not only improves its shelf life but enhances its flavor dramatically. Best of all? You don’t need a bunch of fancy equipment—just a few jars, some vinegar, and a little bit of kitchen confidence.
Why You’ll Love This Recipe
There’s a lot to love about this pickled okra recipe. For starters, it’s incredibly easy to make, even if you’ve never pickled anything in your life. You just need a few ingredients, a clean jar, and a bit of patience. Once prepared, pickled okra can last for months in your refrigerator or even longer when properly canned. Plus, it’s healthy, gluten-free, and low in calories.
It also doubles as a multi-purpose kitchen star. Serve it as a tangy appetizer, toss it in a salad for crunch, or garnish your Bloody Mary for an unexpected twist. You can customize the heat level with jalapeños or chili flakes or go for a more garlicky punch—this recipe is flexible enough to match your taste.
And let’s not forget: homemade pickled okra makes a fantastic gift. Whether you’re preparing for a summer BBQ or looking for a holiday present that stands out, a mason jar of homemade goodness is always a hit.
Ingredients You’ll Need
Fresh Ingredients
To get the perfect crunch and taste, fresh ingredients are non-negotiable. The most important component is, of course, the okra. When picking okra for pickling, look for small to medium-sized pods. They should be firm to the touch, bright green, and free from blemishes or soft spots. Overripe or too-large pods tend to be woody and may not pickle as nicely.
Here’s what you’ll need:
- 1 pound fresh okra pods (choose young, small pods, about 3-4 inches long)
- 4 garlic cloves, peeled and slightly crushed
- 2-4 fresh chili peppers or jalapeños, sliced (optional, for heat)
- Fresh dill sprigs (optional but adds a lovely flavor twist)
These fresh ingredients bring life to the jar. You’ll be surprised how much flavor can come from something so simple. Feel free to add other vegetables like carrots or pearl onions if you’re feeling experimental.
Pantry Staples and Spices
What gives pickled okra its classic tang and punchy taste is the pickling brine—essentially a mix of vinegar, water, and salt, seasoned with spices. This is where your pantry comes into play.
Here’s a list of dry ingredients:
- 1 cup white vinegar (5% acidity)
- 1 cup water
- 2 tablespoons pickling salt (or kosher salt)
- 1 teaspoon black peppercorns
- 1 teaspoon mustard seeds
- 1 teaspoon coriander seeds
- 1/2 teaspoon red pepper flakes (optional for added spice)
- 1 teaspoon sugar (optional, for a touch of sweetness)
You don’t need to be super strict with these measurements; feel free to tweak them according to your flavor preferences. Some folks like to add bay leaves, cumin seeds, or even a dash of smoked paprika for a deeper profile. Just make sure not to skimp on the vinegar-to-water ratio—it’s key for both taste and food safety.
How to Prepare Okra for Pickling
Choosing the Right Okra
The quality of your final product depends heavily on the quality of the okra you start with. Look for okra pods that are:
- Bright green in color
- Firm, not rubbery or mushy
- Small to medium in size (3 to 4 inches is ideal)
- Free from brown spots or blemishes
If you’re growing your own, pick the pods just after they’ve matured but before they get tough. Okra matures quickly, and oversized pods can become fibrous and chewy—two things you definitely don’t want in your pickled snack.
Farmers markets are often your best bet for fresh, flavorful okra. Supermarkets tend to stock older, less vibrant pods that might not give you that snappy texture you’re looking for.
Washing and Trimming Properly
Before you pickle, you need to clean your okra thoroughly. Even if it’s organic, dirt, bugs, or residues may still be present. Here’s the best method:
- Fill a bowl with cold water and submerge the okra.
- Gently agitate the pods to release any dirt.
- Drain and rinse under cold running water.
After washing, pat them completely dry using a clean towel. Moisture can interfere with the pickling process and may lead to soggy okra. Then, trim just the tip of the stem end—don’t cut too deeply into the pod itself or you risk releasing the gooey mucilage that okra is known for (and we’re trying to avoid).
Some people even skip trimming entirely and pickle the whole pod to preserve its integrity. That’s perfectly fine too and makes for a neater presentation.
Sterilizing Your Jars and Equipment
Importance of Sterilization
This step might sound intimidating, but it’s crucial. Sterilizing your jars ensures that no harmful bacteria interfere with the pickling process. This is especially important if you plan to store your pickled okra for an extended period or gift it to others.
Clean jars equal safe, long-lasting pickles. You don’t want all your effort to go to waste because of contamination. Plus, sterilized jars help maintain flavor and freshness, so your okra stays crisp and delicious.
Step-by-Step Sterilizing Process
- Wash jars and lids thoroughly with hot, soapy water. Rinse well.
- Place jars right-side-up on a rack in a large pot or canner. Fill the pot with water until the jars are completely submerged.
- Bring the water to a boil and boil for 10 minutes.
- Turn off the heat but leave the jars in the hot water until you’re ready to fill them.
- For the lids, place them in a separate small pot of simmering (not boiling) water for at least 5 minutes.
Be sure to use tongs or jar lifters to handle the hot jars. Letting them cool too much before filling can lead to cracking when you add the hot brine.
The Pickling Brine – Flavor Base of the Recipe
Balancing Vinegar, Water, and Salt
The brine is the soul of your pickled okra. It’s where all the magic happens—transforming a simple green vegetable into something tangy, spicy, and utterly addictive. Getting the proportions of vinegar, water, and salt right is absolutely essential. Too much vinegar and your pickles might end up too sharp; too little and they might not be preserved safely. The sweet spot is a 1:1 ratio of water to vinegar with enough salt to inhibit bacteria growth and enhance the flavor.
Here’s a simple go-to ratio:
- 1 cup white vinegar (5% acidity)
- 1 cup water
- 2 tablespoons pickling or kosher salt
White vinegar is commonly used because of its sharp, clean taste that complements the earthy notes of okra without overpowering it. Apple cider vinegar can be a fun twist if you want a milder tang and a hint of fruitiness. Don’t use flavored or low-acidity vinegar, as it can disrupt the preservation process.
The salt you choose matters too. Use non-iodized salt, like pickling salt or kosher salt, to avoid cloudiness or odd-tasting brine. Iodized table salt contains additives that can impact the fermentation process and color of your pickles.
Once you’ve nailed the basic ratio, bring the vinegar, water, and salt to a boil. Stir until the salt is completely dissolved, and you’ve got yourself a perfectly balanced brine ready to infuse flavor into your okra.
Adding the Right Spices
Now that you have your base brine, it’s time to elevate things with spices. This is where you can get really creative. The most traditional pickled okra recipes include garlic, black peppercorns, mustard seeds, and dill. These add heat, aroma, and complexity without stealing the spotlight from the okra itself.
Here are some suggested spice additions:
- 1 tsp mustard seeds – adds earthiness and a slight tang
- 1 tsp coriander seeds – introduces a citrusy pop
- 1 tsp black peppercorns – provides warmth and mild heat
- 1/2 tsp red pepper flakes or 1 sliced chili – for those who like it hot
- 2 garlic cloves per jar – a pungent, savory kick
- 1 sprig fresh dill – for that classic dill pickle vibe
You can also experiment with bay leaves, cloves, or even smoked paprika for a bolder taste. The spices can be added directly to the jars before pouring in the brine. They’ll infuse over time, creating a layered, delicious flavor profile that gets better by the week.
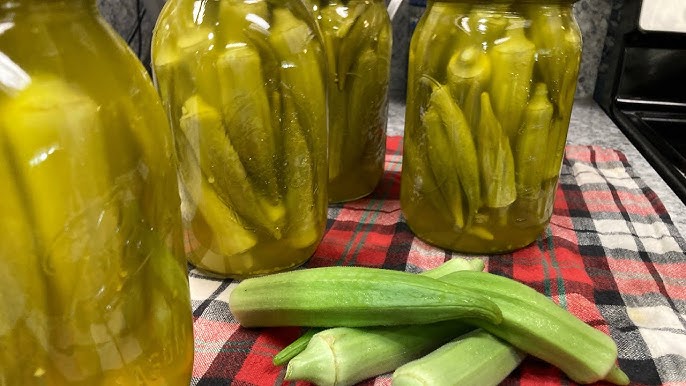
Filling the Jars – How to Pack Your Okra Like a Pro
Layering Ingredients for Maximum Flavor
Packing the jars isn’t just about stuffing okra in and calling it a day. There’s a bit of an art to it. Think of each jar as a layered masterpiece—like a tiny, edible terrarium. You want to balance aesthetics with flavor, making sure every pod is covered with brine and has room to soak in the goodness of your spices.
Start by placing a garlic clove or two at the bottom of each jar. Add your chosen spices—peppercorns, mustard seeds, and so on—next. Then, begin standing the okra vertically, stem end down, with the tips pointing up. This helps prevent mushiness and makes for a cleaner presentation. If your okra is longer than your jars, you can trim them slightly or place them diagonally for a snug fit.
Layer in any chili slices or fresh dill among the okra pods to distribute flavor evenly. You can even alternate okra and other vegetables like baby carrots for a more colorful result.
Tips for Proper Jar Filling
Here are a few practical tips to ensure your jars are perfectly packed:
- Tight but not crammed: Pack the okra in snugly, but don’t squash them. You need room for the brine to circulate.
- Leave headspace: Always leave about ½ inch of headspace at the top of the jar to allow for brine expansion.
- Cover completely: Pour the hot brine over the okra, making sure all the pods are fully submerged.
- Remove air bubbles: Tap the jar gently or use a non-metallic spatula to release trapped air pockets.
Wipe the rim of each jar with a clean towel to ensure a tight seal. Add the lid and screw on the band fingertip-tight. You’re now ready to preserve!
Refrigerator Pickling vs. Water Bath Canning
Quick Fridge Pickles
Not all pickles need to be preserved using heat. If you’re looking for a faster, less intimidating option, refrigerator pickling is your best bet. This method is perfect for beginners and requires minimal effort.
Once your jars are filled and sealed, just let them cool to room temperature before popping them into the refrigerator. The pickled okra will be ready to eat in about 48–72 hours, though the flavor intensifies the longer they sit. These fridge pickles stay fresh for about 2 to 3 months, assuming you use clean utensils each time.
Pros:
- Super easy
- No special canning equipment required
- Retains bright green color and crispness
Cons:
- Shorter shelf life
- Must be kept refrigerated at all times
Long-Term Preservation with Water Bath Canning
If you’re making a big batch or want your pickled okra to last through the winter, water bath canning is the way to go. It allows you to store jars in the pantry for up to a year or more without refrigeration.
To water bath can:
- Place the sealed jars in a large canning pot filled with boiling water.
- Make sure the water covers the jars by at least 1 inch.
- Boil for 10 minutes (adjust for altitude if necessary).
- Carefully remove jars and place on a towel to cool undisturbed for 12–24 hours.
Once cooled, check that the lids are sealed properly. A good seal won’t flex up or down when pressed. Label the jars with the date and store them in a cool, dark place.
Water bath canning requires more time and equipment but rewards you with long-lasting, shelf-stable pickles you can enjoy year-round.
Storing and Aging Your Pickled Okra
How Long Should You Wait Before Eating?
The hardest part about pickling isn’t the chopping or boiling—it’s the waiting. While your pickled okra might look ready to eat the moment the jars are sealed, don’t dig in just yet. The flavors need time to develop and meld. For refrigerator pickles, a minimum of 48–72 hours is recommended before tasting, though 1 to 2 weeks is ideal for optimal flavor.
If you’ve gone the route of water bath canning, give your jars 2 to 4 weeks in a cool, dark pantry before opening. This gives the vinegar and spices time to fully penetrate the okra, delivering that perfect tangy crunch you’re craving.
What happens during aging? The brine infuses the okra with acidity and seasoning while softening the pod just enough to maintain a crisp bite. The spices like garlic, mustard seed, and chili really come alive with time. Just like a good wine, pickled okra improves with age—within reason, of course.
Shelf Life and Storage Tips
Proper storage is crucial to keeping your pickled okra safe and delicious:
- Refrigerated pickles: Store in the fridge and consume within 2–3 months. Always use a clean utensil to avoid contamination.
- Canned pickles: Unopened, they last up to 12–18 months in a pantry. Once opened, refrigerate and eat within a month.
Check the seal before consuming canned pickles. If the lid pops or leaks, or the brine looks cloudy or smells odd, toss it. Safety first.
Always label your jars with the pickling date. It’s easy to forget how long they’ve been sitting, and it helps with rotation if you’re making multiple batches.
Serving Suggestions and Creative Uses
Not Just a Side Dish
Think pickled okra is only good as a snack? Think again. This little green pod is surprisingly versatile and can be used in a variety of dishes and drinks. Sure, it’s great straight out of the jar, but the real magic happens when you get creative in the kitchen.
Cocktail Garnish: One of the trendiest uses? As a Bloody Mary garnish. It adds crunch, spice, and a touch of Southern charm to the classic cocktail. Swap out that boring celery stick and spear a couple of okra pods instead.
Charcuterie Boards: Pickled okra is the underdog of charcuterie. It cuts through fatty meats and rich cheeses with its sharp acidity, offering a refreshing contrast. Its unique shape also adds visual appeal.
Salads and Bowls: Chop them up and toss into grain bowls, salads, or slaws for a tangy pop. Their crunch adds a texture you didn’t know you needed.
Southern Cooking Staples: Add them to gumbo, jambalaya, or even cornbread batter for a flavorful twist. Some Southern cooks even fry them up for a crispy, tangy treat.
Pairing Ideas
Pair pickled okra with:
- Spicy dishes – helps balance the heat
- Rich meats – cuts through the fat
- Cheeses – particularly creamy varieties like brie or goat cheese
- Savory sandwiches – like pulled pork or pastrami
It’s also a great gift. Wrap a jar in a dish towel with a handwritten recipe card, and you’ve got a thoughtful, homemade present for any food lover.
Common Pickling Mistakes to Avoid
Slime, Sog, and Other Disasters
Even though pickling okra is simple, there are a few pitfalls you’ll want to sidestep to avoid ending up with a slimy or soggy mess.
Mistake #1: Cutting into the pods – Once the okra is sliced or the tip is cut too deeply, the mucilage (that gooey stuff) can leak into the brine. Always trim carefully, or skip trimming altogether.
Mistake #2: Using old okra – Overripe or fibrous pods won’t soften properly and could throw off the texture. Fresh, young okra is a must.
Mistake #3: Cold brine or jars – Pouring cold brine into cold jars won’t activate the infusion process effectively. Use hot brine and warm jars for best results.
Mistake #4: Not sterilizing properly – Skipping this step can invite bacteria and shorten shelf life. Always sterilize your jars and lids thoroughly.
Mistake #5: Improper salt – Iodized table salt can leave your brine cloudy and interfere with fermentation. Stick to pickling or kosher salt for a clean finish.
Fixing Problems and Troubleshooting
If your okra turns out slimy, try refrigerating the jar for a few days—it often firms up. Still slimy? It might be over-trimmed or overripe. Toss it and try again with better produce.
Soggy okra? That usually means overcooked brine or pods. Next time, pour the brine while hot, but don’t boil the pods.
Cloudy brine? Likely caused by table salt or fermentation. If there’s no foul smell, it may still be safe, but err on the side of caution.
Scaling the Recipe for Big Batches
Perfect for Gifting or Stocking Up
Once you get the hang of pickling, you’ll want to make more—and trust me, people will ask for it! Whether you’re prepping for a holiday gift or just love having a stash for personal use, scaling up this recipe is easy.
Start with the same vinegar-to-water ratio (1:1) and adjust your spices proportionally. A pound of okra fills about 2 pint-sized jars, so if you’re pickling 5 pounds, you’ll need 10 jars and increase your brine accordingly.
Here’s a bulk batch example:
- 5 lbs okra
- 5 cups vinegar
- 5 cups water
- 10 tbsp salt
- 20 garlic cloves
- 10 tsp mustard seeds, peppercorns, etc.
Keep your brine warm as you fill the jars to maintain food safety. Work in batches so everything stays hot and sterile. Always leave the same ½-inch headspace in each jar.
This method is great for:
- Holiday gifts
- Farmers’ market sales
- BBQ party favors
- Pantry stocking
FAQs about Pickled Okra Recipe
1. What does pickled okra taste like?
Pickled okra has a tangy, slightly salty flavor with a satisfying crunch. Depending on the spices used, it can also carry hints of garlic, dill, or a spicy kick from chili flakes.
2. How long does pickled okra last?
When properly stored in sterilized, sealed jars and kept in the refrigerator, pickled okra can last up to 2–3 months. For shelf-stable jars processed in a water bath, it can last up to a year.
3. Do you have to refrigerate pickled okra?
Yes, if it’s not processed in a canner, refrigerator pickled okra should always be stored in the fridge. If the jars are water-bath canned, they can be stored at room temperature until opened.
4. Can you pickle okra without it becoming slimy?
Absolutely. Using vinegar and cold brine helps prevent sliminess. Also, avoid overcooking or slicing the okra before pickling to maintain its firm texture.
5. Is pickled okra good for you?
Yes, it’s a low-calorie snack rich in fiber and antioxidants. Fermented versions may also support gut health thanks to their probiotic content.
6. Can I reuse the pickling brine?
It’s best not to reuse pickling brine for canning, as its acidity may have diminished. However, you can reuse it for marinating vegetables or in salad dressings.
Conclusion
Plus, there’s something deeply satisfying about making your own pickles. You control the ingredients, the flavor, and the spice level. No weird preservatives or artificial flavors—just real food, made with love.
If you’ve never pickled before, this is a great place to start. And if you’re a seasoned pro, pickled okra is a unique twist that deserves a place in your rotation. So grab your jars, spice up that brine, and start pickling. Your taste buds will thank you.


