Peasant Bread Recipe: There’s something incredibly comforting about the smell of freshly baked bread wafting through the kitchen. Peasant bread, in particular, stands out for its simplicity and rustic charm. Unlike complicated artisan loaves that require special techniques, peasant bread is humble, forgiving, and absolutely delicious. This recipe is designed for beginners—no kneading, no special equipment, and no baking stress. It’s the kind of bread you make on a lazy weekend morning or whenever you crave that homemade, golden-brown loaf that pairs perfectly with soups, stews, or simply butter and jam.
What Makes Peasant Bread Unique
Peasant bread is unique because of its no-knead, one-bowl preparation. It’s designed to be easy yet flavorful. The bread’s rustic nature means that imperfections are part of its charm. Unlike artisan sourdoughs that demand attention and patience, peasant bread delivers similar satisfaction with minimal effort. It has a soft, tender crumb and a crispy, golden crust. The recipe’s simplicity makes it ideal for beginners who want to experience the joy of breadmaking without the intimidation.
The Origins of Peasant Bread
The term “peasant bread” originates from Europe, where families in rural areas would bake simple loaves using whatever ingredients they had on hand. These loaves weren’t meant to be fancy—they were meant to nourish. Over time, peasant bread became a staple in many cuisines, often made with minimal ingredients: flour, water, yeast, and salt. Each region added its twist—some with olive oil, others with whole grains. The spirit of peasant bread is resourcefulness, a tribute to generations who baked with love and simplicity.
Why It’s Perfect for Beginners
Peasant bread is practically foolproof. You don’t need to be a professional baker or even own a mixer. The dough comes together in one bowl with a spoon. There’s no kneading or shaping involved—just mix, rise, and bake. It’s the perfect gateway to homemade bread. If you’ve ever been nervous about baking bread, this recipe will change your mind forever. The process is simple, the results are rewarding, and once you’ve tried it, you’ll never look at store-bought bread the same way again.
Ingredients You’ll Need
Basic Ingredients for Peasant Bread
You only need a handful of pantry staples to create this soft and fluffy loaf. Here’s what you’ll need:
| Ingredient | Quantity |
|---|---|
| All-purpose flour | 4 cups (480g) |
| Warm water (110°F / 43°C) | 2 cups (475ml) |
| Active dry yeast | 2 ¼ tsp (1 packet) |
| Sugar | 2 tsp |
| Salt | 2 tsp |
| Unsalted butter or olive oil (for greasing) | 1 tbsp |
These simple ingredients come together to create magic. The sugar feeds the yeast, helping the dough rise, while the salt enhances flavor. Warm water activates the yeast, and the flour provides structure. That’s all you need to make a perfectly rustic loaf.
Optional Add-ins for Flavor
Want to make your peasant bread more flavorful? Try adding any of these optional ingredients:
- Herbs: Dried rosemary, thyme, or oregano for a savory touch.
- Cheese: Grated cheddar, mozzarella, or parmesan for richness.
- Seeds: Sunflower, sesame, or flax seeds for added crunch and nutrition.
- Garlic: Roasted garlic cloves or garlic powder for extra aroma.
- Sweet version: Add honey, cinnamon, or raisins for a breakfast loaf.
These small tweaks allow you to personalize your loaf and experiment with different flavors.
Ingredient Substitutions and Variations
If you’re missing an ingredient, don’t worry—this recipe is flexible.
- Flour substitute: You can replace half of the all-purpose flour with whole wheat for a nuttier taste.
- Yeast alternative: Use instant yeast instead of active dry (no need to proof it).
- Dairy-free option: Use olive oil instead of butter.
- Gluten-free version: Substitute with a gluten-free flour blend and add 1 tsp xanthan gum.
The key is to maintain the dough’s wet consistency—it should be sticky but manageable.
Essential Tools and Equipment
Kitchen Tools Required
To make peasant bread, you don’t need fancy gadgets. Just gather:
- A large mixing bowl (preferably glass or stainless steel)
- A sturdy wooden spoon or silicone spatula
- A measuring cup and spoon set
- Two round glass bowls or oven-safe containers for baking
- A clean kitchen towel for covering the dough
- Wire rack for cooling
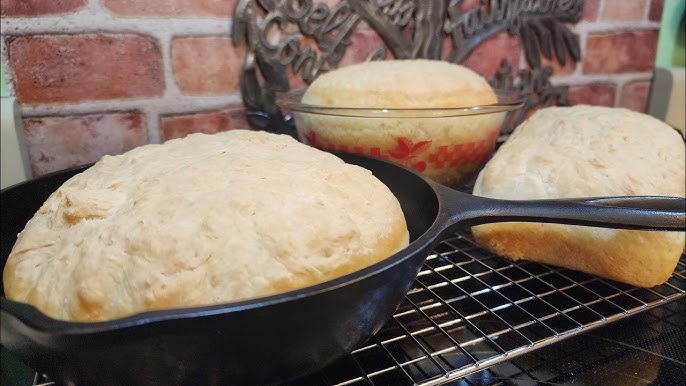
The Best Baking Dish for Peasant Bread
Traditionally, peasant bread is baked in glass bowls, which allow even heat distribution and create a beautifully golden crust. However, you can also use:
- Ceramic baking dishes
- Small cast iron pots
- 8-inch round cake pans
Avoid metal loaf pans—they tend to brown the crust too quickly.
Tips for Proper Dough Handling
Peasant bread dough is wetter than most bread doughs. Don’t panic if it feels sticky—this is normal. Instead of adding more flour, simply grease your hands with oil when handling it. This ensures your bread remains soft and airy rather than dense and heavy.
Step-by-Step Guide to Making Peasant Bread
Step 1 – Activate the Yeast
In a large mixing bowl, combine warm water, sugar, and yeast. Stir gently and let it sit for about 5–10 minutes until the mixture becomes frothy. This step confirms that the yeast is active and ready to work its magic. If it doesn’t foam, your yeast might be expired, and you’ll need to start over with fresh yeast.
Step 2 – Mix the Dough
Once the yeast is bubbly, add salt and flour to the bowl. Stir with a wooden spoon until no dry patches remain. The dough should be sticky and shaggy—don’t overmix. Cover the bowl with a clean kitchen towel and let it rest in a warm spot.
Step 3 – Let the Dough Rise
Allow the dough to rise for 1–2 hours or until it doubles in size. If your kitchen is cool, you can place the bowl inside a slightly warm (not hot) oven with the light on. The rise time may vary depending on temperature and yeast activity.
Step 4 – Shape and Prepare for Baking
Once the dough has risen, grease two glass bowls with butter or oil. Using greased hands or a spatula, divide the dough evenly and transfer it to the bowls. Let it rest again for 20–30 minutes to rise slightly before baking.
Step 5 – Bake to Golden Perfection
Preheat your oven to 425°F (220°C). Bake the loaves for 30–35 minutes, or until the tops are deep golden brown. Once baked, remove them from the oven and let them cool for about 10 minutes before turning them out onto a wire rack.
Cooling, Slicing, and Serving
How to Cool Bread Properly
Once your peasant bread comes out of the oven, it’s tempting to cut right into it—but resist the urge! Cooling is a crucial step that completes the baking process. When bread is removed from the oven, it continues to cook internally for several minutes. Cutting it too early can release the trapped steam, leaving the texture gummy or undercooked.
To cool it properly:
- Transfer the loaves from their baking bowls to a wire rack immediately after 10 minutes of resting.
- Let them cool completely for at least 30–45 minutes before slicing.
- Avoid placing hot bread directly on a solid surface—it will trap moisture and make the crust soggy.
During cooling, the crust becomes crisp while the inside settles into that perfect soft, fluffy texture. Patience here truly pays off.
The Best Way to Slice Homemade Bread
Once your bread is cool, it’s time for the most satisfying part—slicing! Use a serrated bread knife to cut through the crust without squishing the loaf. If you prefer uniform slices for sandwiches, cut the loaf horizontally on a cutting board.
For rustic meals, however, feel free to tear off chunks by hand. Peasant bread was made for comfort and community—it’s not supposed to look perfect! A drizzle of olive oil or a pat of butter on a warm slice brings out its rich, homemade flavor.
Delicious Ways to Serve Peasant Bread
Peasant bread is incredibly versatile and pairs well with almost everything. Here are some ideas:
- With soups and stews: Serve thick slices with creamy tomato soup, beef stew, or minestrone.
- As a breakfast toast: Spread with butter, jam, honey, or avocado.
- For sandwiches: Its soft texture makes it perfect for grilled cheese or BLTs.
- With dips: Try pairing with hummus, spinach dip, or olive tapenade.
- As garlic bread: Brush with garlic butter, sprinkle with herbs, and toast until golden.
No matter how you serve it, peasant bread adds that warm, homemade touch to every meal.
Storage Tips and Shelf Life
How to Store Bread for Freshness
Peasant bread stays fresh at room temperature for about 3–4 days when stored correctly. To maintain its texture and flavor:
- Let the bread cool completely before storing.
- Keep it in a paper bag or wrap it in a clean kitchen towel—this helps preserve the crust’s crispness.
- Avoid airtight containers unless you prefer a softer crust.
- Store in a cool, dry place, away from direct sunlight or humidity.
Never refrigerate bread—it tends to dry out quickly and lose its soft crumb.
Freezing and Reheating Tips
If you’d like to store peasant bread for longer, freezing is your best option. Follow these steps:
- Allow the loaf to cool fully.
- Wrap it tightly in plastic wrap and then in aluminum foil or a freezer bag.
- Label it with the date and freeze for up to 3 months.
To reheat, thaw at room temperature for several hours, then refresh it in a preheated oven at 350°F (175°C) for 10–15 minutes. It’ll taste just like freshly baked bread again—crispy crust, soft inside, and full of aroma.
Troubleshooting Common Mistakes
Why Your Bread Didn’t Rise
If your bread didn’t rise properly, don’t worry—it’s one of the most common baking issues. Possible reasons include:
- Inactive yeast: Always check the expiration date. Yeast that’s too old won’t activate.
- Water temperature: If the water is too hot, it kills the yeast; too cold, and it won’t activate.
- Poor resting environment: Bread dough loves warmth. Aim for a cozy 75–85°F (24–29°C) resting spot.
You can test yeast activity beforehand by mixing it with warm water and sugar—if it doesn’t foam after 10 minutes, it’s time for fresh yeast.
How to Avoid Dense or Gummy Bread
Dense bread usually means the dough didn’t have enough rise time or was overmixed. Remember:
- Don’t rush the rise—let it double naturally.
- Avoid adding too much flour (sticky dough is normal!).
- Ensure your oven is preheated before baking.
For gummy bread, make sure it cools completely before cutting. The internal steam needs to escape to finish the cooking process.
Tips for Perfect Crust Every Time
To achieve that beautiful golden crust every time:
- Brush the dough lightly with melted butter or olive oil before baking.
- Bake in glass or ceramic dishes for even browning.
- If you love a crisp crust, bake for an extra 5 minutes, but watch carefully to prevent burning.
A quick trick: place a small pan of water in the oven during the first 10 minutes of baking—this adds steam and helps develop that perfect, bakery-style crust.
Health Benefits of Homemade Peasant Bread
Nutritional Value
Homemade peasant bread isn’t just delicious—it’s healthier than most store-bought loaves. You’re in control of the ingredients, meaning no preservatives, additives, or artificial flavorings. A typical slice contains:
- Calories: ~100–120
- Carbs: 20–25g
- Protein: 3–4g
- Fat: 1–2g
This bread provides a good source of energy, especially when paired with healthy fats or proteins.
Healthier Alternatives to Store-Bought Bread
Store-bought breads often contain unnecessary sugars, stabilizers, and preservatives to extend shelf life. Making your own peasant bread ensures purity and freshness. For an even healthier version:
- Use whole wheat or spelt flour for added fiber.
- Replace sugar with honey or maple syrup.
- Add seeds or oats for extra nutrients.
Homemade bread gives you full control over nutrition, taste, and texture—and once you start baking it yourself, you’ll never go back to the packaged kind again.
Creative Variations of Peasant Bread
Garlic and Herb Peasant Bread
Infuse your dough with minced garlic, rosemary, and olive oil for an aromatic twist. This version is ideal for Italian dinners or as a side to soups.
Whole Wheat Peasant Bread
Substitute half of the all-purpose flour with whole wheat flour for a hearty, earthy loaf that’s rich in fiber and flavor.
Cheese-Stuffed Peasant Bread
Add shredded cheddar or mozzarella between layers of dough before baking. The result? Gooey, cheesy perfection with every bite.
Serving Ideas and Pairings
Perfect Soups and Stews for Pairing
There’s something timeless about the combination of freshly baked bread and a warm bowl of soup. Peasant bread, with its rustic crust and tender crumb, complements nearly every soup and stew you can think of. Here are a few classic pairings to try:
- Tomato Basil Soup: The light acidity of tomatoes pairs beautifully with the mild flavor of peasant bread. Dip a slice in your soup—it’s the perfect comfort meal.
- Hearty Beef Stew: Thick and rich, beef stew begs for a slice of bread to soak up all those flavorful juices.
- Creamy Mushroom Soup: The earthy taste of mushrooms complements the rustic quality of the bread, creating a balance of flavors.
- Lentil or Vegetable Soup: Healthy, colorful, and filling—these soups pair perfectly with toasted peasant bread for a wholesome meal.
- Chicken Noodle Soup: When you’re feeling under the weather, this classic combo is like a warm hug in food form.
Pro Tip: Brush slices of bread with olive oil, sprinkle a little sea salt, and toast lightly before serving—it adds a delightful crunch to your meal.
Peasant Bread as a Breakfast Option
Peasant bread isn’t just for lunch or dinner—it’s a star at the breakfast table too. Its soft, airy texture makes it ideal for toasts, sandwiches, or even French toast. Here are some breakfast ideas you’ll love:
- Classic Butter and Jam Toast: Spread some salted butter and your favorite fruit jam for a sweet start to your day.
- Avocado Toast: Mash ripe avocados with lemon juice, salt, and pepper, and serve on toasted peasant bread for a modern, healthy twist.
- French Toast: Dip slices in an egg and milk mixture, fry until golden, and top with syrup or fresh fruit.
- Egg and Cheese Sandwich: The light texture of peasant bread makes for a fluffy, satisfying sandwich that’s not too heavy.
- Nut Butter and Honey: Spread almond or peanut butter, drizzle with honey, and top with banana slices for a protein-packed breakfast.
Its versatility makes it a breakfast staple that never gets old—simple, hearty, and endlessly customizable.
Tips from Experienced Bakers
Secrets for Soft and Fluffy Crumbs
The beauty of peasant bread lies in its light and airy crumb. To achieve that bakery-quality softness, keep these professional baking tips in mind:
- Use warm water—not hot or cold. The ideal temperature (around 110°F or 43°C) helps activate yeast properly.
- Don’t add too much flour. The dough should feel sticky and soft. Over-flouring leads to dense bread.
- Let it rise fully. Rushing this step can prevent your bread from developing enough air pockets.
- Avoid overmixing. Stir just until the ingredients combine. Overmixing breaks down gluten and affects texture.
- Use fresh yeast. Active yeast ensures proper fermentation and a beautiful rise.
Remember, peasant bread doesn’t demand perfection. Its slightly rustic look is part of its charm—focus on flavor and texture instead.
How to Add a Rustic Touch
Peasant bread should look beautifully imperfect. To enhance that artisanal feel:
- Dust the top of your dough with a bit of flour before baking for a rustic, country-style finish.
- Use coarse salt or herbs on top for a decorative touch.
- Score the dough lightly with a knife to give it a classic, crackly appearance.
- Bake in a cast iron pot for a heartier crust and deeper color.
Every loaf tells its own story—embrace the uniqueness of each bake.
FAQs about Peasant Bread Recipe
1. Can I Make Peasant Bread Without Yeast?
Yes, but the texture will change. You can use baking powder and yogurt as a substitute for yeast to create a quick bread version. It won’t rise as high, but it will still be deliciously soft and fluffy.
2. How Long Does Peasant Bread Stay Fresh?
When stored properly, peasant bread stays fresh for 3–4 days at room temperature. If you want to keep it longer, freeze it for up to 3 months and reheat before serving.
3. What’s the Difference Between Peasant Bread and Artisan Bread?
While both are rustic, artisan bread often requires kneading, proofing, and specific hydration levels, whereas peasant bread is simple, no-knead, and forgiving. It’s designed for home bakers who want ease without sacrificing flavor.
4. Can I Make It Gluten-Free?
Absolutely! Substitute the all-purpose flour with a gluten-free flour blend and add 1 teaspoon of xanthan gum to help with elasticity. The bread will still rise beautifully and taste great.
5. What Type of Flour Works Best?
The classic recipe uses all-purpose flour, but you can experiment with bread flour for extra chewiness or whole wheat flour for a heartier taste. Mixing half all-purpose and half whole wheat flour often gives the best of both worlds.
Conclusion
Peasant bread is the definition of simplicity and comfort. With just a few ingredients, you can create a loaf that’s warm, flavorful, and perfect for any occasion. It’s a recipe that connects us to centuries of tradition—born from resourcefulness, perfected by practice, and loved for its versatility.
Whether you’re a seasoned baker or a first-time bread maker, this recipe proves that great bread doesn’t need to be complicated. All it takes is patience, love, and a little time. From breakfast toast to dinner rolls, peasant bread will quickly become your go-to homemade favorite.
So roll up your sleeves, grab a mixing bowl, and bake your own piece of rustic perfection. Once you taste that first slice, golden on the outside and soft on the inside, you’ll understand why peasant bread has stood the test of time.