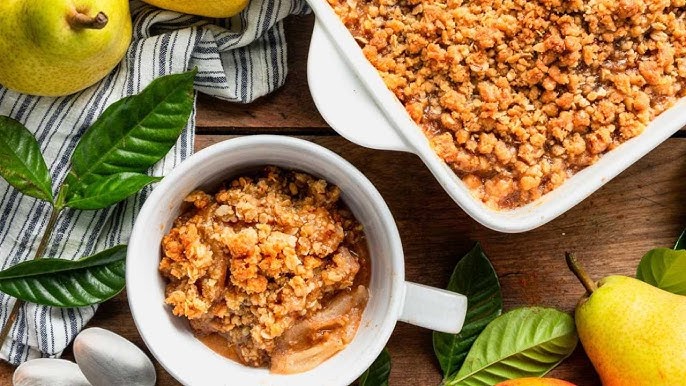
Pear Crisp Recipe: There’s something magical about a warm pear crisp straight out of the oven — the sweet aroma of baked fruit, the buttery crunch of the topping, and that cozy feeling it brings with every bite. Pear crisp is one of those desserts that strike the perfect balance between comfort food and sophistication. It’s simple enough for a casual family dinner yet elegant enough to serve at a holiday gathering.
Unlike pies that require careful rolling and crimping, a crisp is delightfully low-maintenance. All you need are ripe pears, a few pantry staples, and an oven. The result? A golden, bubbling dessert that feels like a warm hug. Whether you’re an experienced baker or just starting your kitchen journey, this recipe will guide you through every step to make the perfect pear crisp — with easy tips and pro secrets along the way.
What Makes Pear Crisp So Special
What sets pear crisp apart from its apple or berry counterparts is its subtle sweetness and delicate texture. Pears have a natural juiciness that caramelizes beautifully as they bake, creating a luscious filling that pairs perfectly with a buttery oat crumble. Each bite offers a mix of soft, syrupy fruit and crunchy topping — a texture combination that’s hard to resist.
Moreover, pears absorb spices wonderfully. A touch of cinnamon, nutmeg, or ginger enhances their natural flavor, giving your crisp a warm, comforting aroma. You can even experiment with vanilla or a drizzle of honey to add depth. The best part? It’s quick, easy, and doesn’t demand perfection. Even if your pears are slightly overripe, they’ll still bake into a delicious dessert.
Why You’ll Love This Recipe
This pear crisp recipe ticks all the boxes for a go-to dessert. It’s quick to prepare (no crust required!), budget-friendly, and endlessly customizable. You can make it ahead of time, tweak the sweetness, or even serve it chilled the next day. Plus, it’s a great way to use up those pears sitting on your counter.
If you’re craving something warm, rustic, and comforting, this is your perfect pick. Imagine scooping it into a bowl, topping it with a scoop of vanilla ice cream or a dollop of whipped cream — pure bliss!
Ingredients You’ll Need
Before diving into the steps, let’s gather all the ingredients. Everything listed below can be easily found in your pantry or at any local grocery store.
For the Pear Filling
- 5 to 6 medium ripe pears (Bartlett or Bosc work best)
- 2 tablespoons lemon juice (to prevent browning and balance sweetness)
- ¼ cup granulated sugar
- 2 tablespoons brown sugar
- 1 tablespoon cornstarch or flour (for thickening the filling)
- 1 teaspoon ground cinnamon
- ¼ teaspoon nutmeg
- 1 teaspoon pure vanilla extract
- Pinch of salt
The filling’s job is to bring out the natural sweetness of the pears while keeping the texture thick and gooey. The lemon juice adds brightness, while the cornstarch ensures your filling doesn’t turn watery.
For the Crisp Topping
- 1 cup rolled oats
- ¾ cup all-purpose flour
- ½ cup brown sugar
- ¼ cup granulated sugar
- ½ teaspoon ground cinnamon
- ½ teaspoon salt
- ½ cup unsalted butter (cold and cubed)
Mixing cold butter into the topping is key to achieving that classic crumbly texture. The oats give a hearty crunch, while the brown sugar caramelizes beautifully during baking.
Optional Add-ins and Substitutions
Want to personalize your pear crisp? Here are a few creative tweaks:
- Add chopped nuts (like pecans or walnuts) for extra crunch.
- Use maple syrup or honey instead of granulated sugar for a natural sweetness.
- Add cranberries or raisins to the filling for a tart twist.
- Substitute coconut oil for butter for a vegan-friendly version.
The beauty of a pear crisp lies in its flexibility — you can tailor it to your taste or what’s available in your pantry.
Equipment Required
You don’t need fancy kitchen gadgets for this recipe — just a few essentials and you’re good to go.
Baking Essentials
- Mixing bowls – One for the filling, one for the topping.
- Baking dish – An 8×8-inch or 9×9-inch dish works perfectly.
- Peeler and knife – To prepare your pears.
- Measuring cups and spoons – For accuracy in mixing ingredients.
- Spatula or spoon – To combine everything smoothly.
Optional Kitchen Tools for Perfect Texture
If you want to level up your crisp game, consider these extras:
- Pastry cutter – Helps blend butter into the topping evenly.
- Microplane grater – Ideal for adding fresh nutmeg or zest.
- Mandoline slicer – For uniformly thin pear slices.
Step-by-Step Guide to Make Pear Crisp
Let’s get to the heart of it — the actual process of making your homemade pear crisp. Follow these steps carefully for a golden, bubbling dessert that smells like heaven and tastes even better.
Step 1 – Prepare the Pears
Start by peeling, coring, and slicing about 5–6 ripe pears. Place them in a large mixing bowl and toss with a bit of lemon juice to prevent browning. Add sugar, cinnamon, and a teaspoon of cornstarch to help thicken the filling as it bakes. Stir gently to coat the pears evenly.
Step 2 – Make the Crisp Topping
In another bowl, combine rolled oats, flour, brown sugar, and a pinch of salt. Cut in cold butter using your fingertips or a pastry cutter until the mixture becomes crumbly and resembles coarse sand. For extra crunch, add a handful of chopped nuts or a sprinkle of cinnamon.
Step 3 – Assemble the Pear Crisp
Spread the pear mixture evenly into a greased baking dish. Sprinkle the crisp topping over the pears, covering them completely for that golden, crunchy finish. Don’t press it down too hard — the air pockets help it crisp beautifully.
Step 4 – Bake to Golden Perfection
Bake in a preheated oven at 350°F (175°C) for 35–40 minutes, or until the top is golden brown and the pear filling is bubbling around the edges.
Step 5 – Cool and Serve
Let the pear crisp cool for about 10 minutes before serving. Enjoy it warm with a scoop of vanilla ice cream or a dollop of whipped cream — sweet, buttery, and comforting in every bite!
Tips for the Perfect Pear Crisp
Even though pear crisp is easy to make, a few expert tips can elevate your dish from “tasty” to “unforgettable.” Let’s explore how to make it absolutely perfect every single time.
Choosing the Best Pears
Not all pears are created equal when it comes to baking. You’ll want varieties that hold their shape and don’t turn mushy in the oven. The best choices are:
- Bosc Pears: Firm, slightly spicy, and great for baking.
- Bartlett Pears: Sweet, juicy, and flavorful — perfect for a soft filling.
- Anjou Pears: Mildly sweet with a smooth texture, ideal for mixing varieties.
A blend of two or more types gives a balanced flavor and texture. Make sure the pears are ripe but still slightly firm to the touch. Overripe pears can become too soft and watery during baking.
How to Get the Right Crisp Texture
A crisp topping should live up to its name — light, crunchy, and buttery. The secret lies in three things: cold butter, the right oat-to-flour ratio, and avoiding overmixing. If you knead the topping too much, it’ll turn doughy instead of crumbly.
Also, don’t forget to spread the topping evenly over the fruit. Uneven layers can lead to soggy spots. And if you like an extra crunch, sprinkle a teaspoon of raw sugar over the top before baking — it caramelizes beautifully!
Sweetness Adjustments and Flavor Twists
Everyone’s sweetness preference is different, so feel free to adjust the sugar levels. If your pears are very sweet, reduce the sugar by 2–3 tablespoons. For a deeper flavor, try adding:
- A splash of bourbon or rum to the filling.
- Fresh ginger for a little spice.
- Orange zest for brightness.
- A handful of berries for color and tartness.
Small tweaks like these can give your pear crisp a personalized touch and make it taste completely unique.
Serving Suggestions
When your kitchen is filled with that sweet, buttery aroma of freshly baked pear crisp, it’s impossible not to start imagining how you’ll serve it. Whether you’re making it for a cozy family night, a fall gathering, or a special dinner party, serving it right makes all the difference.
Best Pairings for Pear Crisp
The beauty of pear crisp is that it pairs beautifully with both simple and sophisticated accompaniments. Here are some classic and creative serving ideas:
- A Scoop of Vanilla Ice Cream: This is the gold standard. The creamy coldness of the ice cream melts into the warm crisp, creating a silky-sweet sauce that enhances every bite.
- Whipped Cream or Chantilly Cream: Light, airy, and slightly sweet, whipped cream complements the crisp’s richness without overpowering it. For an extra flavor boost, add a dash of vanilla or cinnamon to the cream before whipping.
- Drizzle of Caramel or Butterscotch Sauce: Pear and caramel are a match made in dessert heaven. A warm drizzle of caramel sauce gives a glossy, decadent finish that looks as good as it tastes.
- Custard or Cream Anglaise: If you prefer something more elegant, serve your pear crisp with a smooth vanilla custard. The creamy texture adds a luxurious element to this humble dessert.
- Pair with Coffee or Dessert Wine: A hot cup of coffee, spiced chai, or a glass of Moscato perfectly complements the sweetness of the crisp. The warmth and flavor depth make it an ideal end to any meal.
How to Serve for Special Occasions
Want to make your pear crisp party-ready? Here are some presentation tips:
- Individual Ramekins: Bake the crisp in small, oven-safe ramekins for personal portions. It looks refined and makes serving easy.
- Dusting of Powdered Sugar: A light dusting before serving adds a bakery-style touch.
- Garnish with Fresh Pear Slices or Mint: Fresh fruit adds a pop of color and freshness to your plate.
- Add a Scoop of Gelato or Sorbet: Try cinnamon, hazelnut, or vanilla bean gelato for a modern twist.
These small details can turn a simple pear crisp into a show-stopping dessert that everyone will rave about.
Storage and Reheating Tips
Pear crisp is one of those desserts that tastes just as good the next day—if not better! Here’s how to store it properly and bring it back to life after it cools.
How to Store Leftovers
If you somehow manage to have leftovers (which is rare!), let the crisp cool completely at room temperature before storing. Then, follow these steps:
- Room Temperature: Store for up to 2 days covered loosely with foil or plastic wrap. This keeps the topping crisp and prevents sogginess.
- Refrigerator: For longer storage, keep it in an airtight container in the fridge for up to 5 days.
- Freezer: Yes, you can freeze it! Wrap tightly with plastic wrap, then cover with foil or place in a freezer-safe container. It will last up to 3 months.
When you’re ready to enjoy it again, move the frozen crisp to the fridge overnight to thaw slowly.
Best Way to Reheat
To bring back that freshly baked texture:
- Oven Method (Recommended): Preheat to 350°F (175°C) and warm the crisp for 15–20 minutes until the topping is crunchy again.
- Air Fryer Option: Use 320°F for 5–7 minutes for a quick re-crisp.
- Microwave (Quickest but Softens the Top): Heat individual portions for 30–45 seconds. It’ll be soft but still delicious.
Pro tip: If reheating in the oven, cover the crisp with foil for the first 10 minutes to warm the filling, then remove it to let the topping re-crisp perfectly.
Healthier Versions of Pear Crisp
If you love dessert but want to keep things light, don’t worry — pear crisp can easily be made healthier without sacrificing flavor. Here’s how to make it fit your lifestyle.
Gluten-Free Option
For a gluten-free pear crisp, simply swap the all-purpose flour for almond flour, oat flour, or a gluten-free baking blend. Make sure to use certified gluten-free oats as well.
This version not only caters to gluten-sensitive eaters but also adds a lovely nutty flavor and slightly denser texture to the topping. Almond flour, in particular, pairs beautifully with pears — creating a warm, buttery richness that feels indulgent yet wholesome.
Vegan and Dairy-Free Adjustments
To make this recipe completely vegan:
- Replace butter with coconut oil, vegan butter, or margarine.
- Use maple syrup or coconut sugar instead of refined sugars for natural sweetness.
Coconut oil gives the crisp a slightly tropical aroma, while vegan butter keeps the traditional texture intact. You can also toss the pears in a little apple juice instead of sugar to cut back on calories without losing flavor.
If you’re looking to boost nutrition, consider adding:
- Chia seeds or flax seeds to the topping for extra fiber.
- Whole-grain oats or spelt flour for complex carbs and a heartier bite.
Healthy doesn’t have to mean boring — this version is just as cozy, fragrant, and satisfying as the original.
Common Mistakes to Avoid
Even with a simple recipe like pear crisp, a few small missteps can change the outcome. Avoid these common mistakes to ensure success every time.
Overbaking or Undercooking
It’s tempting to eyeball the baking time, but overbaking can make the topping dry and the pears mushy. On the other hand, underbaking leaves the filling watery and the oats soft.
Keep an eye out for two signs that your crisp is done:
- The topping is golden brown.
- The pear filling is bubbling gently around the edges.
Once these appear, pull it out and let it cool slightly. Remember, it will continue cooking a bit from residual heat even after it’s removed from the oven.
Choosing the Wrong Pears
Selecting the right pear variety is crucial. Avoid overripe or extremely soft pears — they’ll turn mushy fast and make your filling soupy. Likewise, underripe pears won’t soften enough and can taste bland.
The perfect pear should yield slightly to pressure but remain firm. A mix of Bosc and Bartlett gives both texture and sweetness — ideal for a perfectly balanced crisp.
Nutritional Information (Approximate)
Here’s a quick nutritional overview per serving (based on 8 servings):
| Nutrient | Amount (Approx.) |
|---|---|
| Calories | 310 kcal |
| Carbohydrates | 54 g |
| Protein | 4 g |
| Fat | 11 g |
| Fiber | 5 g |
| Sugar | 28 g |
| Sodium | 120 mg |
Note: Nutritional values may vary depending on substitutions and portion sizes.
FAQs about Pear Crisp Recipe
1. Can I use canned pears instead of fresh ones?
Yes, but make sure to drain them thoroughly and reduce the added sugar slightly since canned pears are often packed in syrup.
2. How can I make the crisp topping extra crunchy?
Use cold butter and don’t overmix. Adding a tablespoon of chopped nuts or raw sugar before baking also enhances the crunch.
3. Can I prepare the pear crisp in advance?
Absolutely! Assemble it up to 24 hours ahead and refrigerate it unbaked. Just bake it when ready — add about 10 extra minutes to the baking time.
4. What’s the best way to serve it warm?
Reheat it in the oven at 350°F for 15 minutes, then top with ice cream or whipped cream for the ultimate treat.
5. How long will pear crisp last in the fridge?
Stored in an airtight container, it will last for up to 5 days. Reheat before serving for that freshly baked taste.
Conclusion
Pear crisp is one of those timeless desserts that never fail to impress. It’s simple, cozy, and incredibly satisfying — the kind of dish that brings comfort on chilly evenings and warmth to family gatherings. With juicy baked pears, a crunchy oat topping, and that irresistible cinnamon aroma, this dessert checks every box for flavor and texture.
What makes it even better is its flexibility — you can tweak it for any diet, adjust the sweetness to your liking, and serve it however you want. Whether you enjoy it fresh out of the oven with melting ice cream or chilled with morning coffee, it’s guaranteed to become a household favorite.
So go ahead, grab those pears and start baking. One spoonful of this pear crisp, and you’ll realize it’s not just dessert — it’s pure comfort in a dish.