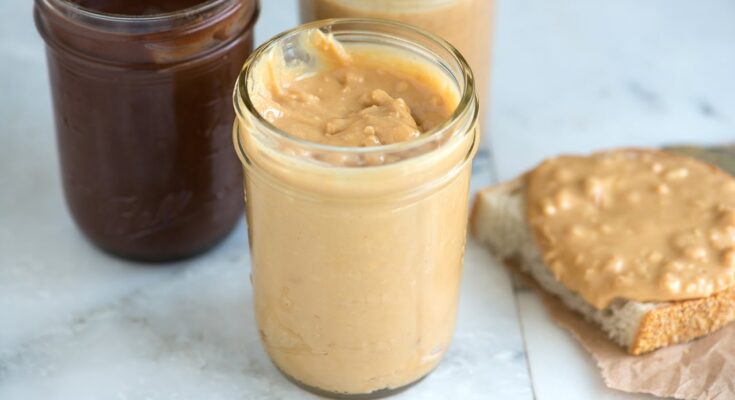
Peanut Spread Recipe: There’s something deeply satisfying about making your own peanut spread from scratch. Imagine spreading a spoonful of warm, nutty, and creamy peanut goodness over a slice of toast—it’s pure comfort in a jar. Homemade peanut spread not only tastes better than most store-bought versions, but it also gives you complete control over what goes inside. No preservatives, no excessive sugar—just roasted peanuts, a touch of salt, and love.
Why Make Peanut Spread at Home?
While supermarket shelves are lined with various brands of peanut butter, making your own spread at home brings an entirely different level of freshness and flavor. You decide whether you want it crunchy or smooth, slightly sweet or purely savory. Moreover, homemade peanut spread is free from hydrogenated oils and artificial stabilizers commonly found in commercial products.
Another perk? It’s cost-effective. A bag of peanuts costs far less than a branded jar of peanut butter. Plus, you can experiment endlessly—add honey for sweetness, cocoa for a chocolate twist, or chili flakes for a spicy kick. Once you start making it yourself, it’s hard to go back to store-bought versions.
Health Benefits of Peanut Spread
Peanut spread isn’t just delicious—it’s packed with nutrients your body will thank you for. Peanuts are a rich source of plant-based protein, making this spread an excellent choice for vegetarians and fitness enthusiasts. It’s also high in healthy monounsaturated fats, which support heart health and help keep you full longer.
Moreover, peanuts contain essential vitamins like Vitamin E, B3 (Niacin), and Magnesium, all of which aid in energy production and maintaining healthy skin. The natural fiber in peanuts also helps improve digestion. When made without added sugar or hydrogenated oils, peanut spread becomes a wholesome, guilt-free treat.
Ingredients You’ll Need
Before diving into the process, let’s get your ingredients ready. The best part? You only need a few simple items—most of which are likely already in your pantry.
Essential Ingredients
Here’s what you’ll need for a basic, creamy peanut spread:
- 2 cups of raw peanuts (shelled and unsalted)
- ½ teaspoon of salt (adjust to taste)
- 1–2 tablespoons of peanut oil (optional, helps with texture)
- 1–2 teaspoons of honey or sugar (optional for sweetness)
That’s it! Four ingredients are all it takes to create a fresh, creamy, and nutritious spread. If you prefer a pure, savory version, you can skip the sweetener. The key is to use fresh, high-quality peanuts—the better your peanuts, the richer the flavor.
Optional Add-Ons for Flavor Variations
Want to jazz up your peanut spread? Here are some optional add-ins to try:
- Honey or maple syrup – For a natural, sweet twist.
- Cocoa powder or dark chocolate – For chocolate lovers.
- Cinnamon or nutmeg – Adds warmth and depth to the flavor.
- Sea salt flakes – For a gourmet finish.
- Chili flakes or cayenne pepper – For a spicy punch.
- Vanilla extract – Balances flavors beautifully.
Feel free to experiment with these ingredients to create your signature peanut spread flavor.
Ingredient Substitutes for Dietary Preferences
If you have specific dietary needs, you can easily modify the recipe:
- For a vegan version: Use maple syrup instead of honey.
- For a keto-friendly version: Skip sweeteners altogether or use stevia.
- For a low-sodium version: Reduce or omit salt.
- For nut allergies: Substitute peanuts with roasted sunflower seeds to make a sunflower seed spread.
Remember, making peanut spread at home means you control everything—from ingredients to consistency to flavor balance.
Tools and Equipment Required
Before you begin, ensure you have the right kitchen tools. While the recipe is simple, the right equipment makes all the difference in texture and consistency.
Basic Kitchen Tools
- Baking tray – For roasting peanuts evenly.
- Mixing bowl – To hold and mix roasted peanuts.
- Spatula – For scraping sides of the blender.
- Airtight jar – For storing your peanut spread.
These are everyday kitchen tools you likely already own, and they’ll help keep your process smooth and organized.
Recommended Appliances for Best Results
The heart of this recipe lies in your food processor or high-speed blender. This is where the magic happens. A strong blender will help grind the peanuts finely and release their natural oils, creating a creamy texture. If your blender is weaker, blend in shorter intervals and scrape the sides frequently to prevent overheating.
A high-speed processor like Vitamix, Ninja, or NutriBullet works wonders. You can also use a mortar and pestle if you’re going for a rustic, old-fashioned texture—but it will take a bit of elbow grease!
Step-by-Step Guide to Making Peanut Spread
Now that your ingredients and tools are ready, it’s time to make your own jar of peanut perfection. Follow these steps carefully for best results.
Step 1 – Roasting the Peanuts
Begin with raw, unsalted peanuts. Spread them evenly on a baking tray and roast in a preheated oven at 350°F (175°C) for about 10–15 minutes, stirring halfway through. You’ll know they’re ready when they turn golden brown and release a rich, nutty aroma.
Step 2 – Cooling and Peeling
Remove the peanuts from the oven and let them cool completely. Once cooled, rub them between your hands or in a clean kitchen towel to remove the skins. This step ensures a smoother, creamier spread.
Step 3 – Blending Process
Transfer the peeled peanuts to a food processor. Start blending in short pulses, then continuously for several minutes. The peanuts will first form crumbs, then a paste, and finally a smooth, creamy spread as the oils release naturally.
Step 4 – Adjusting Texture and Taste
To customize your spread, add a pinch of salt for balance, a teaspoon of honey or sugar for sweetness, and a tablespoon of vegetable oil if you prefer a smoother consistency. Blend again until perfectly silky.
Step 5 – Storing the Peanut Spread
Pour the peanut spread into a clean, airtight jar. Store it at room temperature for up to a week or refrigerate it for longer freshness. Stir before each use — natural oils may separate on top. Enjoy on bread, pancakes, or as a healthy dip!
Tips and Tricks for Perfect Peanut Spread
Even though making peanut spread is simple, a few small tricks can take your results from good to gourmet.
Common Mistakes to Avoid
- Over-roasting the peanuts: Burnt peanuts can give a bitter taste that’s hard to fix. Keep an eye on them while roasting.
- Not letting peanuts cool before blending: Hot peanuts can produce steam, causing the spread to become pasty instead of smooth.
- Using too much oil too soon: Always add oil gradually. Too much oil can make the spread greasy and thin.
- Over-blending: While it’s tempting to keep blending for ultra-smooth texture, too long can overheat the oils, making the spread taste off.
- Skipping proper storage: Exposure to air and moisture can spoil the spread faster.
How to Achieve the Creamiest Texture
The key to a creamy, velvety peanut spread is patience. Blend long enough to release natural oils fully. If you’re using a less powerful blender, pause every minute to scrape down the sides and let the motor cool.
Another trick? Add a teaspoon of neutral oil only after the peanuts start forming a thick paste. This prevents the spread from becoming too oily early on.
Finally, for a smoother finish, run the spread through a fine mesh sieve or food mill. It’s an extra step, but it’s worth it if you want that silky store-bought texture without any additives.
Flavor Variations You Can Try
Homemade peanut spread doesn’t have to be plain. You can create countless flavor twists that cater to every taste—sweet, spicy, or even savory.
Honey Peanut Spread
Add 1–2 tablespoons of honey to your peanut spread during the final blending stage. This creates a naturally sweet, aromatic version perfect for breakfast toast or banana sandwiches.
Want a deeper flavor? Try using maple syrup instead of honey—it adds a subtle caramel-like undertone. This variant also pairs wonderfully with apples, oatmeal, and yogurt bowls.
Chocolate Peanut Spread
Calling all chocolate lovers! Blend in 2 tablespoons of cocoa powder or 1 ounce of melted dark chocolate. Adjust sweetness with honey or sugar as needed.
The result? A rich, nutty, chocolatey delight that rivals commercial chocolate spreads—only healthier. It’s divine on pancakes, waffles, or even as a dip for strawberries.
Spicy Peanut Spread
For those who enjoy a bit of heat, add ¼ teaspoon of chili powder or a few chili flakes while blending. You can also mix in a dash of smoked paprika for a bold, barbecue-style flavor.
This version pairs perfectly with grilled sandwiches, noodles, or even as a dipping sauce for satay. It’s proof that peanut spread isn’t just for sweet treats—it’s a versatile condiment that suits all palates.
Nutritional Benefits of Peanut Spread
Homemade peanut spread is far more than a tasty treat — it’s a nutritional powerhouse. Whether you’re an athlete, a student, or simply someone who loves a quick, wholesome snack, this spread gives your body the fuel it needs.
Each spoonful of peanut spread provides a balanced mix of protein, healthy fats, and essential nutrients that help sustain energy levels and support muscle repair.
Protein and Energy Content
Peanuts are one of nature’s richest sources of plant-based protein. Just two tablespoons of peanut spread contain about 7–8 grams of protein, making it an excellent post-workout snack. Protein helps in building and repairing muscles, while also keeping you feeling full for longer periods.
Beyond protein, peanut spread is a fantastic source of slow-digesting energy. Its combination of fats, fiber, and protein ensures steady energy release throughout the day, unlike sugary snacks that cause energy crashes.
It’s the perfect go-to breakfast addition — a spoonful on toast, in smoothies, or stirred into oatmeal gives you an instant energy boost without artificial additives.
Healthy Fats and Vitamins
One of the biggest misconceptions about peanut spread is that it’s “fattening.” The truth? It’s full of good fats — mainly monounsaturated and polyunsaturated fats — which are beneficial for heart health. These fats help lower bad cholesterol levels and support brain function.
Peanuts also deliver a healthy dose of Vitamin E, a natural antioxidant that protects your cells from damage, and B vitamins like Niacin and Folate, which play a role in energy metabolism. The Magnesium in peanuts supports bone health, while Potassium aids muscle function.
In short, a homemade peanut spread is not just a comfort food — it’s real nourishment in a jar.
Uses of Peanut Spread in Everyday Meals
If you think peanut spread is only meant for sandwiches, you’re missing out on a world of flavor possibilities! This versatile ingredient can be used in sweet and savory dishes alike.
Breakfast Ideas
Start your day strong with peanut spread. Try these easy, delicious breakfast combinations:
- Classic peanut butter toast topped with banana slices or strawberries.
- Peanut spread oatmeal, where you stir a spoonful into warm oats for extra creaminess.
- Smoothie boost — blend peanut spread with banana, milk, and cocoa for a protein-packed shake.
- Stuffed pancakes — swirl peanut spread inside pancake batter for a surprise center.
The protein and fiber from peanuts keep you energized all morning, making breakfast both satisfying and nutritious.
Snacks and Desserts
Peanut spread shines as a snack or dessert ingredient too. Use it as:
- A dip for apple or celery slices — healthy, crunchy, and kid-friendly.
- A topping for yogurt or ice cream, adding a nutty twist.
- A base for protein balls — mix peanut spread with oats, honey, and dark chocolate chips.
- A filling for cookies or brownies, giving them a rich, moist texture.
You can even drizzle a little warm peanut spread over popcorn for a sweet-salty movie-night treat. Once you start experimenting, you’ll realize its uses are practically endless.
Storage and Shelf Life
Proper storage is essential to keep your peanut spread fresh and safe for longer.
How Long Does It Last?
Homemade peanut spread, when stored correctly in a sealed glass jar, can last:
- Up to 2 weeks at room temperature, or
- 2–3 months in the refrigerator.
If you live in a warm or humid climate, refrigeration is always the better choice. The natural oils in peanuts can turn rancid if left out too long in heat.
When refrigerated, the spread may harden slightly. To soften it, leave it at room temperature for 10–15 minutes before using, or stir in a few drops of oil.
Signs of Spoilage
Even natural foods can go bad over time. Keep an eye out for these warning signs:
- Sour or off smell – an indicator of rancid oils.
- Mold growth – appears if moisture enters the jar.
- Unusual taste – bitterness or sharpness means it’s time to discard it.
Always store peanut spread in a cool, dark place, and use clean, dry utensils to prevent contamination.
Peanut Spread vs. Store-Bought Peanut Butter
You may be wondering — why go through the trouble of making peanut spread at home when it’s so easy to grab a jar from the store? Let’s break it down.
Taste and Freshness Comparison
Homemade peanut spread is unbeatable in freshness. Because it’s made with freshly roasted peanuts and no preservatives, it has a deeper, more authentic nutty flavor. The texture is customizable — from creamy to crunchy — and you can adjust sweetness to your liking.
Store-bought peanut butter, on the other hand, often contains added sugar, palm oil, and emulsifiers to enhance taste and shelf life. These additives can dull the natural flavor of peanuts and make the spread overly processed.
Health and Additives Difference
Commercial peanut butter brands frequently use hydrogenated oils, which prevent oil separation but introduce trans fats—the unhealthy kind linked to heart problems. Homemade peanut spread contains zero trans fats and no artificial stabilizers.
When you make it yourself, you know exactly what’s in it — just peanuts, salt, and maybe a hint of honey. It’s clean, pure, and nutrient-rich.
So, while store-bought might be convenient, homemade peanut spread wins hands down for both taste and health.
Troubleshooting Common Issues
Even with a simple recipe like this, a few hiccups can happen. Here’s how to fix them quickly.
Peanut Spread Too Thick?
If your spread turns out too thick or dry, don’t worry. This usually means the peanuts didn’t release enough natural oil, or you roasted them too long. Simply add:
- ½ teaspoon of oil at a time (peanut or neutral oil),
- Blend again until you reach your desired creaminess.
Too Oily or Grainy?
If your peanut spread is overly oily, it might have been over-blended, causing the fats to separate. Place it in the refrigerator for an hour to firm up. Stir before using.
If it’s grainy, it means the blending time wasn’t long enough. Process it a bit longer, scraping the sides frequently. The texture will smooth out as the oils emulsify naturally.
Fun Facts About Peanuts and Their History
Did you know peanuts aren’t actually nuts? They’re legumes, belonging to the same family as beans and lentils. Native to South America, peanuts have been cultivated for over 7,000 years!
Interestingly, George Washington Carver, an American agricultural scientist, promoted peanuts as a vital crop and discovered over 300 uses for them—from food to cosmetics.
Peanut butter, as we know it today, was first introduced at the 1893 Chicago World’s Fair, and since then, it has become a global favorite. From PB&J sandwiches to protein smoothies, this humble legume has become a culinary staple worldwide.
FAQs about Peanut Spread Recipe
1. Can I make peanut spread without a food processor?
Yes! You can use a high-speed blender or even a mortar and pestle for a rustic texture. It’ll take more effort, but the flavor remains amazing.
2. How can I make my peanut spread sweeter?
Add honey, maple syrup, or a touch of brown sugar during the final blending stage for a natural sweetness boost.
3. Can I use salted peanuts for this recipe?
Yes, but reduce or skip additional salt to avoid an overly salty spread.
4. Is homemade peanut spread vegan?
Absolutely! Just replace honey with maple syrup or agave for a fully vegan-friendly version.
5. Why does my peanut spread separate after a few days?
Oil separation is natural since there are no stabilizers. Just stir it before using, and it’s as good as new.
Conclusion
Making your own peanut spread at home is simple, rewarding, and healthier than anything you’ll find on store shelves. With just a handful of ingredients, you can create a creamy, customizable spread that’s free from preservatives and artificial additives.
It’s versatile enough for both sweet and savory dishes, packed with nutrients, and incredibly easy to store. Once you taste the rich, roasted flavor of homemade peanut spread, you’ll never go back to store-bought again.
So, grab your blender, roast some peanuts, and start spreading the love—literally!


