Peanut Butter Eggs Recipe: Peanut butter eggs. Just the name alone might bring back cozy childhood memories of colorful Easter baskets, chocolate-stained fingers, and that first sweet bite of a creamy, peanut-buttery treat wrapped in a rich chocolate shell. These candies are a seasonal favorite, but why limit yourself to store-bought when you can make them right in your kitchen—and honestly, they’re way better homemade.
When you craft your own peanut butter eggs, you control everything: the size, sweetness, chocolate thickness, and even fun add-ins. They’re the perfect blend of comfort food and creative baking—and you don’t need to be a pro to pull them off.
Ready to roll up your sleeves and get your hands (a little) sticky? This step-by-step guide will walk you through every detail, from ingredients to wrapping them up as cute little gifts. Let’s jump in.
Benefits of Making Peanut Butter Eggs at Home
First off, why even bother making these at home when they’re on shelves every spring?
Because homemade peanut butter eggs offer:
- More flavor, less guilt: You decide the sugar level and can swap in natural peanut butter or dairy-free chocolate.
- Better value: Store-bought peanut butter eggs can cost a fortune. Making them at home cuts the cost significantly.
- Fun bonding moments: Get the kids involved or make it a cozy weekend baking project.
- Customizable: Add nuts, crispy bits, coconut, or whatever you love—store-bought just can’t compete.
Plus, nothing beats the satisfaction of biting into something you made that tastes even better than the original.
List of Ingredients You’ll Need
To make a batch of these sweet little treasures, gather the following simple ingredients. You probably already have most of them in your pantry.
Main Ingredients
- 1 cup creamy peanut butter (natural or regular, your choice)
- 1/4 cup unsalted butter, softened
- 1 teaspoon vanilla extract
- 2 to 2½ cups powdered sugar
- 2 cups semisweet or milk chocolate chips
- 1 tablespoon coconut oil or shortening (optional, for smoother chocolate)
Optional Add-ins and Decorations
- Sprinkles or sea salt for topping
- Crisped rice cereal for crunch
- Mini marshmallows for a twist
- White chocolate chips if you want a dual-coating
Substitutions to Consider
- Almond or cashew butter for peanut allergies
- Maple syrup or honey instead of some sugar
- Vegan butter and dairy-free chocolate for a fully plant-based version
Simple, right? Now let’s get to the tools.
Kitchen Tools Required
You don’t need fancy gadgets to make these, just some basics:
Essential Tools
- Mixing bowls (at least two)
- Electric mixer or strong spoon
- Measuring cups and spoons
- Baking sheet
- Parchment paper or wax paper
- Microwave-safe bowl or double boiler for melting chocolate
Optional Tools
- Cookie scoop for even egg shapes
- Dipping fork or toothpicks
- Silicone mat for easier clean-up
Alright—time to get into the fun part: actually making the eggs!
Step-by-Step Guide to Making Peanut Butter Eggs
Step 1: Gather and Measure Your Ingredients
Before you do anything, measure everything out. Trust us—nothing slows you down faster than digging through your pantry mid-recipe.
Place your butter out to soften (don’t microwave it—it changes the texture). Put parchment paper on your baking sheet so the eggs don’t stick when freezing later.
This step sounds boring, but it’s key for a stress-free experience.
Step 2: Mixing the Peanut Butter Filling
In a large mixing bowl, blend together:
- Peanut butter
- Softened butter
- Vanilla extract
Mix on medium speed until smooth and fully combined. Slowly add the powdered sugar, about ½ cup at a time, until a thick but pliable dough forms.
If it’s too sticky, add more sugar. Too dry? Add a tablespoon of peanut butter. You’re aiming for a texture that’s easy to shape but doesn’t fall apart.
Once it’s ready, chill it in the fridge for 15–20 minutes. This makes shaping much easier.
Step 3: Shaping Into Eggs
Time to form the “eggs.” Using about 2 tablespoons of dough, shape each piece into an oval or egg shape with your hands. Don’t worry if they’re not perfect—rustic is charming!
Place each shaped egg on your parchment-lined baking sheet. Keep them slightly spaced to avoid sticking.
Once you’ve shaped them all, pop the tray in the freezer for about 30 minutes. This helps them hold their shape when dipping in chocolate.
Step 4: Freezing the Eggs
This step is quick but crucial. Freezing firm ups the peanut butter centers and keeps them from falling apart in hot chocolate.
While they’re chilling, go ahead and prepare your chocolate for dipping.
Step 5: Melting the Chocolate Coating
In a microwave-safe bowl or using a double boiler, melt your chocolate chips with coconut oil (if using) in 30-second intervals, stirring in between. Don’t rush it—burnt chocolate = disaster.
Your end result should be smooth and silky. If it’s too thick, a splash of oil helps thin it out.
Step 6: Dipping the Eggs in Chocolate
Now comes the most satisfying part.
Using a fork, dip each frozen peanut butter egg into the melted chocolate. Gently shake off the excess and return it to the parchment paper.
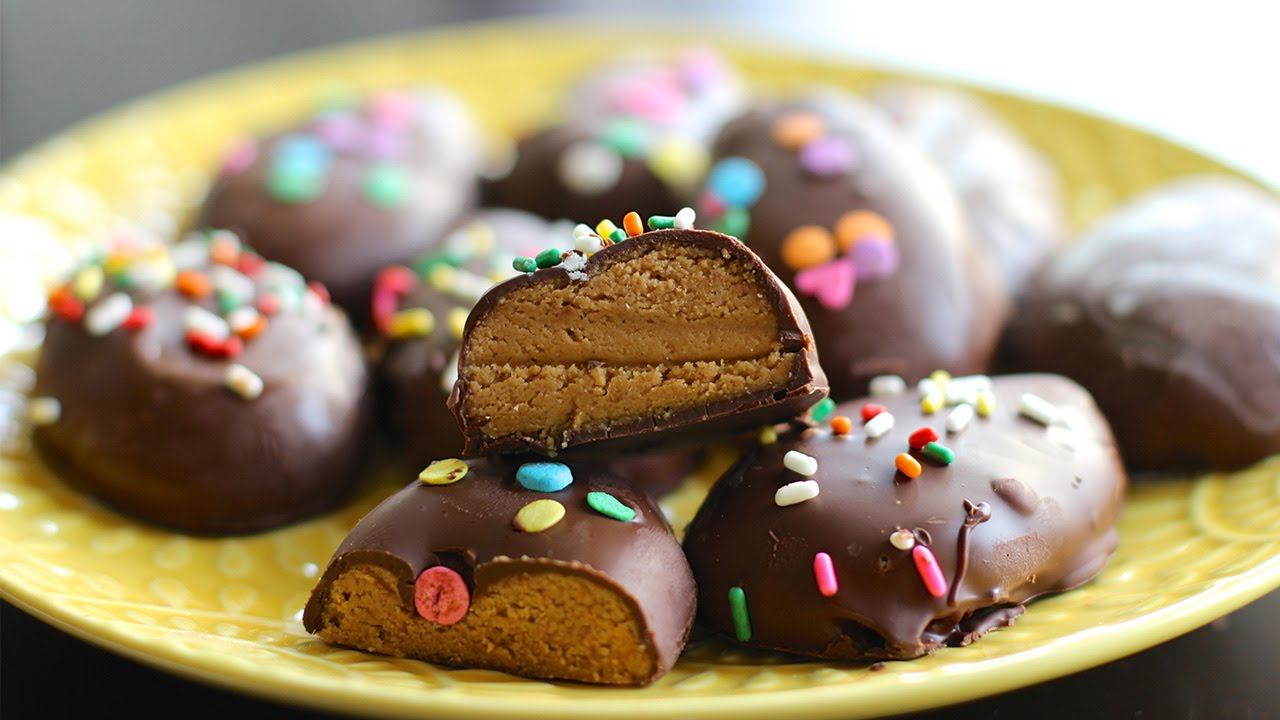
Optional: add sprinkles, crushed nuts, or sea salt before the chocolate sets.
Work quickly so the chocolate doesn’t start to harden mid-dip. If it does, give it a quick reheat.
Step 7: Setting and Storing
Once dipped, let the eggs sit at room temperature until the chocolate firms up, or pop them in the fridge for faster results.
Store in an airtight container in the fridge for up to 2 weeks, or freeze for up to 2 months. Layer them with wax paper if stacking.
Tips for Perfect Peanut Butter Eggs
Want that “wow” factor? Let’s talk strategy. Here are a few smart tips to elevate your peanut butter eggs from good to incredible:
1. Don’t Skip the Chill Time
Chilling the peanut butter mixture before shaping—and freezing it before dipping—is what keeps the eggs from turning into blobs. Trust the process.
2. Grease Your Hands
If the dough is sticking to your fingers, lightly grease your hands with butter or a tiny bit of oil. It makes shaping the eggs faster and way less messy.
3. Use a Fork for Dipping
A regular fork works great for dipping. Place the egg on the fork, dunk it, and gently tap the fork on the side of the bowl to remove excess chocolate. A toothpick works too, but can leave holes.
4. Thin Chocolate If Needed
If the chocolate gets too thick, stir in a bit of coconut oil or vegetable shortening. This keeps the coating silky smooth and glossy.
5. Decorate Before the Chocolate Sets
Want to add crushed nuts, sprinkles, or flaky sea salt? Do it right after dipping—before the chocolate hardens—so your toppings stick beautifully.
Creative Variations
Once you’ve nailed the classic peanut butter egg, don’t stop there. The real fun begins with customizing them to match your cravings or wow your guests.
1. Crunchy Peanut Butter Eggs
Swap in crunchy peanut butter or mix in crushed peanuts to the filling. It adds texture and a salty crunch that’s totally addictive.
2. White Chocolate Coating
Want something different? Dip your eggs in melted white chocolate or drizzle it over the dark chocolate coating for a zebra-striped look.
3. Cookie Dough Filling
Mix in mini chocolate chips or cookie crumbs into the peanut butter mixture to create a hybrid cookie-dough egg.
4. Coconut Joy
Add shredded coconut and a touch of almond extract for a tropical twist. Think of it as a cross between a peanut butter egg and a Mounds bar.
5. Colorful Easter Designs
Add colored candy melts to make pink, green, or pastel-dipped eggs for a festive Easter theme. Perfect for gifting!
Healthy Alternatives
Looking to make a lighter version? You totally can—without sacrificing flavor.
1. Use Natural Peanut Butter
Skip the sugar-loaded brands. Natural peanut butter has just peanuts and maybe a bit of salt—and gives you more control over sweetness.
2. Swap the Sugar
Try using powdered erythritol, monk fruit sweetener, or coconut sugar (blended into powder) instead of traditional powdered sugar.
3. Dark Chocolate or Dairy-Free Coating
Use high-quality dark chocolate (70% or higher) for antioxidants and a richer flavor. Or opt for vegan/dairy-free chocolate chips if needed.
4. Add Protein
Mix in a tablespoon or two of unflavored or vanilla protein powder. It boosts nutrition without changing the texture too much.
Healthy never tasted so good, right?
How to Store and Freeze Peanut Butter Eggs
Let’s make sure your hard work doesn’t go to waste. These eggs store really well.
Storing in the Fridge
- Keep eggs in an airtight container.
- Separate layers with wax paper.
- Good for up to 2 weeks.
Freezing Instructions
- Place eggs on a tray in the freezer until solid.
- Then transfer to a zip-top bag or airtight container.
- They’ll last up to 2 months.
To thaw, just pop them in the fridge overnight or let sit at room temp for about 30 minutes. Still delicious.
Peanut Butter Egg Gift Ideas
Want to turn your homemade peanut butter eggs into a sweet gift? Easy.
1. Wrap Individually
Use small candy wrappers or parchment paper squares. Twist the ends like candy for a retro look.
2. Add to Easter Baskets
Place a few eggs in cellophane bags tied with ribbons. They look adorable nestled among colored paper grass and tiny chocolate bunnies.
3. Use Decorative Tins or Jars
Layer your peanut butter eggs in a festive tin or mason jar for a charming presentation.
Add a tag with the ingredients or a fun message like “Egg-stra Special Treats!” and you’re all set.
Serving Suggestions
Sure, they’re perfect right out of the fridge—but why stop there?
- On a dessert platter at your next party
- As cupcake toppers for Easter-themed cupcakes
- Crumbled over ice cream for an epic sundae
- With a cup of coffee or hot cocoa as an afternoon pick-me-up
- As part of a DIY candy box with other homemade goodies
Basically, they go with everything. Just try not to eat the whole batch at once. (We won’t judge if you do.)
Common Mistakes and How to Avoid Them
Even simple recipes can go sideways. Here are a few mistakes to avoid:
1. Filling Too Soft
If your dough feels sticky and doesn’t hold shape, you need more powdered sugar. Add it gradually until it firms up.
2. Chocolate Seizes Up
If your chocolate gets grainy or lumpy, you may have overheated it. Always melt slowly—low power in the microwave or a double boiler.
3. Eggs Melting in Chocolate
Did your eggs start breaking apart during dipping? They probably weren’t frozen long enough. Give them a solid 30 minutes in the freezer.
4. Chocolate Won’t Stick
Dry eggs help the chocolate stick better. If they’re too oily, pat them lightly with a paper towel before dipping.
Avoid these missteps, and you’ll be golden (or chocolatey, in this case).
Nutritional Information (Per Egg)
Here’s an approximate breakdown based on a standard-size egg (about 1.5 oz):
| Nutrient | Amount |
|---|---|
| Calories | 180–220 |
| Total Fat | 12g |
| Saturated Fat | 5g |
| Carbohydrates | 18g |
| Sugars | 14g |
| Protein | 4g |
Note: This can vary based on ingredients and size, but it gives you a general idea.
FAQs about Peanut Butter Eggs Recipe
1. How long do peanut butter eggs last?
They last up to 2 weeks in the fridge or 2 months in the freezer when stored properly.
2. Can I use almond butter instead of peanut butter?
Absolutely! Almond, cashew, or sunflower seed butter all work well. Just keep an eye on texture—some are thinner and may need more powdered sugar.
3. Can I make them without chocolate?
Sure! You can roll the peanut butter filling in cocoa powder, powdered sugar, or drizzle with yogurt coating instead.
4. Are these gluten-free?
Yes, as long as all your ingredients (like chocolate and vanilla extract) are certified gluten-free.
5. Can I make them vegan?
Yep! Use plant-based butter and dairy-free chocolate. Many natural peanut butters are already vegan.
Conclusion
Homemade peanut butter eggs are way more than just a holiday treat—they’re a delicious project, a family tradition waiting to happen, and a sweet way to show someone you care. Whether you’re whipping them up for Easter, a birthday, or just because you’re craving something decadent, this recipe will become a go-to favorite.
So, get creative, get a little messy, and most importantly—enjoy every bite. Once you try these homemade gems, you may never go back to the store-bought kind again.
Happy chocolate-dipping!