Peanut Butter Dog Treats Recipe: There’s something heartwarming about baking for your furry friend, isn’t there? When you make homemade dog treats, you’re not just cooking—you’re showing love in the most delicious way possible. Store-bought dog treats might be convenient, but they often contain additives, artificial colors, or preservatives that aren’t the healthiest choice for your pet. Making them yourself ensures every ingredient that goes into your dog’s mouth is wholesome, natural, and tailored to their taste.
Plus, let’s be honest—watching your dog’s tail wag while they wait for those peanut butter goodies to come out of the oven is pure joy. Homemade treats can also save you money in the long run and give you complete control over portion sizes and nutrition levels. Dogs thrive on simple, nutritious ingredients, and peanut butter treats are the perfect combination of flavor and health.
Why Make Your Own Dog Treats?
You wouldn’t feed your child just anything, right? The same logic applies to your dog. Homemade dog treats are safer and more transparent—you know exactly what’s going in. No more guessing about hidden sugars, salts, or fillers. By making treats at home, you can adjust the recipe to your dog’s specific dietary needs or allergies. For example, if your dog has a wheat sensitivity, you can easily swap regular flour for oat or coconut flour.
Also, dogs love routine, and homemade treats give you the opportunity to create a consistent snack that fits seamlessly into their diet. Making your own treats is also a fantastic bonding activity—you can get creative with shapes and flavors, and your pup will appreciate the effort every single time. Trust me, once you start, you’ll never go back to those store-bought bags.
Health Benefits of Peanut Butter for Dogs
Peanut butter is often called a “super snack” for dogs—and for good reason. It’s loaded with healthy fats, protein, and vitamins that contribute to your dog’s overall health. Vitamin E supports a shiny coat, while niacin helps with energy and brain function. It’s also a great source of plant-based protein that keeps muscles strong and energy levels high.
However, not all peanut butter is created equal. Always make sure it’s xylitol-free, as xylitol is extremely toxic to dogs. Natural peanut butter with no added sugar, salt, or oils is the safest and healthiest option. When used in moderation, peanut butter makes an excellent reward during training sessions or as a special treat for being a good boy (or girl!).
Ingredients You’ll Need for Peanut Butter Dog Treats
The beauty of this recipe lies in its simplicity. You’ll only need a handful of wholesome ingredients that you likely already have at home. Here’s what you’ll need to whip up a batch of these tasty treats.
Ingredients List:
- 1 cup natural peanut butter (unsalted, xylitol-free)
- 1 ½ cups whole wheat flour (or oat flour for a gluten-free option)
- 1 egg (for binding and texture)
- ½ cup rolled oats
- ⅓ cup unsweetened applesauce or mashed banana
- ¼ cup water (adjust as needed for dough consistency)
Each ingredient serves a purpose. The peanut butter provides flavor and nutrition, the flour forms the structure, and the egg binds everything together. Applesauce adds a touch of natural sweetness and moisture, while oats contribute fiber for better digestion.
Choosing the Right Peanut Butter for Dogs
Before you grab that jar from your pantry, take a quick look at the ingredient label. Many commercial peanut butters contain xylitol, artificial sweeteners, or added salts—none of which are safe for your furry companion. Go for natural peanut butter with only peanuts (and maybe a touch of salt). Brands that say “unsweetened” or “no added sugar” are ideal.
If you want to go the extra mile, you can even make your own peanut butter by blending roasted peanuts in a food processor until smooth. It’s fresh, pure, and completely under your control. Just remember, moderation is key—even healthy fats can add up quickly in calories for smaller dogs.
Optional Add-ins for Extra Nutrition
Want to make your dog treats even more special? Consider these optional, healthy add-ins:
- Pumpkin puree: Great for digestion and adds a nice flavor.
- Carrot shreds: Adds crunch and vitamin A for eye health.
- Blueberries: Packed with antioxidants.
- Flaxseed: Boosts omega-3 fatty acids for a shiny coat.
Mix and match based on your dog’s preferences, but keep the total dough consistency similar. If it gets too sticky, just add a little more flour.
Kitchen Tools and Preparation Tips
Before you dive into baking, let’s make sure you’ve got all the right tools and setup ready to go. Preparation is key when it comes to making any recipe—especially one that involves a wagging tail impatiently waiting nearby! A well-prepared kitchen helps you work smoothly and ensures that your dog treats turn out perfectly every time.
Essential Baking Tools
Here’s a list of basic tools you’ll need for this recipe:
- Mixing bowl (medium to large size)
- Measuring cups and spoons
- Rolling pin
- Cookie cutters (bone-shaped, heart-shaped, or any fun design)
- Baking sheet or tray
- Parchment paper or silicone baking mat
- Cooling rack
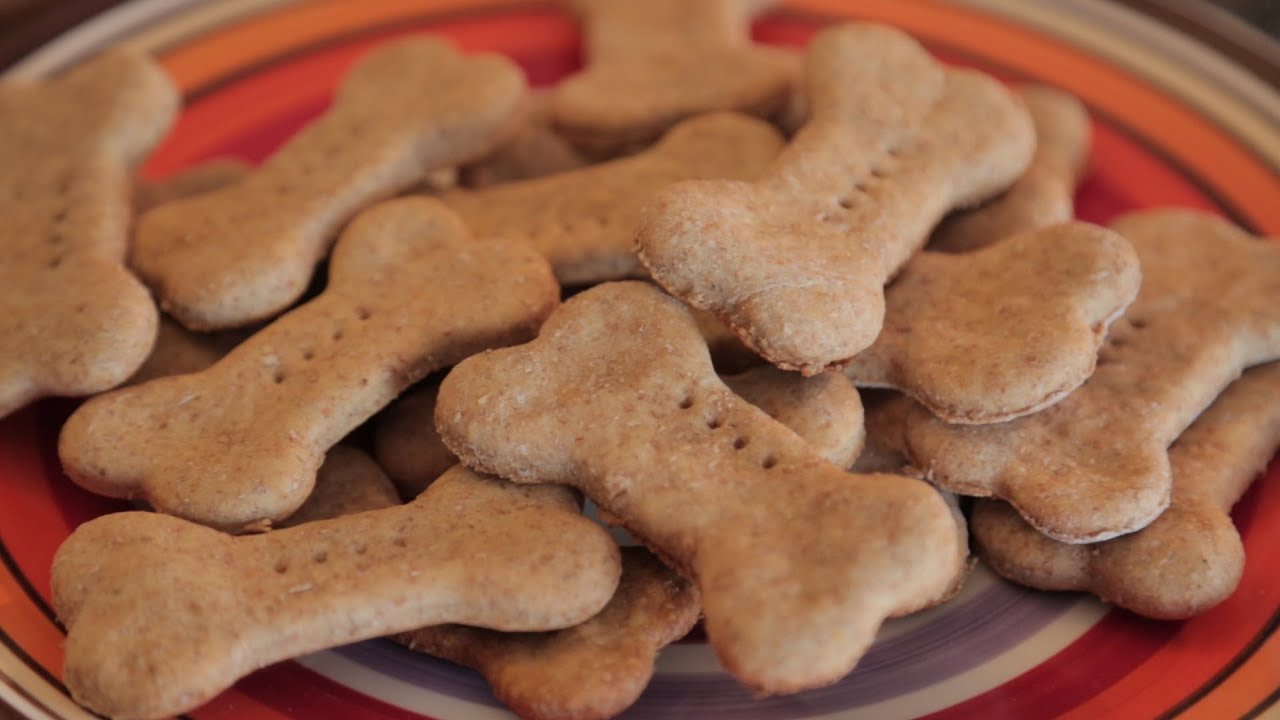
If you bake often, investing in a set of dog bone-shaped cookie cutters can add that adorable finishing touch to your homemade treats. Plus, it makes them look like the ones from fancy pet bakeries—without the hefty price tag.
Preparation Tips Before You Start Baking
- Preheat your oven to 350°F (175°C) before mixing the dough so it’s ready when you are.
- Line your baking sheet with parchment paper or a silicone mat to prevent sticking.
- Make sure all your ingredients are room temperature, especially the peanut butter and egg. This helps create a smooth, consistent dough.
- Have some extra flour on hand for dusting your work surface—it’ll help prevent sticking when rolling out the dough.
- Keep your dog out of the kitchen while baking! (Trust us, the peanut butter aroma is irresistible to them.)
Preparation makes all the difference between a messy kitchen and a smooth baking experience. Once everything is ready, it’s time to move to the fun part—making the dough!
Step-by-Step Guide to Making Peanut Butter Dog Treats
Now that you’ve got everything ready, let’s walk through each step carefully. This process is straightforward, but precision and patience make a big difference in the outcome.
Step 1: Gather and Measure Ingredients
Before you even start mixing, make sure you’ve accurately measured each ingredient. This ensures the right texture and consistency for your treats. Place all the ingredients on your counter in separate bowls. That way, you can easily add them one by one without missing anything.
Pro Tip: Use a kitchen scale if you have one—it’s more accurate than measuring cups, especially for flour.
Step 2: Mix the Dough
In a large mixing bowl, combine the peanut butter, egg, and applesauce (or mashed banana). Stir until the mixture becomes creamy and smooth. Gradually add the flour and oats while mixing. If the dough feels too dry, add a splash of water, one tablespoon at a time, until it forms a soft but firm consistency.
You’re aiming for a dough that’s easy to roll out but not sticky. You can use your hands to knead it for about 1–2 minutes once all the ingredients are combined. This helps bring everything together perfectly.
The smell alone will get your pup’s attention—you’ll probably notice them watching your every move from the kitchen doorway!
Step 3: Roll Out and Cut the Treats
Sprinkle some flour on your countertop or cutting board, then roll the dough out to about ¼ inch thick. Too thick, and they’ll stay soft in the middle; too thin, and they’ll bake too quickly. Use your cookie cutters to cut out fun shapes—bones, hearts, or even stars.
Place the cutouts gently on your prepared baking sheet, leaving about an inch between each one. Re-roll any leftover dough and cut out more treats until you’ve used it all up.
Step 4: Bake to Perfection
Place the tray in the preheated oven and bake for 18–22 minutes, depending on the size of your treats. They should be golden brown and firm to the touch when done. If you prefer crunchier treats (great for dental health), you can leave them in the oven for an additional 5 minutes with the heat turned off—just let them dry out completely.
The smell of peanut butter wafting through your home is enough to make your dog sit by the oven the entire time!
Step 5: Cool and Store Properly
Once baked, transfer the treats to a cooling rack and let them cool completely. This step is crucial because hot treats can trap moisture, leading to mold if stored too soon. Once they’re cool, store them in an airtight container.
If you want them to stay fresh for longer, keep them in the fridge. They’ll last up to two weeks in the refrigerator or three months in the freezer. Just thaw a few at a time as needed—your dog will be none the wiser!
Storage Tips and Shelf Life
After all that baking love, you’ll want to make sure your hard work lasts as long as possible. Proper storage ensures your treats remain safe, crunchy, and tasty for your pup.
How to Store Peanut Butter Dog Treats
Once your dog treats have cooled completely, transfer them to an airtight container. Mason jars, metal tins, or glass containers with tight lids work perfectly. Store them in a cool, dry place, away from direct sunlight or humidity.
If you live in a warmer climate, the peanut butter may soften, so it’s best to refrigerate them to maintain their freshness and texture. When refrigerated, they can last for up to two weeks without losing flavor or crunch.
Freezing Options for Longer Freshness
Want to extend their shelf life even further? Freeze them! Place the treats in a zip-lock freezer bag or freezer-safe container, and they’ll stay good for up to three months. To serve, just remove a few and let them thaw at room temperature for about 15 minutes.
Freezing not only helps preserve the treats but also keeps them from spoiling—especially if you’ve made a big batch. It’s also a great idea for busy dog parents who want to have ready-to-serve snacks on hand.
Common Mistakes to Avoid
Even though this recipe is simple, a few small mistakes can affect your final results. Here’s what you should watch out for:
Overbaking or Undermixing
Overbaking can make the treats rock-hard, while undermixing can leave clumps of flour or uneven textures. Mix until the dough is smooth and consistent, and keep an eye on your oven during baking. Remember, every oven runs slightly differently—so check a few minutes before the suggested time.
Using Unsafe Ingredients
Always double-check labels. Avoid any ingredients that contain xylitol, chocolate, raisins, or artificial sweeteners—they are toxic to dogs. Even small amounts can cause harm. Stick to all-natural, simple ingredients that you’d feel safe eating yourself.
Customizing Your Dog Treat Recipe
One of the best parts about making homemade dog treats is how flexible the recipe can be. Once you’ve mastered the basic peanut butter version, you can start experimenting with different ingredients to keep things fun and nutritious for your furry friend. Dogs, like humans, appreciate a little variety in their snacks. Let’s explore a few tasty customizations you can try.
Adding Fruits and Veggies
Dogs can safely enjoy a variety of fruits and vegetables, and they make excellent additions to these peanut butter treats. Adding small amounts of these natural goodies can boost vitamins, minerals, and fiber in every bite.
Here are some great options:
- Pumpkin puree: Excellent for digestion and gut health. Replace half of the applesauce or banana in the base recipe with pumpkin for a rich, fall-inspired flavor.
- Shredded carrots: Adds a sweet crunch and is packed with vitamin A for healthy eyesight.
- Blueberries: A handful of fresh or frozen blueberries provides antioxidants that strengthen the immune system.
- Sweet potato: Cooked and mashed sweet potatoes add fiber and a lovely orange color.
- Spinach or kale (finely chopped): For dogs who don’t mind a green treat, this adds a powerful nutrient boost.
When adding new ingredients, make sure to maintain the dough’s consistency. If the mixture becomes too wet, sprinkle in extra flour until it firms up again.
Grain-Free Options for Sensitive Dogs
If your dog has a sensitive stomach or allergies to wheat, you can easily adapt this recipe to be grain-free. Replace the whole wheat flour with one of the following:
- Oat flour: A gentle, easily digestible option for most dogs.
- Coconut flour: Naturally gluten-free and adds a light sweetness, but you’ll need to add a bit more water since it absorbs a lot of moisture.
- Almond flour: Packed with protein and fiber, though best in moderation since it’s calorie-dense.
Always introduce new flours or add-ins gradually and observe how your dog reacts. Just like humans, some dogs need time to adjust to dietary changes.
Flavor Twists to Keep Things Interesting
Want to surprise your dog with new flavors? Here are some simple tweaks:
- Peanut butter & pumpkin: A fall favorite that smells amazing while baking.
- Banana & peanut butter: Soft and naturally sweet—perfect for smaller dogs.
- Apple cinnamon: Add a pinch of cinnamon and some finely chopped apple (without seeds!) for a cozy aroma your dog will love.
Just remember: moderation is key. Keep the core recipe healthy and avoid adding sugar, salt, or any spices not safe for dogs.
Nutritional Value of Peanut Butter Dog Treats
While it’s tempting to give your pup as many treats as their adorable face demands, balance is crucial. Let’s break down the nutritional value of these homemade peanut butter treats so you can feel confident about what you’re feeding them.
Protein, Fiber, and Healthy Fats Explained
Peanut butter is the main powerhouse in this recipe—it’s full of protein, which helps build and repair muscles. It also contains healthy monounsaturated fats that support skin and coat health. The oats add fiber, which helps with digestion and keeps your dog’s tummy happy.
The egg adds even more protein and essential nutrients like vitamin D and B12, while applesauce or banana brings in natural sugars and antioxidants. Combined, these ingredients form a wholesome, balanced treat your dog can enjoy without guilt (yours or theirs!).
Here’s a rough nutritional estimate per medium-sized treat:
| Nutrient | Approximate Amount | Benefit |
|---|---|---|
| Protein | 2–3g | Builds muscle and supports energy |
| Fat | 3–4g | Promotes shiny coat and healthy skin |
| Fiber | 1g | Aids digestion |
| Calories | 35–45 kcal | Perfect for a training reward |
These values can vary depending on the size of the treat and specific ingredients used, but overall, they make for a nutrient-dense snack.
How to Control Portion Sizes
Even though these treats are healthy, too many can add unnecessary calories to your dog’s diet. As a rule of thumb:
- Small dogs: 1–2 small treats per day.
- Medium dogs: 2–3 treats per day.
- Large dogs: 3–4 treats per day.
If your dog is overweight or on a specific diet, consider making mini-sized treats using smaller cookie cutters. That way, you can still reward them without going overboard.
You can also use these treats as training rewards—just break them into smaller pieces. Your dog will still get all the flavor and excitement but with fewer calories.
Fun Ways to Present the Treats
These homemade peanut butter dog treats don’t just taste good—they can look adorable too! Presentation adds an extra touch of love, especially if you’re gifting them to fellow dog parents or celebrating a special occasion like your pup’s birthday.
Gift Ideas for Dog Lovers
If you’re the crafty type, these treats make perfect gifts. Package them in small mason jars, tie them with a cute ribbon, and add a personalized tag with your dog’s name and the recipe. You can even include a “Made with Love” label for that professional touch.
For holidays, use themed cookie cutters—like hearts for Valentine’s Day or bones for Christmas—and decorate your packaging accordingly. Your dog-loving friends will appreciate the thoughtful, homemade gesture.
Storing in Cute Containers or Jars
For everyday storage, go for decorative airtight containers. Glass jars not only keep your treats fresh but also look lovely sitting on your counter. Label the jars with the flavor and date baked so you always know when it’s time for a new batch.
If you’re hosting a dog birthday party (yes, that’s a thing!), consider setting up a “treat bar” with various flavors and shapes. It’s a fun way for all the furry guests to enjoy something special.
FAQs about Peanut Butter Dog Treats Recipe
1. What kind of peanut butter is safe for dogs?
Always choose natural peanut butter that is xylitol-free and unsweetened. Xylitol is toxic to dogs, so double-check the label before using any brand.
2. How long do these treats last?
Stored in an airtight container, they’ll last up to two weeks at room temperature or three months in the freezer.
3. Can I substitute peanut butter with something else?
Yes! You can use pumpkin puree, almond butter, or mashed banana as substitutes, depending on your dog’s preferences or allergies.
4. How often should I give my dog these treats?
Moderation is key. Treats should make up no more than 10% of your dog’s daily caloric intake. Use them mainly as rewards or snacks.
5. Are these treats suitable for puppies?
Yes, as long as your puppy is at least 8–10 weeks old and doesn’t have food sensitivities. Opt for smaller, softer treats for younger pups.
Conclusion
Homemade treats give you peace of mind, knowing exactly what goes into your pup’s diet. You can customize them to suit allergies, preferences, and even special occasions. Plus, they’re budget-friendly and easy to store for weeks.
So, the next time your furry friend deserves a reward, skip the store-bought options and make a batch of these peanut butter dog treats right in your kitchen. It’s a small gesture that strengthens your bond—and fills your home with delicious smells and happy paws.