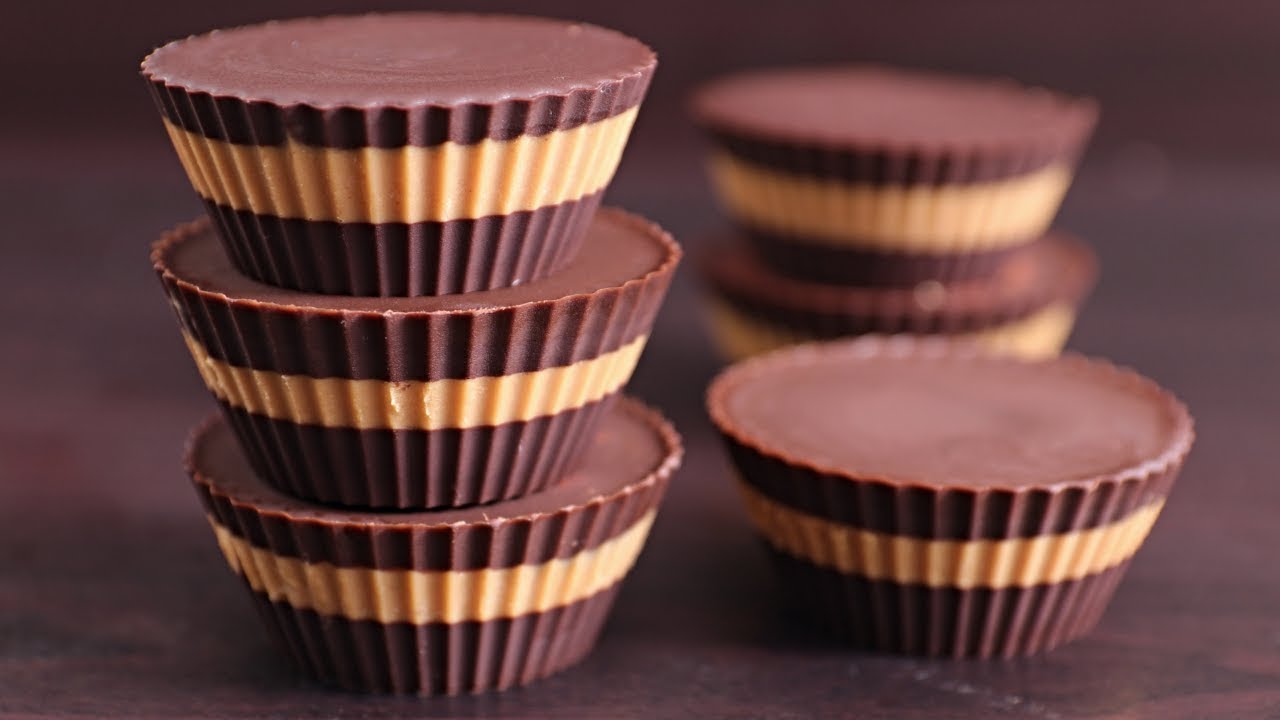
Peanut Butter Cups Recipe: You know that feeling when your sweet tooth kicks in, but you also want something a little salty? That’s where peanut butter cups come in—comforting, delicious, and downright addictive. It’s no surprise that peanut butter cups are a fan-favorite treat around the world. They deliver the perfect harmony between the rich, velvety texture of chocolate and the smooth, nutty creaminess of peanut butter. They’re more than candy—they’re a nostalgic, crave-worthy bite of happiness.
Whether you’re a die-hard Reese’s lover or someone who likes to put a personal spin on things, making peanut butter cups at home brings that joy right into your kitchen. It’s cheaper, fresher, and you get full control over ingredients. Want it sweeter? Done. Need it vegan? Easy. Add some crunch or a pinch of sea salt? Yes, please.
But the best part? They’re super simple to make. With a few basic ingredients and about 30 minutes of your time, you can whip up a batch that tastes even better than store-bought. So, let’s dive into the details!
List of Ingredients You’ll Need
Making peanut butter cups at home doesn’t require any exotic ingredients. In fact, you probably have most of them sitting in your pantry right now. Here’s a detailed list to get started:
Basic Ingredients
- Chocolate chips or chocolate bars (semi-sweet, dark, or milk chocolate)
- Peanut butter (creamy or crunchy—your choice)
- Powdered sugar (for sweetening the peanut butter filling)
- Butter (unsalted, to help blend the filling)
Optional Add-Ins for Custom Flavors
- Sea salt flakes (for topping or mixing)
- Vanilla extract (for depth of flavor)
- Honey or maple syrup (natural sweetener alternatives)
- Crushed nuts or pretzels (for texture)
- Coconut oil (to smooth out melted chocolate and create a glossy finish)
Tools & Equipment
- Silicone or paper cupcake liners
- Muffin tray or silicone molds
- Double boiler or microwave-safe bowl
- Mixing bowls and spoons
- Rubber spatula
Keep in mind: High-quality ingredients lead to high-quality peanut butter cups. Don’t skimp on the chocolate—it’s half the experience!
Choosing the Right Ingredients
Let’s talk about the ingredients that really shape your peanut butter cup experience.
Best Chocolate Types
You can’t go wrong with semi-sweet chocolate chips—they melt beautifully and strike a good balance between bitter and sweet. If you’re a dark chocolate lover, use 60-70% cacao bars for that intense cocoa flavor. Prefer something more mellow? Milk chocolate brings a creamy sweetness that softens the peanut butter’s boldness.
Go for high-quality chocolate like Ghirardelli, Lindt, or a local gourmet brand. Cheap chocolate may harden poorly or taste waxy.
Picking the Perfect Peanut Butter
Natural or commercial? Both work, but they perform differently. Natural peanut butter (just peanuts and salt) offers a more intense nut flavor, while processed versions like Jif or Skippy are creamier and more consistent. For texture lovers, crunchy peanut butter adds a satisfying bite.
Avoid peanut butter that’s too runny—it may not set properly inside the cups. Stick to thicker textures for the best results.
Sweeteners and Substitutes
Powdered sugar is commonly used because it blends smoothly into the peanut butter. Want something healthier? Try maple syrup, honey, or coconut sugar. Keep in mind that liquid sweeteners can change the filling’s texture, so adjust your measurements carefully.
You can also add a dash of vanilla extract or a pinch of sea salt to enhance the flavor layers.
Step-by-Step Guide to Make Peanut Butter Cups
Now that we’ve covered the ingredients, it’s time to roll up those sleeves and make some magic. Here’s a foolproof, step-by-step guide to creating the creamiest, richest peanut butter cups right in your kitchen.
Step 1: Gather Your Tools & Ingredients
Start by assembling everything you need: chocolate (milk, dark, or semi-sweet), creamy peanut butter, powdered sugar, butter, and a pinch of salt. You’ll also need a muffin tin, paper liners, and a heatproof bowl for melting the chocolate.
Step 2: Prepare the Cup Liners
Line a muffin tin with paper cupcake liners. For traditional-sized peanut butter cups, use a standard tin; for bite-sized treats, use a mini tin. Straighten the liners so the chocolate coats them evenly.
Step 3: Melt the Chocolate Properly
Melt your chocolate using a double boiler or microwave in short intervals, stirring between each one. Heat only until smooth—overheating will cause the chocolate to seize or lose its shine.
Step 4: Pour First Layer of Chocolate
Spoon a small amount of melted chocolate into each liner, just enough to cover the bottom. Tilt or tap the tin gently so the chocolate spreads evenly. Place the tin in the freezer for 5–10 minutes to firm up.
Step 5: Mix and Spoon in the Peanut Butter Filling
Combine peanut butter, softened butter, powdered sugar, and a pinch of salt to create a creamy filling. Scoop a small dollop into the center of each chilled chocolate cup, flattening it slightly while keeping space around the edges.
Step 6: Seal with Top Layer of Chocolate
Pour more melted chocolate over each peanut butter mound, ensuring the filling is fully covered. Tap the tin again to smooth the tops.
Step 7: Chill Until Set
Refrigerate or freeze the peanut butter cups for 20–30 minutes until firm. Peel off the liners and enjoy your homemade chocolate-peanut butter treats!
Tips for Perfect Peanut Butter Cups Every Time
Getting your peanut butter cups just right isn’t hard, but these tips can elevate them from good to next-level amazing.
- Use room-temperature peanut butter to help it mix more easily with sugar and butter.
- Don’t overheat your chocolate—it can seize or become gritty. Low and slow is the name of the game.
- Double-layered liners can help create a more polished edge and make removal easier.
- If your peanut butter filling is too soft, add a bit more powdered sugar until it firms up.
- To keep layers clean and distinct, chill each layer fully before adding the next.
Little tweaks like these make a big difference!
Variations to Try
Want to put your own twist on the classic? There are tons of fun and tasty ways to switch things up:
Vegan Peanut Butter Cups
- Use dairy-free chocolate chips (like Enjoy Life).
- Substitute vegan butter or coconut oil.
- Double-check that your peanut butter has no added dairy.
Crunchy Peanut Butter Cups
- Use chunky peanut butter for added texture.
- Mix in chopped roasted peanuts to the filling for extra crunch.
Dark Chocolate vs. Milk Chocolate
- Go dark (70% cacao or more) for a bold, bittersweet flavor.
- Use milk chocolate if you’re after a creamier, sweeter treat.
Low-Carb or Keto Versions
- Use sugar-free chocolate like Lily’s or ChocZero.
- Replace powdered sugar with erythritol or monk fruit sweetener.
- Use almond butter or sunflower seed butter for lower-carb options.
Storage Tips
Homemade peanut butter cups store well if done right. Here’s how to keep them fresh and delicious:
- Refrigerator: Store in an airtight container for up to 2 weeks.
- Freezer: Place in a freezer-safe bag or container and store for up to 3 months. Just thaw in the fridge before eating.
Avoid storing them at room temperature unless your kitchen is cool. Chocolate melts quickly and loses its snap.
Serving Suggestions
Peanut butter cups are perfect on their own, but you can dress them up a bit:
- Pair with coffee or hot cocoa for a cozy snack.
- Chop them up and sprinkle over ice cream or brownies.
- Serve them on a dessert tray during holidays or parties.
- Gift-wrap a few in clear bags tied with ribbon for a thoughtful homemade gift.
Healthier Alternatives
Craving peanut butter cups but watching your sugar intake or calories? No worries—there are several ways to make your treats healthier without sacrificing flavor.
Swap Ingredients for Guilt-Free Treats
- Natural peanut butter (just peanuts and salt) is a great alternative to processed varieties. It’s lower in sugar and higher in healthy fats.
- Replace butter with coconut oil to keep things dairy-free and lighter.
- Use dark chocolate with at least 70% cacao for a richer taste and less sugar.
- Instead of powdered sugar, try monk fruit sweetener, stevia, or erythritol—all low-carb, low-glycemic options.
Portion Control Tips
- Use mini muffin tins for bite-sized cups. You’ll satisfy your sweet tooth without going overboard.
- Store extras in the freezer to avoid easy access and binge temptation. Out of sight, out of mind!
- Limit the filling by using a teaspoon instead of a tablespoon. The ratio of chocolate to peanut butter still hits all the right notes.
Healthy peanut butter cups are not only possible—they’re delicious. With a few smart swaps, you can enjoy them completely guilt-free.
Why Homemade Is Better Than Store-Bought
Sure, you can grab a pack of peanut butter cups at any grocery store. But once you try the homemade version, there’s really no going back. Here’s why:
Ingredient Control
When you make peanut butter cups at home, you know exactly what’s going in. No preservatives, no high-fructose corn syrup, no artificial flavors. Just pure, quality ingredients. Want them gluten-free, dairy-free, or nut-free? You’re in charge.
Cost Comparison
Buying gourmet chocolate treats can be pricey. Making your own is way more cost-effective. You’ll get a big batch for a fraction of the cost of store-bought artisanal versions—and they’ll taste just as good, if not better.
Freshness & Taste Factor
Homemade peanut butter cups taste fresh, rich, and melt-in-your-mouth delicious. Store-bought ones have been sitting on shelves for who knows how long. When you make them at home, they’re always at their peak.
Plus, making them is fun. It’s a mini kitchen project with a big, tasty payoff.
Frequently Made Mistakes and How to Avoid Them
Even with a simple recipe like this, a few small missteps can make a big difference in the final product. Here’s what to look out for—and how to fix it.
Mistake 1: Chocolate is Too Thick or Grainy
This usually happens when chocolate is overheated. Always melt your chocolate slowly and gently—whether you’re using the microwave or a double boiler.
Fix: Add a small amount of coconut oil to help thin and smooth out the texture.
Mistake 2: Peanut Butter Filling is Too Runny
Runny filling can make it impossible to layer properly. This often happens with natural peanut butters that separate.
Fix: Mix the peanut butter well and add more powdered sugar or a tablespoon of oat flour to help it firm up.
Mistake 3: Peanut Butter Layer Sinks to the Bottom
If the bottom layer of chocolate isn’t fully set before adding the filling, it can sink.
Fix: Be patient. Chill the bottom layer completely before adding anything on top.
Mistake 4: Uneven Layers
Eyeballing your chocolate and filling layers can lead to inconsistent cups.
Fix: Use a measuring spoon or small cookie scoop for each layer to keep things even.
Making Peanut Butter Cups with Kids
Looking for a fun, easy activity with the kiddos? This recipe is perfect.
Kid-Friendly Steps
- Let them scoop and pour chocolate into the liners.
- They’ll love rolling the peanut butter filling into little balls.
- Topping each cup with sprinkles or mini candies is a fun way to decorate.
Mess-Free Tips
- Use a baking mat or tray liner under your muffin tin to catch spills.
- Portion chocolate into small bowls to avoid sticky fingers in the main bowl.
- Keep paper towels and wet wipes nearby—this one gets sticky (but that’s part of the fun!).
Peanut butter cups make an awesome family-friendly dessert project, and even picky eaters will want to help.
Scaling Up for Parties or Gifts
Homemade peanut butter cups are the ultimate crowd-pleaser—and they make adorable edible gifts.
How to Scale the Recipe
- Just double or triple all ingredients—no fancy math needed.
- Use multiple muffin tins or make them in batches to keep things manageable.
- If you’re really going big, switch to mini muffin tins to make more in less time.
Creative Wrapping Ideas
- Wrap each cup in foil candy wrappers for a professional look.
- Place a few in a cellophane bag tied with ribbon for gifting.
- Add a homemade tag or label with ingredients if you’re sharing with friends.
They’re perfect for birthdays, holidays, or just showing someone you care.
Decorating Your Peanut Butter Cups
Want to take your cups to the next level? Don’t stop at just chocolate and peanut butter.
Easy Decorating Ideas
- Chocolate drizzle: Melt white or dark chocolate and drizzle over the tops for a bakery-style look.
- Crushed toppings: Sprinkle sea salt, toasted coconut, graham cracker crumbs, or crushed Oreos.
- Fun shapes: Use silicone molds shaped like hearts, stars, or flowers.
Holiday Themes
- Add red and green sprinkles for Christmas.
- Use pastel colors for Easter or baby showers.
- Try orange and black drizzle for Halloween.
Decorating turns a simple treat into something special, and it’s a great way to get creative.
FAQs about Peanut Butter Cups Recipe
1. Can I use almond butter instead of peanut butter?
Absolutely! Almond butter works just as well and gives a slightly different nutty flavor. You can also try cashew or sunflower seed butter for variety.
2. Can I make these without chocolate?
Technically yes—you could use a carob or yogurt coating—but they won’t be the same. Chocolate is kind of the star of the show here.
3. How long do homemade peanut butter cups last?
Stored in the fridge, they last up to 2 weeks. In the freezer, they’ll stay fresh for about 3 months.
4. Can I freeze peanut butter cups?
Yes! Just store them in an airtight, freezer-safe container. Let them thaw in the fridge before eating for best texture.
5. What if I don’t have cupcake liners?
You can use a silicone muffin pan without liners or try making them in ice cube trays for smaller bites. Just be sure to grease the mold for easy release.
Conclusion
There you have it—your complete, foolproof guide to making the most irresistible homemade peanut butter cups from scratch. Whether you’re a chocolate lover, a peanut butter fanatic, or just someone who loves a sweet project, this recipe checks all the boxes. It’s simple, customizable, budget-friendly, and absolutely delicious.
Once you make your first batch, don’t be surprised if you never go back to store-bought. So grab your chocolate, scoop that peanut butter, and start creating. Your taste buds (and everyone you share with) will thank you.