Peach Preserves Recipe: There’s something deeply nostalgic and comforting about opening a jar of homemade peach preserves. Not only do they bring back the warm memories of late summer afternoons and fresh fruit harvests, but making your own preserves is surprisingly simple and incredibly satisfying. Unlike store-bought versions, homemade peach preserves don’t contain preservatives, additives, or artificial sweeteners. You get complete control over the sugar content, texture, and flavor profile, making it healthier and more personalized. Whether you’re a beginner or an experienced home cook, learning how to make your own peach preserves is a rewarding kitchen project that pays off all year round.
The Taste of Summer in a Jar
Every spoonful of peach preserves is like taking a bite out of the juiciest, ripest peach in the middle of July. The sweet-tart flavor is rich and comforting, with a beautiful golden hue that brightens any breakfast spread. With just a handful of ingredients—peaches, sugar, lemon juice, and sometimes pectin—you can bottle up the sunshine and savor it throughout the colder months. These preserves are versatile too: perfect for slathering on toast, topping ice cream, or incorporating into your favorite baking recipes.
Ingredients You’ll Need
Freshness Matters – Picking the Right Peaches
The foundation of great peach preserves starts with the fruit itself. Always choose ripe, fragrant peaches that are slightly soft to the touch but not mushy. Look for ones that are free of bruises or blemishes. Freestone peaches are ideal because the pit is easier to remove, which makes preparation smoother. Yellow peaches are generally preferred for their balance of sweetness and tartness. If you can source organic or locally grown peaches, even better—they’re often more flavorful and haven’t been treated with wax or pesticides.
Sweeteners and Acidity – Balancing the Flavors
To bring out the natural sweetness of the peaches, you’ll need granulated sugar. The amount of sugar not only enhances flavor but also helps with the preservation process by inhibiting bacterial growth. If you’re looking to reduce sugar, low-sugar or sugar-free pectin is available to help your preserves set properly. Don’t skip the lemon juice—it’s not just for flavor; it adds the necessary acidity to ensure your preserves are safe to store and help the mixture gel naturally. Bottled lemon juice is fine here because it has a standardized pH.
Essential Equipment for Peach Preserving
The Must-Have Tools
Making peach preserves doesn’t require fancy equipment, but having the right tools will make the process smoother and safer. Here’s what you’ll need:
- A large, heavy-bottomed pot (for boiling the preserves)
- Wooden spoon or heat-proof spatula (for stirring)
- Ladle (for transferring preserves into jars)
- Canning jars with new lids and bands
- Jar lifter or tongs (to handle hot jars)
- Canning funnel (to fill jars without mess)
- A water bath canner or a large stockpot with a rack (for sealing the jars)
Having these tools on hand not only ensures that your preserves turn out great but also makes the experience less stressful.
Optional but Helpful Gadgets
If you plan to make preserves regularly, consider investing in a digital thermometer to check the gelling point (around 220°F), or a food processor to speed up chopping. A peeler or blanching basket makes skinning peaches a breeze, and a bubble remover/headspace tool helps ensure a perfect seal.
Preparing Your Peaches
How to Peel Peaches Easily
Peeling peaches might seem tedious, but with the blanching method, it becomes a breeze. Here’s how:
- Bring a large pot of water to a boil.
- Score a small “X” at the bottom of each peach.
- Gently lower peaches into the boiling water for 30–60 seconds.
- Transfer immediately into an ice water bath.
- Once cooled, the skins will slip right off.
This method keeps the fruit intact and removes only the skin, preserving maximum flavor and texture.
Cutting and Removing the Pits
Once peeled, cut the peaches in half and twist to separate. Remove the pit (a spoon can help if it’s stubborn), then slice or dice the flesh depending on your desired preserve texture. Some prefer chunky preserves, while others like a smoother consistency. Either way, make sure all the pits and tough center fibers are completely removed.
Making the Preserve Base
Combining Ingredients and Simmering
Now that your peaches are peeled, pitted, and chopped, it’s time to bring everything together in a pot of golden goodness. In a large heavy-bottomed pot, combine the prepared peaches with granulated sugar and lemon juice. If you’re using pectin, follow the package instructions, as the timing for adding it can vary. Stir the mixture well and let it sit for about 15–30 minutes. This resting period allows the sugar to draw out the peach juices, creating a syrupy base.
Turn the heat to medium-high and bring the mixture to a gentle boil. Stir constantly to prevent sticking and burning. As the mixture boils, it will begin to thicken. The goal here is to cook off the excess moisture while encouraging the natural pectin in the fruit (or added pectin) to create a spreadable texture. This step usually takes about 25–45 minutes depending on the quantity and moisture content of your peaches.
Getting the Consistency Just Right
Testing for the perfect preserve consistency is key. You don’t want it too runny or too thick—it should be spoonable and gel just enough to spread. There are a few simple ways to check:
- Freezer plate method: Place a small plate in the freezer for a few minutes. Drop a spoonful of the hot preserves onto the cold plate and wait a minute. Run your finger through it—if it wrinkles and holds the shape, it’s ready.
- Thermometer method: Use a candy or digital thermometer to check when the mixture reaches 220°F, the gelling point for high-sugar preserves.
- Spoon test: Scoop a bit with a spoon and let it fall back into the pot. If it drips slowly in thick drops instead of running off like water, you’re good to go.
Adjust the cooking time if needed. And don’t forget to skim off any foam that forms on top—this keeps your preserves looking clear and beautiful.
Sterilizing and Preparing Jars
Why Sterilization Matters
Sterilizing your jars isn’t just a suggestion—it’s a crucial step to ensure your preserves stay safe and shelf-stable. Even a tiny bit of bacteria or mold can spoil an entire batch. Luckily, sterilizing jars is simple:
- Wash jars, lids, and bands in hot soapy water.
- Place jars in a large pot, cover them with water, and bring to a boil.
- Boil for 10 minutes, then keep them hot until you’re ready to fill them.
Alternatively, you can run jars through a dishwasher cycle on high heat and leave them warm until use. The key is to never pour hot preserves into cold jars or vice versa, as this can cause glass to crack.
Proper Jar Sealing Techniques
Once your jars are sterilized and your preserves are cooked, it’s time to fill and seal. Use a canning funnel to pour the hot preserves into each jar, leaving about 1/4 inch of headspace. This small gap allows room for expansion and proper sealing.
Before placing the lids, run a clean damp cloth around the jar rims to remove any stickiness or residue that might prevent a proper seal. Center the lids and screw on the bands until they’re fingertip tight—not overly tight, but snug.
Now the magic happens: place the filled jars in a boiling water bath, making sure they’re fully submerged. Process for 10–15 minutes depending on altitude and jar size. This final boiling step ensures a vacuum seal, which locks in freshness and prevents contamination.
Filling and Sealing the Jars
Avoiding Air Bubbles
Air bubbles can cause all sorts of problems—from improper sealing to early spoilage. To eliminate them, gently run a bubble remover or a small spatula along the inside of the filled jar. This releases trapped air and allows the preserves to settle properly. If the headspace changes after removing bubbles, top up the jar accordingly.
Tightly Sealing for Longevity
Once air bubbles are out and headspace is correct, it’s time to seal. Place the lid on and tighten the screw band with just your fingertips. Don’t over-tighten; the vacuum seal created during the water bath needs some flexibility. Over-tightening can prevent air from escaping properly, leading to a weak seal or even cracked jars.
After processing the jars in the boiling water bath and removing them, let them cool undisturbed for 12 to 24 hours. Don’t press the lids or tilt the jars while they’re cooling. You’ll hear that satisfying “pop” as each lid seals. Once cool, press the center of each lid—if it doesn’t flex or make a clicking sound, it’s sealed.
Cooling and Storing Peach Preserves
Ideal Storage Conditions
After your jars of peach preserves have cooled completely and passed the seal check, they’re ready to be labeled and stored. Use a permanent marker or label to jot down the date and contents on each jar—trust me, after a few months you might not remember which batch was which. Store your jars in a cool, dark, and dry place like a pantry, cellar, or cabinet away from direct sunlight or heat sources.
Homemade peach preserves can last up to a year if stored properly. Always use the oldest batch first to rotate your stock. Once opened, a jar should be refrigerated and consumed within 3–4 weeks.
Shelf Life of Homemade Preserves
Properly sealed and stored peach preserves have a fantastic shelf life—typically 12 months or more. However, always inspect each jar before use. Look for signs of spoilage such as:
- A broken seal or lid that pops up and down when pressed
- Mold growth on the surface
- Off smells or bubbling
If you notice any of these, discard the jar immediately. While rare, spoilage can happen and it’s better to be safe than sorry. But if stored correctly and sealed well, your preserves will retain their color, flavor, and texture for many months.
Serving Suggestions
Breakfast Ideas
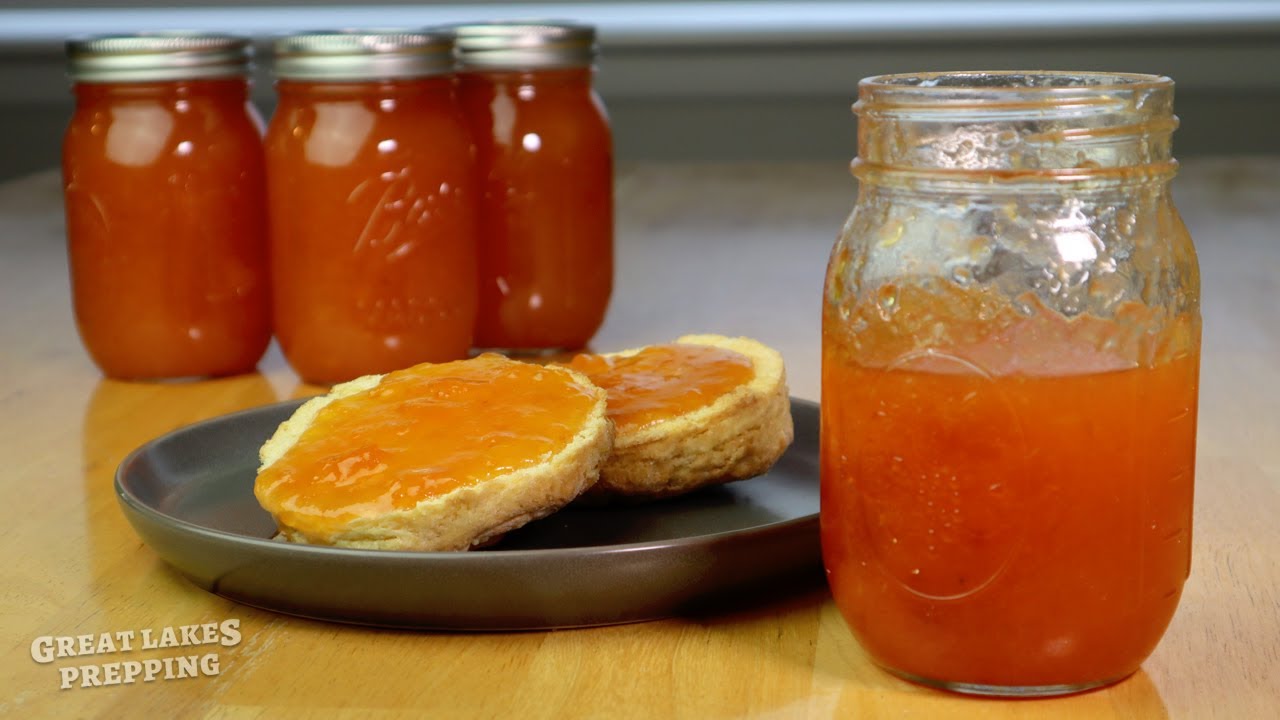
There are few things as delightful as spreading peach preserves on a warm, buttery biscuit or a slice of toast. It’s a morning upgrade that brings sunshine to your breakfast table. But the magic doesn’t stop there—try mixing a spoonful into your yogurt or oatmeal for a fruity twist. You can even swirl it into pancake or waffle batter for a sweet surprise.
If you’re a fan of cheese boards, peach preserves pair beautifully with soft cheeses like brie or goat cheese. The sweet-tart flavor contrasts perfectly with salty and creamy textures, making it a go-to addition for brunch spreads and picnics.
Peach Preserves in Baking
Peach preserves aren’t just for breakfast—they shine in baking too. Use them as a filling for thumbprint cookies, layer them between cakes, or fold them into muffin batter. One of the easiest ways to use them is in a rustic peach tart—just spread preserves over puff pastry, top with sliced fresh peaches, and bake.
They also make a stunning glaze for meats like pork chops or chicken. Just warm up a few spoonfuls with a bit of vinegar or mustard and brush it on during the last few minutes of grilling. It’s an effortless way to add gourmet flair to dinner.
Troubleshooting Common Issues
Preserve Too Runny or Too Thick
Getting the texture just right can be tricky, especially if it’s your first batch. If your preserves turned out too runny, it likely didn’t cook long enough to reach the gelling point. Don’t worry—it’s an easy fix. You can pour the preserves back into a pot and reheat them, this time monitoring the temperature and doing a gel test before sealing.
On the flip side, if your preserves are too thick or even stiff, you might have cooked them a bit too long. Adding a bit of warm water or peach juice and gently reheating can help loosen the consistency. Just be careful not to overdo it—you want to maintain that perfect spreadable texture.
Jars Didn’t Seal Properly
Sometimes, despite your best efforts, a jar or two just doesn’t seal. It happens. If you find any unsealed jars after cooling, refrigerate them right away and use them within a few weeks. For future batches, double-check that you wiped the rims clean and used new, undamaged lids. Also, be sure your jars were hot when filled and processed for the full time in the water bath.
Health Benefits of Peaches
Nutritional Overview
Peaches are not only delicious—they’re packed with nutrients that make your preserves a little healthier, too. They’re rich in vitamins A and C, which support immune function and skin health. Peaches also contain antioxidants, fiber, and potassium, all of which contribute to heart health and digestion.
When you make preserves at home, you’re in control of the sugar content, which is a big plus for those looking to cut back. While traditional recipes do use a fair amount of sugar, you can opt for low-sugar versions or use natural sweeteners like honey or agave.
Preserving Nutrients During Cooking
It’s true that cooking can reduce some vitamin content in fruits, especially vitamin C. However, most of the beneficial fiber and minerals remain intact. Using gentle cooking methods and avoiding overcooking helps retain the most nutrients possible. The quick simmering used in preserve-making helps strike a balance between food safety, shelf stability, and nutrition.
Variations and Flavor Enhancements
Adding Vanilla, Cinnamon, or Other Fruits
Want to take your peach preserves to the next level? Add a little twist with natural flavor boosters that complement peaches beautifully. A splash of pure vanilla extract adds warmth and depth, while a stick of cinnamon during cooking infuses the preserves with cozy spice. Both flavors elevate the final result, especially if you’re gifting your preserves or serving them during fall and winter.
For a fun fruity fusion, mix in raspberries, strawberries, or even mango chunks. These not only add interesting flavor layers but also brighten the color of your preserves. When adding other fruits, keep in mind their water content and sweetness—adjust your sugar levels and cook time accordingly.
Herbs like basil or thyme can offer a gourmet touch, especially when you’re using the preserves with savory dishes. Just a sprig or two is enough to add a fresh, earthy note without overpowering the natural sweetness of the peaches.
Experiment with small test batches before committing to a large mix—this way you can refine the balance of flavors to match your taste.
FAQs about Peach Preserves Recipe
Can You Use Frozen Peaches?
Absolutely. While fresh peaches are ideal, frozen peaches are a great backup when peaches are out of season. Just make sure they’re unsweetened and fully thawed before using. Drain any excess water from thawing to avoid diluting the preserve. The flavor and texture will be slightly different, but still delicious.
Do You Have to Use Pectin?
Not necessarily. Traditional peach preserves often rely on natural pectin found in the fruit and added lemon juice. However, if you want a firmer set or are making a lower-sugar version, commercial pectin helps achieve consistent results. It’s all about personal preference. Some folks love a looser, more rustic preserve, while others prefer a thick, jam-like texture.
Can I Reduce the Sugar?
Yes, but it affects both flavor and preservation. Reducing sugar means you’ll need to either consume the preserves faster or store them in the fridge. Using low-sugar pectin or adding a bit more lemon juice helps keep the preserve safe and tasty. Always follow tested recipes when adjusting sugar levels to avoid spoilage.
Why Did My Preserve Turn Brown?
Browning usually happens due to oxidation when air sneaks into the jar, or the fruit wasn’t acidic enough. Make sure to include lemon juice and remove all air bubbles before sealing. Store in a cool, dark place and avoid light exposure, which can also fade the color.
What’s the Difference Between Jam and Preserves?
Great question! Jam typically has a more uniform texture with mashed fruit, while preserves have noticeable chunks or slices of fruit. Both use similar methods, but preserves let the fruit shine a bit more, both in texture and appearance.
Conclusion
Making homemade peach preserves is a rewarding way to capture the essence of summer and enjoy it all year long. From selecting ripe, fragrant peaches to gently simmering them into a golden, sweet spread, every step is part of a joyful, old-fashioned craft that brings a taste of home to your table.
The process isn’t just about food—it’s about creating memories, traditions, and even heartfelt gifts for friends and family. With a little time and patience, you’ll find that peach preserves can be one of the simplest and most satisfying things you make in your kitchen.
So the next time you spot ripe peaches at the market, grab a basket and get started. Once you taste the homemade difference, you’ll never go back to store-bought.


