Pastrami Recipe: Pastrami. Just saying the word makes your mouth water, doesn’t it? That peppery, smoky, tender meat that melts in your mouth is a deli legend. While you can grab it from your local sandwich shop, nothing—and I mean nothing—beats homemade pastrami. You control the flavor, the quality of the meat, and best of all, it’s an experience that makes you feel like a true culinary boss. If you’re ready to dive into a meat lover’s paradise, this step-by-step guide will walk you through everything you need to know to make incredible pastrami right in your own kitchen.
What is Pastrami?
Let’s rewind for a sec. What is pastrami anyway? At its core, pastrami is cured, seasoned, smoked, and steamed beef—usually made from brisket, although other cuts can be used too. Its roots trace back to Eastern Europe, particularly Romania, where it was originally made with goose. Immigrants brought the technique to the United States, and soon, beef became the go-to meat. The process was designed to preserve meat before refrigeration, but over time, pastrami evolved into a culinary delicacy, especially in Jewish delis.
Pastrami is often confused with corned beef, but the two differ in several ways. Corned beef is boiled after curing, while pastrami is smoked and then steamed. Pastrami also gets its signature spice crust—typically a mix of black pepper, coriander, and garlic—that gives it that rich, deep flavor profile.
Essential Ingredients for Homemade Pastrami
Before we jump into cooking, let’s talk about the stuff that makes pastrami magical—the ingredients. Keep in mind that while the ingredient list isn’t short, each one plays a crucial role in developing that classic pastrami flavor.
The Meat:
Traditionally, pastrami is made with the brisket, more specifically the navel cut (plate), which has a good balance of fat and meat. However, the flat or point cut of brisket will work well too.
Brine Ingredients:
- Water
- Kosher salt
- Sugar
- Pink curing salt (Prague Powder #1)
- Garlic cloves
- Pickling spices (mustard seeds, coriander, bay leaves, allspice, cloves, cinnamon stick, etc.)
Spice Rub:
- Cracked black pepper
- Crushed coriander seeds
- Smoked paprika (optional for color)
- Garlic powder
- Onion powder
- Brown sugar
Smoking Materials:
- Wood chips (cherry, apple, or hickory are great choices)
Everything on this list is pretty accessible, and once you have them, you’ll be ready to roll.
Tools and Equipment You’ll Need
Making pastrami from scratch isn’t overly complicated, but it does require some specific kitchen tools. Here’s what you should have on hand:
Must-Have Tools:
- Large container or brining bag (for soaking the meat)
- A smoker or grill with indirect heat
- Meat thermometer
- Sharp slicing knife
Nice-to-Haves:
- Spice grinder or mortar and pestle (for a fresh spice rub)
- Steamer (for final cooking step)
- Vacuum sealer or airtight containers (for storage)
These tools help ensure the process goes smoothly, and more importantly, safely.
Step-by-Step Pastrami Recipe
Now for the part you’ve been waiting for—the actual recipe. Don’t worry if it looks like a lot. Take it step by step, and you’ll be amazed at the result.
Step 1: Choosing the Right Beef
Start with a brisket cut. Look for a piece that’s 4 to 5 pounds, with a nice fat cap on top. This fat renders during smoking and keeps the meat juicy. Trim any excess hard fat, but leave a good amount for flavor.
Step 2: Preparing the Brine
In a large pot, bring the following to a simmer:
- 1 gallon of water
- 1 cup kosher salt
- 1/2 cup sugar
- 1 tablespoon pink curing salt
- 2 tablespoons pickling spice
- 4 garlic cloves, crushed
Let the brine cool completely. Once cool, submerge the brisket in the brine, cover it, and refrigerate for 5 to 7 days. Rotate the meat every day to ensure even curing.
Step 3: Brining the Meat (5–7 Days)
Patience is key here. Let the meat cure in the fridge for at least 5 days. The salt and curing agents will penetrate the beef, preserving it and enhancing its flavor. You’ll notice a pinkish hue developing—that’s the sign the cure is working.
Step 4: Rinsing and Drying
After brining, rinse the brisket thoroughly under cold water to remove excess salt. Then pat it completely dry with paper towels. Let it sit uncovered in the fridge overnight. This dries out the surface, which helps the spice rub stick and creates a better bark during smoking.
Step 5: Applying the Spice Rub
Mix your spice rub:
- 1/4 cup cracked black pepper
- 1/4 cup crushed coriander
- 1 tbsp garlic powder
- 1 tbsp onion powder
- 1 tbsp brown sugar
Press the rub firmly onto the entire surface of the meat. Don’t be shy—this crust is what gives pastrami its signature punch.
Step 6: Smoking the Pastrami
Set up your smoker to 225°F (107°C). Use cherry or hickory wood for that traditional smoky flavor. Smoke the brisket until it reaches an internal temp of 190°F (88°C). This usually takes around 6 hours depending on the size of the meat.
Step 7: Steaming and Slicing
Once smoked, steam the meat for 1–2 hours until it’s super tender. This step helps rehydrate and soften the pastrami. Let it rest before slicing thinly against the grain for maximum tenderness.
Tips for Perfect Pastrami Every Time
If you’re going through the time and effort to make homemade pastrami, you want it to turn out amazing, right? Here are some pro-level tips to make sure your pastrami hits that perfect balance of smoky, juicy, and flavorful every time.
1. Be Patient With the Brine
The longer you allow the meat to sit in the brine (within reason), the deeper the flavor. Don’t rush this step. It’s not just about salt—it’s where the magic of curing and flavor infusion happens. Minimum 5 days, but 7 is ideal for most briskets.
2. Use a Meat Thermometer
This isn’t one of those “cook it till it looks done” kind of recipes. You need a reliable meat thermometer to monitor internal temps. Undercooked brisket will be tough and dry, while overcooked might fall apart too much. Aim for 190°F during smoking, and check again after steaming to ensure it’s fork-tender.
3. Don’t Skip the Steaming
You might be tempted to slice the smoked pastrami right away, but the steaming step is crucial. This not only makes the pastrami extra tender but brings moisture back into the meat. It’s what separates good from phenomenal pastrami.
4. Let It Rest Before Slicing
After all that smoking and steaming, your pastrami needs a breather. Let it rest, tented loosely in foil, for at least 30 minutes. It helps the juices redistribute so each slice is moist and flavorful.
5. Slice Against the Grain
If you cut it the wrong way, even the most perfectly cooked pastrami will feel tough. Always slice against the grain—this shortens the muscle fibers and gives that melt-in-your-mouth texture.
Serving Suggestions
Alright, your pastrami is ready. Now what? While the classic deli sandwich is unbeatable, there are a ton of creative ways to enjoy your homemade masterpiece.
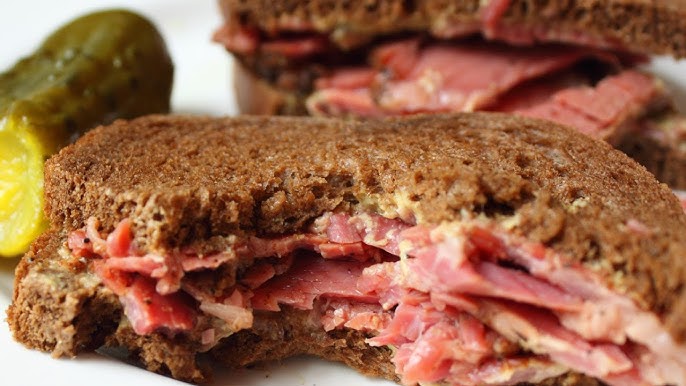
1. Classic Pastrami Sandwich
Thick slices of pastrami, piled high on rye bread with spicy mustard and maybe a few slices of Swiss cheese? Perfection. Add a pickle on the side and you’ve got yourself a deli-style lunch right at home.
2. Pastrami Reuben
Swap the corned beef for pastrami in a traditional Reuben sandwich. Add sauerkraut, Swiss cheese, and Russian dressing between two slices of grilled rye bread. This is a flavor explosion you won’t forget.
3. Pastrami Hash
Got leftovers? Dice the pastrami and sauté it with potatoes, onions, and peppers for a killer breakfast hash. Top it with a fried egg for bonus points.
4. Pastrami Pizza
Oh yes, we’re going there. Use your pastrami as a pizza topping along with mozzarella, pickled onions, and mustard drizzle. It’s next-level delicious.
5. Pastrami Salad
Looking for a low-carb option? Throw some slices over a bed of greens with cherry tomatoes, cucumbers, and a tangy vinaigrette. It’s hearty and healthy.
The possibilities are endless—and the best part is, you made it all from scratch.
Common Mistakes to Avoid
Making pastrami isn’t complicated, but there are a few common pitfalls that can mess things up. Here’s what to look out for:
1. Over-smoking
More smoke doesn’t always mean better flavor. Too much smoke can make the meat bitter. Stick with a moderate amount of wood chips and let the meat shine.
2. Skipping the Cure
Some folks think they can shortcut the curing process—don’t do it. Without curing, your meat won’t have that signature pastrami texture, flavor, or color. The pink salt isn’t just for looks—it’s part of the chemistry.
3. Not Using Enough Spice Rub
That peppery crust isn’t just for looks. It’s what gives pastrami its bold personality. Be generous when applying the rub. Really press it into the meat and make sure it’s well coated.
4. Rushing the Resting Time
You’ve waited days to eat this, what’s another 30 minutes? Resting allows juices to redistribute and makes slicing easier and cleaner. Don’t rush it.
5. Poor Slicing Technique
As mentioned earlier, slicing against the grain is essential. If you slice with the grain, you’ll end up with chewy, stringy meat. Use a sharp knife and take your time.
Nutritional Value of Homemade Pastrami
Homemade pastrami can actually be a healthier option compared to store-bought versions, especially because you control what goes into it. Here’s a rough nutritional breakdown per 3-ounce (85g) serving:
| Nutrient | Amount |
|---|---|
| Calories | 200–250 kcal |
| Protein | 18–22 g |
| Total Fat | 15–18 g |
| Saturated Fat | 5–6 g |
| Sodium | 600–800 mg |
| Carbohydrates | 1–2 g |
Of course, these numbers vary depending on your cut of meat and how much seasoning you use, but homemade pastrami generally has fewer additives and preservatives.
FAQs about Pastrami Recipe
1. What is pastrami made from?
Pastrami is typically made from beef brisket, although other cuts like the deckle (a fattier cut) or even turkey can be used. The meat is cured, seasoned with a mix of spices (like garlic, coriander, black pepper, paprika, cloves, and allspice), smoked, and then steamed to perfection.
2. How long does it take to make homemade pastrami?
Patience is key! Making pastrami at home can take about a week. You’ll spend a few days curing the meat, a day or so for it to absorb the spices, a few hours smoking it, and finally, steaming it until it’s tender. Each step is crucial to develop those deep, smoky flavors and that buttery texture.
3. Do I need special equipment to make pastrami?
While having a smoker adds an authentic touch, you can improvise with a grill or even an oven for the smoking step. For steaming, a standard stovetop steamer or a tightly covered pot will do the trick.
4. Can I make pastrami without pink curing salt?
Yes, but using pink curing salt (sodium nitrite) helps prevent the growth of bacteria during the curing process and keeps the meat safe and savory. It also gives pastrami its characteristic pink color. If you choose to go without, your pastrami will be more brownish and might have a slightly different flavor profile.
5. What’s the best way to serve pastrami?
Pastrami is super versatile! While it’s famously served on rye bread with mustard for a classic New York deli-style sandwich, you can also slice it up for salads, mix it into scrambles, or even pile it high on a bagel with cream cheese.
6. How should I store homemade pastrami?
Wrap your pastrami tightly in plastic wrap or place it in an airtight container. It will keep in the refrigerator for up to four days. For longer storage, you can freeze it for up to three months.
7. Is homemade pastrami healthier than store-bought?
Making pastrami at home allows you to control the ingredients, such as the quality of meat and the amount of salt. This can result in a healthier product, free from the preservatives often found in commercially-prepared versions.
Conclusion
Making pastrami at home might sound intimidating at first, but once you break it down, it’s really just a process of patience, spice, and smoke. The reward? Rich, juicy, tender pastrami that beats anything you can buy at the store. From building the brine to slicing that final piece for your sandwich, every step is a labor of love—and your taste buds will thank you for it.
So, roll up those sleeves, fire up that smoker, and get ready to impress your friends, family, or heck—just yourself. You deserve it.