Pastel de Nata Recipe: If you’ve ever wandered the charming streets of Lisbon, you’ve probably caught a whiff of something heavenly – warm, sweet, and utterly irresistible. That, my friend, was likely a Pastel de Nata. These golden Portuguese custard tarts have captured the hearts (and taste buds) of millions around the world. But guess what? You don’t need a plane ticket to enjoy one – you can make them right in your kitchen.
The History Behind the Tart
The Pastel de Nata was born in the 18th century within the walls of Jerónimos Monastery in Belém, Lisbon. Monks used egg whites for starching clothes and ended up with a surplus of yolks. Being creative culinary geniuses, they turned them into these delicious tarts. Fast forward a few centuries, and these pastries have become a symbol of Portuguese baking. Every bakery in Portugal claims theirs is the best – and after today, yours might be too.
Ingredients You’ll Need
For the Custard Filling
The soul of any good Pastel de Nata is its creamy, rich custard. You’ll need:
- 1 cup (240 ml) whole milk
- 3 tablespoons all-purpose flour
- 1 cup (200 g) granulated sugar
- 1/2 cup (120 ml) water
- 6 large egg yolks
- 1 cinnamon stick
- 1 strip of lemon peel
The flour adds a slight thickness without making the custard too dense, and the cinnamon and lemon peel give it that traditional Portuguese aroma.
For the Puff Pastry Base
The crispy, flaky shell holds all the goodness together:
- 1 sheet of frozen puff pastry (thawed)
- A bit of flour (for dusting)
- Butter (for greasing your muffin tin)
Store-bought puff pastry works just fine, but if you’re feeling ambitious, homemade puff pastry will take your tarts to another level.
Equipment Checklist
Before you get started, make sure you have these tools handy:
- A 12-cup muffin tin
- Saucepan
- Whisk
- Mixing bowls
- Rolling pin
- Fine sieve or strainer
- Pastry brush (optional)
Having everything ready makes the process smooth and fun.
Step-by-Step Instructions
Step 1: Preparing the Puff Pastry
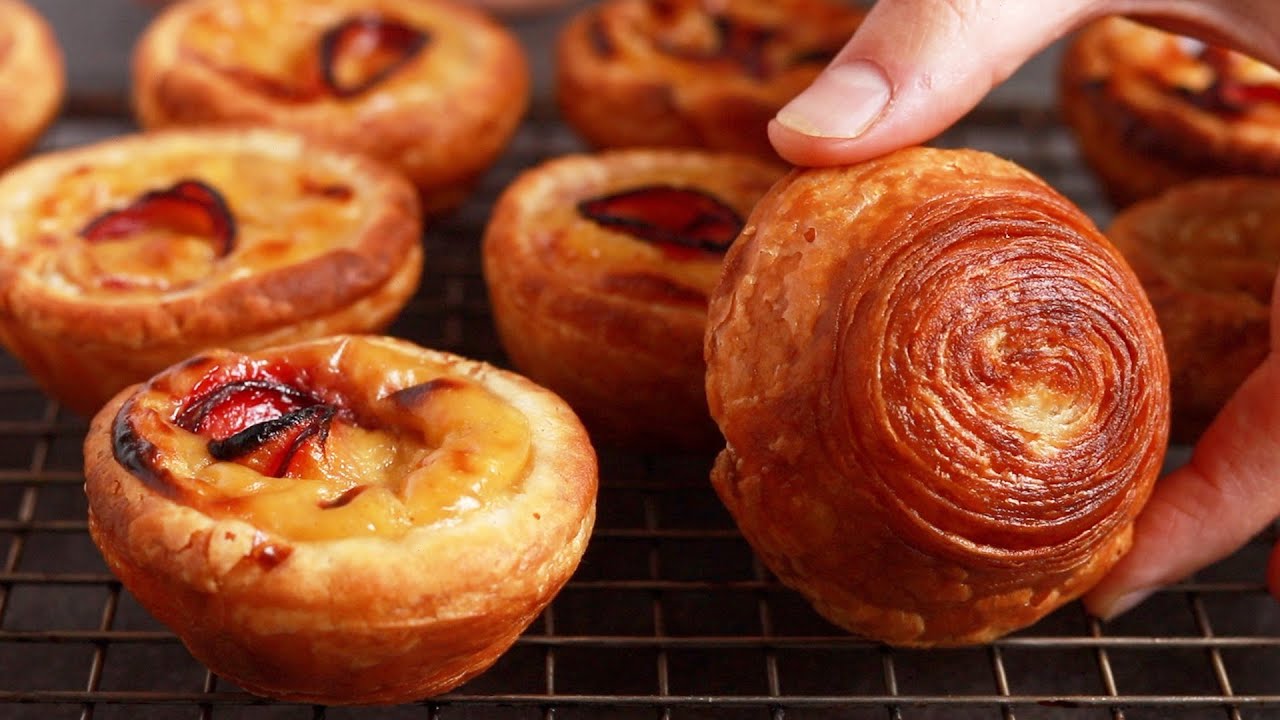
Start by rolling out your thawed puff pastry on a lightly floured surface. Roll it tightly into a log, then cut it into 12 equal slices. Place each slice, cut side down, into the muffin tin cups. Now, using your thumbs, press and spread the dough evenly up the sides to form little pastry cups.
This spiral rolling method gives the crust that signature layered look and crisp texture. Chill the pastry in the fridge while you prepare the custard.
Step 2: Making the Sugar Syrup
In a small saucepan, combine the sugar, water, cinnamon stick, and lemon peel. Bring it to a gentle boil over medium heat and let it bubble until it reaches thread stage – about 220°F (105°C) on a candy thermometer. Remove it from heat and let it cool slightly. This syrup is what gives the custard its silky texture and depth of flavor.
Step 3: Mixing the Custard
Meanwhile, whisk the flour and a bit of milk together in a bowl until smooth. In another saucepan, heat the remaining milk until warm and slowly whisk it into the flour mixture. Cook over medium heat until slightly thickened. Then, remove from the heat and gradually whisk in the sugar syrup. Finally, add the egg yolks one at a time, mixing until you get a smooth, creamy blend.
Pro tip: Strain the custard through a fine sieve to catch any lumps or eggy bits. You want a perfectly smooth filling.
Step 4: Assembling the Tart Shells
Take your muffin tin with the chilled pastry cups out of the fridge. Fill each one with the custard mixture, about 3/4 full. Don’t overfill – the custard will puff up and settle beautifully as it bakes.
Step 5: Baking to Golden Perfection
Preheat your oven to 500°F (260°C) or as high as it will go. Bake the tarts for about 15 minutes, or until the custard starts to caramelize and form those iconic dark spots on top. Keep a close eye on them – you want golden-brown with some charred blisters, not burnt.
Remove from the oven and let them cool slightly. The pastry will be golden and flaky, and the custard set but still creamy inside.
Tips for the Perfect Pastel de Nata
Texture, Flavor, and Authenticity
Creating the perfect Pastel de Nata is part science, part art. If you want that truly authentic taste and texture, here are some game-changing tips to elevate your tarts:
- Use High Heat: Traditional bakeries in Portugal bake their tarts in ovens that reach temperatures up to 800°F (425°C). Most home ovens don’t get that hot, but cranking it up to the max helps mimic that effect. The high heat caramelizes the top and crisps the pastry.
- Chill the Dough Properly: Puff pastry works best when it’s very cold. If it starts to soften while you’re shaping it in the tin, pop it back in the fridge for 10–15 minutes. Cold dough puffs up better and gives you those beautiful layers.
- Don’t Skip the Syrup Stage: The sugar syrup might seem like an extra step, but it’s crucial. It not only sweetens the custard evenly but also adds that silky texture that makes these tarts stand out.
- Strain for Smoothness: A fine mesh sieve is your best friend here. Any lumps or curdled bits in your custard will ruin the texture, so strain the custard before pouring it into your tart shells.
- Watch the Bake: Keep an eye out during the last 5 minutes of baking. Those signature charred spots are what you’re looking for. It might feel counterintuitive to let it burn a little, but that’s the magic.
- Rest Before Eating: Although the smell is heavenly and temptation is strong, let your tarts cool for 5–10 minutes. The custard continues to set, and the flavors meld as they cool.
Serving Suggestions and Variations
Creative Twists on the Classic Tart
While the classic Pastel de Nata is already a masterpiece, you can have a little fun with it, especially if you’re serving it to guests or want a twist for your second batch:
- Dust with Cinnamon and Powdered Sugar: This is how many Portuguese locals enjoy them. A light dusting right before serving adds an extra pop of flavor and sweetness.
- Fruit-Filled Versions: Add a small layer of jam (like raspberry or apricot) at the bottom of the pastry cup before pouring in the custard. It adds a fruity tang to balance the creamy filling.
- Chocolate Natas: Mix a tablespoon of cocoa powder into the custard mixture or drizzle some melted dark chocolate on top after baking. Chocolate and custard? Yes, please!
- Espresso-Infused Custard: Add a shot of strong espresso or a teaspoon of instant coffee to your milk mixture for a mocha twist.
- Mini Versions: Use a mini muffin tin to create bite-sized Pastéis de Nata. These are perfect for parties or snacking.
When serving, pair your tarts with a strong espresso, a cappuccino, or even a glass of port wine if you want the full Portuguese experience.
Storing and Reheating Tips
Let’s be real – Pastéis de Nata are best eaten fresh. But if you’ve got leftovers (lucky you), here’s how to store and reheat them:
- Storage: Store cooled tarts in an airtight container in the fridge for up to 3 days. The pastry will soften over time, but they’ll still taste great.
- Reheating: Pop them in the oven at 375°F (190°C) for about 5–7 minutes. This will help the pastry regain some of its crispness and warm the custard without making it rubbery. Avoid microwaving unless you’re in a hurry – it ruins the texture.
- Freezing: You can freeze the baked tarts. Wrap them individually in plastic wrap and place in a freezer-safe container. To serve, thaw overnight in the fridge and reheat in the oven.
Nutritional Information
Here’s a quick breakdown of what’s in one classic Pastel de Nata (approximate values):
| Nutrient | Amount per Tart |
|---|---|
| Calories | 210 kcal |
| Total Fat | 11g |
| Saturated Fat | 5g |
| Carbohydrates | 24g |
| Sugars | 13g |
| Protein | 3g |
| Fiber | 0.5g |
| Sodium | 80mg |
These aren’t diet food, but they’re a delightful treat when you’re looking to indulge a little. The good news? A little goes a long way with these rich, flavorful pastries.
FAQs about Pastel de Nata Recipe
1. Can I use milk alternatives like almond or oat milk?
Yes, you can use non-dairy milk, but the texture may vary slightly. Full-fat coconut milk or oat milk works best for a creamy finish.
2. How do I know when the custard is done baking?
Look for a lightly browned, blistered top and a slightly jiggly center. The custard will firm up as it cools.
3. Can I make Pastéis de Nata in advance?
Yes! You can prepare and bake them a day ahead. Reheat in the oven to regain the crispy texture.
4. Is it okay to use phyllo dough instead of puff pastry?
Phyllo isn’t ideal – it’s too thin and lacks the buttery, flaky layers that puff pastry offers.
5. Why did my custard curdle?
It likely overheated or the eggs were added too quickly to the hot milk. Always temper your eggs slowly and keep the heat low when mixing.
Conclusion
Whether you’ve tasted them in a Lisbon café or you’re just discovering their magic, the Pastel de Nata is one of those unforgettable desserts. With a crispy, flaky pastry shell and a creamy, caramelized custard center, they’re nothing short of pastry perfection. And now, you’ve got everything you need to recreate that Portuguese magic in your own kitchen.
So go ahead – gather your ingredients, turn up the heat, and bake up a batch of tarts that’ll transport you to the heart of Portugal with every bite.