Parker House Rolls Recipe: Parker House Rolls are the kind of bread that once you try, you’ll find yourself dreaming about. These rolls are soft, buttery, and gently golden brown—perfect as a side for dinner or just enjoyed with a dab of jam or honey. They’ve been a staple in American households for generations, especially during the holidays. Think Thanksgiving, Christmas dinners, or even a weekend family gathering. These iconic rolls are beloved for their pillowy texture and rich flavor.
What makes them unique? The fold-over style of the roll gives them a signature look and a buttery middle bite. Once you bite into one, it’s hard to stop at just one. They’re that addictive. Whether you’re a beginner baker or a seasoned dough handler, this recipe breaks everything down into a simple, step-by-step guide that you’ll follow with ease.
Origin and History
Parker House Rolls hail from the Parker House Hotel in Boston, Massachusetts, back in the 1870s. Yes, that long ago! The story goes that a grumpy guest threw his bread roll at a waiter, and the result was the folded-over roll we now love. Whether that tale is true or not, the rolls became an instant classic and have stayed popular ever since.
These rolls became famous for their rich, buttery flavor and that signature folded shape. Over time, countless variations have emerged, but the original remains a beloved icon. Restaurants and home bakers alike try to recreate the fluffiness and golden-butter glaze that make them unforgettable. Today, we’re diving into how you can make these timeless rolls at home with ease.
Why You’ll Love This Recipe
Perfectly Buttery and Fluffy
If you’re a fan of soft, warm, and melt-in-your-mouth bread, Parker House Rolls are your dream come true. The dough is enriched with butter and milk, giving the rolls a tender crumb and rich flavor. When baked, the top turns golden and crisp, while the inside remains cloud-like.
What truly sets them apart is the buttery layers. Thanks to the folded shape, you get this magical texture—a light crust outside and a steam-soft middle that pulls apart beautifully. Every bite feels like a treat. And yes, they’re even better with more butter on top. Trust us—don’t hold back.
These rolls are foolproof, too. With clear instructions and just a bit of patience for the dough to rise, you can have bakery-quality rolls right from your oven. They freeze well, reheat perfectly, and taste just as fresh the next day.
Crowd Favorite for Any Occasion
Whether you’re hosting a holiday feast or a casual Sunday dinner, Parker House Rolls fit the bill. They pair well with just about everything—roast chicken, hearty stews, or even as sandwich sliders the next day.
Want to impress your guests without spending hours in the kitchen? These rolls do that effortlessly. You can even prepare the dough ahead of time, shape the rolls, and keep them in the fridge until you’re ready to bake. Warm, fresh bread with minimal effort? That’s a win.
They’re also kid-approved. Little hands love helping shape and fold the rolls, and the buttery taste wins over even picky eaters. They’re the kind of dish that brings people to the table with smiles.
Ingredients You’ll Need
Pantry Staples
Let’s keep it simple. You don’t need any fancy ingredients—just a handful of basics you probably already have:
- All-purpose flour: The base of your dough. It gives structure without being too heavy.
- Active dry yeast: This helps the dough rise and gives the rolls their airy texture.
- Granulated sugar: A touch of sweetness balances out the flavor and helps the yeast activate.
- Salt: Enhances flavor and controls yeast fermentation.
- Unsalted butter: Star of the show! You’ll use it in the dough and melted on top for that signature shine.
- Whole milk: Adds richness and moisture, making the rolls extra tender.
- Egg: Just one, but it adds richness and helps bind everything together.
Special Additions for Extra Flavor
Want to level up your rolls? Here are some optional but tasty add-ins:
- Honey: Swap some sugar for honey for a deeper, floral sweetness.
- Garlic powder or fresh herbs: Mix a little into the dough or sprinkle on top before baking for a savory twist.
- Flaky sea salt: Sprinkle just before serving for a gourmet touch.
These ingredients make it easy to create soft, fluffy, golden-brown Parker House Rolls that taste like they’re fresh from a five-star kitchen.
Step-by-Step Instructions
Step 1 – Activate the Yeast
This step sets the foundation for perfect rolls. Start by warming 1 cup of whole milk until it’s just warm to the touch (about 100–110°F). Pour it into a bowl and add 2¼ teaspoons of active dry yeast and 1 tablespoon of sugar. Stir gently and let it sit for about 5–10 minutes until it becomes frothy. This is called proofing.
If your mixture doesn’t bubble, your yeast might be expired—start over with a fresh batch. It’s a small but crucial step. Once the yeast is active and foamy, you’re ready to build the dough.
Step 2 – Mix the Dough
Now that your yeast is activated, it’s time to build your dough. In a large mixing bowl, combine 3½ cups of all-purpose flour, 1½ teaspoons of salt, and the remaining 2 tablespoons of sugar. Give that a quick stir to mix the dry ingredients evenly.
Next, add in your yeast mixture along with one beaten egg and 6 tablespoons of melted butter (make sure it’s slightly cooled, not hot). Use a wooden spoon or a stand mixer with a dough hook to mix everything together until a soft dough forms. If the dough is too sticky, you can add a little more flour, one tablespoon at a time. The dough should be slightly tacky but not overly sticky.
Once combined, knead the dough for about 8-10 minutes until it becomes smooth and elastic. If using a stand mixer, 5-6 minutes should be enough. Kneading builds the gluten structure that gives these rolls their soft yet chewy texture.
Form the dough into a ball and place it in a lightly oiled bowl. Cover it with a damp kitchen towel or plastic wrap and let it rise in a warm place for about 1 to 1½ hours, or until it doubles in size.
Step 3 – First Rise
This is where the magic starts. After kneading, the dough needs time to rest and rise. This process allows the yeast to do its work—creating air pockets and giving the dough that light, fluffy texture we all love in Parker House Rolls.
Make sure the environment is warm but not hot. If your kitchen is cold, you can turn on the oven to 200°F for a few minutes, then turn it off and place your dough inside with the door slightly ajar. Another tip? Place the bowl near a sunny window or on top of a warm appliance.
After 1 to 1½ hours, your dough should look puffed and almost doubled in size. Gently poke it with your finger—if the indentation stays, you’re ready to move on. Punch down the dough lightly to release the air, then transfer it to a floured surface for shaping.
Step 4 – Shape the Rolls
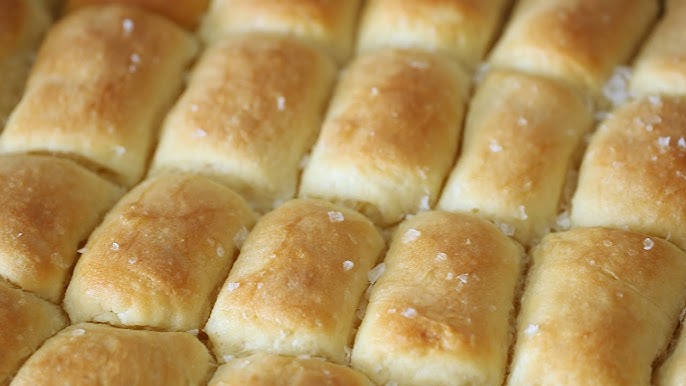
This step is fun and rewarding. Roll out your dough into a rectangle about ½ inch thick. Using a round cookie cutter or the rim of a glass, cut out circles of dough. Then, take each circle and fold it almost in half, leaving a slight overlap—this gives Parker House Rolls their iconic folded shape.
Place each folded roll onto a greased baking sheet, seam side down. Make sure to space them out slightly so they have room to puff up during the second rise. Once all your dough is shaped and on the tray, cover them loosely with a clean towel.
Now, let them rest for their second rise—about 30 to 45 minutes. This step helps them become ultra-soft and ensures a perfect texture after baking. While they rise, preheat your oven to 350°F (175°C).
Step 5 – Final Rise and Bake
Once your rolls have risen a second time, they should be plump and puffy. Just before baking, brush the tops with melted butter. This gives them that signature golden-brown top and buttery finish.
Place the rolls in your preheated oven and bake for about 15–18 minutes, or until they’re lightly golden on top. Every oven is different, so start checking around the 14-minute mark.
Once out of the oven, immediately brush them with more melted butter. Yes, more butter—it’s what gives these rolls their addictive, rich flavor. Let them cool for a few minutes, but don’t wait too long. These rolls are at their best when served warm, fresh out of the oven.
Pro Tips for Success
Mastering Parker House Rolls doesn’t have to be hard, especially if you keep these helpful tips in mind. These little tricks can make the difference between good rolls and unforgettable ones.
- Use room temperature ingredients: Cold milk, eggs, or butter can slow down the yeast activity. Let your ingredients sit out for about 30 minutes before starting.
- Don’t over-flour your dough: The dough should be soft and a bit sticky. Adding too much flour can make the rolls dense instead of airy and light.
- Let your dough rise fully: Rushing this step leads to underwhelming texture. Give your dough the time it needs to double in size during both rises.
- Use a scale for accuracy: Measuring flour by weight ensures consistency, especially since scooping with a cup can lead to packing and too much flour.
- Butter is your best friend: Be generous when brushing melted butter on top. It not only adds flavor but also gives that classic glossy finish.
- Shape uniformly: Make sure all your rolls are about the same size. This helps them bake evenly and look better when served.
These tips are easy to follow but essential. Even if it’s your first time baking, sticking to these can help you create bakery-worthy results right at home.
Variations to Try
While the classic Parker House Roll is amazing as-is, adding your own twist can take them to a whole new level. Here are some fun and tasty variations to experiment with:
- Cheesy Rolls: Add shredded cheddar or parmesan to the dough or sprinkle on top before baking. You’ll love the savory, gooey flavor.
- Garlic Herb Butter Rolls: Mix melted butter with minced garlic, chopped parsley, and a bit of thyme. Brush it over the rolls before and after baking.
- Honey Butter Rolls: Add 1–2 tablespoons of honey into the dough for a slightly sweet, aromatic flavor. Finish with a honey-butter glaze.
- Whole Wheat Version: Swap out half of the all-purpose flour with whole wheat flour for a slightly nutty flavor and added nutrition.
- Stuffed Rolls: Tuck in a small piece of cheese or a spoonful of jam before folding each roll. A surprise center makes these extra special.
These variations are easy to incorporate and let you customize your rolls based on the meal or occasion. Don’t be afraid to get creative—once you master the base recipe, the sky’s the limit!
How to Store and Reheat
Parker House Rolls are best eaten fresh out of the oven, but they’re still delicious later if stored properly. Here’s how to keep them soft and tasty for days:
- At Room Temperature: Store leftover rolls in an airtight container or zip-top bag for up to 2–3 days. Add a slice of bread inside the container to help keep them moist.
- Refrigerate: Not the best option for texture, but if needed, store them for up to a week. Just be sure to reheat before serving.
- Freeze: Parker House Rolls freeze beautifully! Once completely cooled, place them in a freezer-safe bag, squeezing out excess air. They’ll keep well for up to 2 months.
To reheat:
- From the fridge: Wrap in foil and warm in a 300°F oven for about 10 minutes.
- From the freezer: Thaw at room temperature first, then reheat in the oven or microwave with a damp paper towel to prevent drying out.
Reheating with a brush of fresh butter makes them taste like they just came out of the oven again. That’s the secret to always enjoying them at their best.
Serving Suggestions
Parker House Rolls are super versatile and can be served with just about anything. Here are a few ideas to inspire your menu:
- Holiday Dinners: Serve alongside turkey, ham, roast beef, or lamb. These rolls soak up gravy like a dream.
- Weeknight Meals: Great with soups, stews, and chili. Dip them, scoop with them, or just enjoy on the side.
- Breakfast: Toast a leftover roll, add butter and jam, and pair it with coffee or tea for a cozy morning treat.
- Mini Sandwiches: Slice them open and fill with deli meats, cheese, or egg salad for bite-sized sandwiches.
- Appetizer Boards: Add them to a bread basket with garlic butter, herbed oil, or cheese spreads.
No matter how you serve them, Parker House Rolls are sure to be the most requested item on the table.
FAQs about Parker House Rolls Recipe
1. Can I make Parker House Rolls ahead of time?
Absolutely! After shaping the rolls, you can refrigerate them overnight on the baking tray. Cover with plastic wrap. The next day, bring them to room temperature for about 30 minutes before baking. This makes meal prep a breeze!
2. Can I use instant yeast instead of active dry yeast?
Yes, you can substitute instant yeast. Just mix it directly with the dry ingredients—no need to proof it first. However, the rising times may be slightly shorter, so keep an eye on the dough.
3. Why didn’t my rolls rise properly?
Several factors could be at play. Your yeast may have been expired, the liquid too hot or cold, or your kitchen may have been too chilly. Always check yeast freshness and ensure the dough is in a warm, draft-free environment.
4. Can I freeze the dough instead of the baked rolls?
Definitely. After shaping, freeze the rolls on a tray, then transfer them to a bag once solid. When ready to use, thaw in the fridge overnight, then let rise at room temp before baking.
5. How do I get that shiny golden top like in bakeries?
It’s all about the butter! Brushing melted butter both before and after baking gives that signature glossy finish and rich flavor. Don’t skip this step!
Conclusion
There’s something undeniably comforting about a warm, homemade Parker House Roll. From the soft, pillowy center to the golden, buttery crust, these rolls are pure joy in every bite. Whether you’re baking for a holiday, a special dinner, or just want to fill your home with the scent of freshly baked bread, this recipe delivers every single time.
What makes Parker House Rolls so special is their simplicity and timeless appeal. They don’t rely on fancy ingredients or complicated steps—just good technique, patience, and a whole lot of butter. With a bit of practice, anyone can master them. Plus, once you do, you’ll have a go-to recipe that impresses guests and delights family members, time and time again.
So next time you’re in the mood for something cozy, nostalgic, and incredibly satisfying, give these rolls a try. Serve them fresh, warm, and slathered in butter—you’ll see just how fast they disappear!