Panko Chicken Recipe: Crispy on the outside, juicy on the inside — that’s what makes Panko Chicken so irresistible. This dish perfectly blends the light crunch of Japanese-style breadcrumbs with the tenderness of well-seasoned chicken. Whether you’re cooking for a family dinner, meal prep, or simply craving comfort food, this recipe will never disappoint.
So, what sets this dish apart from regular fried chicken? The secret lies in Panko breadcrumbs, which are lighter and flakier than traditional breadcrumbs. They create that satisfying, golden crunch that feels like it came straight from a restaurant kitchen. With just a few ingredients and simple steps, you can recreate that perfect crisp at home.
What is Panko Chicken?
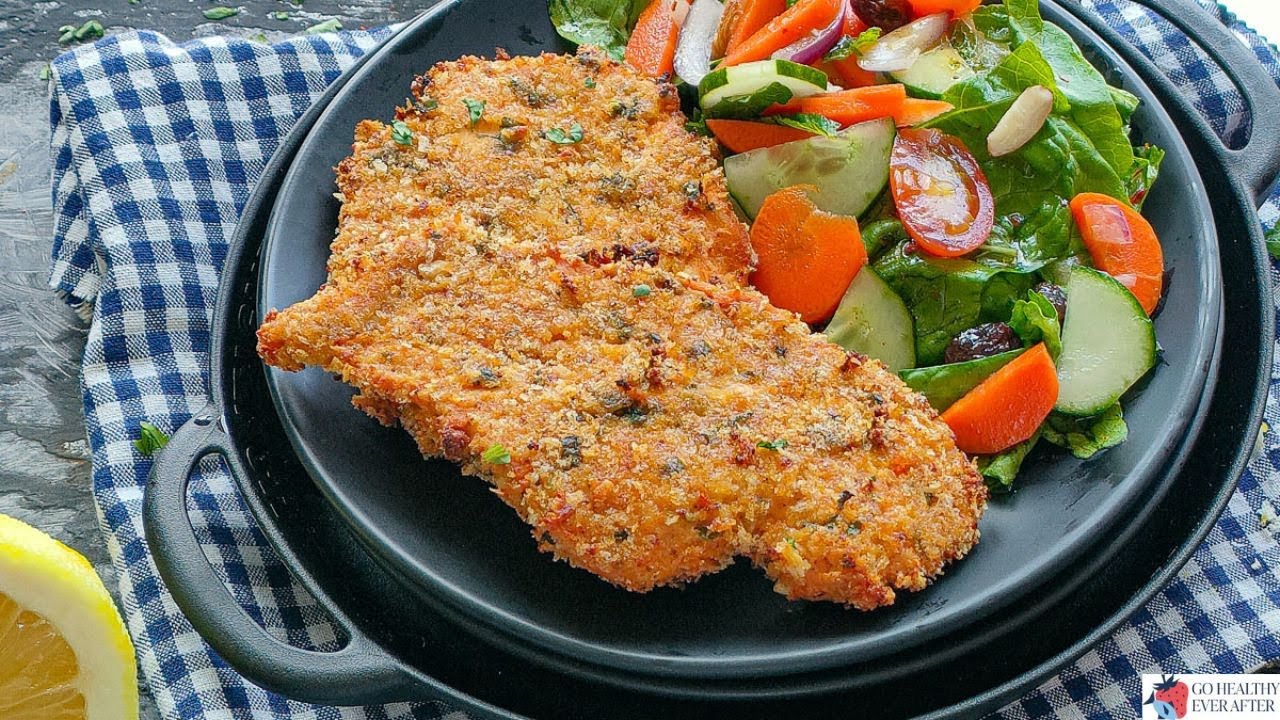
Panko Chicken is a Japanese-inspired dish that involves coating chicken cutlets or tenders in Panko breadcrumbs before frying or baking. The result is a crunchy, golden crust with a soft and juicy interior. It’s a versatile recipe that can be served with rice, noodles, salads, or even inside sandwiches and wraps.
Unlike traditional breaded chicken, Panko Chicken uses a special kind of breadcrumb made from crustless white bread. These crumbs are airier, which gives the chicken a lighter texture and a crispier bite. The method is simple, but the flavor and texture combination makes it feel gourmet.
Why Panko Breadcrumbs Make a Difference
The magic of Panko lies in its texture. Panko breadcrumbs are made by baking bread with electric current rather than direct heat, creating larger, flaky crumbs that absorb less oil. That means you get a lighter, crunchier crust that stays crisp longer — even after sitting for a while.
When frying with regular breadcrumbs, the crust often turns soggy or heavy. But with Panko, you’ll notice the coating stays airy and crispy. It’s the reason Japanese katsu dishes — like Chicken Katsu and Tonkatsu — are famous worldwide for their crunch factor.
A Brief History of Panko in Japanese Cuisine
Panko has its roots in Japan during World War II, when inventive cooks discovered a way to bake bread without using traditional ovens — instead, they used electric current. This technique created bread with a unique texture and no crust, which, when turned into crumbs, became what we now know as Panko.
Over time, Panko became a staple in Japanese cooking and was adopted globally. Today, it’s not just used in Japanese cuisine but in Western dishes too — from chicken tenders to casseroles and seafood recipes. Its versatility and superior crunch make it a favorite among chefs and home cooks alike.
Ingredients You’ll Need
Before diving into the cooking process, let’s gather everything you’ll need for this delicious Panko Chicken recipe. Using fresh, high-quality ingredients ensures the best flavor and texture.
Main Ingredients
Here’s what you’ll need for the base recipe (serves 4):
- 4 boneless, skinless chicken breasts or thighs – pounded to even thickness
- 1 cup all-purpose flour – for dredging
- 2 large eggs – beaten (acts as the binder)
- 2 cups Panko breadcrumbs – for that irresistible crunch
- 1 teaspoon salt – for seasoning
- 1/2 teaspoon black pepper – to enhance flavor
- 1/2 teaspoon garlic powder – adds aroma and depth
- 1/2 teaspoon paprika – gives a light smoky note
- Oil for frying – vegetable, canola, or peanut oil work best
That’s your basic setup. With just these ingredients, you can make a simple yet delicious Panko Chicken that everyone will love.
Optional Ingredients for Extra Flavor
If you want to elevate the taste, consider adding these:
- Grated Parmesan cheese – for a cheesy crust
- Dried herbs (thyme, oregano, parsley) – for added aroma
- Hot sauce or chili powder – for a spicy kick
- Lemon zest – for a refreshing tang
These extras can easily transform your dish into a signature recipe. The beauty of Panko Chicken is how adaptable it is — you can adjust the seasoning to suit your mood or your guests’ preferences.
Substitutes for Common Ingredients
Don’t worry if you’re missing an ingredient — here are some quick swaps:
- No Panko breadcrumbs? Use crushed cornflakes or regular breadcrumbs mixed with a bit of flour for a similar texture.
- No eggs? Substitute with a mixture of milk and a tablespoon of flour or mayonnaise.
- Want it gluten-free? Opt for gluten-free Panko or use crushed rice crackers.
These simple alternatives mean you can always whip up this recipe, even when your pantry’s running low.
Tools and Equipment Required
Having the right tools makes the process smooth and enjoyable. Here’s what you’ll need to prepare and cook your Panko Chicken efficiently.
Kitchen Essentials for Perfect Panko Chicken
- Cutting board and sharp knife – for trimming and slicing the chicken
- Meat mallet or rolling pin – to flatten the chicken evenly
- Three shallow bowls – for flour, egg wash, and Panko breadcrumbs
- Tongs – to handle the chicken during coating and frying
- Paper towels – for draining excess oil after frying
Recommended Cookware and Utensils
Depending on how you plan to cook your Panko Chicken, here’s what you might use:
- For frying: A deep skillet or cast-iron pan for even heat distribution.
- For baking: A wire rack placed on a baking sheet to keep the chicken crispy.
- For air frying: An air fryer basket lightly greased to prevent sticking.
With these basic tools, you’re all set to start cooking like a pro!
Step-by-Step Guide to Making Panko Chicken
Let’s move to the exciting part — actually cooking! Follow this step-by-step guide for the perfect Panko Chicken every single time.
Step 1 – Preparing the Chicken
Start by using boneless, skinless chicken breasts or thighs. Pat them dry with paper towels, then season both sides with salt, pepper, and your favorite spices — paprika, garlic powder, or Italian seasoning work great. For even cooking, lightly pound the chicken to an even thickness.
Step 2 – Setting Up the Breading Station
Prepare three shallow bowls: one with flour, one with beaten eggs, and one with panko breadcrumbs. You can mix a little parmesan or seasoning into the panko for extra flavor. This setup ensures a crisp, flavorful coating that sticks perfectly.
Step 3 – Coating the Chicken with Panko
First, dredge the chicken in flour, shaking off the excess. Next, dip it into the beaten egg so it’s fully coated. Finally, press the chicken into the panko breadcrumbs until it’s evenly covered and crunchy-looking.
Step 4 – Frying or Baking the Chicken
For frying, heat oil in a skillet over medium heat and cook the chicken for 3–4 minutes per side until golden brown and cooked through. For a lighter version, bake at 400°F (200°C) for about 20–25 minutes, flipping halfway.
Step 5 – Serving Suggestions
Serve your crispy panko chicken with mashed potatoes, rice, or a fresh salad. Drizzle with honey mustard, garlic aioli, or sweet chili sauce — simple, crunchy, and irresistibly good!
Tips for Making Perfect Panko Chicken
Everyone loves crispy chicken, but getting that perfect texture can be tricky. These simple yet effective tips will help you nail it every time.
How to Keep It Crispy
- Don’t overcrowd the pan or tray. Overcrowding traps steam, which softens the crust. Cook in small batches instead.
- Drain on a wire rack, not paper towels. Paper towels make the bottom soggy, while a rack allows air to circulate and keeps the chicken crispy.
- Serve immediately. Panko Chicken tastes best fresh off the pan, when the crust is at its crispiest.
Mistakes to Avoid
- Skipping the flour layer: It may seem unnecessary, but without it, the coating won’t stick properly.
- Frying in cold oil: This leads to greasy chicken. Always preheat the oil first.
- Turning too often: Let each side cook fully before flipping. Frequent turning can break the crust.
Expert Tips for Flavor Boost
- Marinate your chicken for 30 minutes in buttermilk or yogurt for extra tenderness.
- Add grated Parmesan or crushed cornflakes to the Panko for a unique crunch.
- Experiment with spices — smoked paprika, chili flakes, or even curry powder can give your chicken a whole new twist.
These pro tips turn an ordinary Panko Chicken into a show-stopper — crunchy, flavorful, and absolutely delicious.
Variations of Panko Chicken
While the classic version of Panko Chicken is already a hit, you can easily tweak the recipe to create exciting variations that suit different taste preferences. From cheesy to spicy, baked to gluten-free, the possibilities are endless. Let’s explore some popular and mouthwatering variations that can elevate your Panko Chicken game.
Panko Chicken with Parmesan
If you’re a cheese lover, this version is a must-try! Adding Parmesan cheese to the breadcrumbs creates a savory, nutty crust that’s simply irresistible. The flavor combination of crispy Panko and rich Parmesan gives your chicken a gourmet restaurant vibe.
How to make it:
- Mix ½ cup of grated Parmesan cheese into your Panko breadcrumbs before coating the chicken.
- Add a dash of Italian seasoning (oregano, basil, or parsley) for that Mediterranean touch.
- Bake or air fry instead of deep frying to enhance the cheesy aroma and prevent burning.
This version pairs beautifully with spaghetti, marinara sauce, or a light Caesar salad. It’s essentially a lighter version of Chicken Parmesan — without the heavy breading or oil.
Spicy Panko Chicken
For those who love bold flavors, spicy Panko Chicken is a fiery twist that adds some excitement to your meal. The spice level is totally adjustable, so you can make it mildly zesty or tongue-tingling hot.
How to make it:
- Add 1 teaspoon of cayenne pepper, ½ teaspoon of chili powder, and a few drops of hot sauce to the egg wash.
- Mix crushed red pepper flakes into the Panko crumbs for extra heat.
- Serve with ranch dressing or cooling yogurt sauce to balance the spice.
This version works perfectly as a game-day snack, party appetizer, or spicy sandwich filler. It’s crunchy, fiery, and unforgettable — perfect for spice enthusiasts.
Baked Panko Chicken
If you’re trying to cut down on oil but still crave that crunch, baking your Panko Chicken is the way to go. Baking keeps it lighter yet still crispy and flavorful when done right.
Steps for success:
- Preheat the oven to 400°F (200°C).
- Arrange breaded chicken on a wire rack over a baking sheet. This allows hot air to circulate evenly.
- Spray or lightly brush each piece with oil.
- Bake for 25–30 minutes, flipping halfway through until golden brown.
The key to perfectly baked Panko Chicken is that rack — it prevents sogginess and ensures a uniform crust. The result is a guilt-free meal that tastes indulgent but is much lighter on calories.
Nutritional Information
Curious about what’s in your delicious Panko Chicken? While the numbers can vary depending on how it’s cooked, here’s a general nutritional breakdown for one medium-sized serving (about 4 ounces of chicken).
| Nutrient | Fried Panko Chicken | Baked Panko Chicken |
|---|---|---|
| Calories | 380 kcal | 260 kcal |
| Protein | 32 g | 32 g |
| Carbohydrates | 20 g | 18 g |
| Fat | 20 g | 9 g |
| Fiber | 1 g | 1 g |
| Sodium | 580 mg | 500 mg |
As you can see, baking significantly reduces fat and calories while maintaining flavor and texture. For a balanced meal, pair your chicken with fresh vegetables or a salad.
Healthier Alternatives
- Use whole-wheat Panko breadcrumbs for added fiber.
- Switch to air frying to reduce oil intake.
- Replace flour with almond flour for a low-carb, keto-friendly version.
- Opt for skinless chicken breast instead of thighs to lower fat content.
Healthy doesn’t have to mean boring — with the right tweaks, you can enjoy your crispy comfort food guilt-free!
Serving Suggestions
Your Panko Chicken is ready, golden, and crispy — now it’s time to serve it in a way that makes your meal shine. Whether you’re cooking for your family or hosting friends, presentation and pairing matter just as much as flavor.
Side Dishes That Pair Perfectly
Here are some delicious side ideas that complement your crunchy Panko Chicken beautifully:
- Steamed Jasmine Rice or Fried Rice – simple and satisfying.
- Mashed Potatoes – creamy texture contrasts the crispy chicken perfectly.
- Roasted Vegetables – try carrots, broccoli, or asparagus for a colorful plate.
- Japanese Coleslaw or Cabbage Salad – fresh, light, and adds a refreshing crunch.
- Garlic Butter Noodles – rich and flavorful; great for kids and adults alike.
If you’re going for an Asian-inspired meal, serve with katsu sauce or sweet chili glaze. For a Western-style dinner, BBQ sauce or honey mustard dip works wonders.
Dipping Sauces to Try
No Panko Chicken experience is complete without an amazing dip. Here are a few tried-and-true favorites:
- Tonkatsu Sauce: A Japanese-style sweet and tangy sauce that pairs perfectly with fried chicken.
- Garlic Mayo Dip: Creamy and rich, this adds a luxurious touch.
- Spicy Sriracha Mayo: Perfect for those who like heat.
- Honey Mustard: A classic that balances sweetness and tang.
- Yogurt Dill Sauce: A cool, refreshing dip that’s great with baked or air-fried versions.
For a fun twist, set up a “dipping bar” with several sauces and let everyone customize their flavor experience.
Storage and Reheating Instructions
Made too much Panko Chicken? No worries — it stores and reheats beautifully when done correctly. Here’s how to keep it as crispy and flavorful as when you first made it.
How to Store Leftovers
- Refrigerator: Let the chicken cool completely, then place it in an airtight container lined with paper towels to absorb moisture. Store for up to 3–4 days.
- Freezer: Wrap each piece individually in plastic wrap, then place them in a ziplock bag or airtight container. Store for up to 2 months.
Always label your storage containers with the date to keep track of freshness.
How to Reheat Without Losing Crispiness
Avoid microwaving if possible — it makes the crust soggy. Instead, try one of these methods:
- Oven: Preheat to 375°F (190°C) and reheat for 10–12 minutes on a wire rack.
- Air Fryer: Heat at 360°F (180°C) for about 5–7 minutes.
- Skillet: Reheat on medium heat for 3–4 minutes per side to restore crispiness.
These methods keep the chicken crunchy on the outside and tender on the inside — just like when it was freshly cooked.
FAQs about Panko Chicken Recipe
1. Can I use chicken thighs instead of breasts?
Absolutely! Chicken thighs are juicier and more flavorful, though slightly higher in fat. They work great for Panko Chicken.
2. Can I prepare the chicken ahead of time?
Yes! You can bread the chicken and refrigerate it (unfried) for up to 8 hours. When ready, cook directly — no need to bring it to room temperature.
3. Can I use an egg substitute?
If you’re allergic to eggs or vegan, you can use a mixture of milk and flour, or even unsweetened yogurt, to help the Panko stick.
4. How do I make my Panko Chicken extra crispy?
Double-coat your chicken, fry at the right temperature (around 350°F), and always drain it on a wire rack, not paper towels.
5. What’s the best oil for frying Panko Chicken?
Neutral oils like canola, vegetable, or peanut oil are best because they have high smoke points and don’t overpower the flavor.
Conclusion
Panko Chicken is one of those dishes that never fail to impress — crispy, flavorful, and surprisingly easy to make. Whether you fry, bake, or air fry it, the result is always satisfying. With its Japanese-inspired crunch and universal appeal, it’s a dish that fits every occasion — from weeknight dinners to weekend parties.
The beauty of this recipe lies in its simplicity and versatility. You can customize it to your liking, experiment with spices, or serve it in countless ways. Follow the steps, tips, and variations shared here, and you’ll have a plate of perfectly golden, crunchy, and juicy Panko Chicken every single time.
So, roll up your sleeves, grab your Panko breadcrumbs, and get cooking — because your next crispy masterpiece awaits!