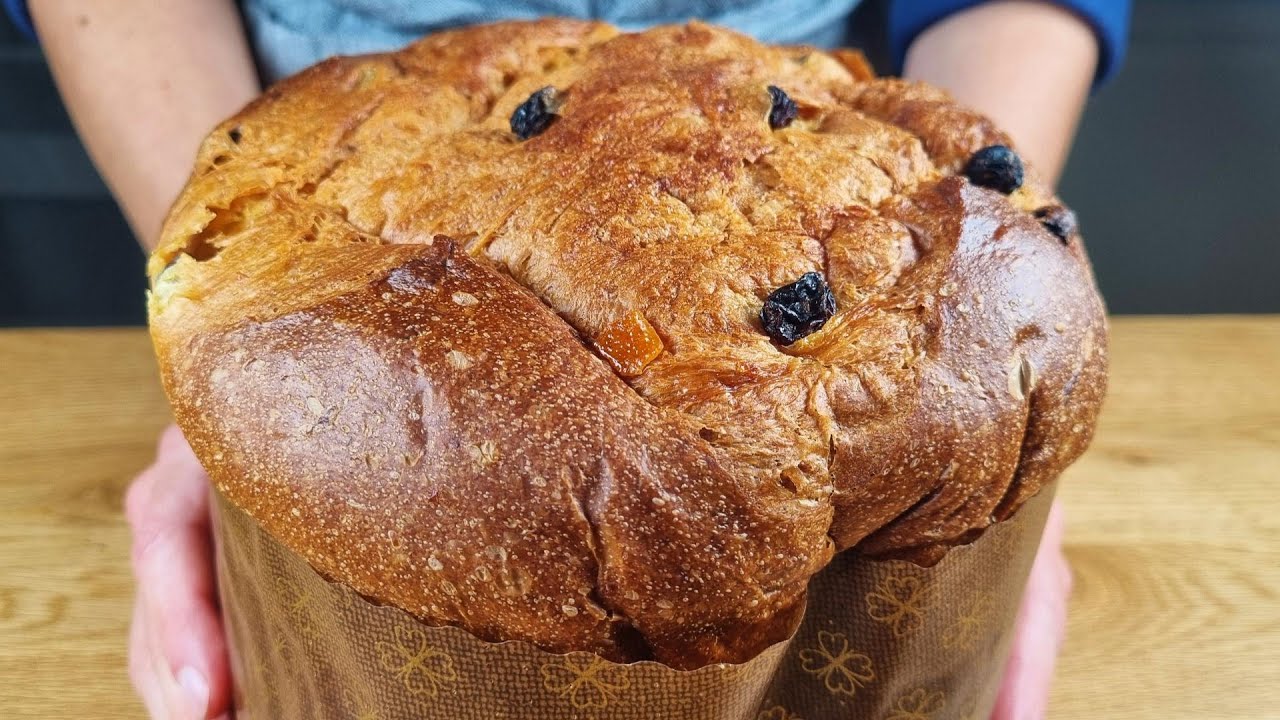
Panettone Recipe: Panettone is not just any bread; it’s a fluffy, sweet, and rich Italian Christmas bread that captures hearts and taste buds every holiday season. Often shaped like a dome, this golden-hued bread is studded with candied orange, raisins, and sometimes chocolate chips, giving it a delightful balance of sweetness, softness, and texture. Originally from Milan, panettone has gained international fame for its unique taste and cloud-like crumb.
Unlike other breads, panettone is made using a long fermentation process that gives it a complex, slightly tangy flavor. It’s known for its rich, buttery dough and its impressive shelf life—thanks to the high-fat content and proper baking technique. Though it might seem daunting at first, making panettone at home is totally achievable with a bit of patience and the right steps.
Panettone can be served plain, toasted, or paired with coffee or sweet wine. Whether you’re a passionate baker or a curious home cook, learning how to make panettone is a rewarding experience.
History and Origins of Panettone
Panettone dates back to the Roman Empire, where ancient Romans used honey to sweeten a type of leavened bread. But the panettone we know today originated in Milan during the 15th century. One popular legend tells of a young nobleman named Toni who disguised himself as a baker to win over the love of a baker’s daughter. He invented this sweet bread that became so loved, it was named “Pan di Toni,” which eventually evolved into “Panettone.”
By the early 20th century, panettone production was industrialized, and it became a staple across Italy and South America during the Christmas holidays. Today, panettone is sold worldwide and often gifted during the festive season. It remains a symbol of celebration, unity, and tradition.
Why Make Panettone at Home?
You might be wondering, why go through all the effort of making panettone from scratch when it’s available in stores? Well, the homemade version brings unmatched freshness, flavor, and satisfaction. Store-bought versions, although convenient, often contain preservatives or artificial flavoring. Homemade panettone lets you control the ingredients, adjust the sweetness, and add your favorite mix-ins.
Also, making panettone is an exciting culinary challenge. It helps you grow as a baker by learning about dough hydration, fermentation, and temperature control. Plus, it makes a fantastic gift for friends and family. There’s a sense of pride when you present a golden, fluffy loaf you baked yourself.
Ingredients Needed for Homemade Panettone
Essential Ingredients List
Before diving into the baking process, gather all your ingredients. Precision matters here, so use a digital scale for accuracy.
Here’s what you’ll need for a classic panettone (makes 1 large loaf):
- 500g Bread flour (high protein content)
- 100g Sugar
- 150g Unsalted butter (softened)
- 4 Egg yolks
- 2 Whole eggs
- 200g Raisins or mixed dried fruit
- 100g Candied orange peel (or other citrus)
- 15g Fresh yeast (or 7g active dry yeast)
- 1 tsp Salt
- 1 tsp Vanilla extract
- Zest of 1 lemon and 1 orange
- 120ml Milk (lukewarm)
This combination gives the dough its rich, sweet profile while maintaining the airy texture.
Choosing the Right Flour and Yeast
Flour is a critical component in this recipe. Choose high-protein bread flour (around 13-14% protein content). This ensures the dough can support the richness of butter and eggs without collapsing. All-purpose flour might not give the same structure, resulting in a denser loaf.
When it comes to yeast, you can use fresh, active dry, or instant yeast. Fresh yeast gives the best flavor but has a short shelf life. Active dry yeast is more accessible and reliable. Instant yeast can also work, but reduce the quantity slightly compared to active dry yeast.
Variations and Optional Add-ins
Panettone is incredibly customizable. Want something more decadent? Add chocolate chips or chopped hazelnuts. Prefer something tangy? Try dried cranberries or a splash of orange liqueur. Here are a few variations to explore:
- Chocolate Panettone: Swap raisins for dark or milk chocolate chips.
- Nutty Delight: Add toasted almonds or pistachios.
- Boozy Fruit: Soak the dried fruit in rum or brandy for an extra kick.
You can also experiment with spices like cardamom, cinnamon, or nutmeg for a holiday twist.
Tools and Equipment Required
Must-Have Kitchen Tools
To make panettone at home, you’ll need a few essential tools to make the process smooth:
- Large mixing bowls
- Dough hook mixer (stand mixer)
- Kitchen scale
- Thermometer (for temperature control)
- Pastry brush
- Plastic wrap or clean towel (for covering dough)
These tools ensure your dough is well-kneaded, properly proofed, and bakes evenly.
Special Panettone Molds
Traditional panettone is baked in tall paper molds. These cylindrical molds help the dough rise upwards, giving panettone its classic domed shape. You can find disposable panettone molds online or at specialty baking stores.
If you don’t have a panettone mold, use a deep cake pan lined with parchment paper, allowing extra height for the dough to climb. Just make sure the container is oven-safe and tall enough (at least 5 inches deep).
Substitutes if You Don’t Have Everything
If you’re missing some tools, here are some alternatives:
- No stand mixer? Use a strong arm and knead by hand, but be prepared for a workout.
- No thermometer? Test milk with your finger—it should be warm but not hot.
- No panettone mold? Line a deep coffee tin or tall cake pan with parchment.
The goal is to maintain structure and temperature so the dough rises correctly.
Preparing the Dough
Step 1 – Activating the Yeast
This step ensures your yeast is alive and ready to work its magic. Dissolve the yeast in warm milk (around 100°F or 38°C) with a pinch of sugar. Let it sit for about 10 minutes. It should start to foam—this means your yeast is active.
If nothing happens, your yeast might be expired. Always check the date before starting.
Step 2 – Making the Starter Dough
Now it’s time to build flavor and strength in the dough. In a bowl, combine:
- Half of your flour
- Activated yeast mixture
- One whole egg
- 1 tbsp sugar
Mix until a shaggy dough forms. Cover and let it rise for about 1-2 hours or until doubled. This sponge method gives the final bread that light, airy texture and deep flavor.
Step 3 – Mixing the Final Dough
After your starter is bubbly, add in the rest of your ingredients:
- Remaining flour
- Eggs and yolks
- Sugar
- Butter (add gradually)
- Salt
- Zest, vanilla, and dried fruits
Use a stand mixer with a dough hook and knead for 15-20 minutes. The dough should be elastic, slightly sticky, and glossy. This is a rich dough—be patient. Don’t add extra flour unless absolutely necessary.
Proofing and First Rise
Importance of Proper Proofing
Proofing, or allowing your dough to rise, is one of the most important steps in baking panettone. This slow fermentation process develops the structure and flavor of your bread. Skip or rush this step, and you’ll end up with a dense, dry, and flavorless loaf. Good proofing ensures your panettone is light, fluffy, and full of that iconic tang from natural fermentation.
Why is proofing so crucial for panettone? Well, the dough is extremely rich—it’s loaded with butter, eggs, and sugar. These ingredients can weigh it down, which means the yeast needs extra time to work through the dough and build air pockets. That’s what gives panettone its soft, pillowy texture.
During this process, the yeast consumes sugars and produces carbon dioxide, which creates bubbles that stretch the dough. This also improves the bread’s digestibility and enhances its complex, slightly sweet flavor.
Some bakers even prefer a two-day fermentation process, letting the dough rest in the fridge overnight. This cold-proofing step adds even more depth of flavor, but if you’re short on time, a single long rise in a warm environment will do.
Ideal Environment for Rising
Yeast is like Goldilocks—it doesn’t like things too hot or too cold. The perfect environment for proofing is warm, slightly humid, and draft-free. Ideally, aim for a temperature between 75°F and 85°F (24°C to 29°C). If your kitchen is too cold, here are a few hacks:
- Place the dough inside an oven with just the light turned on.
- Set it near a warm window or on top of the fridge.
- Use a proofing box if you have one.
You can also put a bowl of hot water next to the dough inside a turned-off oven. This adds humidity and warmth, mimicking bakery conditions.
Cover your dough with a clean towel or plastic wrap to prevent a crust from forming. Let it rise undisturbed for several hours.
How Long to Let it Rise?
Panettone isn’t a recipe you can rush. After mixing the final dough, allow it to rise until it doubles in size. This can take anywhere from 4 to 6 hours, depending on your yeast, temperature, and dough hydration. If you’re cold-proofing, the dough can rest overnight in the fridge—just let it come back to room temperature before shaping.
Don’t be tempted to bake early if it “looks good enough.” Under-proofed panettone won’t rise properly in the oven and will come out gummy or collapsed. On the flip side, over-proofing can cause the dough to deflate or taste overly sour.
To test if it’s ready, gently press your finger into the dough. If it springs back slowly and leaves a slight indent, you’re good to go. If it snaps back too quickly, give it more time.
Shaping and Final Proof
How to Shape Panettone Like a Pro
Once your dough has doubled in size and is airy and soft, it’s time to shape it. This step gives panettone its signature look and helps it rise upward into that beautiful dome.
Start by gently deflating the dough—don’t punch it down aggressively. Transfer it to a lightly floured surface and stretch it gently into a rectangle. Fold it like a letter: fold the top third down, then the bottom third up over that. Rotate it 90 degrees and do it again. This technique strengthens the gluten structure, giving the loaf more lift.
Now form the dough into a smooth, round ball. Use cupped hands to tuck the dough underneath itself, creating surface tension on top. This helps the loaf hold its shape during baking.
Place the shaped dough into your prepared panettone mold. It should fill only about one-third of the mold—remember, it will rise significantly during final proofing and baking.
Final Proofing Before Baking
This last rise is a waiting game, but it’s worth it. Cover the dough gently and let it rise again in a warm, draft-free place. You want the dough to rise until it reaches about ¾ of the way up the mold. This usually takes 4 to 5 hours, but don’t go by time alone—visual cues matter more.
Resist the urge to rush this step. A proper final proof means the loaf will spring beautifully in the oven, giving it that tall, fluffy, golden crown.
Once it’s close to ready, uncover the dough and let it sit for 20–30 minutes to form a slight skin on the surface. This helps it score cleanly and bake evenly.
Baking Your Panettone
Oven Prep and Temperature Settings
Preheat your oven to 350°F (175°C). Make sure your rack is in the lower third of the oven to give your panettone enough room to rise without hitting the top. Because the dough is rich and slow to cook, it’s important to have an even, steady temperature.
Some bakers prefer to start at a slightly higher temperature (375°F/190°C) for the first 10 minutes, then lower it to 325°F (165°C) to finish baking. This initial heat gives the dough a strong oven spring—the rapid rise that happens when dough hits hot air.
Place a small pan of water on the bottom of the oven. The steam it creates helps prevent the crust from forming too quickly, allowing your bread to expand and stay moist inside.
Scoring the Dough
Just before baking, score an “X” across the top of the dough using a sharp knife or razor blade. This helps control the expansion and gives it that traditional panettone top.
If you’re feeling fancy, add a small knob of butter in the center of the “X.” It melts during baking, adding flavor and helping the crust brown evenly.
Cooling and Hanging the Panettone
Why You Should Hang Panettone Upside Down
This may sound strange, but it’s an essential part of the process. Panettone is so light and airy that if left upright to cool, it might collapse on itself under its own weight. Hanging it upside down while it cools locks in the height and structure.
You’ll need skewers or long metal rods. As soon as the panettone comes out of the oven, insert the skewers through the bottom of the mold (about an inch from the base) and flip it upside down. Suspend it between two tall objects like chairs, large pots, or even kitchen cabinets.
Let it cool completely—this can take up to 8 hours. Don’t skip this part, even if you’re tempted to dig in. Cooling stabilizes the crumb and enhances the flavor.
Storing and Serving Suggestions
How to Store Panettone Properly
After all the work you’ve put into baking your panettone, the last thing you want is for it to dry out or lose its texture. Proper storage is essential to maintaining that light, moist crumb and ensuring your bread stays fresh for as long as possible.
Once the panettone has cooled completely (remember, it needs several hours hanging upside down), wrap it tightly in plastic wrap or store it in a large zip-top bag. You can also place it in an airtight container. The goal is to limit air exposure, which dries out the bread.
At room temperature, homemade panettone can last up to a week if stored correctly. For longer storage, consider freezing it. Wrap the loaf in plastic, then in foil, and place it in a freezer-safe bag. It can be frozen for up to 2 months without losing flavor. To serve, let it thaw at room temperature overnight—never microwave it!
Creative Serving Ideas
Panettone is incredibly versatile when it comes to serving. Of course, it’s delicious on its own—soft, fragrant, and full of flavor. But if you want to get a little creative, here are a few serving suggestions:
- Toasted with butter: Slice and toast lightly, then smear with a pat of butter for a cozy breakfast.
- French toast: Dip slices in egg custard and fry until golden for a decadent holiday brunch.
- Bread pudding: Use leftover chunks to make a rich, festive bread pudding.
- Panettone trifle: Layer with custard, whipped cream, and berries for an impressive dessert.
- With wine or coffee: Serve it with a glass of Moscato or a strong espresso for the traditional Italian experience.
Whatever way you slice it, panettone brings holiday warmth to any table.
Common Mistakes and How to Avoid Them
Why Panettone Might Not Rise
One of the biggest challenges with panettone is getting it to rise properly. If your dough is dense or doesn’t rise enough, several culprits could be to blame:
- Old yeast: Always test your yeast before starting. If it doesn’t bubble, toss it.
- Temperature: Cold environments slow yeast activity. Keep your dough warm but not hot.
- Overloading with fillings: Too many raisins or chocolate chips can weigh down the dough.
- Under-kneading: Rich dough needs a good knead to develop gluten and hold its shape.
- Short proofing time: Give your dough time—it might take longer than expected.
Avoiding a Dry or Dense Texture
A dry or tough panettone can result from overbaking or incorrect ingredient ratios. Make sure to:
- Use a thermometer to check doneness (190°F or 88°C inside the loaf).
- Don’t overbake—golden brown on the outside doesn’t always mean it’s ready.
- Measure ingredients precisely, especially liquids and fats.
- Don’t cut into the bread too soon; it needs to cool thoroughly first.
Fixing the Flavor
Sometimes, panettone can come out bland if the dough wasn’t fermented long enough. Next time, try an overnight cold rise. You can also adjust flavors with:
- Extra citrus zest
- A splash of rum or vanilla extract
- Soaking the dried fruit in flavored syrup or liquor
Making mistakes is part of baking, but once you understand how to troubleshoot, panettone becomes a much easier and more rewarding project.
Making Mini Panettones
Why Mini Versions are a Hit
Mini panettones are a fun twist on the classic Italian loaf. Not only are they adorable, but they also make perfect holiday gifts, party favors, or single servings. Plus, smaller loaves bake faster and are a great way to test new flavor combinations without committing to a full-size recipe.
They’re especially handy if you’re hosting a dinner or want to share the love without baking multiple large loaves. You can also mix and match fillings—some with chocolate chips, others with cranberries, and some plain for the purists.
Adjusting the Recipe
To make mini versions, simply divide your dough into equal portions and place each into a mini panettone mold or muffin tin lined with parchment paper. Keep in mind:
- Reduce the baking time (20–30 minutes depending on size)
- Monitor closely for browning; mini loaves can burn faster
- Still allow time for proofing—don’t rush just because they’re small
Mini panettones still need to cool upside down to avoid collapsing. Use toothpicks or skewers inserted through each one and hang them over a bowl or between elevated surfaces.
Packaging Ideas
If you’re gifting them, wrap each loaf in clear cellophane and tie it with a festive ribbon. Add a tag with ingredients or a sweet message. It’s a personal, heartfelt gift that beats store-bought any day.
Healthier Panettone Alternatives
Lighter Ingredient Swaps
Panettone is a rich bread by nature, but you can tweak the recipe for a lighter, healthier version. Here are some simple substitutions:
- Use whole wheat pastry flour for a fiber boost
- Swap half the butter for Greek yogurt or mashed banana
- Use coconut sugar or monk fruit instead of white sugar
- Add chopped nuts or seeds instead of candied fruits
You can also reduce the overall sugar content and skip the glaze if you prefer something less sweet.
Gluten-Free and Vegan Options
Yes, you can make panettone gluten-free or vegan—it just takes a little experimentation. For gluten-free panettone:
- Use a high-quality 1:1 gluten-free baking mix
- Add xanthan gum for structure
For vegan panettone:
- Replace eggs with a flaxseed or chia egg substitute
- Use plant-based butter and non-dairy milk
- Make sure any chocolate chips or sweeteners are vegan-friendly
The result may not be quite the same as the traditional loaf, but it’ll still be festive, flavorful, and suitable for everyone at the table.
FAQs about Panettone Recipe
1. What is panettone made of?
Panettone is an Italian sweet bread made with flour, sugar, eggs, butter, and yeast. It often contains raisins, candied orange peels, and lemon zest for its signature festive flavor.
2. Why does panettone take so long to make?
Panettone requires a long fermentation process, often involving two or more rises, to develop its light and airy texture. The dough is rich in butter and eggs, which also slows down yeast activity and requires extra time to rise properly.
3. Can I make panettone without a special mold?
Yes, if you don’t have a traditional paper panettone mold, you can use a high-sided cake pan lined with parchment paper. Just ensure it’s tall enough to allow the dough to rise fully.
4. How do I store homemade panettone?
Wrap your cooled panettone tightly in plastic wrap and store it in an airtight container at room temperature. It stays fresh for up to a week. For longer storage, you can freeze it for up to 2 months.
5. Why does my panettone collapse after baking?
This often happens if the dough is underbaked or over-proofed. Make sure the internal temperature reaches at least 190°F (88°C) before removing it from the oven, and handle it gently when cooling.
Conclusion
Panettone may look like a baking challenge reserved for professionals, but with patience, the right ingredients, and a bit of love, you can absolutely make this iconic Italian holiday bread in your own kitchen. From its sweet, fluffy crumb to the citrusy bursts and rich butter aroma, every bite is worth the effort. Whether you’re baking a large loaf or gifting mini versions, panettone is a beautiful way to bring warmth and joy to your holiday season.
Give it a try. Experiment with flavors. Learn from the process. And most importantly—share the love, one slice at a time.


