Pan Seared Scallops Recipe: Scallops are the show-stoppers of the seafood world. They’re tender, juicy, and melt-in-your-mouth delicious when cooked just right. But let’s face it—cooking scallops at home can feel intimidating if you’ve never done it before. Good news? It’s easier than you think, and once you master the art of pan searing scallops, you’ll wonder why you didn’t try it sooner. This recipe guide walks you through every detail, making it super easy to cook restaurant-quality scallops in your own kitchen.
Scallops are a favorite on high-end menus, but you don’t need a culinary degree to make them taste incredible. The trick lies in simple techniques—getting that beautiful golden crust on the outside while keeping the inside tender and moist. Once you nail the timing and temperature, the rest is a breeze. Whether you’re preparing a special dinner for two or just treating yourself, pan-seared scallops can make any meal feel like a five-star experience.
Ingredients You’ll Need
Getting the ingredients right is key to making scallops taste their best. You don’t need a long list—just a few fresh and flavorful basics.
Scallops – The Star of the Dish
Start with high-quality scallops. Look for dry-packed sea scallops if you can. These are larger and have a more intense flavor than bay scallops. “Dry-packed” means they haven’t been soaked in a preservative solution, so they sear better and taste more natural. If you only have access to wet-packed scallops, rinse them well and dry them thoroughly.
Essential Pantry Items
You’ll need:
- Sea salt or kosher salt
- Freshly ground black pepper
- Olive oil (or a neutral oil like avocado or grapeseed)
- Unsalted butter
- Fresh garlic or garlic powder
- Lemon juice for brightness
This basic lineup is more than enough to create flavor-packed scallops with that dreamy crust and juicy center.
Optional Add-Ins for Extra Flavor
Want to elevate your dish? Consider these:
- Fresh herbs like parsley, thyme, or chives
- A splash of white wine for deglazing
- Crushed red pepper for heat
- A dab of Dijon mustard in the pan sauce
- Capers for a tangy bite
These extras are not required, but they can add a gourmet twist if you’re feeling fancy.
Choosing the Right Scallops
Scallops might look similar, but choosing the right type can make a big difference in how your dish turns out.
Sea vs Bay Scallops
Sea scallops are the larger variety—perfect for pan searing. They’re usually about 1 to 2 inches in diameter and offer a meaty, slightly sweet flavor. Bay scallops are much smaller and better suited for quick sautés or adding to pasta.
For this recipe, always go with sea scallops. Their size and texture are ideal for getting that golden crust without overcooking.
Fresh vs Frozen – What’s Better?
Fresh scallops are fantastic, but high-quality frozen scallops can be just as good. In fact, many scallops are flash-frozen on the boat right after being caught. Just make sure to thaw them properly—overnight in the fridge is best. Avoid using a microwave, which can mess up the texture.
How to Prep Scallops for Searing
Before cooking, you’ll need to:
- Remove the side muscle (a small, tough strip that can make your scallop chewy)
- Rinse briefly under cold water and pat very dry with paper towels
- Let them come to room temperature for about 10-15 minutes so they cook evenly
Moisture is the enemy of a good sear, so drying the scallops thoroughly is a crucial step.
Kitchen Tools You’ll Need
Let’s talk gear. The right tools can take your scallops from average to amazing.
Must-Have Tools for a Perfect Sear
- Heavy-bottomed skillet (cast iron or stainless steel is best)
- Tongs for flipping scallops without breaking them
- Paper towels for drying
- Spatula or fish turner for gentle handling
Cast iron is especially great for scallops because it holds heat well and creates that delicious golden crust.
Nice-to-Have Extras
- Meat thermometer if you’re nervous about overcooking
- Basting spoon for butter
- Small strainer if you’re making a quick pan sauce
- Zester for adding lemon zest at the end
While not essential, these extras can help elevate your scallop game and add that final touch of finesse.
Step-by-Step Guide to Cooking Pan-Seared Scallops
Now the fun part—let’s cook! Follow these steps and you’ll have perfectly seared scallops in no time.
Step 1: Patting Scallops Dry
This step is a deal-breaker. If your scallops are wet, they’ll steam instead of sear. Use multiple paper towels and gently press both sides. They should feel tacky, not slick.
Step 2: Seasoning Like a Pro
Keep it simple—salt and pepper are your best friends here. Season both sides just before searing. If you salt too early, the scallops can release moisture and become rubbery.
Step 3: Preheating Your Pan
Heat your skillet over medium-high heat until it’s almost smoking. Add a splash of oil and swirl it to coat. Drop in one scallop—if it sizzles loudly, the pan’s ready.
Step 4: Searing to Perfection
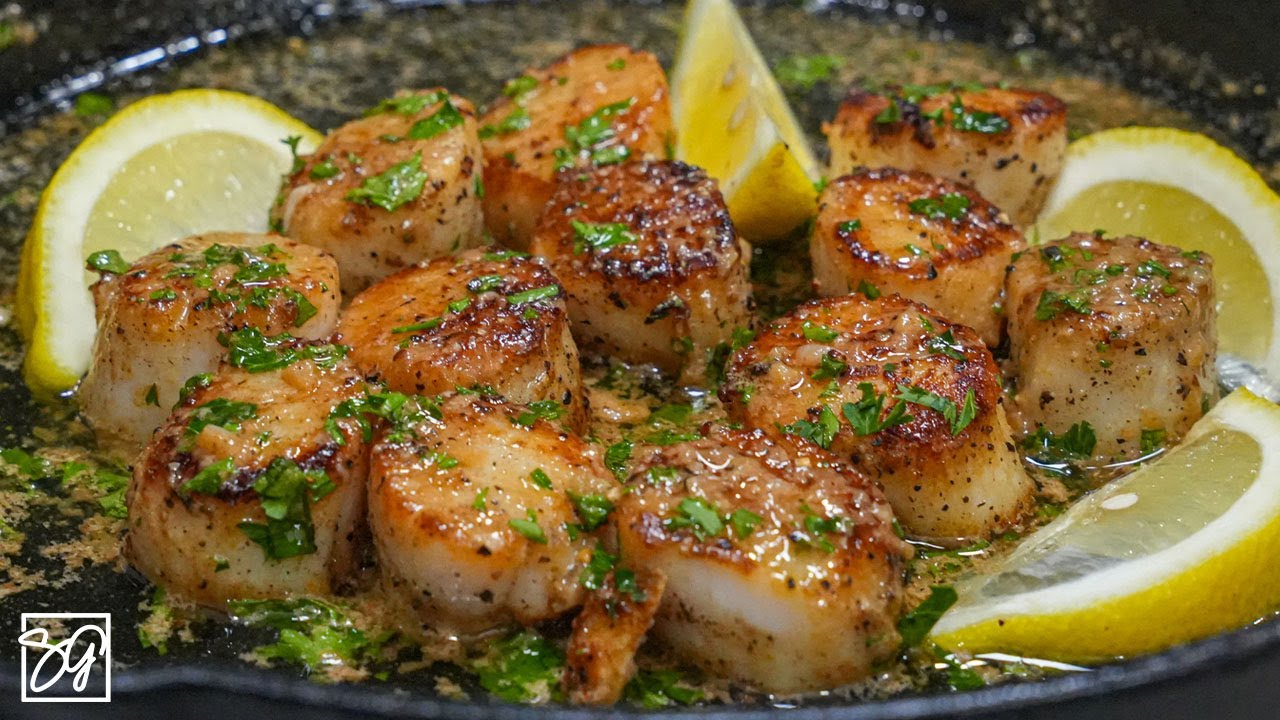
Place scallops in the pan, leaving space between each one. Don’t touch them for 2 to 3 minutes. When the bottom is deep golden brown, flip them gently and add a pat of butter. Cook for another 1-2 minutes while spooning melted butter over the top.
They’re done when the sides look opaque and they feel just firm to the touch.
Step 5: Resting and Serving
Let the scallops rest for a minute before serving. Squeeze a little lemon juice on top and sprinkle with fresh herbs if desired. Serve over pasta, risotto, or a simple salad for a stunning presentation.
Serving Suggestions for Pan-Seared Scallops
Once your scallops are golden and glorious, it’s time to think about how to serve them. Sure, they’re the main attraction, but what you pair them with can either elevate or overpower their delicate flavor.
Classic Pairings
- Creamy Risotto: A Parmesan risotto makes for a luxurious base. The creaminess complements the seared crust of the scallops beautifully.
- Buttery Mashed Potatoes: Rich, smooth mashed potatoes are a comforting match for tender scallops.
- Pasta with Garlic and Olive Oil: Keep it simple so the scallops shine—spaghetti aglio e olio works like a charm.
- Cauliflower Puree: This light, nutty alternative to mashed potatoes lets the scallops stand out.
Lighter Options
- Arugula Salad: Toss with lemon vinaigrette and shaved Parmesan for a light, zesty side.
- Grilled Vegetables: Asparagus, zucchini, or bell peppers bring color and freshness to your plate.
- Citrus Quinoa: Add a bit of zest and herbs for a refreshing contrast to the rich scallops.
Garnishing Tips
- Fresh Herbs: Sprinkle with chives, parsley, or tarragon.
- Zest and Juice: A little lemon or lime zest brightens up the entire dish.
- Finishing Oils: Drizzle with a touch of truffle oil or good-quality olive oil for an extra burst of flavor.
The key is to pair your scallops with sides and garnishes that support—not overshadow—their subtle sweetness.
Common Mistakes to Avoid
Even seasoned cooks can make a misstep when searing scallops. Let’s break down the most common mistakes and how to dodge them.
Not Drying Scallops Enough
As mentioned earlier, moisture is the enemy of a good sear. If your scallops are still damp, they’ll steam instead of sear, and you’ll miss out on that beautiful golden crust.
Tip: Use multiple layers of paper towels and press gently but firmly on both sides.
Crowding the Pan
Overcrowding the skillet lowers the temperature and traps steam. This is a surefire way to end up with pale, rubbery scallops.
Tip: Work in batches if necessary. Give each scallop plenty of space to breathe.
Cooking Too Long
Scallops cook quickly—overcooking them even by 30 seconds can turn them chewy.
Tip: Sear for 2–3 minutes per side. They’re done when opaque and just firm to the touch.
Using the Wrong Pan
Non-stick pans can sometimes prevent browning. A heavy-bottomed stainless steel or cast iron pan is your best bet.
Tip: Get the pan screaming hot before adding oil and scallops.
How to Store and Reheat Leftovers
Scallops are best enjoyed fresh, but if you have leftovers, here’s how to handle them without sacrificing too much quality.
Storing
- Place in an airtight container
- Store in the refrigerator within 2 hours of cooking
- Eat within 2 days for best quality
Reheating
- Avoid the microwave. It makes scallops rubbery.
- Instead, reheat gently in a skillet over low heat with a bit of butter or broth.
- Cover to trap steam and keep them moist.
- Heat for just 1–2 minutes per side.
Remember, scallops are delicate. Treat them with care and they’ll stay delicious even the next day.
Health Benefits of Scallops
Not only are scallops delicious—they’re also incredibly good for you. If you’re looking to keep meals both tasty and nutritious, scallops are a smart pick.
Low in Calories and Fat
A typical serving of scallops contains just 90-100 calories and only 1 gram of fat—yet they’re satisfying and filling.
Rich in Protein
Scallops are packed with high-quality protein, making them great for muscle repair and overall health.
Loaded with Nutrients
You’ll also get:
- Vitamin B12 for brain function
- Selenium for immune support
- Zinc and magnesium, both important for energy and metabolism
Scallops are heart-healthy, low-carb, and keto-friendly, making them ideal for many different diets.
FAQs about Pan Seared Scallops Recipe
1. What type of scallops are best for pan searing?
Go for dry sea scallops — they’re bigger, meatier, and don’t contain added preservatives or water. Wet scallops tend to steam, not sear, and that’s a culinary crime in this house.
2. Should scallops be thawed before searing?
Absolutely. Thaw completely in the fridge overnight or under cold running water. Pan searing frozen scallops is like trying to grill a snowball — messy and tragic.
3. How long do you sear scallops on each side?
About 1.5 to 2 minutes per side on medium-high heat. The goal? A golden crust outside and buttery tenderness inside. Don’t overcook unless you enjoy rubbery regrets.
4. What oil is best for searing scallops?
Use a high smoke point oil like canola, avocado, or grapeseed oil. Butter adds flavor, but if you’re going full sear-mode, it’s best added near the end to prevent burning.
5. Why do my scallops stick to the pan?
You’re either not using enough oil, the pan isn’t hot enough, or you’re trying to flip them too soon. Wait until they naturally release — they’re not clingy, just misunderstood.
6. Can I use frozen scallops?
Yes, as long as they’re properly thawed and patted dry. Water is the enemy of that crispy golden crust, so dry them like your life depends on it.
7. What’s the best pan for searing scallops?
A cast iron skillet or stainless steel pan gets hot and stays hot — ideal for that sizzling sear and flavorful crust.
8. What do you serve with pan seared scallops?
Scallops pair beautifully with lemon butter sauce, garlic pasta, risotto, or a fresh veggie medley. Fancy without the fuss.
9. How do I know if scallops are cooked through?
They’ll be opaque in the center and firm to the touch. If they bounce like a stress ball, you’ve gone too far.
10. Can I make pan seared scallops ahead of time?
Technically yes, but they’re best served immediately. Reheating messes with the texture, and scallops deserve better.
Conclusion
Cooking pan-seared scallops at home is not only doable—it’s downright enjoyable. With the right techniques, a bit of patience, and quality ingredients, you can create a restaurant-level dish that’s sure to impress. Remember, the key to perfection is in the sear: dry scallops, hot pan, and just the right amount of time. Whether you’re serving them with risotto, salad, or a glass of chilled white wine, these scallops will steal the show every time.


