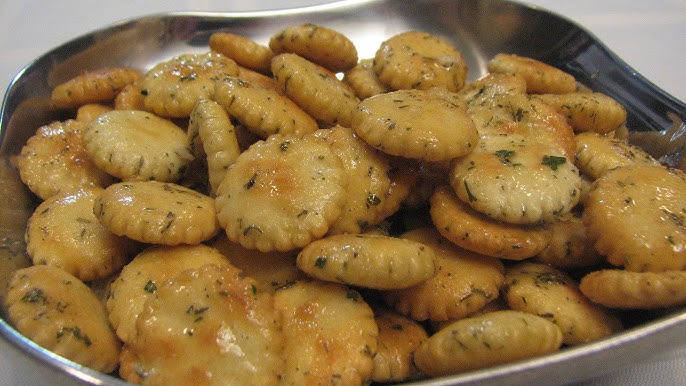
Oyster Cracker Recipe: Oyster crackers are tiny, crunchy crackers that are a common accompaniment to soups, particularly clam chowder and tomato soup. Despite the name, they don’t contain oysters at all. The name comes from their traditional pairing with oyster stew. These little gems are bite-sized, typically round or hexagonal, and delightfully crispy. They’re simple yet satisfying, and they bring a nostalgic charm to any meal.
Why Make Them at Home?
Store-bought oyster crackers are convenient, but homemade ones? They’re next-level delicious. When you make them from scratch, you control the ingredients, skip the preservatives, and elevate the flavor. Plus, they’re surprisingly easy to make. If you’ve never tried baking your own crackers before, this is the perfect entry-level recipe. With just a few pantry staples and minimal equipment, you can create a snack that’s miles better than anything in a box.
Ingredients You’ll Need
Simple Pantry Staples
To make a basic batch of oyster crackers, you only need a handful of everyday ingredients. Here’s what you’ll need:
- 1½ cups all-purpose flour
- 1 teaspoon sugar
- ½ teaspoon salt
- 1 teaspoon baking powder
- 2 tablespoons cold butter (cubed)
- ⅓ cup water (cold)
These ingredients come together to create a lightly flavored cracker with a flaky, crisp texture. Think of it as the lovechild of a biscuit and a saltine.
Optional Add-Ins for Flavor Twists
Want to jazz up your oyster crackers? Try adding:
- Garlic powder or onion powder – for a savory twist.
- Parmesan cheese – adds a nutty richness.
- Dried herbs (thyme, rosemary, oregano) – enhances the aroma and taste.
- Crushed red pepper flakes – for a kick of spice.
These optional ingredients let you customize the flavor to suit your dish or personal preference.
Kitchen Tools and Equipment
You don’t need a fully stocked kitchen to make oyster crackers. Here’s what’s essential:
- Mixing bowl
- Pastry cutter or fork
- Rolling pin
- Baking sheet
- Parchment paper
- Pizza cutter or sharp knife
- Measuring cups and spoons
That’s it. Most of these tools are already in your kitchen, which makes this recipe even more accessible.
Step-by-Step Instructions
Step 1: Preheat Your Oven
Preheat your oven to 375°F (190°C). This ensures that once your crackers are ready to go, the oven is already hot enough to start crisping them up immediately. Line a baking sheet with parchment paper to prevent sticking and for easy cleanup.
Step 2: Combine Dry Ingredients
In a large mixing bowl, whisk together the flour, baking powder, salt, and sugar. Mixing the dry ingredients first helps distribute everything evenly, ensuring each cracker has consistent texture and flavor.
Step 3: Mix in the Butter
Add the cold, cubed butter to the dry ingredients. Use a pastry cutter, fork, or even your fingertips to cut the butter into the flour until the mixture resembles coarse crumbs. This is similar to making a pie crust—the tiny butter bits will create flaky layers in your crackers.
Step 4: Add Water and Form Dough
Gradually add cold water, starting with a couple tablespoons and mixing after each addition until the dough begins to come together. You want a firm, but not sticky dough. Too much water can make it tough, so go slow. Once it forms a ball, knead it a few times until smooth.
Step 5: Roll Out the Dough
Lightly flour your work surface and rolling pin. Roll the dough out to about ⅛-inch thickness. The thinner the dough, the crispier the cracker. Try to get it as even as possible to ensure uniform baking.
Step 6: Cut into Shapes
Use a small round cookie cutter, piping tip, or pizza cutter to cut the dough into tiny rounds or hexagons. Place them on the prepared baking sheet, leaving a little space between each. They don’t spread much, but space helps with even cooking.
Step 7: Bake Until Golden
Place the baking sheet in the preheated oven and bake for 12–15 minutes, or until the crackers are lightly golden brown. Keep an eye on them in the last few minutes—these little guys can go from perfect to burnt pretty quickly.
Tips for Perfect Oyster Crackers
Homemade oyster crackers may be simple, but a few pro tips can make a big difference between average and absolutely addictive.
- Keep the butter cold – This is crucial. Cold butter creates flaky pockets during baking, giving the crackers a light and crispy texture.
- Don’t overwork the dough – Just like with pie crust or biscuits, too much kneading can develop gluten, resulting in tough crackers.
- Even thickness matters – Uneven dough means some crackers will burn while others stay soft. Use guide sticks or a rolling pin with rings if you need help keeping it level.
- Prick with a fork – For that signature oyster cracker look and to prevent puffing up too much, you can poke the top of each cracker with a fork before baking.
- Flip halfway through – For an extra-crispy finish, carefully flip the crackers halfway through baking. It helps both sides brown evenly.
By following these tips, you’ll end up with crispy, flavorful crackers that are miles ahead of the store-bought variety.
How to Store Homemade Oyster Crackers
Let your crackers cool completely before storing—this keeps them crisp and prevents moisture from turning them soft. Once cooled:
- Store them in an airtight container at room temperature.
- They’ll stay fresh and crunchy for up to 7–10 days.
- For longer storage, you can freeze them. Just place in a zip-top freezer bag and store for up to 2 months. Re-crisp in a warm oven if needed.
If you notice they’ve gone soft, pop them in a 300°F oven for about 5 minutes to bring back that crunch.
Serving Suggestions
Oyster crackers aren’t just soup sidekicks. They’re surprisingly versatile and make a tasty snack on their own or a fun crunchy topping. Here are some ways to enjoy them:
- With soup – The classic pairing. Perfect for clam chowder, tomato soup, or even chicken noodle.
- As salad toppers – Add crunch to a Caesar or garden salad.
- With dips – Pair with hummus, spinach dip, or cheese spread.
- Seasoned snack – Toss them with olive oil and spices (like ranch seasoning or taco mix) and bake for a flavorful snack.
- Trail mix addition – Mix with nuts and dried fruit for a salty-sweet treat.
Once you try them, you’ll see they’re much more than just a soup garnish.
Nutritional Information
Here’s a rough breakdown of the nutritional content per 1-ounce (about 20 crackers) serving of basic homemade oyster crackers:
| Nutrient | Amount |
|---|---|
| Calories | 120 |
| Total Fat | 4g |
| Saturated Fat | 2g |
| Carbohydrates | 18g |
| Sugar | <1g |
| Protein | 2g |
| Sodium | 180mg |
| Fiber | 1g |
This is based on the original recipe and will vary depending on add-ins or changes. Opting for whole wheat flour or reducing salt can make the crackers even healthier.
FAQs about Oyster Cracker Recipe
1. Can I make oyster crackers gluten-free?
Yes! Substitute the all-purpose flour with a gluten-free 1:1 baking blend. You may need to adjust the water slightly depending on the blend used.
2. What’s the best way to season them?
Toss your crackers with a tablespoon of olive oil and your favorite spices (like garlic powder, ranch seasoning, or cayenne pepper) after baking. Return to the oven for 3–5 minutes for extra flavor.
3. Can I freeze the dough?
Absolutely. Wrap the dough in plastic wrap and freeze for up to 2 months. Thaw overnight in the fridge before rolling and baking.
4. How do I keep them crunchy after baking?
Let them cool fully and store in an airtight container. Avoid storing them while warm—they’ll steam and soften.
5. Can I make them in an air fryer?
Yes, but you’ll need to work in small batches. Air fry at 350°F for 5–7 minutes, shaking halfway through, until golden and crisp.
Conclusion
Oyster crackers may be small, but they pack a lot of satisfaction into every crunchy bite. Whether you’re adding them to a bowl of soup or munching them straight out of the jar, these tiny treats are surprisingly easy to make and incredibly tasty. With just a few ingredients and simple steps, you can whip up a batch that beats any store-bought version—plus, you’ll impress your family and guests with your homemade touch.
So roll up your sleeves, dust off that rolling pin, and give this oyster cracker recipe a shot. Once you do, you’ll never go back to boxed again.