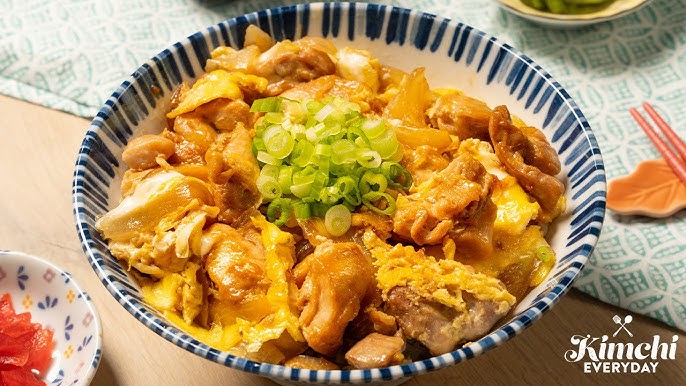
Oyakodon Recipe: If you love comfort food, then Oyakodon is a dish you absolutely need in your life. This classic Japanese rice bowl is made with juicy pieces of chicken and soft, runny eggs simmered in a savory-sweet broth, all served over steaming hot rice. The word “Oyakodon” literally means “parent-and-child bowl”—a poetic reference to the use of chicken and eggs together in the dish. It’s simple, hearty, and delivers big on flavor with just a handful of ingredients.
History and Cultural Significance
Oyakodon has been a staple in Japanese households and eateries for more than a century. It first gained popularity in the Meiji era, around the late 1800s, and has since become one of Japan’s most beloved donburi (rice bowl) dishes. The “parent-and-child” name is rooted not just in the ingredients, but also in the emotional bond of comfort and warmth the dish evokes. You’ll find it served in everything from fast-food joints to fancy restaurants across Japan.
This dish is not just about feeding the stomach—it’s also about nourishing the soul. It’s often associated with home cooking and maternal care, making it an emotional as well as a culinary favorite.
Why You Should Try This Dish
Oyakodon is incredibly easy to make, requiring minimal ingredients and just one pan. It’s perfect for beginners in Japanese cooking but flavorful enough to impress seasoned foodies. Whether you’re cooking a quick weekday meal or looking for something comforting on a cold night, Oyakodon is your go-to. Plus, the clean flavors and satisfying textures make it a hit with both kids and adults.
Ingredients Needed for Oyakodon
Main Ingredients
Here’s what you’ll need for two servings of Oyakodon:
- 2 boneless chicken thighs (skin-on or skinless)
- 1 medium yellow onion, thinly sliced
- 2 large eggs, lightly beaten
- 2 cups steamed Japanese short-grain rice
- 1/2 cup dashi (Japanese soup stock)
- 2 tablespoons soy sauce
- 1 tablespoon mirin (sweet rice wine)
- 1 tablespoon sake
- 1 teaspoon sugar
These ingredients are simple, but when combined, they create that signature umami-packed broth that makes Oyakodon unforgettable.
Optional Add-ons and Substitutions
You can tailor this dish based on what you have on hand or your personal preferences. Don’t have dashi? Try using chicken broth with a splash of soy sauce. Prefer chicken breast over thighs? Go for it, just be cautious about overcooking it. Want a bit of spice? Add a sprinkle of shichimi togarashi (Japanese seven spice).
Other fun add-ons:
- Green peas for a pop of color
- Shiitake mushrooms for an earthy note
- Chopped scallions or mitsuba (Japanese parsley) as garnish
Where to Buy Authentic Ingredients
Your local Asian grocery store will likely carry all the essentials. For the best quality dashi, look for brands like Kikkoman or Yamaki. You can also order ingredients online through Japanese specialty food websites or big platforms like Amazon. If you’re lucky enough to live near a Japanese supermarket, even better!
Tools and Equipment Required
Kitchen Essentials
One of the best things about making Oyakodon is how low-maintenance it is. Here’s all you need:
- Medium frying pan (non-stick or stainless steel)
- Knife and cutting board
- Mixing bowl (for beating eggs)
- Measuring spoons and cups
- Rice cooker or pot (for cooking rice)
No need for anything fancy. A basic kitchen setup will do just fine.
Japanese Cooking Tools (Optional)
If you want to go the traditional route, here are some tools used in Japanese kitchens:
- Donburi-nabe (single-serving pot often used for donburi)
- Wooden rice paddle
- Dashi strainer (if making dashi from scratch)
These aren’t essential, but they add an authentic touch and make the experience even more enjoyable.
Preparation Tips Before Cooking
Ingredient Prep
The secret to a stress-free cooking experience is all in the prep. Start by slicing the onions thinly so they cook evenly and quickly. Then, cut the chicken into bite-sized pieces—this ensures they cook at the same rate as the onions. Crack the eggs into a bowl and gently beat them; you want to keep some of the egg whites visible for a silky texture.
Make sure your rice is cooked and ready to go before you start on the main dish. You don’t want to be scrambling to get your rice done while your Oyakodon is waiting.
Setting Up Your Cooking Station
Lay out all your ingredients and tools before turning on the heat. Keep your soy sauce, mirin, sugar, and sake measured and ready. Have your eggs within arm’s reach because timing is key when you add them to the pan.
Also, keep a bowl of steamed rice ready so that as soon as the egg sets, you can serve the dish piping hot. Trust us, this makes all the difference.
Step-by-Step Oyakodon Recipe
Step 1 – Prepare the Dashi Broth
If you’re using instant dashi granules, dissolve 1/2 teaspoon of granules into 1/2 cup of hot water. For homemade dashi, soak a piece of kombu (dried kelp) and a handful of bonito flakes in hot water for 5-10 minutes, then strain. Combine the dashi with soy sauce, mirin, sake, and sugar in your pan.
Heat the mixture over medium and stir to dissolve the sugar. This broth is the heart of Oyakodon, so make sure it tastes balanced—savory, slightly sweet, and full of umami.
Step 2 – Slice Chicken and Onions
Once your broth is ready, it’s time to move on to the meat of the dish—literally. Thinly slice your yellow onion into half-moons. This shape allows the onions to cook quickly and absorb the broth evenly, becoming soft and sweet. Then, take your boneless chicken thighs and cut them into small bite-sized pieces. Make sure all pieces are roughly the same size so they cook uniformly.
Place the sliced onions into the simmering broth first. Let them cook for about 3–5 minutes, or until they become translucent and soft. This stage builds the flavor foundation of the dish, as the onions soak up the umami-rich sauce. Once the onions are tender, add the chicken pieces right on top. Don’t stir too much—let the chicken gently poach in the simmering broth for about 5–7 minutes or until fully cooked and tender. Flip the chicken once halfway through to ensure both sides soak up that flavorful sauce.
Step 3 – Simmer the Chicken and Onions
This is where the magic really starts to happen. Let the chicken and onions cook together in harmony, soaking up all the sweet-savory goodness of the broth. Keep your heat at medium-low so everything simmers gently. You want the chicken to be tender, not dry or rubbery.
Don’t cover the pan; just let the broth reduce a little naturally as the chicken and onions continue to cook. This also intensifies the flavors and creates that slightly syrupy sauce that Oyakodon is known for. By now, your kitchen will smell absolutely amazing—like a cozy little Japanese eatery.
While this simmers, give your eggs a quick whisk. You don’t want them completely uniform; a few streaks of egg white left in the mix will give the finished dish that classic layered texture. Trust us—it’s part of the Oyakodon charm.
Step 4 – Add Beaten Eggs
Now for the signature move. Once your chicken is cooked through and the onions are meltingly tender, it’s time to add the beaten eggs. Gently pour the egg mixture in a spiral motion over the chicken and onions. Don’t stir! Just let the eggs settle naturally over the surface.
Cover the pan with a lid and cook for about 30–60 seconds, depending on how runny or firm you like your eggs. The traditional way is to keep the eggs slightly runny in the center—it creates a creamy texture that blends perfectly with the rice.
Remove the lid and turn off the heat. The residual heat will continue to cook the eggs just a bit more, making them soft, delicate, and custardy. It’s this egg layer that sets Oyakodon apart from other rice bowls—it’s velvety, savory, and downright comforting.
Step 5 – Serve Over Steamed Rice
Time to assemble! Take your hot, freshly steamed short-grain rice and scoop it into serving bowls. Using a spatula or ladle, gently slide the chicken-egg mixture right over the top of the rice. Make sure to get a generous amount of that delicious broth too—it soaks into the rice and ties the whole dish together.
For the final touch, garnish with a sprinkle of chopped scallions or a few leaves of fresh mitsuba if you can find it. If you like a bit of heat, a pinch of shichimi togarashi adds a flavorful kick.
And there you have it—a bowl of pure comfort, flavor, and tradition. Oyakodon isn’t just a dish; it’s a warm hug in bowl form.
Final Touches and Garnishing
Best Toppings for Oyakodon
Toppings can elevate your Oyakodon from great to unforgettable. Here are some popular choices:
- Chopped Scallions: Adds a fresh, sharp contrast to the richness of the egg and chicken.
- Mitsuba (Japanese parsley): Has a slightly peppery flavor and adds authenticity.
- Shichimi Togarashi: A Japanese chili spice mix that gives the dish a slight kick.
- Nori strips: Toasted seaweed for a hint of umami and texture.
- Pickled Ginger: Adds a zingy brightness and balances the sweet-savory profile.
Presentation Tips
Presentation matters, especially with such a homey dish. Use a donburi bowl or a deep rice bowl. When you pour the egg mixture over the rice, try to keep the layers intact so the egg sits beautifully over the chicken. Garnish carefully, and serve the bowl with a small miso soup or side salad for a complete Japanese-style meal.
Nutritional Information
Understanding the nutritional profile of Oyakodon can help you appreciate it not just as a flavorful meal but as a relatively balanced one too. Here’s a general breakdown per serving (approximate values based on standard ingredients and portions):
| Nutrient | Amount per Serving |
|---|---|
| Calories | 500–550 kcal |
| Protein | 30–35g |
| Carbohydrates | 40–50g |
| Fat | 20–25g |
| Fiber | 2–3g |
| Sodium | 800–1000mg |
What Makes Oyakodon Nutritious?
- Protein: The chicken and eggs provide high-quality protein, essential for muscle repair and maintenance.
- Healthy Fats: Eggs also contribute healthy fats, which support brain and hormone function.
- Carbs for Energy: The steamed rice gives you the carbohydrates you need for energy, making it a great post-workout or mid-day meal.
- Low in Sugar: The only sugar content comes from the sauce, and it’s minimal, making this dish relatively low on the glycemic index.
Want to make it healthier? Use brown rice for added fiber, reduce the amount of sugar and soy sauce, or go for leaner cuts of chicken like breast meat.
Common Mistakes to Avoid
Even though Oyakodon is a simple dish, a few missteps can mess up the texture or flavor. Here are some common pitfalls and how to avoid them:
1. Overcooking the Eggs
The charm of Oyakodon lies in the delicate, silky texture of the eggs. Overcooked eggs turn rubbery and lose that luscious, custard-like quality. Always add eggs at the end and cook just until they’re barely set.
2. Using the Wrong Rice
Short-grain Japanese rice has the perfect stickiness and fluffiness for this dish. Avoid long-grain rice or jasmine rice—they won’t absorb the broth the same way, and the texture will be off.
3. Boiling Instead of Simmering
High heat will cause the broth to evaporate too quickly and may dry out the chicken. Keep the heat medium-low to allow flavors to meld and the chicken to cook gently.
4. Not Tasting the Sauce
Before you add the chicken, taste your sauce. If it’s too salty, add a splash of water. Too sweet? Cut back on sugar. Seasoning is everything in Japanese cuisine—balance is key.
Variations of Oyakodon
While the traditional version is unbeatable, it’s always fun to experiment. Here are some popular Oyakodon twists you can try at home:
1. Spicy Oyakodon
Add a bit of chili oil or shichimi togarashi to the broth for a kick of heat. You can also mix in some gochujang (Korean chili paste) for a cross-cultural version.
2. Vegetarian Oyakodon (Tamago Don)
Skip the chicken and double up on eggs. Add vegetables like spinach, mushrooms, or tofu to create a vegetarian version that still hits all the right notes.
3. Seafood Oyakodon
Swap out chicken for shrimp or scallops. The cooking method stays the same, but you’ll get a completely different flavor profile—light, briny, and delicious.
4. Western Fusion Oyakodon
Try adding a little grated cheese over the egg mixture before it finishes cooking. It adds a creamy texture and a new flavor layer that cheese lovers will appreciate.
Storage and Reheating Tips
Although Oyakodon is best served fresh, you can store leftovers for up to 2 days in an airtight container in the fridge.
To Store:
- Let the chicken and egg mixture cool completely before transferring to a container.
- Store the rice separately for best texture upon reheating.
To Reheat:
- Microwave: Place the egg and chicken mix over rice in a microwave-safe bowl, cover with a damp paper towel, and heat in short bursts (30 seconds each) until warmed through.
- Stovetop: Heat gently in a non-stick pan, adding a splash of water or dashi to rehydrate the sauce.
Avoid overcooking when reheating, especially the eggs, which can easily become rubbery.
Perfect Side Dishes with Oyakodon
To make your meal feel like it came straight out of a Japanese kitchen, pair your Oyakodon with traditional sides. Here are a few favorites:
1. Miso Soup
A classic companion that complements Oyakodon perfectly. It’s light, umami-rich, and helps balance out the meal.
2. Japanese Pickles (Tsukemono)
Crisp and tangy pickles like takuan (pickled daikon) or umeboshi (pickled plum) add a refreshing contrast.
3. Green Salad with Sesame Dressing
A simple salad with a nutty sesame dressing provides freshness and texture.
4. Edamame or Boiled Spinach with Soy Sauce
For a healthy veggie side, boiled greens seasoned with a little soy sauce and sesame seeds work great.
These sides round out the meal and elevate it from a quick bowl of rice to a full dining experience.
FAQs about Oyakodon Recipe
What is Oyakodon?
Oyakodon is a popular Japanese comfort food that literally translates to “parent-and-child” donburi. This dish features chicken (the parent) and eggs (the child) simmered together in a savory broth and served over a bowl of steamed rice.
What ingredients are needed for Oyakodon?
To make Oyakodon, you will need chicken thighs, eggs, onions, soy sauce, mirin, dashi stock, and sugar. Rice is also essential as it serves as the base for the dish.
How do you make the broth for Oyakodon?
The broth for Oyakodon is a mixture of dashi stock, soy sauce, mirin, and sugar. These ingredients are simmered together to create a flavorful liquid that the chicken and onions cook in, before the eggs are added.
Is Oyakodon suitable for vegetarians?
Traditional Oyakodon is not vegetarian due to the chicken and dashi (which is often made from fish). However, you can create a vegetarian version by substituting the chicken with tofu or a plant-based protein and using a vegetable stock instead of dashi.
Can I make Oyakodon without mirin?
Yes, if mirin is unavailable, you can substitute it with a combination of sugar and white wine, or a little extra sugar to compensate for the lack of sweetness.
How long does it take to cook Oyakodon?
Oyakodon can be prepared in about 20-30 minutes, making it a quick and satisfying meal. The actual cooking time is short, with most of the time spent on simmering the ingredients to enhance their flavors.
Is Oyakodon healthy?
Oyakodon is relatively balanced, providing protein from the chicken and eggs, along with carbohydrates from the rice. To make it healthier, you can use less sugar and opt for low-sodium soy sauce.
How can I store leftovers of Oyakodon?
Leftover Oyakodon can be stored in an airtight container in the refrigerator for up to two days. Reheat it gently in the microwave or on the stove to preserve the best texture and flavor.
Conclusion
Oyakodon is one of those magical dishes that proves you don’t need fancy ingredients or complicated steps to create something truly satisfying. It’s humble, hearty, and full of flavor. Whether you’re new to Japanese cooking or just looking for a quick, comforting meal, this “parent-and-child” rice bowl is a must-try. With the step-by-step guide above, you’re now fully equipped to bring this beloved Japanese classic into your kitchen.
So go ahead—grab those ingredients, fire up the stove, and let your culinary journey begin. You’ll find yourself making this dish again and again, and maybe even passing the recipe down, just like a family tradition.


